
Get Ready for a Burst of Citrusy Joy with Festive Orange Cookies
There’s something magical about the holiday season, and these Festive Orange Cookies are no exception. They’re not just cookies; they’re a burst of sunshine and a warm hug in every bite. Last Christmas, I decided to add a twist to our traditional cookie platter, and these zesty treats quickly became a family favorite. Let me share this delightful recipe with you!
A Sweet Slice of History: The Origin of Sablés de Noël à l’Orange
These cookies have a rich history rooted in French cuisine. Originally, sablés were simple, buttery cookies that crumbled delightfully in your mouth. Over time, creative bakers started adding unique flavors like orange zest, which gave them a festive and refreshing twist. In my family, we’ve been making these cookies for generations, but the orange zest is a modern touch that adds a burst of freshness.
Why You’ll Fall in Love with These Festive Orange Cookies
These cookies are a perfect blend of simplicity and flavor. The orange zest adds a bright, citrusy note that complements the rich, buttery texture beautifully. Plus, they are so easy to make that even baking novices can whip up a batch without breaking a sweat. The aroma of these cookies baking is enough to make anyone feel like it’s Christmas morning.
Perfect Occasions to Prepare This Recipe
These Festive Orange Cookies are ideal for any holiday gathering. Whether you’re hosting a Christmas party, a New Year’s Eve celebration, or simply enjoying a cozy night in with family and friends, these cookies will be a hit. They also make a thoughtful homemade gift, packaged in a pretty tin or box.
Ingredients
- 250 g of flour
- 125 g of sugar
- 100 g of softened butter
- 1 egg
- Zest of one orange
- 1/2 teaspoon of baking powder
- A pinch of salt
- Powdered sugar for decoration
Substitution Options
If you can’t find an ingredient, don’t worry! You can substitute the egg with an apple sauce or a chia seed mixed with water. For the orange zest, you can use lemon zest for a different but equally delicious flavor. And if you want to make them a bit healthier, try using whole grain flour.
Preparation Section
Step 1: Cream the Butter and Sugar
In a large bowl, cream together the softened butter and sugar until the mixture is light and fluffy. This step is crucial as it helps to incorporate air into the dough, giving the cookies a lovely texture. The color should be a light, creamy yellow – a sign that you’re on the right track.
Step 2: Add the Egg and Orange Zest
Crack the egg into the creamed butter and sugar mixture. Add the orange zest and mix well. The zest will infuse the batter with a wonderful, fresh citrus aroma. You’ll notice the color of the batter becoming a bit more vibrant, thanks to the orange zest.
Step 3: Mix the Dry Ingredients
In another bowl, sift the flour, baking powder, and a pinch of salt. Sifting ensures there are no lumps in your flour, resulting in a smooth and even batter. The dry ingredients should be well combined before moving on to the next step.
Step 4: Combine the Wet and Dry Ingredients
Gently fold the dry ingredients into the wet mixture. Use a spatula to combine them until the dough comes together. It should be smooth and slightly sticky. The combination of the rich, creamy butter and the fresh orange zest will create a delightful, aromatic dough.
Step 5: Chill the Dough
Form the dough into a ball, wrap it in plastic wrap, and refrigerate for 30 minutes. Chilling the dough helps to firm it up, making it easier to handle when rolling out. While the dough chills, preheat your oven to 180°C (350°F).
Step 6: Roll and Cut the Dough
Once chilled, roll the dough out on a lightly floured surface to about 5 mm thick. Use your favorite cookie cutters to cut out shapes. The dough should feel cool and firm to the touch, making it easy to handle. Place the cut cookies on a baking sheet lined with parchment paper.
Step 7: Bake the Cookies
Bake the cookies for 10-12 minutes, or until they are lightly golden around the edges. The aroma of the baking cookies will fill your kitchen with a delightful, citrusy scent. Once done, remove them from the oven and let them cool on the baking sheet for a few minutes before transferring them to a wire rack.
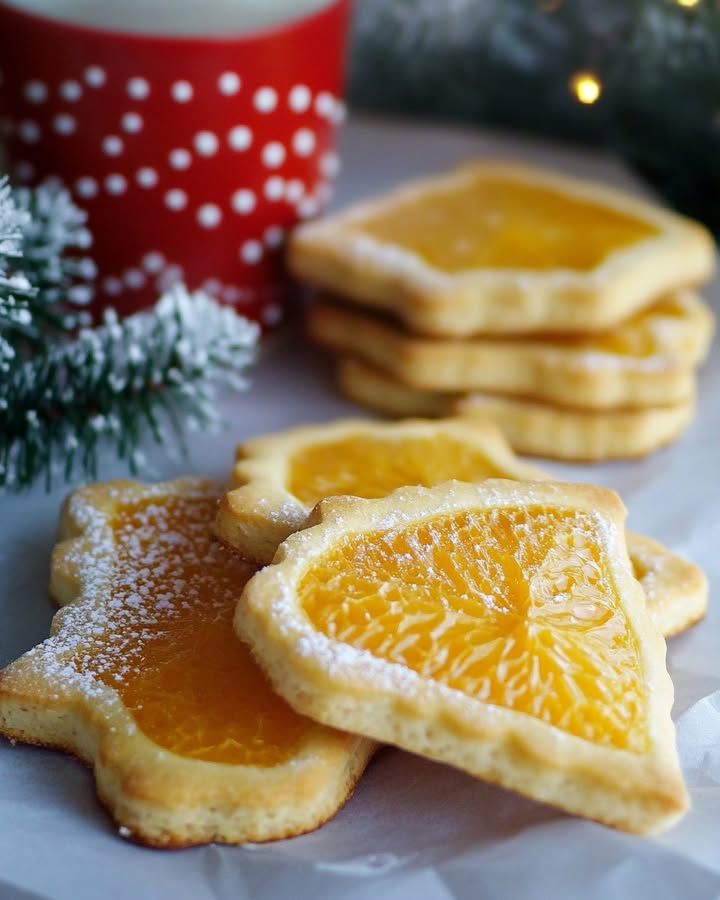
Step 8: Decorate with Powdered Sugar
Once the cookies are completely cool, sprinkle them with powdered sugar for a festive touch. The powdered sugar will add a sweet, snowy finish to the cookies. You can also get creative with different designs or patterns using a small sieve or a piping bag.
Timing
Prep Time: 30 minutes
Cooking Time: 12 minutes
Total Time: 42 minutes
Resting Time: 30 minutes
Chef’s Secret
To enhance the flavor even more, try adding a teaspoon of vanilla extract to the batter. The vanilla complements the orange zest beautifully, creating a more complex and delicious taste.
Extra Info
Funnily enough, the first time I made these, I accidentally used a clementine instead of an orange. Surprisingly, it turned out to be a delightful variation, with a slightly sweeter and more intense citrus flavor. So, if you find yourself short of oranges, a clementine works just as well.
Necessary Equipment
- Large mixing bowls
- Electric mixer or whisk
- Spatula
- Cookie cutters
- Baking sheet
- Parchment paper
- Rolling pin
- Wire cooling rack
Storage
These cookies can be stored in an airtight container at room temperature for up to 5 days. If you want to keep them longer, you can store them in the refrigerator for up to 2 weeks. To maintain their freshness and prevent them from becoming too soft, layer the cookies with wax paper between each layer. For long-term storage, you can freeze the cookies for up to 3 months. Just make sure to let them thaw at room temperature before serving.
Tips and Advice
For a more pronounced orange flavor, you can brush the tops of the cookies with a little bit of orange juice before baking. This will give them an extra citrus kick. Also, if you want to add a bit of crunch, consider sprinkling some finely chopped nuts on top of the cookies before baking.
Presentation Tips
For a festive presentation, arrange the cookies on a beautiful plate and garnish with a few candied orange peels or a dusting of cinnamon. You can also stack them in a clear glass jar and tie a ribbon around it for a charming, homemade gift.
Healthier Alternative Recipes
For those looking to enjoy these cookies while keeping it on the healthier side, here are six variations you might love:
- Lemon White Chocolate Cookies: A zesty and sweet alternative that’s perfect for a fresh twist.
- Pineapple Cherry Cookies: Packed with tropical flavors, these cookies are a hit with kids and adults alike.
- Cinnamon Sugar Bites: A classic and comforting treat with a hint of spice.
- Minty Chocolate Delights: A refreshing and indulgent option for chocolate lovers.
- Whole Grain Orange Cookies: Swap regular flour for whole grain flour for a nuttier, more nutritious version. Learn more about the benefits of whole grain foods at MyPlate.
- Oatmeal Raisin Cookies: A wholesome and satisfying option that’s always a crowd-pleaser.
Common Mistakes to Avoid
Mistake 1: Overmixing the Dough
Overmixing the dough can lead to tough, dense cookies. Once the dough starts to come together, stop mixing. A good rule of thumb is to mix until the dough is just combined and no streaks of flour remain. Pro tip: Mix the dough by hand to avoid overmixing.
Mistake 2: Using Cold Butter
Using cold butter can result in a lumpy, hard-to-mix dough. Make sure your butter is at room temperature. This will make it much easier to cream with the sugar and create a smooth, creamy base for your cookies.
Mistake 3: Not Chilling the Dough
Skipping the chilling step can cause the cookies to spread too much during baking, resulting in flat, unappealing cookies. Make sure to chill the dough for at least 30 minutes before rolling and cutting. This will help the cookies hold their shape and bake evenly.
Mistake 4: Overbaking the Cookies
Overbaking can turn your cookies from golden and crispy to dark and burnt. Keep a close eye on the cookies towards the end of the baking time. They should be lightly golden around the edges and still pale in the center. Pro tip: Use an oven timer to ensure you don’t forget about them.
Mistake 5: Not Decorating Properly
Decorating the cookies with powdered sugar too early can cause the sugar to melt and become a sticky mess. Make sure the cookies are completely cool before decorating. This will ensure that the powdered sugar stays put and provides a nice, snowy finish.
FAQ
Can I use different types of citrus zest?
Yes, you can definitely experiment with different citrus zest. Lemon, lime, or even grapefruit zest can add a unique and delicious flavor to the cookies. Just remember to adjust the amount based on the intensity of the zest.
What if I don’t have an electric mixer?
No problem! You can use a hand whisk or a wooden spoon to cream the butter and sugar. It may take a bit more effort, but it will still work. Just make sure the butter is very soft to make the process easier.
The cookies are done when they are lightly golden around the edges and still pale in the center. They should also be firm to the touch but not hard. If they’re starting to brown too quickly, cover the tray with aluminum foil to prevent burning.
Can I make the dough ahead of time?
Absolutely! You can prepare the dough, form it into a disc, wrap it in plastic wrap, and refrigerate it for up to 24 hours. Just let it come to room temperature for a few minutes before rolling and cutting.
Yes, you can make these cookies vegan by using a plant-based butter and replacing the egg with a flax egg (1 tablespoon ground flaxseed mixed with 3 tablespoons water). The rest of the recipe remains the same.
Can I use whole grain flour instead of all-purpose flour?
Yes, you can use whole grain flour for a healthier option. Whole grain flour will give the cookies a nuttier flavor and a denser texture. You may need to add a bit more liquid if the dough is too dry. Check out MyPlate for more information on the benefits of whole grain foods.
Store the cookies in an airtight container at room temperature for up to 5 days. Layer them with wax paper to prevent sticking. For longer storage, you can refrigerate them for up to 2 weeks or freeze them for up to 3 months.
Of course! In addition to powdered sugar, you can use a simple icing, chocolate drizzle, or even a sprinkle of chopped nuts. Get creative and have fun with your decorations!
Each Festive Orange Cookie contains approximately 150 calories, 2 grams of protein, and 7 grams of fat. This makes them a reasonably healthy treat, especially when enjoyed in moderation.
Yes, you can make these cookies gluten-free by using a gluten-free flour blend. Just make sure to check the label to ensure it’s a 1:1 ratio for all-purpose flour. You may need to add a bit more liquid to adjust the consistency of the dough.
What other recipes can I try with orange zest?
Orange zest is a versatile ingredient that can be used in a variety of recipes. Try adding it to your favorite muffins, scones, or even pancakes. It also works well in savory dishes like marinades, dressings, and roasted vegetables. If you’re in the mood for more cookie recipes, check out our cookie recipes section for more inspiration.
Conclusion
These Festive Orange Cookies are a delightful and easy way to add a touch of cheer to your holiday baking. With their bright, citrusy flavor and simple preparation, they are sure to become a new favorite in your home. Happy baking, and may your holiday season be filled with joy and delicious treats! 🍊🍪
Equipment
- Large mixing bowls
- Electric mixer or whisk
- Spatula
- Cookie cutters
- Baking sheet
- Parchment paper
- Rolling pin
- Wire cooling rack
Ingredients
- 250 g flour
- 125 g sugar
- 100 g softened butter
- 1 unit egg
- 1 unit zest of one orange
- 1/2 tsp baking powder
- a pinch salt
- q.s. powdered sugar for decoration to taste
Instructions
- In a large bowl, cream together the softened butter and sugar until light and fluffy.
- Crack the egg into the creamed butter and sugar mixture and add the orange zest, mixing well.
- In another bowl, sift the flour, baking powder, and a pinch of salt.
- Gently fold the dry ingredients into the wet mixture until the dough comes together.
- Form the dough into a ball, wrap it in plastic wrap, and refrigerate for 30 minutes.
- Roll the chilled dough out on a lightly floured surface to about 5 mm thick and cut out shapes.
- Place the cut cookies on a baking sheet lined with parchment paper and bake for 10-12 minutes.
- Once cooled, sprinkle the cookies with powdered sugar for decoration.
Notes
Nutrition

Hi, I’m Olivia Parker, the founder of BakingSecret.com and a lifelong lover of all things sweet and homemade. I grew up in a small town in Oregon, where the smell of fresh cookies in my family’s kitchen sparked my passion for baking. Over the years, I turned that passion into a mission: to help home bakers feel confident, inspired, and creative.
After studying food science and working in several artisan bakeries across the U.S., I decided to create a space where everyone from beginners to seasoned bakers can find reliable recipes, expert tips, and a warm, welcoming community. BakingSecret.com is my way of sharing the magic of baking with the world. When I’m not testing new recipes, you’ll find me exploring farmers’ markets, collecting vintage cookbooks, or perfecting my sourdough technique.