
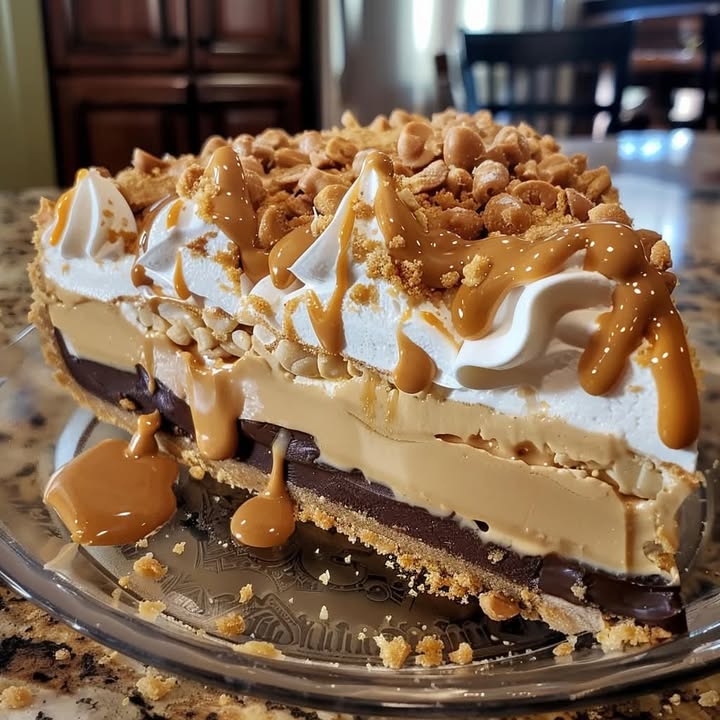
The Ultimate No-Bake Peanut Butter Bliss
You know that feeling when you need a dessert that feels like a hug? Something rich, creamy, and ridiculously easy? My family practically riots when I don’t have this Peanut Butter Bliss pie in the fridge. It’s the dessert I turn to when I want maximum “wow” with minimal work, and it never, ever lets me down.
A Slice of Happiness: The Story Behind Peanut Butter Bliss
This pie is my love letter to the classic peanut butter cup. I wanted that same magical combo of chocolate and peanut butter, but in a luxurious, sliceable form. While no-bake peanut butter pies have been a potluck staple for ages, my version focuses on that perfect, cloud-like texture. I tested it for weeks, bringing slightly different versions to every book club and soccer practice until my friends gave it the official “bliss” stamp of approval. The secret is in the whipped cream, which makes it light enough that you can absolutely justify a second slice.
Why You’ll Fall in Love With This Peanut Butter Pie
First, there’s no baking! This is a lifesaver in the summer heat. Second, it’s incredibly forgiving. If you can mix things in a bowl, you can make this pie. The flavor is pure nostalgia—creamy, nutty, and just sweet enough—with a delightful crunch from the crust and topping. It’s the kind of dessert that makes people ask for the recipe before they’ve even finished their piece.
Perfect Occasions for Your Peanut Butter Bliss
This pie is your new best friend for any gathering. It’s a superstar at summer barbecues, a comforting treat for holiday potlucks, and the perfect “just because” dessert for a Tuesday night. I love making it for birthdays (especially for the peanut butter obsessed!) or as a thank-you gift for a neighbor. It travels well and always disappears fast.
Gathering Your Ingredients for Bliss
Here’s everything you need to create this dreamy dessert. Using quality, simple ingredients is key!
- 1 Chocolate Cookie Crust: The base layer of rich chocolate complements the peanut butter filling perfectly. You can use a store-bought crust or make your own with crushed chocolate cookies and melted butter.
- 1 1/2 cups Creamy Peanut Butter: The star of the show! Smooth peanut butter creates a rich and creamy filling. Make sure to use regular peanut butter rather than the natural kind for best texture.
- 1 cup Powdered Sugar: Adds just the right amount of sweetness without making the filling too grainy. Sift the sugar beforehand for a silky-smooth consistency.
- 8 oz Cream Cheese, softened: Cream cheese makes the filling incredibly smooth and gives it a slight tang, balancing out the sweetness.
- 1 1/2 cups Heavy Whipping Cream: Whipped to soft peaks, this will give the pie a light, airy texture. Be sure your cream is very cold before whipping.
- 1/2 cup Crushed Graham Crackers or Peanut Butter Cookies: A sprinkle on top for texture and flavor, adding a delightful crunch and extra peanut butter goodness.
Easy Swaps: Substitution Options
Don’t have something? No problem! Here are some easy swaps.
- For the Crust: Use a graham cracker crust or even a pretzel crust for a sweet-and-salty twist.
- For the Peanut Butter: If you must use natural peanut butter, mix it really well and expect a slightly denser texture. You can also try almond or cashew butter.
- For the Heavy Cream: For a lighter version, you can use an extra 8 oz of whipped topping (like Cool Whip), folded in at the end instead of the whipped cream.
- For the Topping: Chopped peanuts, chocolate shavings, or a drizzle of chocolate syrup are all fantastic alternatives.
Creating Your Masterpiece: Step-by-Step Instructions
Step 1: Prepare Your Base
Start by placing your chocolate cookie crust on the counter. If you’re making your own, combine about 1 1/2 cups of fine cookie crumbs with 5-6 tablespoons of melted butter. Press it firmly into a 9-inch pie plate. The smell is already amazing! Let this chill in the fridge while you work on the filling. A firm, cold crust helps support that glorious fluffy filling later.
Step 2: Whip the Cream to Cloud-Like Peaks
Pour your very cold heavy whipping cream into a large, clean bowl. Using a hand mixer or stand mixer, beat it on medium-high speed. Watch as it transforms from liquid to frothy, then to soft, billowy peaks. This is the key to the pie’s airy texture. Pro tip: Chill your bowl and beaters in the freezer for 10 minutes first. It makes the cream whip up faster and higher. Stop when the cream holds its shape but is still soft and smooth.
Step 3: Blend the Heart of the Peanut Butter Filling
In another large bowl, beat the softened cream cheese until it’s completely smooth and lump-free. This might take a minute. Add the creamy peanut butter and sifted powdered sugar. Beat it all together until it’s one homogenous, thick, and creamy mixture. Scrape down the sides of the bowl to make sure everything is incorporated. The color is a beautiful, warm tan and the aroma is pure, nutty heaven.
Step 4: Gently Fold It All Together
This step needs a gentle touch. Add about one-third of your whipped cream to the peanut butter mixture. Use a rubber spatula to fold it in gently. This lightens the dense peanut butter base. Now, add the remaining whipped cream. Fold with wide, sweeping motions until no white streaks remain. You’re preserving all those tiny air bubbles that make the filling light. The mixture will be thick, creamy, and dreamy.
Step 5: Assemble and Chill to Perfection
Retrieve your chilled crust from the fridge. Spoon the peanut butter bliss filling into the crust. Use your spatula to smooth the top into pretty swirls. Now, sprinkle the crushed graham crackers or peanut butter cookies evenly over the top. This adds a wonderful contrast. Chef’s tip: For super clean slices, chill the pie for at least 6 hours, but overnight is best. This allows the flavors to meld and the filling to set perfectly.
Your Peanut Butter Bliss Timeline
This pie is mostly hands-off time, which is the best kind of cooking!
- Prep Time: 20 minutes
- Chill Time: 6 hours (or overnight)
- Total Time: 6 hours 20 minutes
The Secret to Silky-Smooth Filling
Here’s my not-so-secret secret: sift your powdered sugar. It takes one extra minute but makes a world of difference. It prevents any tiny lumps of sugar in your filling, ensuring a texture that’s utterly smooth and luxurious on the tongue. Trust me on this one!
A Sweet Bit of Peanut Butter Trivia
Did you know peanut butter was first introduced as a protein source for people with poor teeth? It’s true! Now, it’s a beloved staple in pantries everywhere. Combining it with cream cheese in a dessert is a relatively modern, and utterly brilliant, invention that we can all be thankful for.
Tools You’ll Need
You likely have everything already!
- Electric hand mixer or stand mixer
- Two large mixing bowls
- Rubber spatula
- 9-inch pie plate
- Measuring cups and spoons
Storing Your Peanut Butter Bliss Pie
This pie must be stored in the refrigerator. Cover it loosely with plastic wrap or place it in a cake carrier. The chilled environment keeps the whipped cream stable and the filling firm.
For the best texture and flavor, enjoy your pie within 3-4 days. The crust may start to soften slightly after that, but it will still taste delicious.
You can also freeze this pie for longer storage. Wrap it tightly in a few layers of plastic wrap and freeze for up to a month. Thaw it overnight in the fridge before serving.
Tips for Pie Perfection
- Make sure your cream cheese is truly softened. Leaving it out for an hour helps it blend smoothly without lumps.
- Use a regular, shelf-stable creamy peanut butter for the creamiest, most stable filling.
- For a fun twist, swirl in some melted chocolate or sprinkle mini chocolate chips into the filling.
Showstopper Presentation Ideas
- Serve each slice with a dollop of extra whipped cream and a single peanut butter cup on the side.
- Drizzle the plate with chocolate sauce and a little caramel before placing the slice.
- For a party, make mini versions in a muffin tin lined with cupcake liners for individual servings.
Love This? Try These Healthier Twists!
If you’re looking to lighten things up or try a new flavor, these variations are fantastic.
- Greek Yogurt Swap: Replace half the cream cheese with plain, full-fat Greek yogurt. It adds protein and a lovely tang.
- Sugar-Free Version: Use a sugar-free powdered sweetener and a sugar-free chocolate crust. Check that your peanut butter has no added sugar.
- Protein-Packed Bliss: Blend a scoop of vanilla protein powder into the peanut butter mixture. You may need a tablespoon of milk to help it combine.
- Dark Chocolate Drizzle: After chilling, drizzle the top with melted dark chocolate. Dark chocolate has less sugar and adds antioxidants.
- Nut-Free “Peanut” Butter Bliss: Use sunflower seed butter for a similar texture that’s safe for nut allergies. The filling will have a greenish tint but tastes great!
- Mini Portion Control: Make the recipe in small jars or ramekins. It helps with serving size and looks adorable.
Speaking of no-bake desserts that save the day, if you adore this easy pie, you might also go crazy for a no-bake German chocolate cheesecake. It has a similar fuss-free charm but with a rich, coconut-pecan twist. For another creamy dream, a banana cream cheesecake combines two classic flavors into one stunning dessert. If you’re in a fruity mood, a bright and moist orange yogurt cake with apricot glaze is a wonderful choice. And for a little crunch with your coffee, you can’t beat classic gluten-free biscotti recipes.
Common Mistakes to Avoid for Peanut Butter Bliss
Mistake 1: Using Natural Peanut Butter
This is the most common pitfall. Natural peanut butter, the kind that separates, has a different texture and oil content. It can make your filling oily, gritty, or cause it to not set properly. The oils can also prevent the cream from whipping up nicely. Stick with a standard, homogenized creamy peanut butter like Jif or Skippy for the perfect, creamy consistency every time.
Mistake 2: Not Softening the Cream Cheese
Lumpy filling is no fun! If your cream cheese is cold, it will never blend smoothly with the peanut butter and sugar. You’ll end up with small bits of cream cheese throughout an otherwise smooth pie. To avoid this, take the cream cheese out of the fridge at least an hour before you start. You want it to be room temperature and soft to the touch.
Mistake 3: Over-whipping the Heavy Cream
Whipped cream should be soft and pillowy for folding. If you whip it until it’s very stiff and looks like buttercream, it becomes grainy and hard to blend. This can make your final pie dense instead of light. Stop whipping as soon as the cream holds soft peaks that gently flop over when you lift the beater. Pro tip: If you accidentally overwhip it, gently fold in a splash of fresh liquid cream to soften it.
Mistake 4: Skipping the Long Chill
Impatience is the enemy here. If you try to slice the pie after just two hours, it will be a runny mess. The chilling time is non-negotiable. It’s when the filling firms up and the flavors come together. For clean, beautiful slices that hold their shape, a minimum of 6 hours is key. Overnight chilling is truly the best path to Peanut Butter Bliss perfection.
Choosing quality ingredients isn’t just about taste; it’s a simple step toward better well-being. For instance, being mindful of your overall diet, including maintaining a good cholesterol balance, is an important part of a healthy lifestyle, even when enjoying treats.
Frequently Asked Questions
Can I make this Peanut Butter Bliss pie ahead of time?
Absolutely! This pie is an ideal make-ahead dessert. In fact, it gets better with time. I recommend making it the day before you need it. The long chill in the fridge allows the filling to set firmly and the flavors to blend beautifully. Just cover it well and keep it refrigerated. You can even add the crunchy topping right after you fill the crust, so it’s ready to go when you are. This makes it stress-free for parties and gatherings.
What’s the best way to get clean slices?
Clean slices are all about a sharp knife and a set pie. First, ensure the pie has chilled for at least 6 hours, preferably overnight. Dip a sharp, thin-bladed knife in very hot water. Wipe it dry with a towel. Make a clean cut straight down. Repeat the hot water dip and wipe for every single slice. This melts through the creamy filling just enough to give you a pristine edge. It takes a second longer but makes your pie look professionally made.
Can I freeze this no-bake peanut butter pie?
Yes, you can freeze this pie successfully. Wrap the whole pie (or individual slices) tightly in plastic wrap, then again in aluminum foil. Freeze for up to one month. To serve, transfer it to the refrigerator and let it thaw overnight. The texture may be slightly denser after freezing, but it will still be delicious. Do not thaw it at room temperature, as this can make the filling weep.
Why did my filling turn out grainy or runny?
A grainy texture usually comes from powdered sugar that wasn’t sifted, or cream cheese that wasn’t fully softened and blended. A runny pie almost always means the cream was under-whipped, the pie didn’t chill long enough, or natural peanut butter was used. To fix a runny pie, just pop it back in the freezer for an hour or two to firm up. For your next try, follow the tips for soft cream cheese, sifted sugar, and proper chill time.
Can I use a different kind of nut butter?
You can experiment with other nut butters, but the results will vary. Almond butter or cashew butter will work with a similar method and give a different, elegant flavor. Sunflower seed butter is a great nut-free option, though it may tint the filling green. Avoid using “natural style” butters that separate, as they can cause texture issues. No matter what you use, make sure it’s the creamy, not chunky, variety for the smoothest filling.
Is there a way to make this recipe lighter?
There are a few tricks for a lighter version. You can use reduced-fat cream cheese, though the filling may be slightly less firm. For the whipped cream, some people have success with whipping chilled coconut cream. You could also fold in a container of light whipped topping instead of whipping the heavy cream. Remember, even small portions of rich desserts like this can be part of a balanced diet when enjoyed in moderation.
My crust got soggy. How can I prevent that?
A soggy bottom crust happens when the filling is very moist and sits on it for a long time. To prevent this, you can create a moisture barrier. Before adding the filling, brush the inside of your pre-baked or prepared crust with a thin layer of melted chocolate or even a beaten egg white. Let it set for a few minutes. This creates a seal that keeps the crust crispier for longer, even after days in the fridge.
Can I make this without an electric mixer?
You can, but it will be a serious arm workout! For the whipped cream, a stand mixer or hand mixer is highly recommended to get enough volume and air. For the peanut butter and cream cheese mixture, you could technically mix it by hand with a strong whisk and a lot of elbow grease. Just make sure the cream cheese is very, very soft to make it easier. I’d call borrowing a mixer from a friend a smart move!
What can I use if I don’t have a pie plate?
No pie plate? No problem! You can make this in a 9×9 square baking dish for “peanut butter bliss bars.” You can also use a springform pan for a taller, more elegant presentation. Individual servings in mason jars or dessert cups are always a hit. Just layer the crust crumbs and the filling. The recipe is very adaptable to different containers, so use what you have.
How long will leftovers last in the fridge?
Properly stored with a cover or plastic wrap, your Peanut Butter Bliss pie will stay fresh and delicious in the refrigerator for 3 to 4 days. The whipped cream topping may start to deflate a little after day two, and the crust will gradually soften, but it will still be perfectly safe and tasty to eat. This is not a pie that lasts long in my house, anyway!
If this no-bake wonder has you hooked on creamy, cheesy desserts, you should definitely explore our full collection of incredible cheesecake recipes for more inspiration.
Your New Go-To Dessert Awaits
So there you have it. Your path to Peanut Butter Bliss is clear and simple. This pie is more than just a recipe. It’s a guaranteed smile-maker, a crowd-pleaser, and your secret weapon for easy entertaining. The magic is in how simple ingredients come together to create something truly special. Go grab that peanut butter and cream cheese. Your happiest dessert is just a mix and a chill away. Now, who’s ready for a slice?
Equipment
- Grand bol
- Fouet
- Spatule
- Plaque à pâtisserie
- Papier sulfurisé
Ingredients
- 1 base de tarte croûte de biscuit au chocolat
- 1.5 tasse beurre de cacahuète crémeux
- 1 tasse sucre glace
- 8 oz fromage à la crème, ramolli
- 1.5 tasse crème épaisse
- 0.5 tasse biscuits Graham écrasés ou cookies au beurre de cacahuète
Instructions
- Placez votre croûte de biscuit au chocolat sur le comptoir ; réfrigérez si vous la préparez vous-même.
- Versez votre crème épaisse froide dans un grand bol et fouettez jusqu'à obtenir des pics mous.
- Dans un autre bol, battez le fromage à la crème ramolli jusqu'à consistance lisse ; ajoutez le beurre de cacahuète et le sucre glace tamisé, puis mélangez jusqu'à ce que le tout soit crémeux.
- Incorporez délicatement un tiers de la crème fouettée dans le mélange de beurre de cacahuète, puis incorporez le reste de la crème fouettée jusqu'à ce qu'il n'y ait plus de stries blanches.
- Versez la garniture au beurre de cacahuète dans la croûte réfrigérée, en lissant le dessus et en ajoutant des biscuits écrasés sur le dessus.
- Réfrigérez pendant au moins 6 heures ou toute la nuit pour de meilleurs résultats.
Notes
Nutrition

Hi, I’m Olivia Parker, the founder of BakingSecret.com and a lifelong lover of all things sweet and homemade. I grew up in a small town in Oregon, where the smell of fresh cookies in my family’s kitchen sparked my passion for baking. Over the years, I turned that passion into a mission: to help home bakers feel confident, inspired, and creative.
After studying food science and working in several artisan bakeries across the U.S., I decided to create a space where everyone from beginners to seasoned bakers can find reliable recipes, expert tips, and a warm, welcoming community. BakingSecret.com is my way of sharing the magic of baking with the world. When I’m not testing new recipes, you’ll find me exploring farmers’ markets, collecting vintage cookbooks, or perfecting my sourdough technique.