
Discovering the Magic of Cheesecake Mousse
I still remember the first time I tasted cheesecake mousse at a friend’s dinner party. I expected the usual dense, heavy slice of traditional cheesecake. Instead, I got a spoonful of something completely different. It was light, airy, and melted on my tongue like a cloud. I was hooked instantly.
That moment changed how I thought about desserts. Sometimes you want something sweet but not heavy. You want flavor without feeling stuffed afterward. That’s exactly what cheesecake mousse delivers.
Hi, I’m here to share my love for this amazing dessert with you. Over the years, I’ve made countless batches of cheesecake mousse for family gatherings, holidays, and regular weeknight treats. Each time, it disappears faster than any cake I’ve ever baked.
The best part? This dessert is incredibly flexible. You can make a classic French cheesecake mousse recipe for an elegant dinner party. Need something low-carb? Try cheesecake mousse keto versions that taste just as good. Craving chocolate? There’s a chocolate cheesecake mousse for that. Even seasonal options like pumpkin cheesecake mousse bring fall flavors to your table.
I’ve also played around with lemon cheesecake mousse delish variations and even tried a banana cheesecake mousse that surprised everyone. The options truly never end.
Throughout this article, I’ll walk you through everything you need to know about making perfect cheesecake mousse. You’ll learn which ingredients work best, how to achieve that signature texture, and which variations match your dietary needs. Whether you’re hosting guests or treating yourself, you’ll find a version that works for you.
Let’s explore this wonderful dessert together. Trust me, once you master cheesecake mousse, you’ll make it again and again.
What Makes Cheesecake Mousse Different?
Many people ask me: “What makes cheesecake mousse different?” The answer lies in both texture and preparation. Traditional cheesecake is baked, dense, and sits heavy on your stomach. Cheesecake mousse skips the oven entirely and delivers something much lighter.
Think of regular cheesecake as a rich, filling meal. Now imagine that same flavor in a whipped, airy form. That’s mousse.
The texture difference is huge. Regular cheesecake has that thick, creamy consistency that coats your mouth. Cheesecake mousse feels almost weightless. It’s fluffy, smooth, and dissolves quickly as you eat it. You get all the tangy cream cheese flavor without the heaviness.
I love serving mousse after big meals when guests are already full. They always have room for it because it doesn’t weigh them down. Try offering someone a slice of dense cheesecake after Thanksgiving dinner. Now try offering them a glass of light, airy mousse. The mousse wins every time.
The preparation methods also differ completely. Traditional cheesecake requires a water bath, careful temperature control, and patience while it bakes and cools. One crack in the surface can ruin the look. The pressure can be stressful.
Cheesecake mousse removes all that stress. You whip ingredients together, fold them gently, and chill. No oven means no cracks, no water baths, and no anxiety about whether it will turn out right. The process is actually relaxing.
A classic French cheesecake mousse recipe uses whipped cream folded into sweetened cream cheese. The French have perfected the art of light desserts, and their version of cheesecake mousse shows that expertise. It’s elegant, simple, and always impressive.
Some recipes call for cheesecake mousse with gelatin to help it hold its shape. Gelatin creates a slightly firmer texture that works great if you’re piping the mousse into glasses or making layered desserts. I use it when I want something that looks fancy but still tastes light.
The mousse also works better for portion control. You can serve it in small glasses or cups, which looks beautiful and helps everyone enjoy a reasonable amount. With regular cheesecake, cutting perfect slices can be messy, and portions often end up too large.
Here’s another advantage: mousse is easier to customize. Want to add fruit? Just fold in some berries. Prefer chocolate? Mix in melted chocolate or cocoa powder. With baked cheesecake, you’re committed once it goes in the oven. With mousse, you can adjust as you go.
The flavor profile differs slightly too. Baking changes how ingredients taste. The heat intensifies some flavors while mellowing others. Cheesecake mousse keeps everything fresh and bright. The cream cheese tang comes through clearly. Any fruit or chocolate you add tastes more vibrant.
Temperature also matters. We eat traditional cheesecake cold, but it’s still dense. Mousse is both cold and airy. That combination refreshes your palate in a way regular cheesecake can’t match.
Many of my friends who say they don’t like cheesecake change their minds after trying mousse. They usually dislike the heavy, thick texture of the baked version. The mousse gives them the flavor they enjoy without the parts they don’t.
This makes cheesecake mousse perfect for people who want dessert but prefer something lighter. After a heavy meal, rich chocolate cake or dense pie might sound unappealing. But fluffy mousse? That sounds perfect.
I also find mousse easier to eat. Regular cheesecake requires a fork and some effort to cut through each bite. Mousse practically melts off the spoon. It’s an effortless eating experience that feels indulgent without being overwhelming.
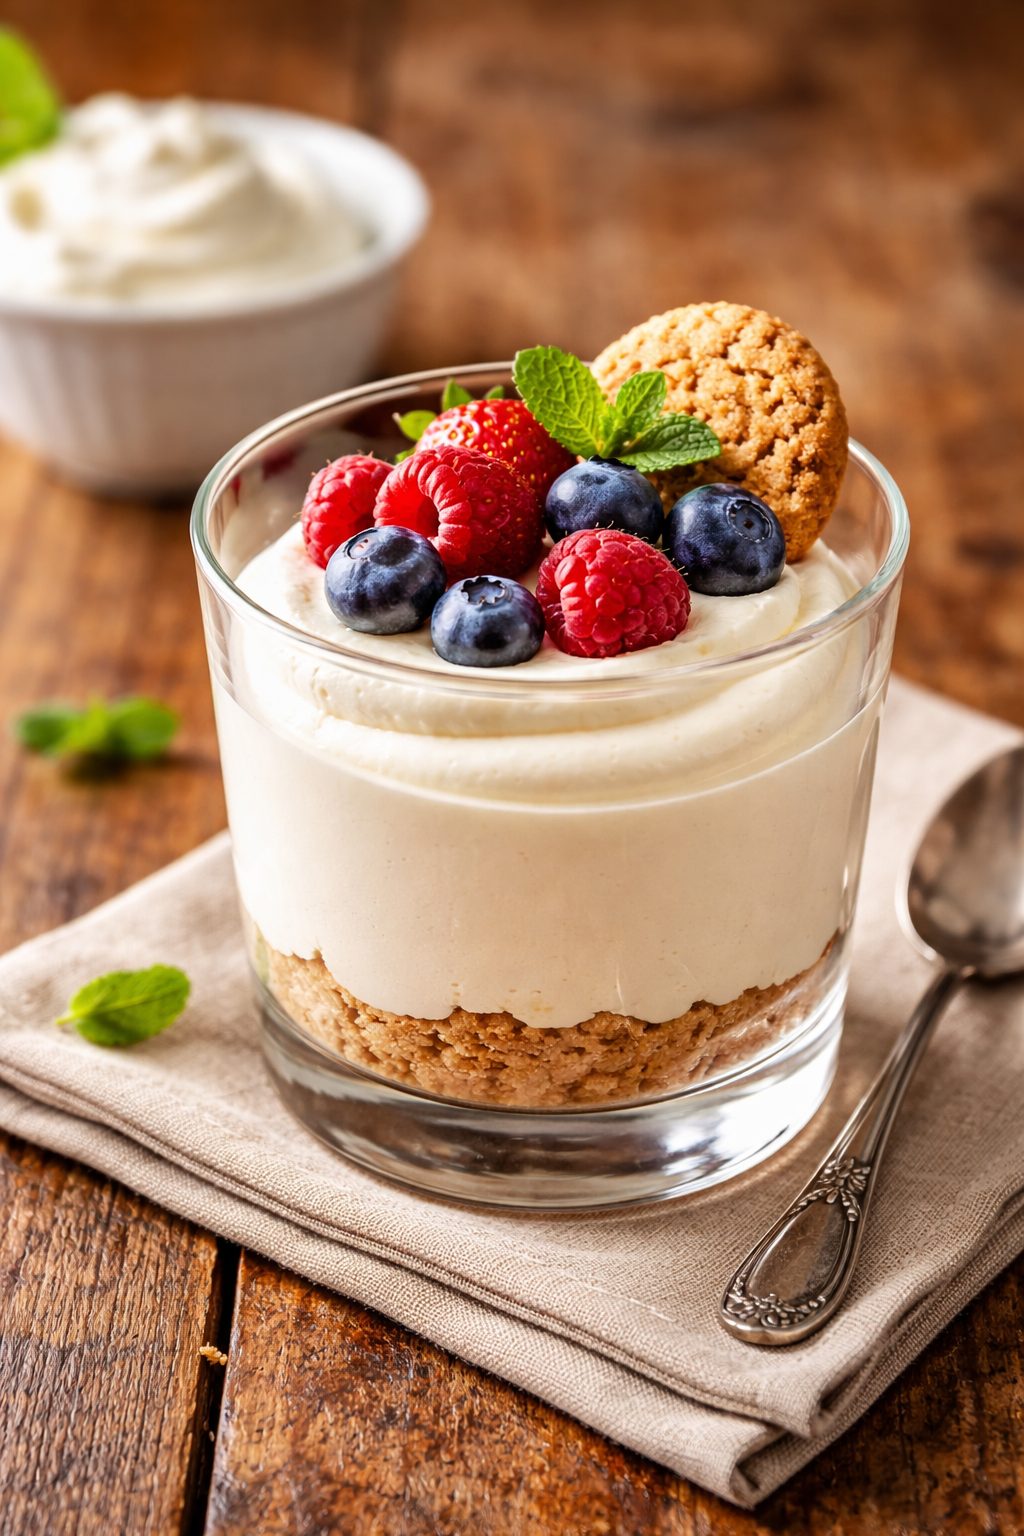
The visual appeal differs too. Traditional cheesecake sits on a plate as a solid wedge. Mousse can be served in clear glasses, showing off pretty layers or swirls. You can top it with fresh fruit, chocolate shavings, or cookie crumbs. The presentation options are endless.
During summer, I reach for mousse over baked desserts. The light texture feels appropriate for warm weather. Plus, I don’t have to heat up my kitchen by running the oven for an hour.
Even the ingredients can be lighter. Many cheesecake mousse keto recipes use low-carb sweeteners and skip the graham cracker crust entirely. You get dessert that fits your diet without compromise. Traditional cheesecake requires that buttery crust, which adds calories and carbs whether you want them or not.
So what makes cheesecake mousse different? Everything. The texture is lighter. The preparation is easier. The serving options are more flexible. The eating experience is more pleasant. You get the same great flavor in a completely new form.
Once you understand these differences, you’ll see why so many people prefer mousse. It takes the best parts of cheesecake and makes them even better.

The Building Blocks: What Ingredients Are in Cheesecake Mousse?
Now that you understand why mousse beats traditional cheesecake in so many ways, let’s talk about what actually goes into making it.
The ingredient list for cheesecake mousse is surprisingly short. That’s one of the things I love most about this dessert. You don’t need a pantry full of exotic items or a specialty store run. Most of what you need is probably already in your fridge.
Cream cheese forms the foundation. I always use full-fat cream cheese that’s been softened to room temperature. The full-fat version gives you that rich, tangy flavor we associate with cheesecake. When it’s soft, it blends smoothly without lumps. Cold cream cheese straight from the fridge creates chunks that ruin the texture. Trust me, I learned that lesson the hard way during my first attempt.
Heavy whipping cream comes next. This ingredient creates the light, airy texture that makes mousse special. You’ll whip it until stiff peaks form, then fold it gently into the cream cheese mixture. The whipped cream adds volume and that cloud-like consistency. Some recipes use Cool Whip instead, but I prefer real whipped cream. The flavor is just better, more natural and fresh.
Sugar sweetens everything, obviously. I typically use powdered sugar because it dissolves faster than granulated sugar. Powdered sugar also contains a bit of cornstarch, which helps stabilize the mousse slightly. The amount of sugar varies based on your taste. I’ve made versions with as little as three tablespoons and as much as a cup. Start with less and adjust upward if needed.
Vanilla extract rounds out the basic recipe. Just a teaspoon or two enhances all the other flavors without overpowering them. I splurge on real vanilla extract instead of imitation. The difference shows up in the final taste.
Those four ingredients create a basic cheesecake mousse. Seriously, that’s all you need. Cream cheese, heavy cream, sugar, and vanilla. Mix them properly and you’ve got dessert.
Here’s the thing though. While those four ingredients work perfectly fine, sometimes you want more structure. That’s where cheesecake mousse with gelatin comes in. Adding unflavored gelatin helps the mousse hold its shape better, especially if you’re piping it into fancy glasses or creating layers.
I use gelatin when I’m making mousse for a birthday cheesecake or any occasion where presentation really matters. The gelatin makes everything more stable without changing the flavor. You’ll bloom the gelatin in cold water first, then dissolve it in a small amount of hot liquid before mixing it into the cream cheese. It sounds complicated but takes maybe two extra minutes.
The ratio matters here. Too much gelatin and your mousse becomes rubbery. Too little and it won’t help. I typically use about one teaspoon of powdered gelatin per cup of cream cheese. That gives just enough structure without making things weird.
By the way, if you’re looking at cheesecake mousse keto options, you’ll swap out that regular sugar for a low-carb sweetener. I’ve had great success with erythritol and monk fruit sweetener. Both dissolve well and don’t leave a strange aftertaste like some artificial sweeteners do.
The keto version uses the exact same base ingredients otherwise. Full-fat cream cheese? Check. Heavy whipping cream? Absolutely. You’re just replacing the sugar component. Some keto sweeteners measure cup-for-cup like sugar, while others are more concentrated. Read the package instructions carefully.
I make keto lemon cheesecake mousse all the time for my sister who follows a strict low-carb diet. She adds fresh lemon juice and lemon zest to the basic keto mousse recipe. The citrus flavor brightens everything up and makes it taste sophisticated. Nobody at family dinners ever guesses it’s sugar-free unless I tell them.
Funny enough, the keto version actually tastes richer to me than the regular version. Maybe it’s because you’re using all those high-fat ingredients without any grain-based additions. Whatever the reason, I sometimes make the keto version even when I’m not watching carbs.
Speaking of variations, let’s talk about the 3 ingredient cheesecake that people keep asking about. What are the ingredients in 3 ingredient cheesecake? Simple: cream cheese, sweetener, and whipped cream. That’s it. You literally combine softened cream cheese with your sweetener of choice, fold in whipped cream, and you’re done.
I make this ultra-simple version when I’m tired or short on time. It takes maybe ten minutes from start to fridge. Sure, the vanilla adds a nice touch, but you can absolutely skip it. The three core ingredients deliver plenty of flavor on their own.
Here’s a little secret I discovered: you can add a spoonful of sour cream to any cheesecake mousse recipe for extra tang. My grandmother used to do this with her Baileys cheesecake, and I borrowed the technique for mousse. The sour cream amplifies that signature cheesecake tartness without making things runny.
Now, about special dietary needs. Someone recently asked me: Can diabetics eat mousse? The answer is yes, with modifications. A diabetic-friendly cheesecake mousse uses sugar-free sweeteners just like the keto version. The difference is diabetics might also want to watch their total fat intake, depending on their specific health requirements.
I’ve made versions using reduced-fat cream cheese and mixing in Greek yogurt to cut some of the fat while adding protein. These adaptations work surprisingly well. The texture stays creamy, and the flavor remains recognizable as cheesecake. You sacrifice a tiny bit of richness, but gain something that fits within dietary restrictions.
For diabetic friends, I also focus on adding fresh berries as toppings instead of sugary sauces. Strawberries, blueberries, and raspberries add natural sweetness and fiber. They make the dessert feel more substantial without spiking blood sugar. Sometimes I even incorporate the fruit directly into the mousse, like in strawberry cheesecake overnight oats, but in mousse form.
The beauty of cheesecake mousse ingredients is their flexibility. You start with that basic foundation of cream cheese and whipped cream, then customize from there. Want chocolate cheesecake mousse? Melt some dark chocolate and fold it in. Craving pumpkin cheesecake mousse for fall? Add pumpkin puree and warming spices.
I’ve even experimented with banana cheesecake mousse by mashing ripe bananas into the cream cheese before adding the whipped cream. My kids went crazy for that version. The banana flavor paired perfectly with vanilla wafer crumbs on top.
One ingredient combination that surprised me was inspired by a baklava cheesecake recipe I tried last year. I added a touch of honey and chopped pistachios to my mousse. The Middle Eastern flavors worked beautifully with the tangy cream cheese. Sometimes the best recipes come from unexpected inspiration.
When shopping for ingredients, quality matters more than you might think. Generic cream cheese tastes fine, but name-brand versions usually have better texture and tang. Same goes for heavy cream. The ultra-pasteurized stuff lasts forever but doesn’t whip quite as nicely as regular pasteurized cream.
Store your ingredients properly too. Cream cheese should stay cold until about an hour before you need it. Heavy cream must stay refrigerated and used before the expiration date. Old cream won’t whip correctly and might taste off.
The ingredient simplicity makes cheesecake mousse accessible for beginners. You’re not juggling ten different components or worrying about complicated techniques. Mix, whip, fold, chill. That’s the whole process. Even if you’ve never made dessert from scratch before, you can master this one.
Exploring Delicious Cheesecake Mousse Variations and Flavors
This is where things get really fun. Once you’ve mastered the basic cheesecake mousse, a whole world of flavors opens up. I’ve probably tried fifty different variations over the years, and I’m still discovering new combinations that surprise me.
The best part about mousse is how forgiving it is when you experiment. Unlike baked goods where one wrong ingredient can ruin everything, mousse lets you taste and adjust as you go. Too sweet? Add a splash of lemon juice. Not sweet enough? Fold in more sweetener. It’s almost impossible to mess up completely.
Chocolate Cheesecake Mousse: A Classic Twist
Let me start with chocolate cheesecake mousse because it’s probably the most popular variation I make. My neighbor actually rings my doorbell when she sees me making it through the kitchen window. That’s not an exaggeration.
For chocolate versions, I melt about four ounces of good quality dark chocolate and let it cool slightly before mixing it into the softened cream cheese. The chocolate needs to be warm enough to blend smoothly but not so hot that it melts everything else. Room temperature or just barely warm works perfectly.
I’ve tried using cocoa powder instead of melted chocolate, and honestly, both methods work. Cocoa powder gives you a lighter chocolate flavor and keeps the mousse fluffier. Melted chocolate creates a richer, more intense taste with a slightly denser texture. Neither is wrong. It just depends on what you’re craving that day.
Here’s something I learned the hard way: use quality chocolate. I once grabbed a bag of cheap chocolate chips thinking it wouldn’t matter much. Wrong. The mousse tasted waxy and artificial. Now I spring for chocolate bars with at least 60% cacao content. The flavor difference is massive.
One trick I love is adding a tiny pinch of espresso powder to chocolate cheesecake mousse. You won’t taste coffee, I promise. The espresso just makes the chocolate flavor pop more intensely. My husband thought I’d changed chocolate brands when I first tried this. Nope, just a quarter teaspoon of espresso powder working magic.
Seasonal Favorites: Pumpkin Cheesecake Mousse
Every October, my family starts asking when I’ll make pumpkin cheesecake mousse. It’s become our unofficial fall tradition, right up there with apple picking and complaining about pumpkin spice being everywhere.
Making pumpkin mousse is dead simple. Take your basic recipe and fold in about half a cup of pumpkin puree per eight ounces of cream cheese. Make absolutely sure you’re using pure pumpkin puree, not pumpkin pie filling. The pie filling already has sugar and spices, which throws off your ratios.
For spices, I add cinnamon, nutmeg, ginger, and just a touch of cloves. The exact amounts vary based on how I’m feeling that day. Usually about a teaspoon of cinnamon and a quarter teaspoon each of the others. Sometimes I go heavier on the ginger if I want more bite.
One year I topped pumpkin cheesecake mousse with crushed gingersnap cookies and everyone lost their minds. The spicy cookie crunch against the smooth, creamy mousse was perfection. Now I can’t serve it any other way without hearing complaints.
By the way, pumpkin mousse works beautifully as a make-ahead dessert for Thanksgiving. I prep it the day before, portion it into individual glasses, and cover them with plastic wrap. On Thanksgiving day, I just pull them out, add toppings, and done. No last-minute stress while I’m managing six other dishes.
Unique and Unexpected: Banana Cheesecake Mousse
I stumbled onto banana cheesecake mousse completely by accident. I had overripe bananas sitting on my counter and didn’t feel like making banana bread for the millionth time. So I mashed one up and stirred it into my cream cheese mixture. Best accident ever.
The banana adds natural sweetness, which means you can reduce the added sugar. It also brings a subtle tropical vibe that feels different from traditional cheesecake flavors. I usually use one very ripe banana per eight ounces of cream cheese.
Make sure the banana is really ripe, with lots of brown spots. Those bananas are sweeter and mash more smoothly. A barely-ripe banana won’t incorporate well and won’t taste as good. Trust the brown spots.
For toppings, I’ve done vanilla wafer crumbs, caramel drizzle, and even chocolate shavings. My kids prefer it with crushed Nilla wafers on top because it reminds them of banana pudding. I won’t lie, the combination is pretty genius.
Funny enough, adults at parties usually approach banana cheesecake mousse with skepticism. They expect it to be too sweet or taste artificial. Then they try it and come back for seconds. The natural banana flavor combined with tangy cream cheese creates something unexpectedly sophisticated.
Bright and Refreshing: Lemon Cheesecake Mousse
If I’m serving dessert after a heavy meal, I reach for lemon cheesecake mousse every single time. The citrus brightness cuts through all that fullness and leaves your mouth feeling clean and refreshed.
I make mine with fresh lemon juice and lemon zest. The juice provides tartness while the zest adds intense lemon flavor without extra liquid. For every eight ounces of cream cheese, I use the juice and zest of one large lemon. Sometimes I go a bit lighter on the sugar since lemon’s natural acidity makes things taste less sweet anyway.
One presentation I love is lemon cheesecake in a glass. I layer the mousse with crushed graham crackers and lemon curd in clear glasses. The layers look beautiful, and you get different textures in each spoonful. It’s fancy enough for dinner parties but easy enough for weeknight dessert.
The lemon cheesecake mousse delish version that got popular online adds extra lemon zest for decoration and sometimes includes a layer of berry compote. I’ve made that adaptation using fresh blueberries cooked down with a little honey. The blueberry-lemon combination is spectacular, especially in summer when both ingredients are at their peak.
Here’s a tip about lemons: always zest them before you juice them. Trying to zest an already-juiced lemon is frustrating and messy. Also, room temperature lemons release more juice than cold ones. If your lemons are refrigerated, give them thirty seconds in the microwave or roll them firmly on the counter before cutting.
During summer barbecues, I serve lemon cheesecake mousse in small mason jars with handles. People can walk around with their dessert, which works better than plates at outdoor gatherings. Plus, mason jars look charming and Instagram-worthy, if you care about that sort of thing.
Getting Adventurous: Beyond Traditional Flavors
Once you’re comfortable with the basic technique, you can push into really creative territory. I’ve experimented with lavender, earl grey tea, and even camembert cheesecake inspired by French fromage desserts.
The camembert version is definitely not for everyone. It’s savory-sweet, which some people find confusing. I use half cream cheese and half room-temperature camembert with the rind removed. Then I sweeten it just slightly and fold in whipped cream. Instead of sugar, I drizzle honey on top and add fresh figs or pears.
This works better as an appetizer-dessert hybrid, honestly. I serve it at wine tastings or sophisticated dinner parties where people expect unusual flavor combinations. My book club loved it with champagne. My kids, not so much. They looked at me like I’d lost my mind.
For more standard adventurous options, try mixing in fruit preserves. A spoonful of raspberry preserves swirled through basic mousse creates beautiful marbling and adds intense fruit flavor. Apricot preserves with a hint of amaretto extract is another winner.
I’ve also played with extracts beyond vanilla. Almond extract gives you that classic cherry-almond vibe. Coconut extract paired with lime zest tastes like vacation. Peppermint extract during December makes everything feel festive. Just remember that extracts are potent. Start with a quarter teaspoon and taste before adding more.
Coffee-flavored cheesecake mousse is another favorite in my house. I dissolve instant espresso powder in a tiny bit of warm cream, then mix it into the cream cheese. The coffee flavor is bold without being bitter, and it pairs wonderfully with chocolate shavings on top.
For people interested in getting nutrients while enjoying desserts, incorporating fresh fruit not only adds flavor but also provides vitamins and can even help with nutrient absorption when paired with the fat content in cream cheese.
Layering and Presentation Ideas
Sometimes the flavor isn’t what makes a dessert special. How you present it matters too. I’ve learned dozens of presentation tricks that make simple mousse look restaurant-quality.
Parfait glasses are my go-to. Layer mousse with cookie crumbs, fruit compote, or chocolate ganache. Each layer should be visible through the glass. I use a piping bag to add the mousse cleanly, but honestly, a ziplock bag with the corner snipped off works just as well.
For cookie crusts in glasses, butter isn’t always necessary. Sometimes I just crush graham crackers or Oreos and press them into the bottom. The moisture from the mousse softens them slightly, creating a nice texture contrast without added fat.
Trifle dishes work beautifully for feeding crowds. I make a huge batch of cheesecake mousse, then layer it with brownies, whipped cream, and caramel sauce. People can scoop out servings themselves, which makes parties easier on me.
Here’s the thing about toppings: they’re not just decoration. They add textural interest that makes each bite more enjoyable. Smooth mousse is great, but smooth mousse with crunchy nuts, chewy caramel, and fresh berries is transcendent.
I keep a mental list of topping combinations that work well together. For chocolate cheesecake mousse: chocolate shavings, fresh raspberries, and crushed Oreos. For pumpkin: candied pecans, caramel drizzle, and whipped cream. For lemon: fresh blueberries, shortbread crumbs, and lemon zest.
Making It Your Own
The variations I’ve mentioned barely scratch the surface. You could make cheesecake mousse every week for a year and never repeat the same flavor combination. That’s what keeps this dessert exciting for me.
Think about flavors you already love. Do you always order strawberry cheesecake at restaurants? Make strawberry mousse. Obsessed with key lime pie? That’s just lime-flavored mousse waiting to happen. Your favorite candy bar? Probably translates to mousse somehow.
I encourage people to start with classic versions first. Master the basic technique, then branch out. Once you understand how the cream cheese and whipped cream work together, experimentation becomes intuitive.
Document what you try. I keep a small notebook in my kitchen where I jot down which combinations worked and which didn’t. Last month I tried mixing matcha powder into mousse. Spoiler: it needs way less powder than I used. The notebook reminds me to adjust next time.
Don’t be afraid of small failures either. Sometimes an experiment doesn’t turn out perfectly. That’s fine. You’re still learning, and even imperfect mousse usually tastes good enough to eat. The worst batch I ever made still disappeared within two days.
If you’re looking for more inspiration, checking out other cheesecake recipes can spark ideas that translate well to mousse format. Sometimes a baked cheesecake flavor profile works even better as a light, airy mousse.
The beauty of cheesecake mousse is that it grows with you. Beginners can make simple versions successfully. Experienced cooks can push creative boundaries. Everyone ends up with something delicious. That’s pretty rare in the dessert world, and it’s exactly why I keep coming back to this recipe again and again.
So grab your cream cheese and whipping cream. Start with whatever flavor sounds good to you right now. Make it once, adjust what you’d change, then make it again. Before long, you’ll have your own signature version that friends specifically request. That’s when you know you’ve truly mastered cheesecake mousse.
Final Thoughts
Making cheesecake mousse has genuinely changed how I think about dessert. It’s taught me that impressive doesn’t have to mean complicated, and that the best recipes are often the most flexible. Start simple, taste as you go, and don’t stress about perfection. Your mousse will turn out great, and you’ll enjoy making it as much as eating it.
Frequently Asked Questions About Cheesecake Mousse
What makes cheesecake mousse different?
Cheesecake mousse differs from traditional cheesecake primarily in texture and preparation. Regular cheesecake is dense, baked, and heavy, while mousse is light, airy, and requires no baking. The mousse version incorporates whipped cream that gets folded into sweetened cream cheese, creating a fluffy consistency that melts quickly on your tongue. You get the same tangy cream cheese flavor without the heaviness, making it perfect after large meals when regular cheesecake would feel too rich.
What ingredients are in cheesecake mousse?
The basic cheesecake mousse requires just four ingredients: cream cheese, heavy whipping cream, sugar, and vanilla extract. Some recipes add unflavored gelatin for extra stability, especially if you’re piping the mousse or creating layered desserts. For keto versions, you simply swap regular sugar for low-carb sweeteners like erythritol or monk fruit. The simplicity of the ingredient list makes this dessert accessible for beginners while still producing impressive results.
Can diabetics eat mousse?
Yes, diabetics can enjoy cheesecake mousse with some modifications. Replace regular sugar with sugar-free sweeteners that don’t spike blood sugar levels. Many diabetics successfully use erythritol, stevia, or monk fruit sweetener. You might also consider using reduced-fat cream cheese or mixing in Greek yogurt to lower the fat content, depending on your specific dietary needs. Topping with fresh berries instead of sugary sauces adds natural sweetness plus fiber, making the dessert more diabetes-friendly.
What are the ingredients in 3 ingredient cheesecake?
The ultra-simple 3 ingredient cheesecake contains only cream cheese, sweetener of your choice, and whipped cream. You combine softened cream cheese with your preferred sweetener, then gently fold in whipped heavy cream until everything is smooth and fluffy. While vanilla extract makes a nice addition, it’s technically optional. This minimalist version takes about ten minutes to prepare and delivers plenty of classic cheesecake flavor with almost no effort required.
How long does cheesecake mousse last in the refrigerator?
Cheesecake mousse stays fresh in the refrigerator for about three to four days when stored properly. Cover it tightly with plastic wrap or store in airtight containers to prevent it from absorbing other food odors. The mousse might lose a bit of its fluffy texture after a couple days as the whipped cream settles, but the flavor remains good. If you’ve added fresh fruit, consume it within two days since fruit releases moisture that can make the texture watery.
Can I freeze cheesecake mousse?
Freezing cheesecake mousse is possible but not ideal. The whipped cream tends to separate and become grainy when thawed, changing the texture significantly. If you must freeze it, store in airtight containers for up to one month. Thaw slowly in the refrigerator overnight rather than at room temperature. After thawing, you might need to gently stir the mousse to reincorporate any separated liquid. The flavor survives freezing better than the texture does.
Do I need to use gelatin in cheesecake mousse?
Gelatin is optional in most cheesecake mousse recipes. Basic mousse holds together fine without it, especially if you’re eating it from a bowl or glass. However, gelatin helps if you want firmer mousse for piping decoratively, creating stable layers, or making shapes. Use about one teaspoon of unflavored powdered gelatin per cup of cream cheese. Too much gelatin creates rubbery texture, while the right amount simply adds structure without changing flavor.
What’s the best way to soften cream cheese quickly?
The best method is planning ahead and leaving cream cheese at room temperature for about an hour. If you forgot, cut it into small cubes which soften much faster than a whole block. As a last resort, microwave the unwrapped cream cheese in ten-second intervals, checking after each one. Be very careful with microwaving because cream cheese can quickly go from cold to melted, and melted cream cheese won’t give you the right mousse texture.
Why did my cheesecake mousse turn out runny?
Runny cheesecake mousse usually happens when the whipped cream wasn’t beaten to stiff peaks before folding, or when ingredients were added while too warm. Make sure your heavy cream is cold and whipped until it holds firm peaks. If you’re adding melted chocolate or dissolved gelatin, let them cool to room temperature first. Also, don’t overmix when folding ingredients together, as this deflates the whipped cream and creates a thinner consistency.
Can I make cheesecake mousse dairy-free?
Making dairy-free cheesecake mousse is possible using vegan cream cheese and coconut cream. Refrigerate a can of full-fat coconut milk overnight, then scoop out the solid cream that separates to the top. Whip this coconut cream just like regular whipping cream, then fold it into softened vegan cream cheese with your sweetener. The texture won’t be identical to traditional mousse, but it comes surprisingly close and tastes delicious with the right vegan cream cheese brand.
Equipment
- Mixing bowl
- Whisk
- Spatula
- Electric mixer
- Serving glasses
Ingredients
- 8 oz cream cheese, softened
- 1 cup heavy whipping cream
- 1/3 to 1 cup powdered sugar to taste
- 1-2 tsp vanilla extract
- 1 tsp unflavored gelatin optional, for added stability
Instructions
- In a mixing bowl, beat the softened cream cheese until smooth.
- In a separate bowl, whip the heavy cream until stiff peaks form.
- Gradually add powdered sugar to the cream cheese, mixing until well combined.
- Gently fold in the whipped cream into the cream cheese mixture until no streaks remain.
- If using, dissolve gelatin in cold water, then heat a small amount of liquid and mix it in before folding into the mousse.
- Spoon the mousse into serving glasses or bowls.
- Chill the mousse in the refrigerator for at least 2 hours before serving.
Notes
Nutrition

Hello! I’m Sarah Mitchell, and I’m passionate about bringing creativity and innovation to baking. My love for baking started in high school when I first tried my hand at decorating cupcakes for a class project. What began as a fun hobby quickly became a full-time passion. I’ve spent the past decade working in bakeries and dessert shops, honing my skills in everything from simple cookies to intricate wedding cakes.
After working in some of the top bakeries across the country, I realized that baking was about more than just following recipes — it was about infusing your personality into each creation. At BakingSecret.com, I love creating recipes that push boundaries while staying true to the heart of classic baking. I specialize in creating delicious and visually stunning pastries that will wow your guests.
When I’m not baking, I enjoy teaching baking classes, trying out new cake decoration techniques, and traveling to find inspiration in global dessert traditions. I’m so excited to share my tips and tricks with you to help elevate your baking game!