
Why I Fell in Love with This Cheesecake Pie Recipe
Last summer, I showed up to a family barbecue empty-handed and embarrassed. My elaborate dessert plan had failed miserably that morning. My aunt noticed my distress and pulled me aside. “I’ll teach you my secret,” she whispered. What she showed me changed everything I knew about desserts. Her cheesecake pie recipe was so simple that I actually laughed out loud. No fancy equipment. No complicated steps. Just pure creamy heaven that everyone devoured in minutes.
That day sparked my obsession with perfecting this dessert. I’ve made it dozens of times since then. I’ve served it at birthday parties, potlucks, and quiet Sunday dinners. Every single time, people ask for the recipe. Some even refuse to believe I made it myself because it tastes like something from a high-end bakery.
Here’s what makes this dessert so special. It takes the rich, velvety texture of traditional cheesecake and pairs it with a buttery pie crust. You get two beloved desserts in one. The crust adds a satisfying crunch that regular cheesecake lacks. The filling stays smooth and creamy without being too heavy. It’s the best of both worlds.
The beauty of this easy baked cheesecake recipe is that it doesn’t require a springform pan or water bath. Those techniques intimidate many home bakers. With my method, you simply mix, pour, and bake. No stress. No fancy tools. Just straightforward baking that produces professional results.
I’ve tried countless variations over the months. Some were hits. Others ended up in the trash. Through trial and error, I discovered what works and what doesn’t. The recipe I’m sharing today is the winner. It’s foolproof enough for beginners but impressive enough for experienced bakers.
One of my favorite things about this dessert is how adaptable it is. You can keep it simple with the original cheesecake recipe base. Or you can jazz it up with toppings and mix-ins. I’ve made versions with chocolate chips, lemon zest, and caramel drizzle. My personal favorite is the strawberry cheesecake pie recipe variation. Fresh strawberries add a bright pop of flavor that cuts through the richness perfectly.
This recipe also works brilliantly for different occasions. Need something elegant for a dinner party? Top it with fresh berries and a dusting of powdered sugar. Want a casual family dessert? Serve it plain with a dollop of whipped cream. Planning a holiday feast? Make it a day ahead to save time and reduce stress.
What You’ll Need for Your Cheesecake Pie Recipe
Let me walk you through everything you’ll need. I always gather my ingredients first. This simple step prevents those frustrating moments when you’re halfway through baking and realize you’re missing something crucial.
The star ingredient is Philadelphia cream cheese. I’ve tested this recipe with different brands, and Philadelphia consistently gives the best results. It blends smoother and tastes richer than store brands. You’ll need 16 ounces, which is two standard blocks. Make sure it’s at room temperature. Cold cream cheese creates lumps that are nearly impossible to smooth out.
Next up is sour cream. This ingredient is what sets my cheesecake pie recipe with sour cream apart from others. It adds tanginess and prevents the filling from being too sweet. The sour cream also creates an incredibly silky texture. You’ll need half a cup. Again, room temperature works best for smooth mixing.
For the crust, you have options. A pre-made graham cracker crust from the store saves time. I use this shortcut often, and nobody can tell the difference. You can also use a regular pie crust for a more traditional approach. Some people prefer the old fashioned cheesecake pie style with a flaky pastry base. Both work beautifully, so choose based on your preference and time.
Here’s a complete list of what you’ll need:
- 16 ounces Philadelphia cream cheese (softened)
- 1/2 cup sour cream (room temperature)
- 2/3 cup granulated sugar
- 2 large eggs (room temperature)
- 1 teaspoon vanilla extract
- 1 prepared pie crust (9-inch)
That’s it for the basic version. Simple, right? These six ingredients create magic together.
If you want to try the strawberry cheesecake pie recipe, add these items to your list:
- 2 cups fresh strawberries (sliced)
- 2 tablespoons sugar
- 1 tablespoon lemon juice
The strawberry topping takes just five minutes to prepare. You’ll macerate the berries with sugar and lemon juice while the pie bakes. The result is a gorgeous, glossy topping that tastes like summer.
Now let’s talk about those essential ingredients. The eggs act as a binder and give structure to the filling. They’re what transforms liquid Philadelphia cream cheese pie filling into a firm, sliceable dessert. Don’t skip them or try to reduce the number.
Sugar does more than sweeten. It affects texture too. The amount I’ve specified creates a filling that’s sweet but not cloying. It balances the tanginess from the cream cheese and sour cream perfectly.
Vanilla extract is small but mighty. It rounds out all the other flavors and adds depth. Pure vanilla extract works best, though imitation vanilla will do in a pinch.
I mentioned bringing ingredients to room temperature multiple times. This step is critical. Cold ingredients don’t blend well. You’ll end up with a lumpy filling full of cream cheese chunks. Room temperature ingredients combine into a smooth, silky mixture in seconds.
Here’s my pro tip: Take your cream cheese, sour cream, and eggs out of the fridge an hour before you start baking. Set them on the counter and forget about them. When you’re ready to bake, they’ll be perfect.
If you forgot and need cream cheese softened quickly, I have a trick. Cut it into small cubes and spread them on a plate. They’ll soften in about 15 minutes. Don’t microwave it. That creates uneven soft spots and can partially melt the cheese.
For those interested in a no bake cheesecake pie recipe, you can adapt this with a few changes. Swap regular cream cheese for whipped cream cheese. Add stabilized whipped cream. Skip the eggs entirely. The filling sets up in the refrigerator instead of the oven. I’ll touch on that variation later in this guide.
Maybe you’re cooking for one or two people. The full recipe feels like too much. Try my small cheesecake recipe adaptation. Use a 6-inch pie pan and cut all ingredients in half. The baking time reduces to about 25 minutes. You get all the deliciousness in a compact size.
Before we move on to mixing and baking, double-check your pantry. Make sure everything is there and ready. Trust me, this small step saves so much frustration later. There’s nothing worse than cracking your last egg only to realize you actually needed one more.

Preparing the Perfect Cheesecake Pie Filling
Once you’ve got all your ingredients lined up on the counter, the real fun begins. Mixing the filling is honestly my favorite part because it’s so satisfying to watch simple ingredients transform into something luxurious.
First things first, grab your mixing bowl. I prefer using a stand mixer for this, but a hand mixer works just fine too. Some people even do it by hand with a whisk, though that requires some serious arm strength. Drop those two blocks of softened Philadelphia cream cheese into the bowl. Beat them on medium speed for about two minutes until they’re completely smooth and fluffy. You want zero lumps here. Seriously, none. This is the foundation of your Philadelphia cream cheese pie filling, and lumps will haunt you later.
Add the sugar next. I always pour it in gradually while the mixer runs. This helps it incorporate evenly. Beat for another minute until everything looks light and creamy. The mixture should be noticeably paler than when you started. That’s air getting whipped in, which creates a lighter texture.
Now comes the sour cream. Scrape down the sides of your bowl first with a spatula. There’s always cream cheese hiding up there. Pour in that half cup of sour cream and mix on low speed until just combined. The cheesecake pie recipe with sour cream technique is what makes this version so much better than others I’ve tried. The tanginess balances everything beautifully.
Here’s where people sometimes mess up. Add the eggs one at a time. Crack the first egg into the bowl and mix on low speed until it’s barely incorporated. Then add the second egg. Mix just until you can’t see any yellow streaks. Stop there. Overmixing eggs causes cracks in your finished pie. Nobody wants that. The filling should look silky and smooth but not overly airy.
Splash in that teaspoon of vanilla extract and give it one final brief mix. Maybe ten seconds. That’s all you need.
By the way, if you notice any small lumps at this point, don’t panic. Strain the filling through a fine-mesh sieve into another bowl. Push it through with a spatula. This extra step takes maybe three minutes but guarantees a perfectly smooth filling.
Pour your gorgeous filling into whichever crust you chose. I usually tap the pie pan gently on the counter a few times. This releases any air bubbles trapped in the filling. Those bubbles can create weird pockets or contribute to cracking.
For those of you curious about a no bake cheesecake pie recipe, let me share a quick adaptation. Skip adding the eggs entirely. Instead, fold in one cup of heavy cream that you’ve whipped to stiff peaks. Add a tablespoon of powdered gelatin that’s been bloomed in cold water and melted. Mix everything gently until combined. Pour into your crust and refrigerate for at least six hours. The texture is lighter and airier than the baked version. Different, but equally delicious in its own way.
Speaking of variations, I once made a Baileys cheesecake using this same base recipe. I replaced the vanilla extract with Baileys Irish Cream and added a bit to the filling too. Absolutely incredible for adult gatherings. The Irish cream adds this sophisticated warmth that pairs wonderfully with the creamy filling.
Want to try something really special? Check out my baklava cheesecake for a totally different take on this dessert. It combines Middle Eastern flavors with creamy cheesecake in ways that’ll blow your mind.
Now, about that old fashioned cheesecake pie style I mentioned earlier. My grandmother made hers with a pastry crust instead of graham crackers. She’d also add a tablespoon of flour to the filling for extra stability. The flour prevents the filling from being too soft. Some people swear by this method. It creates a firmer slice that holds its shape beautifully when served. If you’re going for that nostalgic feel, blind bake your pastry crust for ten minutes before adding the filling. This prevents it from getting soggy.
Funny enough, my neighbor once asked me about making a three-ingredient cheesecake. She’d seen it somewhere online and wondered if it was legit. Honestly? Yes, they exist. The most basic version uses just cream cheese, sugar, and eggs. But I find that version a bit one-dimensional. Adding sour cream and vanilla doesn’t complicate things much, and the flavor improvement is massive. Those two extra ingredients are worth it.
Baking and Serving Your Cheesecake Pie
Preheat your oven to 325°F. This temperature is crucial. Too hot and your filling will puff up and crack. Too cool and it won’t set properly. I learned this the hard way after several failed attempts in my early days.
Place your filled pie on a baking sheet before sliding it into the oven. This catches any drips and makes the pie easier to handle. Bake for 35-40 minutes. You’re looking for specific signs of doneness. The edges should be set and slightly puffed. The center should still jiggle when you gently shake the pan. Think of how jello moves. That’s the consistency you want in the middle.
Here’s the thing that trips people up. The center will look underdone. You might worry it’s not ready. Trust me, it is. The residual heat continues cooking the pie after you remove it from the oven. If you bake until the center is completely firm, you’ll end up with an overbaked, rubbery pie.
Turn off the oven and crack the door open about four inches. Leave your pie inside for another hour. This gradual cooling prevents cracks from forming. The temperature change from hot oven to cool kitchen is too drastic otherwise. Your filling needs to adjust slowly.
After that hour, remove the pie and let it cool completely on a wire rack. This takes another hour or so. Once it reaches room temperature, cover it loosely with plastic wrap and refrigerate for at least four hours. Overnight is even better. This chilling time allows the filling to firm up properly. Skipping this step means you’ll have a soupy pie that won’t slice cleanly.
For a small cheesecake recipe using a six-inch pan, reduce your baking time to 25-28 minutes. The smaller size cooks faster. Everything else stays the same. I make these mini versions when it’s just my husband and me at home. A full nine-inch pie feels like too much sometimes.
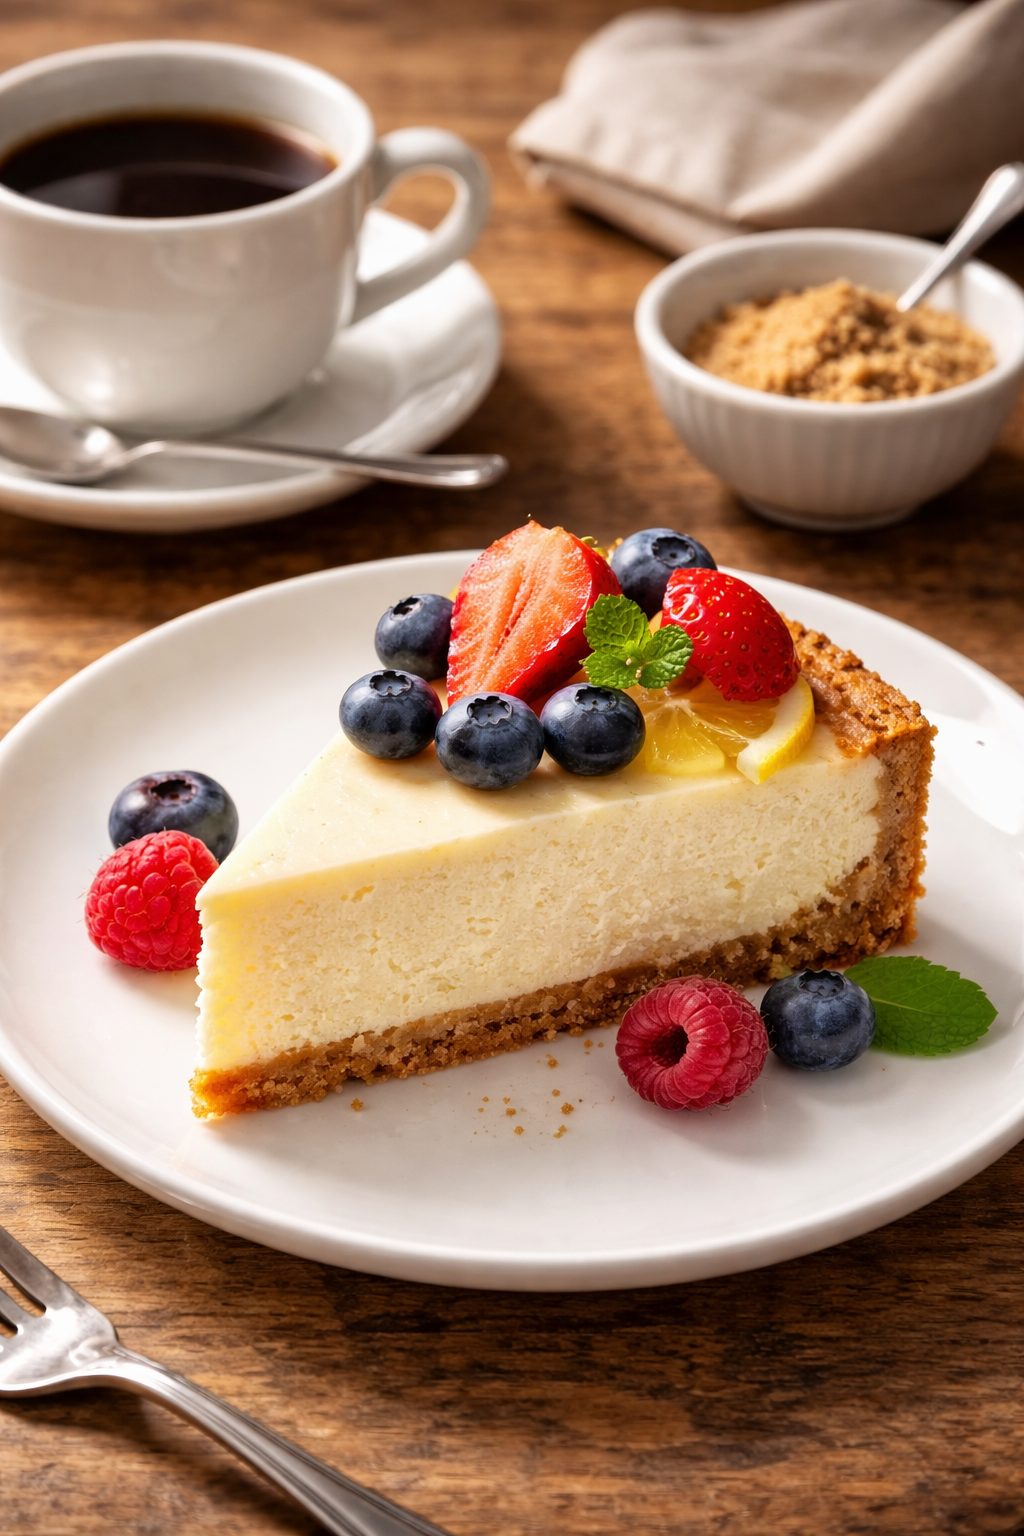
Now let’s talk about serving this beauty. If you made the strawberry version, prepare your topping while the pie chills. Toss those sliced strawberries with sugar and lemon juice. Let them sit for at least thirty minutes. They’ll release their juices and create this gorgeous syrup. Spoon the berries over individual slices when serving. The bright red color against the pale filling looks stunning.
For a fancier presentation, consider making it look like a birthday cheesecake with some creative decorating. Fresh flowers, colorful sprinkles, or elegant chocolate shavings all work beautifully.
Here’s my favorite way to serve this. Let the pie sit at room temperature for about twenty minutes before slicing. Cold cheesecake is harder to cut cleanly. Fill a tall glass with hot water and keep it nearby. Dip your knife in the hot water, wipe it clean, and make your cut. Dip and wipe between each slice. This creates those perfect, clean slices you see in bakeries.
Garnish options are endless. A dollop of whipped cream is classic. Fresh berries add color and freshness. A drizzle of chocolate sauce satisfies chocolate lovers. Caramel sauce creates a sweet, buttery complement. Crushed cookies on top add texture. I’ve even served it with a side of cheesecake mousse for an over-the-top dessert experience.
This pie keeps beautifully in the refrigerator for up to five days. Cover it tightly with plastic wrap or store it in an airtight container. The flavor actually improves after a day or two as everything melds together.
One last tip about serving. If you’re taking this to a gathering, transport it in its pan covered with foil. Don’t slice it beforehand. The slices won’t survive the trip well. Bring your knife and serving spatula with you. Slice it fresh when you arrive. People love watching you cut into a beautiful whole pie anyway.
Someone once asked me if cheesecake is okay for heart patients. Honestly, it’s not the healthiest dessert with all that cream cheese. But enjoyed occasionally as a treat? Most doctors would say a small slice is fine. Everything in moderation, right? You could make lighter versions with reduced-fat cream cheese, though I personally think the taste suffers too much.
Is cream cheese pie the same as cheesecake? Great question. They’re cousins, really. Traditional cheesecake is deeper and denser, usually baked in a springform pan. Cream cheese pie is shallower and often has a different texture. But the line between them is pretty blurry these days.
Variations and Tips for Your Cheesecake Pie
Let me tell you about the time I discovered sour cream topping. I was at a diner in upstate New York, and they served their cheesecake with this glossy white layer on top. I asked the waitress what it was, and she smiled like she was sharing classified information. Sour cream topping. Mind blown. It’s ridiculously simple but elevates your cheesecake pie recipe to restaurant quality.
Here’s how you make it. Mix one cup of sour cream with three tablespoons of sugar and half a teaspoon of vanilla. That’s literally it. After your pie has baked for those 35-40 minutes, pull it out and spread this mixture gently over the top. Return it to the oven for just ten more minutes. The topping sets into this beautiful, slightly tangy layer that contrasts perfectly with the sweet filling below. It also helps hide any cracks if they happened. Win-win.
Another variation I absolutely love involves swapping out the crust entirely. I’ve tried this with crushed Oreos instead of graham crackers. Mix about two cups of Oreo crumbs with four tablespoons of melted butter. Press it into your pie pan and freeze it for fifteen minutes before adding your filling. The chocolate adds this unexpected depth that chocolate lovers go crazy for. My coworker Jamie refuses to eat any other version now.
Speaking of crusts, let me share something about cheesecake with pie crust that changed my perspective. I was skeptical at first about using shortbread cookies as a base. Seemed too fancy. But during the holidays last year, I had leftover butter cookies and thought, why not? I crushed them up, added melted butter, and created this incredible buttery foundation. The richness paired beautifully with the tangy filling. Now I rotate between graham crackers, shortbread, and Oreos depending on my mood.
Want to try something really different? Pretzel crust. I know it sounds weird. Hear me out though. Crush about two cups of pretzels and mix with a quarter cup of brown sugar and six tablespoons of melted butter. The salty-sweet combination is addictive. This works especially well with the strawberry cheesecake pie recipe variation because the salt balances the sweetness of both the filling and the berries.
By the way, I should mention something important about digestion. Rich desserts like cheesecake can sometimes feel heavy. Your body produces digestive enzymes to break down fats and proteins, but dairy-heavy foods can occasionally overwhelm your system. I’m not saying don’t eat cheesecake. Just maybe don’t have two giant slices right before bed. Trust me on this one.
Let’s talk about flavor variations beyond fruit. Chocolate chip cheesecake pie is a huge hit in my house. Fold half a cup of mini chocolate chips into your filling right before pouring it into the crust. They sink slightly during baking and create these pockets of melted chocolate throughout. You could also swirl in some Nutella or peanut butter. Use about a third of a cup, drop spoonfuls onto the filling, and swirl with a knife before baking.
Lemon lovers, this one’s for you. Add two tablespoons of fresh lemon juice and a tablespoon of lemon zest to your philadelphia cream cheese pie filling. The brightness cuts through the richness beautifully. Top it with blueberries instead of strawberries for a summery twist. I made this version for my mom’s birthday in June, and she claimed it was the best dessert she’d ever had. Coming from a woman who’s been baking for forty years, that meant something.
Here’s a tip that’ll save you from disaster. Always use a pie shield or aluminum foil around the edges of your crust. Without protection, the crust edges brown way too fast while the filling sets. I learned this the hard way after serving a pie with burnt edges to my in-laws. Not my finest moment. Now I cover the edges for the first twenty-five minutes, then remove the shield for the final ten to fifteen minutes.
Temperature matters more than people realize. Room temperature ingredients blend smoothly, but there’s another temperature trick I use. Let your baked and chilled pie sit out for exactly thirty minutes before serving. Not twenty, not forty. Thirty. At this temperature, the filling has the perfect creamy texture. Too cold and it’s almost hard. Too warm and it loses structure. Thirty minutes is the sweet spot.
Something interesting about the old fashioned cheesecake pie style that I discovered through research. Traditional versions often included a layer of jam between the crust and filling. Raspberry or apricot preserves were common. Spread about a quarter cup of warmed preserves over your crust before adding the filling. It creates this hidden layer of fruit that surprises people with every bite. Nobody expects it, and everyone loves it.
For those interested in presentation, consider using a tart pan with a removable bottom instead of a regular pie pan. The fluted edges look professional, and removing the outer ring lets you serve the pie on a flat plate or cake stand. Makes for gorgeous photos too, if you’re into that sort of thing. I definitely am.
Let me address mix-ins more thoroughly. Crushed pineapple works surprisingly well. Drain it thoroughly first, then fold a half cup into your filling. Gives it a tropical vibe that’s perfect for summer parties. Caramel bits are another favorite. Those little wrapped caramels, unwrapped and chopped, distributed throughout the filling. They get all melty and create ribbons of caramel flavor.
Coffee lovers shouldn’t feel left out either. Dissolve two tablespoons of instant espresso powder into your vanilla extract before adding it to the filling. Or make it mocha by combining the coffee with those mini chocolate chips I mentioned earlier. This version pairs wonderfully with an Oreo crust.
Storage deserves more attention than it usually gets. Never store your pie uncovered. The filling absorbs refrigerator odors like a sponge. I once made the mistake of storing mine next to leftover curry. Yeah, don’t do that. Wrap it tightly in plastic wrap, making sure the wrap touches the surface to prevent a skin from forming. Or use an airtight container if you have one large enough.
Can you freeze cheesecake pie? Absolutely. Wrap individual slices in plastic wrap, then again in aluminum foil. They’ll keep for up to two months. Thaw them overnight in the refrigerator. The texture stays remarkably good. I actually prefer keeping a few slices frozen for those emergency dessert moments. You know what I’m talking about. Those days when only cheesecake will fix what’s wrong.
Here’s something nobody talks about. The pan matters. Dark pans absorb more heat and can overbake your crust. Shiny metal or glass pans work best. They distribute heat evenly and prevent burning. If you only have a dark pan, reduce your oven temperature by 25 degrees.
Funny enough, my sister once asked if she could make this in a muffin tin to create individual servings. I hadn’t tried it but told her to go for it. She lined a muffin tin with cupcake liners, pressed graham cracker crust into the bottoms, and divided the filling among them. Baked for about eighteen minutes. They turned out adorable and perfect for portion control. Great idea for parties where people are mingling and need handheld desserts.
Regarding the differences between cream cheese pie and traditional cheesecake, it really comes down to technique and depth. Traditional cheesecake uses a springform pan, stands tall, and usually involves a water bath to prevent cracking. It’s denser and richer. Cream cheese pie is shallower, baked in a standard pie pan, and slightly lighter in texture. Both are delicious. Neither is better. They’re just different approaches to the same basic concept. Think of them as cousins rather than twins.
If you’re looking for more inspiration or want to explore other variations, I’ve collected tons of ideas in my cheesecake recipe collection that might spark your creativity.
One final tip about avoiding cracks beyond the gradual cooling method. Don’t open your oven door during baking. I know it’s tempting to check on things. Resist that urge. The temperature drop from opening the door causes the filling to contract suddenly, which creates cracks. Set a timer and trust the process.
The beauty of this easy baked cheesecake recipe is its flexibility. You can dress it up or keep it simple. Make it ahead or bake it fresh. Serve it plain or loaded with toppings. Every version works. That’s what makes it such a reliable recipe to have in your collection.
Now you’ve got everything you need to create your own perfect version. Pick your favorite crust, choose your mix-ins, decide on your toppings. Make it yours. That’s what cooking should be about anyway. Taking a foundation and building something that reflects your taste and creativity.
Conclusion
I hope this guide helps you create a cheesecake pie that becomes your go-to dessert, just like it did for me. Don’t stress about perfection on your first try. Even if it cracks or doesn’t look bakery-perfect, it’ll still taste incredible. The real magic happens when you share it with people you care about and watch their faces light up with that first bite.
Frequently Asked Questions
What are the ingredients in 3 ingredient cheesecake?
The most basic three-ingredient cheesecake uses just cream cheese, sugar, and eggs. You typically need 16 ounces of softened cream cheese, half a cup of sugar, and two eggs. Mix everything together and bake in a prepared crust. While this version is incredibly simple, I find it lacks the depth and tanginess that sour cream and vanilla extract provide. It’s a decent emergency recipe, but adding those two extra ingredients makes such a difference that I always recommend going for the five-ingredient version instead.
Is there a cheesecake pie?
Yes, cheesecake pie absolutely exists and it’s what this entire recipe is about. It combines the creamy filling of cheesecake with the convenience of a pie pan and crust. Instead of using a springform pan and water bath like traditional cheesecake, you simply pour the filling into a pie crust and bake it. The result is shallower than traditional cheesecake but equally delicious. It’s become incredibly popular because it’s less intimidating for home bakers while still delivering that rich, creamy texture everyone loves. Many bakeries and diners serve this style because it’s easier to slice and serve than tall cheesecakes.
Is cheesecake good for heart patients?
Cheesecake isn’t typically recommended as a regular part of a heart-healthy diet due to its high content of saturated fat and cholesterol from cream cheese, eggs, and butter. However, occasional small portions as part of a balanced diet are usually fine for most people. If you’re managing heart health, consider making modifications like using reduced-fat cream cheese or smaller portion sizes. Always consult with your doctor about specific dietary restrictions. Enjoying desserts in moderation as occasional treats rather than daily indulgences is generally the approach most health professionals recommend. Life needs some sweetness, just not at every meal.
Is cream cheese pie the same as cheesecake?
They’re very similar but not identical. Traditional cheesecake is typically baked in a deep springform pan, often with a water bath, resulting in a tall, dense dessert. Cream cheese pie uses a standard pie pan, is shallower, and generally has a slightly lighter texture. The ingredients are nearly the same, but the baking method differs. Think of cream cheese pie as cheesecake’s more casual cousin. Both are delicious, and honestly, the distinction has blurred over the years. Most people use the terms interchangeably now. The important thing is that both deliver that creamy, tangy flavor we all crave.
Can I make cheesecake pie without sour cream?
Yes, you can substitute Greek yogurt for sour cream in equal amounts. The texture stays creamy and you still get that tangy flavor. Heavy cream also works, though it creates a slightly sweeter, less tangy result. Some people use cream cheese exclusively and increase it by a quarter cup to replace the sour cream. Each substitution changes the flavor profile slightly. I’ve tried all these variations, and while they work, I really think sour cream produces the best balance of richness and tanginess. But if you don’t have it on hand or have dietary restrictions, these alternatives will still give you a delicious pie.
How do I prevent my cheesecake pie from cracking?
The key is gentle, gradual temperature changes. Don’t overbake the filling; it should still jiggle slightly in the center when you remove it. Turn off the oven and leave the door cracked open, letting the pie cool inside for an hour. This prevents the sudden temperature drop that causes cracking. Also, make sure all your ingredients are at room temperature before mixing, and don’t overmix once you add the eggs. If cracks still appear, don’t worry. A sour cream topping or fresh fruit completely hides them. Some of my most cracked pies have been the most delicious ones.
How long does cheesecake pie last in the refrigerator?
Properly stored cheesecake pie stays fresh for five to seven days in the refrigerator. Cover it tightly with plastic wrap or store it in an airtight container to prevent it from absorbing other food odors. The flavor actually improves after the first day as everything melds together. I’ve found that day two or three is when it tastes absolutely best. Make sure to keep it refrigerated at all times since the dairy content makes it perishable. If you notice any off smells or mold, throw it out. But honestly, in my house, it never lasts more than three days anyway.
Can I use a store-bought crust for cheesecake pie?
Absolutely, and I do it all the time. Store-bought graham cracker crusts are convenient and taste great. Nobody will know you didn’t make it from scratch. You can also buy refrigerated pie dough and press it into your pan if you prefer a pastry crust. The filling is what really matters here. Homemade crusts are lovely if you have time, but don’t let crust-making stop you from enjoying this recipe. I’ve served this dessert dozens of times with store-bought crusts, and I’ve never received anything but compliments. Save your energy for perfecting that smooth, creamy filling.
Do I need a springform pan for cheesecake pie?
No, that’s one of the best things about this recipe. You use a regular nine-inch pie pan, which most people already have in their kitchen. Springform pans are great for traditional tall cheesecakes, but they’re not necessary here. The pie pan makes this recipe much more accessible and less intimidating. You also don’t need a water bath, which eliminates another complicated step. Just pour your filling into the crust in a regular pie pan and bake. When it’s time to serve, you slice it just like any other pie. Simple and straightforward.
Can I add fresh fruit directly to the cheesecake filling before baking?
I’d caution against adding most fresh fruits directly into the filling before baking. Fruits like strawberries and blueberries release a lot of moisture during baking, which can make your filling watery and prevent it from setting properly. The exception is citrus zest, which works beautifully mixed into the filling. For fruit flavors, I recommend making a topping that you add after the pie is baked and chilled. You can also use fruit preserves as a layer between the crust and filling. Another option is using freeze-dried fruit powder mixed into the filling, which adds flavor without extra moisture.
Equipment
- Mixing bowl
- Mixer
- Spatula
- 9-inch pie pan
- Baking sheet
Ingredients
- 16 oz Philadelphia cream cheese softened
- 0.5 cup sour cream room temperature
- 2/3 cup granulated sugar
- 2 large eggs room temperature
- 1 tsp vanilla extract
- 1 prepared pie crust 9-inch
- 2 cups fresh strawberries sliced
- 2 tbsp sugar
- 1 tbsp lemon juice
Instructions
- Preheat the oven to 325°F.
- In a mixing bowl, beat the softened Philadelphia cream cheese on medium speed until smooth and fluffy (about 2 minutes).
- Gradually add the sugar while mixing until light and creamy (about 1 minute).
- Scrape down the bowl and add sour cream, mixing on low speed until combined.
- Add the eggs one at a time, mixing on low just until incorporated to avoid overmixing.
- Stir in the vanilla extract briefly.
- Pour the filling into the prepared pie crust and tap gently to release air bubbles.
- Bake for 35-40 minutes, until edges are set and the center jiggles slightly.
- Turn off the oven, crack the door open, and leave the pie inside for 1 hour to cool gradually.
- Let the pie cool completely on a wire rack for about an hour.
- Refrigerate for at least 4 hours or overnight before serving.
- For strawberry topping, mix sliced strawberries with sugar and lemon juice; let sit for 30 minutes, then spoon over slices when serving.
Notes
Nutrition

Hello! I’m Sarah Mitchell, and I’m passionate about bringing creativity and innovation to baking. My love for baking started in high school when I first tried my hand at decorating cupcakes for a class project. What began as a fun hobby quickly became a full-time passion. I’ve spent the past decade working in bakeries and dessert shops, honing my skills in everything from simple cookies to intricate wedding cakes.
After working in some of the top bakeries across the country, I realized that baking was about more than just following recipes — it was about infusing your personality into each creation. At BakingSecret.com, I love creating recipes that push boundaries while staying true to the heart of classic baking. I specialize in creating delicious and visually stunning pastries that will wow your guests.
When I’m not baking, I enjoy teaching baking classes, trying out new cake decoration techniques, and traveling to find inspiration in global dessert traditions. I’m so excited to share my tips and tricks with you to help elevate your baking game!