
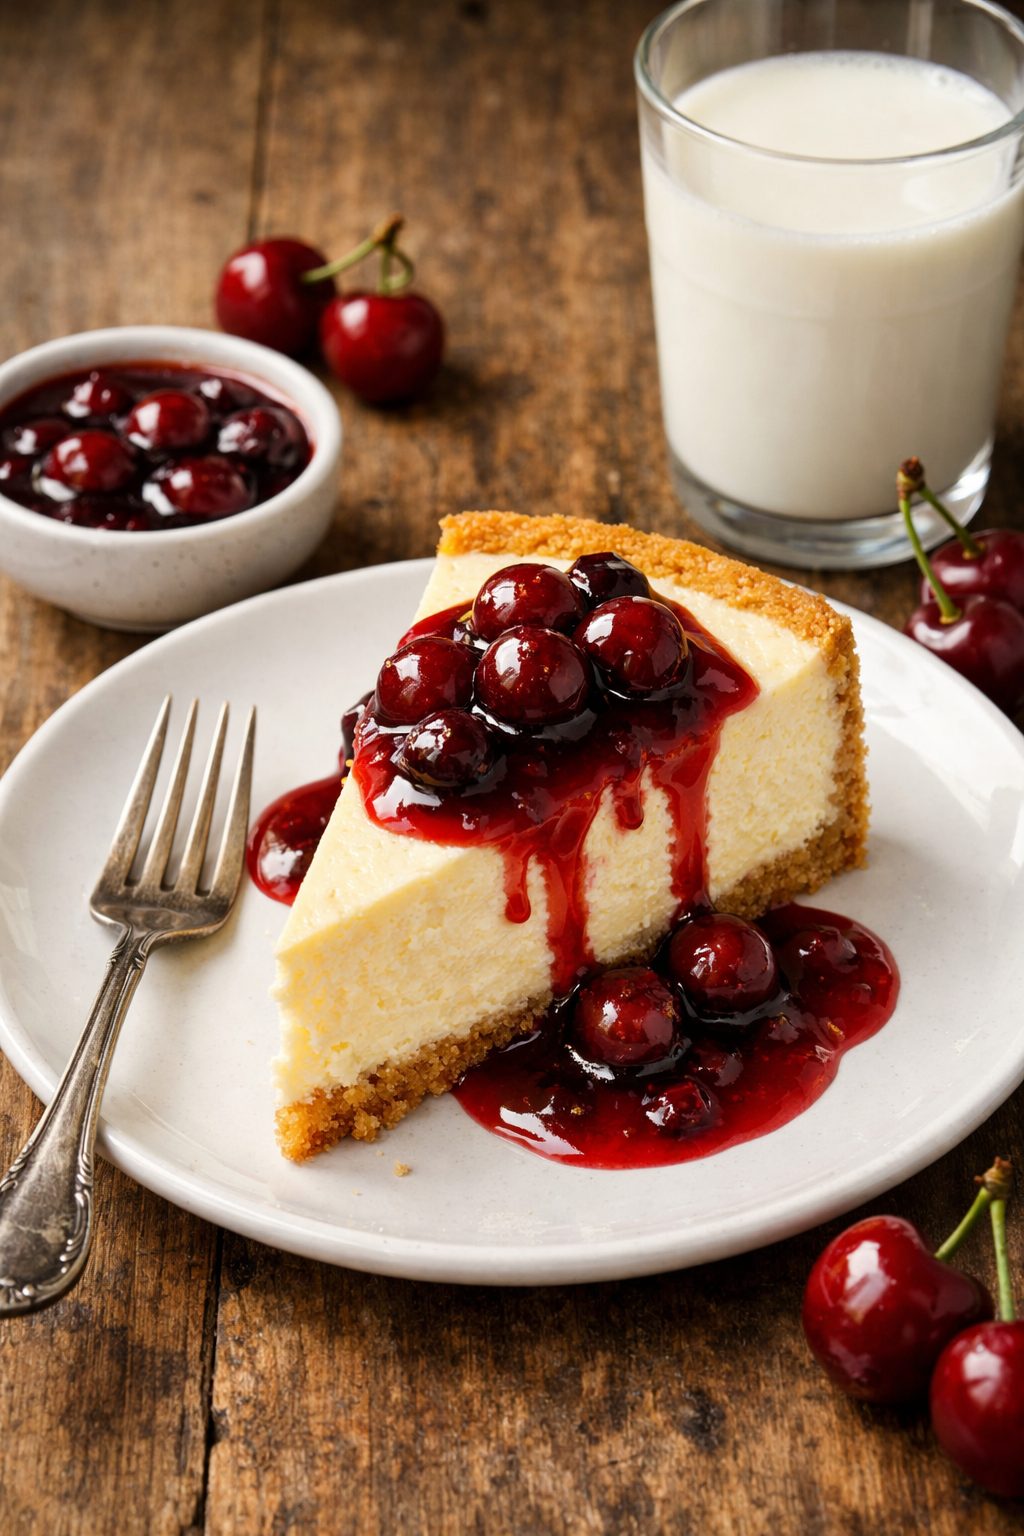
Last summer, I watched my sister take a perfectly good store-bought cheesecake and top it with canned cherry pie filling. The result? A dessert so sweet it made my teeth hurt. That’s when I knew I had to teach her (and now you) how to make a proper cherry sauce for cheesecake. Trust me, once you taste homemade cherry topping, you’ll never go back to the canned stuff.
Welcome to my kitchen, where I’m going to show you how to whip up a cherry sauce that will make your cheesecake shine. This isn’t just any topping. It’s a game-changing sauce that balances sweet and tart in all the right ways. The cherries stay plump and juicy, not mushy like the stuff from a can. And the sauce itself? It’s silky smooth without being goopy.
I’ll share my favorite recipe with you today. You’ll also get some tasty variations and helpful tips along the way. Whether you’re making cheesecake for a holiday dinner or just because it’s Tuesday, this cherry topping for cheesecake will become your secret weapon. People will ask for seconds. They’ll want the recipe. They might even propose marriage (okay, maybe that’s a stretch, but it’s really good).
Let’s explore why this cherry sauce deserves a spot in your recipe collection. By the end of this article, you’ll know exactly how to create the best cherry topping for cheesecake that suits your taste and style.
Why Choose Cherry Sauce for Cheesecake?
Cherries and cheesecake go together like peanut butter and jelly. This pairing has been around forever, and for good reason. The rich, creamy texture of cheesecake needs something bright and fruity to cut through all that heaviness. Cherries do exactly that.
The tartness of cherries balances the sweet, tangy cream cheese filling. Each bite becomes more interesting. You get cream, then fruit, then back to cream again. It’s a flavor dance that keeps your taste buds happy from the first bite to the last.
Store-bought cherry pie filling cheesecake topping might seem convenient, but it often tastes artificial. The texture is usually too thick and gummy. Plus, those bright red cherries swimming in neon syrup? That’s not what real cherries look like. When you make homemade cherry sauce, you control the sweetness level. You decide how thick or thin you want it. You choose fresh or frozen cherries based on what’s available.
A homemade cherry sauce for cheesecake transforms your dessert from ordinary to extraordinary. The flavor is brighter and more natural. The color is deep and rich, not artificial looking. Your guests will notice the difference immediately. I’ve served both versions at different parties, and the homemade sauce always gets better reviews.
Here’s what makes homemade cherry sauce special:
- You can taste the actual fruit, not just sugar and thickeners
- The texture is smoother and more elegant
- You can adjust the sweetness to match your cheesecake
- It looks more professional and appetizing
- You avoid weird preservatives and artificial colors
Now, let’s talk about cherry varieties. Most people reach for sweet cherries, but morello cherry sauce brings something special to the table. Morello cherries are tart and have a deeper, more complex flavor. They’re the traditional choice in European desserts, especially in the UK. If you can find them fresh or frozen, grab them. They make an outstanding cherry sauce recipe uk style that impresses everyone.
Sweet cherries work great too, though. Bing cherries, Rainier cherries, or any fresh variety from your farmers market will do the job. Fresh cherries give you the best flavor during summer months. Frozen cherries are perfect for the rest of the year. I keep bags of frozen cherries in my freezer just for this purpose.
Some recipes use maraschino cherry topping for cheesecake, but I’m not a fan. Those bright red cherries in jars are soaked in sugar and have lost their natural flavor. They’re fine for decorating cocktails, but they don’t bring much to a dessert that already has plenty of sweetness. Real cherries, whether fresh, frozen, or morello, give you actual fruit flavor.
Here’s something many bakers don’t know: you can make a fantastic cherry sauce without cornstarch. Most recipes call for cornstarch or flour as a thickener. These ingredients can make your sauce look cloudy and feel starchy on your tongue. My recipe uses a natural reduction method instead. You cook the cherries with sugar and a bit of lemon juice until the mixture thickens on its own.
A cherry topping for cheesecake without cornstarch has several benefits:
- The flavor is cleaner and more pure
- The sauce looks glossy instead of cloudy
- It doesn’t leave a starchy aftertaste
- The texture is silky smooth
- It’s naturally gluten-free without any modifications
When you cook cherries down into a simply cherry sauce, the fruit releases its natural pectin. This pectin acts as a thickener. You just need patience. Let the sauce simmer and reduce until it reaches the right consistency. It takes a bit longer than the cornstarch method, but the results are worth every extra minute.
The reduction method also concentrates the cherry flavor. You end up with a cherry reduction sauce that tastes intensely of fruit. It’s not watered down or masked by thickeners. This technique is similar to how fancy restaurants make their sauces. In fact, if you’ve ever had a cherry sauce recipe for duck at a high-end restaurant, it was probably made this way.
I learned this technique from my culinary school friend who works in fine dining. She pointed out that professional chefs rarely use cornstarch for fruit sauces. They reduce them naturally. Why should home cooks settle for less? We deserve restaurant-quality results in our own kitchens.
Making cherry sauce at home also costs less than buying jars of topping. A bag of frozen cherries runs about the same price as one jar of prepared filling, but you can make two or three batches from that bag. Plus, you know exactly what’s going into your food. No mystery ingredients or questionable additives.
Another reason to choose homemade cherry sauce? You can customize it. Add a splash of vanilla extract for warmth. Stir in some almond extract for a sophisticated touch. Mix in a bit of orange zest for brightness. The basic recipe is your starting point, but you can make it your own.
How to Make Homemade Cherry Sauce
Now that you understand why homemade beats store-bought every time, let’s get into the actual cooking part. Making cherry sauce for cheesecake is surprisingly simple. If you can stir a pot and measure ingredients, you’re already qualified.
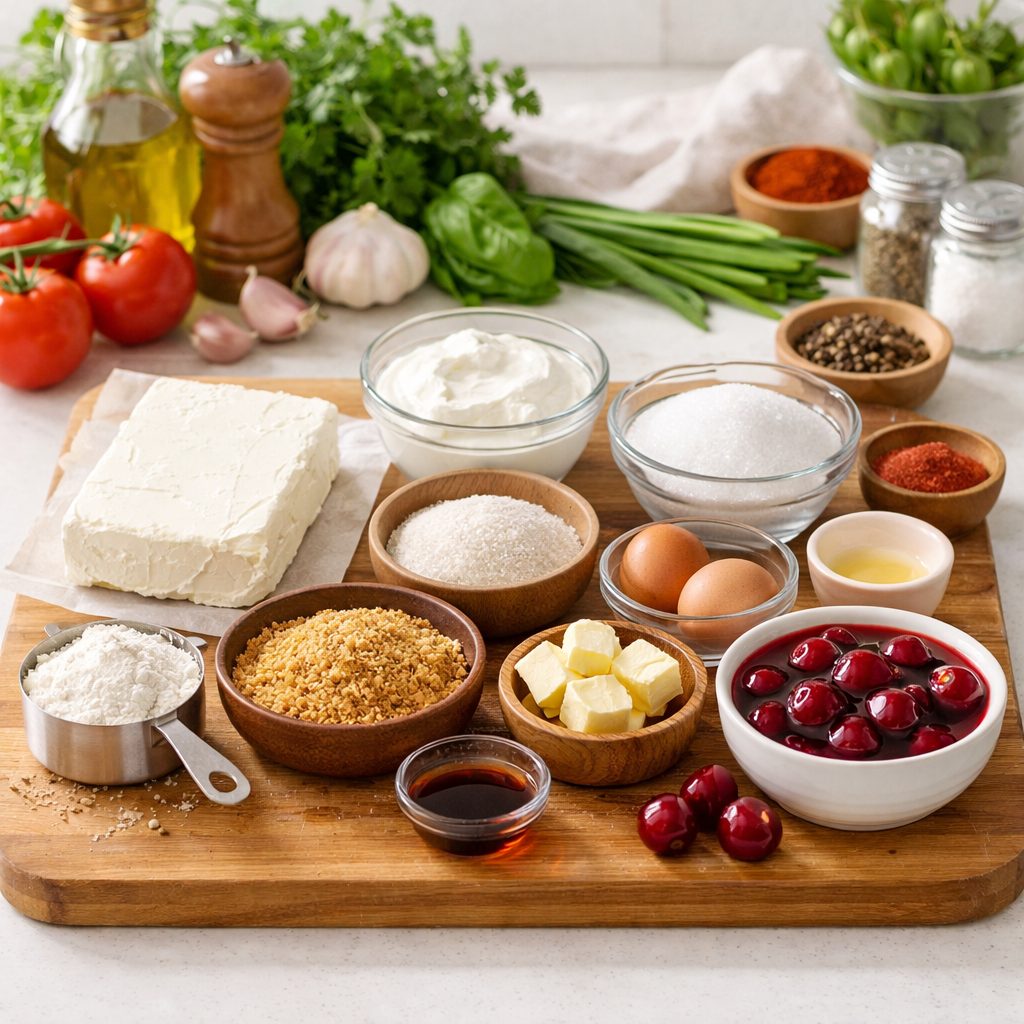
Here’s what you’ll need to gather before you start cooking. First, the ingredients: two cups of fresh or frozen cherries (pitted, obviously), half a cup of granulated sugar, a quarter cup of water, one tablespoon of fresh lemon juice, and a pinch of salt. That’s it. Five ingredients. My grandmother always said the best recipes are the ones you can count on one hand, and she was right about most things.
For tools, you need a medium saucepan, a wooden spoon or spatula for stirring, and something to mash with if you want a chunkier texture. I use a potato masher sometimes, but a fork works just fine. You’ll also want a small bowl nearby in case you need to adjust the sweetness later.
Here’s how I make it every single time. Start by combining your cherries, sugar, and water in your saucepan over medium heat. Don’t crank it up to high because you’re not in that much of a hurry, and burned sugar tastes terrible. Stir everything together until the sugar starts dissolving into the liquid.
Once the mixture begins bubbling, reduce your heat to medium-low. This is where patience becomes your best friend. Let everything simmer for about fifteen to twenty minutes, stirring occasionally. The cherries will start breaking down and releasing their juices. The liquid will gradually thicken as it reduces. You’ll know it’s ready when you drag your spoon through the sauce and it takes a second for the liquid to fill back in.
Add your lemon juice and salt in the last five minutes of cooking. The lemon juice brightens everything up and keeps the color vibrant. The salt might seem weird in a sweet sauce, but it enhances all the other flavors. Trust me on this one.
By the way, if you’re making this for a birthday cheesecake or another special occasion, you can double the batch easily. The sauce keeps in the fridge for up to two weeks, so making extra never hurts.
The simply cherry sauce version is even more straightforward. Skip the water entirely and use only cherries, sugar, and lemon juice. This creates a thicker, more concentrated topping right from the start. I use this method when I’m really short on time or when I want an ultra-fruity flavor. The cooking time drops to about ten minutes because there’s less liquid to evaporate.
For those times when you want something truly special, the cherry reduction sauce takes things up a notch. Start with three cups of cherries instead of two, and add an extra quarter cup of sugar. Cook everything down for thirty to forty minutes until the sauce becomes thick and glossy. This method concentrates the flavors so much that a little goes a long way. I drizzle this version over cheesecake mousse sometimes, and it’s absolutely stunning.
The reduction method also works beautifully when you’re making morello cherry sauce. Since morello cherries are naturally tart, the longer cooking time mellows them out while keeping that distinctive tangy edge. If you’ve ever wondered why European desserts taste different from American ones, this is part of the secret. They let their fruit sauces develop deeper flavors through patient reduction.
Here’s the thing about fresh versus frozen cherries. Fresh cherries are wonderful during summer when they’re in season. They give you the brightest flavor and the best texture. But pitting fresh cherries is honestly kind of annoying. Your hands get stained, juice goes everywhere, and you always miss a pit or two no matter how careful you are.
Frozen cherries solve this problem beautifully. They’re already pitted, they’re available year-round, and they’re often cheaper than fresh. When cherries are frozen at peak ripeness, they actually retain more flavor than fresh cherries that have been shipped across the country. Don’t thaw them before cooking, just toss them straight into the pan. They’ll release a bit more liquid, so you might need to cook the sauce a few extra minutes.
Canned cherries work in a pinch, but drain them really well first. They’re packed in syrup that throws off your sugar measurements. I’ve used them when I couldn’t find anything else, and the results were acceptable but not amazing. Save canned cherries for emergencies only.
The cherry sauce recipe uk style typically uses morello cherries and includes a splash of kirsch, which is cherry brandy. British bakers also tend to make their sauces slightly less sweet than American versions. If you’re following a UK recipe, reduce your sugar by about two tablespoons and add one tablespoon of kirsch or cherry liqueur at the end of cooking. This creates a more sophisticated flavor profile that works beautifully with rich cheesecakes like my baklava cheesecake recipe.
Funny enough, the same reduction technique we use for cheesecake topping works for savory dishes too. That cherry sauce recipe for duck I mentioned earlier uses almost identical cooking methods. The main difference is adding savory elements like balsamic vinegar or fresh thyme instead of lemon juice. Once you master the basic technique, you can adapt it for all sorts of dishes.
Variations and Creative Twists
The basic cherry sauce is fantastic on its own, but sometimes you want to get a little creative. Adding flavor variations transforms a good sauce into something memorable. These tweaks are simple but make people think you went to fancy cooking school.
Almond extract is my secret weapon for cherry topping for cheesecake without cornstarch. Add just a quarter teaspoon at the very end of cooking. Any more than that and you’ll taste nothing but almond. This tiny amount enhances the cherry flavor without announcing itself. Cherries and almonds are botanical relatives, so they naturally complement each other. This combination works especially well with cheesecake pie recipe variations that have nutty crusts.
Brandy or bourbon brings warmth and complexity to cherry sauce. Add two tablespoons during the last five minutes of cooking. The alcohol cooks off, leaving behind rich, mellow notes. My uncle always adds a splash of brandy to his holiday desserts, and now I understand why. It makes everything taste more grown-up and sophisticated.
Vanilla extract works beautifully too. One teaspoon added at the end brightens everything without overwhelming the cherry flavor. Sometimes I’ll split a vanilla bean lengthwise and let it simmer with the cherries, then remove it before serving. This creates tiny vanilla specks throughout the sauce that look really professional.
Orange zest brings a citrus twist that surprises people in the best way. Grate about a teaspoon of zest into your sauce during the last few minutes of cooking. The orange and cherry combination tastes fresh and modern. It’s especially good during winter holidays when citrus fruits are at their peak.
Cinnamon adds warmth without making your sauce taste like pie filling. Use just a quarter teaspoon, stirred in halfway through cooking. This works particularly well when you’re using sweet cherries that need a flavor boost. The spice adds depth without competing with the fruit.
Now, about maraschino cherry topping for cheesecake. I know I said earlier that maraschino cherries aren’t my favorite, but they have their place. If you want that retro diner look or you’re making a throwback dessert, go ahead and use them. Chop them up and fold them into your homemade sauce for pops of bright red color. The contrast between real cherries and maraschino creates an interesting texture.
Some people swear by using cherry pie filling straight from the can as a quick solution. I get it. Life gets busy. You don’t always have time to simmer fruit on the stovetop. If you’re going this route, at least doctor it up a bit. Stir in some fresh lemon juice to cut the sweetness. Add a splash of vanilla or almond extract. Mix in some frozen cherries for better texture. These small additions make canned filling taste much more homemade.
You can also thin out thick cherry pie filling cheesecake topping with a little water or cherry juice. Heat it gently in a saucepan with a tablespoon or two of liquid until it reaches a pourable consistency. This makes the texture more elegant and less gloopy. Sometimes convenience products just need a little help to shine.
Frequently Asked Questions About Cherry Sauce for Cheesecake
Over the years, I’ve gotten tons of questions about making cherry sauce from friends, family, and readers. Some people worry they’ll mess it up. Others want to know shortcuts. Here are the questions that come up most often, along with answers that actually help.
How to make homemade cherry sauce?
Making homemade cherry sauce is easier than most people think. Combine two cups of pitted cherries with half a cup of sugar and a quarter cup of water in a saucepan. Bring everything to a simmer over medium heat, then reduce to medium-low and cook for fifteen to twenty minutes. The cherries will break down and release their juices, creating a naturally thick sauce. Add a tablespoon of lemon juice and a pinch of salt during the last five minutes. That’s the basic method, and it works beautifully every single time. You don’t need special equipment or advanced cooking skills.
Can you buy cherry sauce for cheesecake?
Yes, you can absolutely buy ready-made cherry sauce or cherry pie filling at most grocery stores. They’re usually in the baking aisle near the canned fruit. Duncan Hines, Comstock, and Lucky Leaf are popular brands that make decent products. Some specialty stores carry imported European cherry sauces that are less sweet and more sophisticated. However, these store-bought options can’t match the fresh, vibrant flavor of homemade sauce. If you’re buying prepared sauce, look for ones with short ingredient lists and actual cherry pieces visible through the jar.
What sauce do you put on top of cheesecake?
Cherry sauce is the classic choice, but you’ve got plenty of options depending on your mood and the season. Strawberry sauce works beautifully in spring and summer. Blueberry compote is gorgeous and tastes amazing. Raspberry coulis adds elegance to any cheesecake. Caramel sauce brings a buttery richness that some people prefer. Chocolate ganache turns your cheesecake into something decadent. I’ve even served plain cheesecake with just a dusting of powdered sugar, and nobody complained. The best sauce is whatever sounds good to you, though cherry remains my personal favorite for its perfect balance of sweet and tart.
Do cherries help lower cholesterol?
Cherries contain antioxidants and anti-inflammatory compounds that may support heart health. Some research suggests that eating cherries regularly can help reduce inflammation markers in the body. They’re also a good source of fiber, which plays a role in managing cholesterol levels. That said, cherry sauce made with sugar isn’t exactly a health food, so don’t count on your cheesecake topping to lower your cholesterol. Fresh cherries eaten as a snack provide more health benefits than cooked sauce. Think of cherry sauce as an occasional treat that happens to come from a fruit with some nutritional value, rather than a cholesterol-lowering remedy.
Are there any other fruits that work well as a cheesecake topping?
Absolutely, and experimenting with different fruits keeps things interesting. Strawberries are probably the second most popular choice after cherries, especially when they’re in season. Blueberries make a gorgeous deep purple sauce that looks stunning against white cheesecake. Blackberries and raspberries create beautiful jewel-toned toppings with a sophisticated tartness. Mixed berries give you color variation and complex flavor. Peaches work surprisingly well during summer months. I’ve even made mango sauce for a tropical twist that my kids absolutely loved. The cooking method stays basically the same regardless of which fruit you choose.
How long does homemade cherry sauce last in the fridge?
Homemade cherry sauce for cheesecake keeps well in the refrigerator for up to two weeks when stored properly. Transfer your cooled sauce to an airtight container or a jar with a tight-fitting lid. Glass jars work better than plastic because they don’t absorb odors or stains. Always use a clean spoon when you scoop out sauce to avoid introducing bacteria. If you notice any mold, off smells, or changes in color, toss it immediately. I usually make a batch on Sunday and use it throughout the week on various desserts. The flavor actually improves after a day or two as everything melds together.
Can you freeze cherry sauce, and if so, how should it be stored?
Cherry sauce freezes beautifully, which makes it perfect for meal prep or preserving summer cherries. Let your sauce cool completely before freezing, otherwise you’ll get ice crystals. Pour it into freezer-safe containers, leaving about half an inch of space at the top for expansion. I like using small containers that hold about one cup each, which is usually enough for one cheesecake. Label everything with the date because frozen sauce looks identical to frozen soup after a few months. It’ll keep in the freezer for up to three months without losing quality. Thaw it overnight in the fridge before using, then give it a good stir.
Is there a specific type of cherry that works best for cheesecake toppings?
Tart cherries like Montmorency or morello cherry sauce varieties create the best flavor balance with rich, sweet cheesecake. Their natural tartness cuts through the cream cheese filling without being overwhelmingly sour. Sweet cherries like Bing or Rainier work fine too, especially if you reduce the sugar in your recipe. I’ve made sauce with every cherry variety I could find, and honestly, they all turn out good. Frozen tart cherries are my go-to choice because they’re consistent, affordable, and available year-round. If you’re buying fresh cherries at a farmers market, ask the vendor which variety they recommend for cooking rather than eating fresh.
How can you adjust the sweetness of the cherry sauce to your liking?
Start with less sugar than the recipe calls for, because you can always add more but you can’t take it away. I usually begin with a third of a cup instead of half a cup, then taste the sauce after it’s been cooking for about ten minutes. Remember that the sauce tastes sweeter when it’s warm, so let a spoonful cool before making your final decision. If it needs more sweetness, stir in sugar one tablespoon at a time. If it’s too sweet, add more lemon juice to balance things out. The type of cherry you use makes a huge difference too. Sweet cherries need less added sugar than tart varieties.
Can I make cherry sauce ahead of time for a party?
Making cherry sauce ahead of time is actually a smart move because it gives you one less thing to worry about on the day of your event. I always prepare mine at least two days before a party. This gives the flavors time to develop and meld together properly. Store it in the fridge and bring it to room temperature before serving, or warm it gently if you prefer it slightly heated. You can even make it weeks ahead and freeze it, then thaw it the day before your party. When you’re preparing multiple dishes, having the cherry topping for cheesecake without cornstarch ready to go saves valuable time and reduces stress.
What’s the difference between cherry sauce and cherry compote?
The terms get used interchangeably, but there’s technically a small difference. Cherry sauce is usually thinner and pourable, with a smoother consistency. Compote tends to be chunkier and thicker, with more visible fruit pieces. A cherry reduction sauce falls somewhere in between, with concentrated flavor and a syrupy texture. For cheesecake purposes, any of these work perfectly fine. I call mine sauce because it sounds simple and approachable, but fancy restaurants would probably call it a compote or reduction. Don’t get too hung up on terminology. What matters is that it tastes good and has the texture you want.
Can I use cherry sauce for other desserts besides cheesecake?
Cherry sauce is incredibly versatile and works with way more desserts than just cheesecake. I’ve spooned it over vanilla ice cream, pancakes, waffles, and French toast with great success. It’s fantastic layered into parfaits with yogurt and granola. You can swirl it into brownie batter before baking for a fruity twist. It makes plain pound cake taste special. I’ve even spread it between cake layers as a filling. The natural fruit sugars help send satiety signals to your brain, meaning you might feel more satisfied with smaller portions compared to desserts with just refined sugar. Once you have a batch in your fridge, you’ll find yourself putting it on everything.
Here’s something I learned after years of making this sauce. The quality of your ingredients directly impacts your final result, which sounds obvious but bears repeating. When you use fresh, ripe cherries at the peak of season, your sauce tastes bright and vibrant. When you use cherries that have been sitting in your freezer for a year, well, the sauce tastes like old freezer cherries. This doesn’t mean you need to spend a fortune on fancy organic fruit, but it does mean paying attention to freshness matters.
Another tip that helps: resist the urge to stir constantly. I know it’s tempting to hover over your pot and keep everything moving, but cherries need time to break down and release their juices. Stir every few minutes to prevent sticking, but otherwise let the heat do its work. My mom used to stand at the stove stirring continuously, and her sauce always turned out mushy. Once I explained that less stirring creates better texture, her results improved dramatically.
If you’re making cherry sauce without cornstarch for the first time, you might worry that it won’t thicken properly. Give it time. The natural pectin in the fruit needs heat and time to activate. If you’ve been cooking for twenty minutes and the sauce still seems thin, keep going for another five to ten minutes. It’ll get there. The sauce also thickens considerably as it cools, so don’t judge the final consistency while it’s still hot.
By the way, if you end up making too much sauce (which honestly never happens in my house because someone always finds uses for it), you can turn it into quick cherry jam. Just cook it down for an extra ten to fifteen minutes until it’s really thick. Pour it into sterilized jars and process them in a water bath if you know how to can. Otherwise, keep it in the fridge and use it on toast, English muffins, or stirred into oatmeal. Waste not, want not, as my grandmother would say.
One final thought about presentation. The way you serve your cherry sauce matters almost as much as how it tastes. Rather than dumping it all over the top of your cheesecake, try drizzling it artfully or serving it on the side. Let each person decide how much sauce they want. Some people prefer just a little, while others want their cheesecake swimming in cherries. Offering it separately also keeps your cheesecake from getting soggy if there are leftovers, though in my experience, cheesecake topped with homemade cherry sauce rarely has leftovers.
If you’re looking for more inspiration and want to explore different cheesecake variations, you’ll find plenty of recipes that work beautifully with cherry sauce. The combination is endlessly adaptable.
Making your own cherry sauce for cheesecake isn’t complicated or time-consuming, but it makes a real difference in how your dessert tastes. The fresh fruit flavor, the perfect balance of sweet and tart, the glossy appearance, all of these elements elevate your cheesecake from good to memorable. Whether you stick with the classic recipe or experiment with the variations I’ve shared, you’ll end up with something that beats store-bought options every time. So grab some cherries, pull out a saucepan, and give it a try. Your taste buds will thank you, and so will anyone lucky enough to share your cheesecake.
Equipment
- Medium saucepan
- Wooden spoon or spatula
- Potato masher or fork (optional)
Ingredients
- 2 cups fresh or frozen cherries (pitted)
- 1/2 cup granulated sugar
- 1/4 cup water
- 1 tablespoon fresh lemon juice
- a pinch salt
Instructions
- Combine cherries, sugar, and water in a medium saucepan over medium heat.
- Stir until the sugar begins to dissolve.
- Once bubbling, reduce heat to medium-low.
- Simmer for 15-20 minutes, stirring occasionally, until cherries break down and liquid thickens.
- In the final 5 minutes, add lemon juice and salt.
- Adjust sweetness if needed and serve warm or chilled.
Notes
Nutrition

Hello! I’m Sarah Mitchell, and I’m passionate about bringing creativity and innovation to baking. My love for baking started in high school when I first tried my hand at decorating cupcakes for a class project. What began as a fun hobby quickly became a full-time passion. I’ve spent the past decade working in bakeries and dessert shops, honing my skills in everything from simple cookies to intricate wedding cakes.
After working in some of the top bakeries across the country, I realized that baking was about more than just following recipes — it was about infusing your personality into each creation. At BakingSecret.com, I love creating recipes that push boundaries while staying true to the heart of classic baking. I specialize in creating delicious and visually stunning pastries that will wow your guests.
When I’m not baking, I enjoy teaching baking classes, trying out new cake decoration techniques, and traveling to find inspiration in global dessert traditions. I’m so excited to share my tips and tricks with you to help elevate your baking game!