
Welcome to My Mini Pumpkin Cheesecake Kitchen
Last October, I burned three batches of cookies before my coffee kicked in. I’d agreed to bring dessert to a friend’s party, and everything was going wrong. Then I remembered the beauty of mini pumpkin cheesecake treats sitting in my fridge from the night before. They saved the day, and everyone wanted the recipe.
That moment taught me something important. Sometimes the best desserts are the ones you can make ahead and serve without stress. No last-minute panic. No burnt edges. Just grab them from the fridge and watch people smile.
Welcome to my kitchen, where we’re all about making the most of the fall season with a delightful and easy-to-make treat: mini pumpkin cheesecake. These little bites pack all the creamy richness you love about regular cheesecake with the warm spices of autumn. They’re cute, they’re tasty, and they won’t leave you scrubbing a springform pan for twenty minutes.
Whether you’re a seasoned baker or just starting out, this recipe is sure to be a hit at your next gathering. I’ve taught this recipe to friends who claimed they couldn’t boil water. They all succeeded. If they can do it, so can you.
Let’s talk about why mini pumpkin cheesecakes are not just delicious but also a fun way to enjoy the flavors of autumn. These treats bring together everything we crave when the leaves start falling and the air gets crisp.
Why Mini Pumpkin Cheesecake Wins Every Time
Here’s the thing about mini desserts. They make everyone feel like they’re getting their own special treat. No cutting. No serving drama. No arguments about who got the bigger piece. Each person gets their own perfect portion, and that matters more than you’d think.
I’ve watched guests at parties carefully eyeing a full-size cake, trying to figure out if taking a slice is too much or too little. With mini pumpkin cheesecake tarts, that awkwardness disappears. People feel comfortable taking one, sometimes two. They can try your creation without commitment, which sounds silly but it’s true.
The appeal goes beyond just portion control. These little cheesecakes are easier to eat while standing and chatting. No balancing act required. No fork fumbling. Just pick one up with a napkin and enjoy. This makes them perfect for crowded gatherings where seating is limited.
The versatility of mini pumpkin cheesecake desserts blows my mind every time I make them. You can switch up flavors without much effort. One batch can become mini pumpkin cheesecakes with salted caramel on top. Another can stay simple and classic. Some people love adding a mini pumpkin cheesecake swirl on top for visual appeal.
I’ve experimented with so many variations. Sometimes I follow a food network mini pumpkin cheesecake recipe to the letter. Other times I wing it based on what’s in my pantry. The base recipe is forgiving enough to handle your creativity.
For friends watching their carbs, I make a mini pumpkin cheesecake keto version using alternative sweeteners. They taste just as good, and no one feels left out. That’s the beauty of working with individual servings. You can customize batches to fit different dietary needs without making five separate desserts.
Presentation options are endless too. You can use muffin tins, fancy tart pans, or even Keebler ready crust mini shells if you’re short on time. The keebler ready crust mini pumpkin cheesecake recipe approach saves you from making crusts from scratch, which honestly makes weeknight baking possible.
Some bakers prefer making mini pumpkin cheesecake bars instead of rounds. Same great taste, different shape. This works well if you want to cut them into squares and stack them on a platter. The bars also travel better to potlucks since they pack flat in containers.
The Convenience Factor You Can’t Ignore
Making these small treats is easier than tackling a full-size cheesecake. The baking time drops significantly. Instead of waiting an hour or more, most mini pumpkin cheesecakes are done in 20 to 25 minutes. This means less time watching the oven and more time doing literally anything else.
The cooling process speeds up too. Large cheesecakes need hours to cool properly, then more time in the fridge. Mini versions cool faster because there’s less mass to deal with. I’ve had batches ready to eat in about three hours total from start to finish.
Storage becomes simple when you’re working small. These treats stack nicely in containers. You can freeze extras without worrying about how to thaw a giant cheesecake later. Just pull out what you need when guests arrive unexpectedly.
The Libbys mini pumpkin cheesecake approach using their canned pumpkin makes the recipe even more convenient. You don’t need to roast and puree your own pumpkin, though you certainly can if you want. The canned stuff works perfectly and stays consistent batch after batch.
Serving at parties couldn’t be easier. Line them up on a tray and you’re done. No cake stands required. No fancy serving utensils. People can grab one as they pass by your dessert table. This grab-and-go style fits modern gatherings where everyone’s moving around and mingling.
Clean-up is my favorite part. Instead of scrubbing one large pan forever, you’re dealing with a muffin tin or small tart pans. Most times, I use paper liners and throw them away. The pans barely get dirty. On tired weeknights, this matters more than perfect Instagram photos.
I found a great trick from love from the oven mini pumpkin cheesecakes that changed my baking game. Using a small cookie scoop for the filling ensures each cheesecake gets the same amount. They bake evenly, look uniform, and nobody feels shortchanged.
The best part about mini pumpkin cheesecake delish recipes? You can test one before serving the whole batch. Pop one in your mouth while they’re cooling. If something tastes off, you know immediately and can adjust next time. With a full-size cake, you don’t discover problems until you’ve cut into it in front of guests.
These little desserts also make great gifts. Pack a few in a cute box, tie a ribbon around it, and you’ve got a homemade present that people actually want. I’ve given them to neighbors, teachers, and mail carriers during the holidays. Everyone appreciates food gifts, especially when they’re this good.

Getting Your Ingredients and Tools Ready
Now that you know why these little treats work so well, let’s talk about what you need to actually make them happen.
The ingredient list for mini pumpkin cheesecake isn’t complicated. I promise you already have half of this stuff in your kitchen right now. You’ll need cream cheese, and this is where quality matters. I learned this the hard way when I bought the cheapest brand at the store and ended up with a grainy texture. Splurge on the full-fat, name-brand stuff. Your cheesecakes will thank you.
Pumpkin puree comes next. The Libbys mini pumpkin cheesecake method uses their canned pumpkin, which I keep stocked year-round. Make sure you grab pure pumpkin, not pumpkin pie filling. I mixed those up once and my cheesecakes tasted like I’d dumped an entire spice cabinet into them. Not good.
Sugar is standard, though if you’re doing a mini pumpkin cheesecake keto version, swap in your preferred sugar substitute. I’ve used erythritol with decent results. Eggs bind everything together. Room temperature works best because cold eggs don’t blend as smoothly. I forget this detail constantly and end up microwaving my eggs for ten seconds to take the chill off.
The spice blend brings autumn to life in these treats. You’ll want cinnamon, nutmeg, ginger, and maybe a pinch of cloves. I buy pre-mixed pumpkin pie spice because measuring four separate spices feels like too much work on a Tuesday night. Some people judge me for this shortcut. I don’t care.
Vanilla extract adds depth. Real vanilla beats imitation every time, similar to how real cream cheese beats the cheap stuff. You’ll also need a bit of flour or cornstarch to help stabilize everything. The food network mini pumpkin cheesecake recipe I tried once skipped this, and my filling turned out runny. Learn from my mistakes.
For the crust, graham crackers are classic. You can also use gingersnaps for extra spice or vanilla wafers for something milder. The keebler ready crust mini pumpkin cheesecake recipe approach skips all this by using pre-made mini crusts. I keep a box in my pantry for emergencies. No shame in convenience.
Butter binds your crust together. Melted, unsalted butter works perfectly. Some recipes call for a tiny bit of sugar in the crust too. I add it when I remember, skip it when I don’t. Both ways taste fine.
By the way, if you enjoy experimenting with cheesecake flavors, you might want to check out variations like cookie butter cheesecake for something different down the road.
Here’s what I’ve found about ingredient quality. The difference between mediocre and amazing mini pumpkin cheesecake tarts often comes down to your cream cheese and pumpkin. Everything else can be middle-grade, but those two ingredients carry the flavor. I tested this theory by making two batches side by side. The expensive cream cheese batch won by a mile.
For equipment, you don’t need anything fancy. A standard muffin tin works great for making twelve servings. I prefer the non-stick kind because even with liners, things can stick. Paper liners make life easier. The foil ones look fancier if you’re going for presentation points.
Mixing bowls in a couple sizes help keep things organized. I use one for the crust mixture and another for the filling. You could technically use the same bowl if you mix the crust first, but then you’re washing it mid-recipe, which defeats the purpose of easy cleanup.
An electric mixer saves your arm from exhaustion. I used a fork once when my mixer broke. Never again. My arm hurt for two days. Hand mixers work fine, but a stand mixer is even better if you have one. The filling needs to get really smooth and creamy, which takes some serious mixing power.
A rubber spatula helps scrape down the sides of your bowl. You’d be surprised how much unmixed cream cheese clings to the sides. I’ve had lumps in my finished cheesecakes because I didn’t scrape properly. It’s worth the extra fifteen seconds.
Measuring cups and spoons are obvious necessities. I prefer the kind that nest together because I lose things easily. A small cookie scoop makes portioning the filling so much easier. The love from the oven mini pumpkin cheesecakes trick I mentioned earlier really does create uniform results.
You’ll also want a cooling rack. Cheesecakes need to cool gradually, and a rack lets air circulate underneath. I’ve set hot pans directly on my counter before and ended up with soggy bottoms. Not ideal when you’re trying to impress people.
Making Your Mini Pumpkin Cheesecakes Step by Step
Alright, time to actually make these things. Preheat your oven to 325 degrees. This lower temperature prevents cracking, which is the enemy of pretty cheesecakes. I used to crank the oven to 350 and wonder why my tops looked like earthquake damage.
Start with the crust. If you’re using the keebler ready crust mini pumpkin cheesecake recipe method, you can skip ahead. For the rest of us, crush your graham crackers into fine crumbs. I put them in a plastic bag and smash them with a rolling pin. It’s therapeutic after a long day.
You’ll need about one and a half cups of crumbs. Mix them with three tablespoons of melted butter and two tablespoons of sugar. The mixture should feel like wet sand. Press about a tablespoon into the bottom of each muffin cup. Really pack it down with your fingers or the bottom of a small glass. Loose crusts fall apart when you try to eat them.
Funny enough, I learned about pre-baking crusts from a cheesecake mix instruction sheet years ago. Pop your crusts in the oven for five minutes. This step helps them hold together better and adds a slight toasted flavor. Some recipes skip this, but I think it’s worth it.
While those bake, make your filling. Beat your cream cheese until it’s completely smooth. This takes longer than you think. Keep mixing even when you think it’s done. Any lumps now will be lumps in your finished product, and nobody wants that surprise.
Add three-quarters cup of sugar gradually. Then mix in one cup of pumpkin puree. The mixture should look orange and creamy. Add two eggs one at a time, mixing after each. Don’t overmix once the eggs go in, or you’ll incorporate too much air and end up with cracks.
Here’s where the magic happens. Add your spices. I use one teaspoon of cinnamon, half a teaspoon of ginger, quarter teaspoon of nutmeg, and just a tiny pinch of cloves. One teaspoon of vanilla extract goes in too. Mix just until everything combines.
For a mini pumpkin cheesecake swirl effect, reserve about a third of your filling before adding the pumpkin and spices. Keep that portion plain. Fill your muffin cups mostly with the pumpkin mixture, then dollop a bit of plain filling on top. Use a toothpick to swirl them together. It looks impressive and takes almost no extra effort.
The mini pumpkin cheesecakes with salted caramel variation happens after baking. You can drizzle store-bought caramel sauce on top and sprinkle some flaky sea salt. This combination is dangerous because I end up eating way too many.
If you want to try mini pumpkin cheesecake bars instead, use an eight-by-eight pan. Press the crust into the bottom, pour all the filling over it, and bake a bit longer. Cut into squares after cooling. This works great when you need to feed a crowd and don’t want to fuss with individual portions.
Speaking of other cheesecake adventures, I once made a cookie dough cheesecake that had everyone asking for seconds. The versatility of cheesecake bases really is endless.
Fill each muffin cup about three-quarters full. They’ll puff up slightly while baking, then settle as they cool. I overfilled my first batch and ended up with mushroom-top cheesecakes. They tasted fine but looked weird.
Bake for 20 to 25 minutes. The centers should still jiggle slightly when you shake the pan. They’ll firm up as they cool. Overbaked cheesecakes get dry and dense. I set a timer for 20 minutes, then check every two minutes after that.
Once they’re done, turn off the oven and crack the door open. Let them sit in there for ten minutes. This gradual temperature change prevents cracking. I know it sounds fussy, but it really works. After that, pull them out and let them cool completely on a rack.
The hardest part is waiting. These need at least two hours in the fridge before serving. Overnight is even better. The flavors meld together and the texture becomes perfect. I’ve tried eating them warm because I have no patience. They’re okay warm, but absolutely incredible when properly chilled.
If you’re feeling adventurous with international flavors, try making guava cheesecake sometime. It brings a tropical twist to the traditional format.
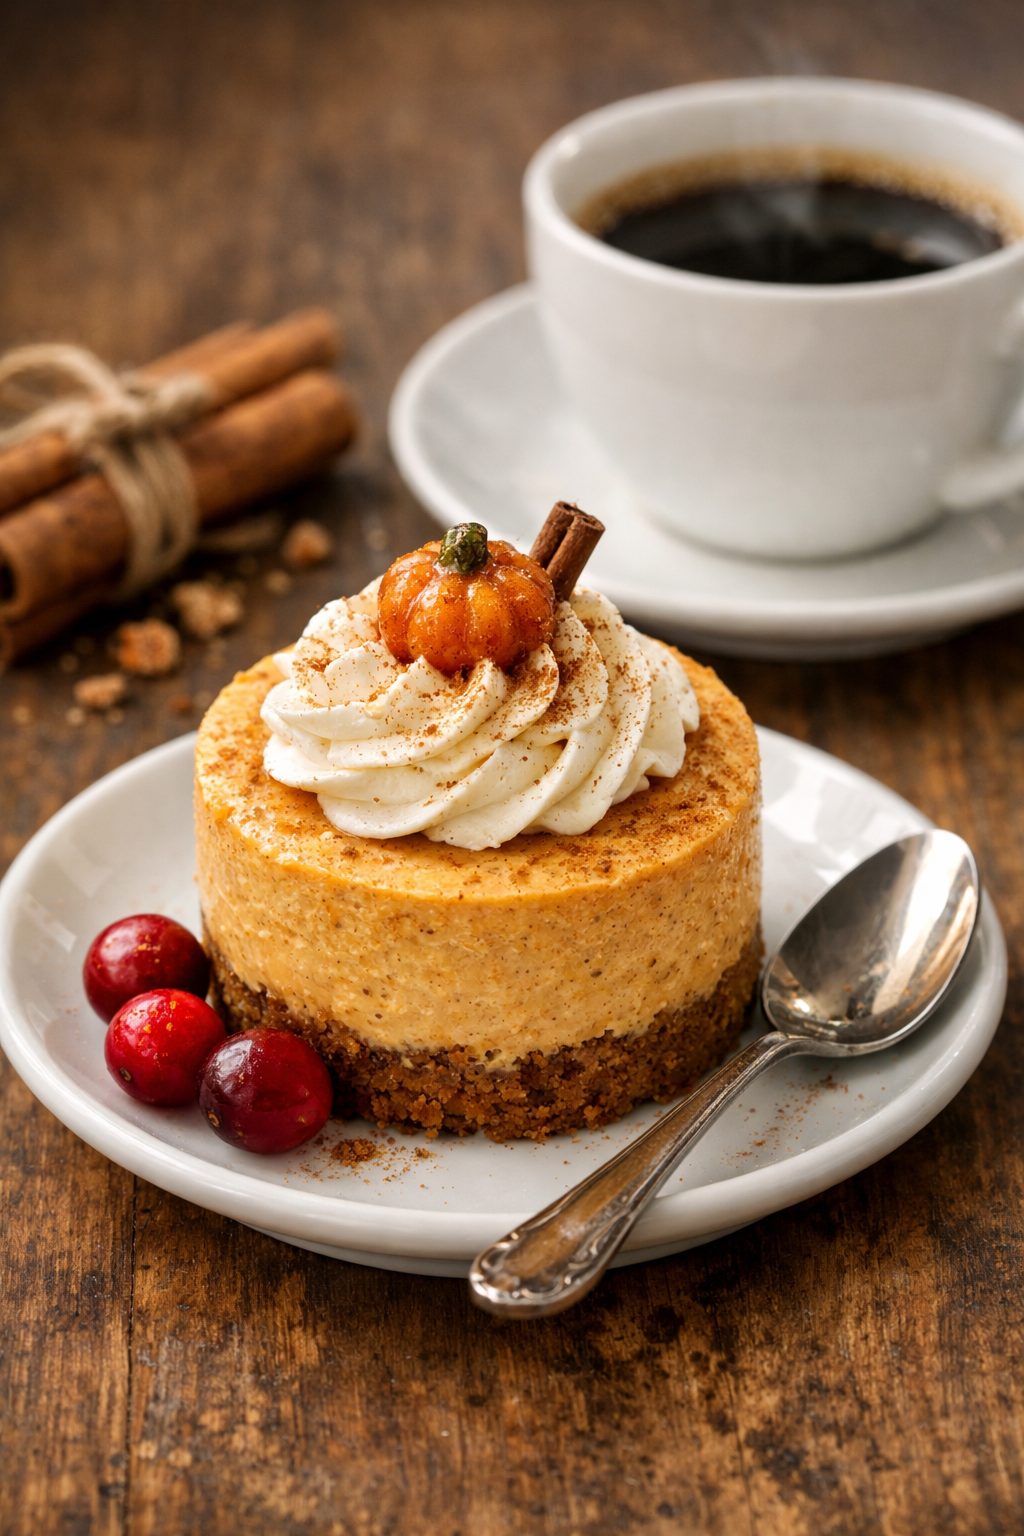
The mini pumpkin cheesecake delish approach involves topping these with whipped cream right before serving. I add a tiny dollop on each one and maybe a sprinkle of cinnamon. Some people prefer them plain. Both camps are right.
Store leftovers in an airtight container in the fridge. They’ll keep for five days, though mine never last that long. You can freeze them too. Wrap each one individually in plastic wrap, then put them all in a freezer bag. They thaw in about an hour at room temperature.
Taking Your Mini Pumpkin Cheesecake Game to the Next Level
Once you’ve mastered the basic recipe, the real fun begins. I’ve spent years experimenting with different flavors and toppings, and I’m always surprised by how much personality you can pack into such a small dessert.
The mini pumpkin cheesecakes with salted caramel combination is where I started my flavor journey. After my first batch cooled, I drizzled store-bought caramel sauce over the tops and finished with a sprinkle of flaky sea salt. My brother, who claims he doesn’t like pumpkin, ate four in one sitting. The salt cuts through the sweetness and adds this sophisticated edge that makes people think you spent way more time than you actually did.
Here’s something I discovered by accident. If you warm the caramel sauce for about ten seconds in the microwave, it becomes easier to drizzle in those fancy patterns. I use a spoon and just let it fall in thin streams across the top. Sometimes I try to make elaborate designs. Most times it looks like a toddler decorated them. Either way, they taste incredible.
The mini pumpkin cheesecake keto version opened up possibilities for friends who watch their carb intake. I swap regular sugar for erythritol or monk fruit sweetener in a one-to-one ratio. For the crust, almond flour mixed with melted butter works perfectly. Some people add a bit of cinnamon to the almond flour crust for extra flavor. The texture changes slightly, becoming a bit more crumbly, but nobody’s complained yet.
One of my friends who follows keto guidelines told me she’d been avoiding desserts for months. When I brought these to her birthday party, she almost cried. That reaction might sound dramatic, but feeling included matters. Being able to enjoy what everyone else is eating without worry changes the whole social experience.
For chocolate lovers, I sometimes press an Oreo cookie into the bottom of each muffin cup instead of making graham cracker crust. The chocolate-pumpkin combination works better than you’d expect. My nephew requests these specifically now. He calls them “Halloween cheesecakes” even though I make them year-round.
Adding a cream cheese swirl creates visual interest without much effort. Before mixing in your pumpkin and spices, set aside about a quarter cup of the plain cream cheese mixture. Fill your muffin cups with the pumpkin filling, then drop small spoonfuls of the plain mixture on top. Drag a toothpick through both in a figure-eight pattern. The mini pumpkin cheesecake swirl effect looks professional even when you have no idea what you’re doing.
Toppings change everything. Besides caramel, I’ve tried maple glaze, which brings out the autumn flavors beautifully. Mix powdered sugar with maple syrup until it reaches a thick but pourable consistency. Drizzle it on and let it set for a few minutes. The maple flavor pairs with pumpkin like they were meant to be together.
Candied pecans on top add crunch and elegance. I buy them pre-made because I’m lazy, but you can make your own if you’re feeling ambitious. Just chop them roughly and press a few pieces into the top of each cheesecake right after they come out of the oven. They stick as everything cools.
White chocolate chips melted and drizzled create a fancy look for holiday parties. I melt them in the microwave in thirty-second bursts, stirring between each one. Once smooth, I transfer the chocolate to a small plastic bag, snip off a tiny corner, and squeeze it over the cheesecakes in zigzag patterns. My mom saw these at Thanksgiving and thought I’d ordered them from a bakery. Best compliment ever.
The love from the oven mini pumpkin cheesecakes inspiration taught me about presentation. Sometimes I serve these on small dessert plates with a dollop of whipped cream on the side. A light dusting of cinnamon or pumpkin pie spice on the plate makes them look restaurant-quality. Other times I stick a cinnamon stick into the whipped cream topping. It’s purely decorative since nobody actually eats the cinnamon stick, but it signals “fall dessert” immediately.
For kids’ parties, I’ve decorated these with candy corn around Halloween or small fondant leaves during Thanksgiving. My daughter helped with this once, and her versions looked chaotic but adorable. The kids loved them more than my carefully arranged adult versions, which taught me something about overthinking.
Cookie butter spread makes an incredible topping too. Warm it slightly so it becomes spreadable, then put a small dollop on each cheesecake. The spiced cookie flavor complements the pumpkin perfectly. I discovered this combination when I ran out of caramel and got creative with what was in my pantry.
Some people go the fresh fruit route. Thin apple slices fanned across the top look elegant and add a fresh element to balance the richness. I’ve also seen people use fresh figs when they’re in season. It’s not traditional, but it works surprisingly well.
For a mini pumpkin cheesecake delish presentation at dinner parties, I arrange them on a wooden board with some decorative elements. Small pumpkins, autumn leaves, or even just scattered pecans around the base create an impressive display. The effort-to-impact ratio is excellent since the setup takes maybe two minutes.
Individual serving plates with a dessert fork and maybe a fresh mint leaf beside each cheesecake elevate the whole experience. I did this for my anniversary dinner at home, and my husband acted like we were at a five-star restaurant. The mood you create matters as much as the food itself.
By the way, if you’re serious about expanding your dessert repertoire beyond just pumpkin season, browsing through different cheesecake recipes can give you ideas for every occasion throughout the year.
Here’s a fun twist I tried last month. Before adding the pumpkin filling, I dropped a small piece of dark chocolate into the center of each crust. As the cheesecakes bake, the chocolate melts and creates this hidden surprise. Nobody expects it, and the reaction when they discover it is priceless.
For a more health-conscious approach, reducing sugar without sacrificing flavor is possible. I’ve cut the sugar amount by a third and compensated with extra vanilla and spices. The cheesecakes taste slightly less sweet but more complex. Some people prefer this version, especially those trying to develop healthy eating habits without giving up desserts entirely.
Texture variations matter too. Adding a tablespoon of sour cream to the filling makes everything extra creamy and adds a slight tang that balances the sweetness. I learned this from the food network mini pumpkin cheesecake recipes I studied when I was first starting out. That little addition made a noticeable difference.
Layering different flavors creates complexity. I’ve made versions with a chocolate layer on the bottom and pumpkin on top. I’ve also tried maple cream cheese as a layer between the crust and pumpkin filling. Each variation teaches me something new about how flavors interact.
The mini pumpkin cheesecake bars format allows for different topping strategies. You can spread a streusel topping across the whole pan before baking, which is harder to do with individual portions. The crumbly, buttery topping adds another texture dimension that people love.
Ginger snap crusts bring extra spice intensity. If you really love ginger, this amplifies that warming sensation. I make these when I want something with more kick. They’re not for everyone, but ginger fans go crazy for them.
For special occasions, I’ve made larger versions in ramekins for a more substantial dessert. The baking time increases to about thirty-five minutes, but the concept stays the same. These work well for intimate dinner parties where you’re serving plated desserts.
One creative idea that worked surprisingly well was adding a thin layer of dulce de leche between the crust and the pumpkin filling. The caramelized milk flavor paired beautifully with the spices. I got this idea from a dessert I had at a restaurant and managed to recreate it at home.
Remember that experimentation is part of the fun. Not every variation will be a winner, and that’s okay. I once tried adding coffee to the filling because I thought it would be sophisticated. It tasted weird. I threw that batch away and learned from it. The next attempt, using just a tiny bit of espresso powder, worked much better.
The beauty of working with mini pumpkin cheesecake tarts is that you can make half a batch one way and half another way. Test different ideas without committing to twenty-four servings of something experimental. This flexibility encourages creativity without the fear of wasting ingredients.
Whether you stick with classic toppings or venture into wild territory, these little desserts handle whatever you throw at them. They’re forgiving, adaptable, and always appreciated. That combination makes them worth keeping in your regular rotation.
Don’t be afraid to make these treats your own. Add the flavors you love, skip the ones you don’t, and create something that makes you happy every time you pull a batch from the fridge.
Your Questions About Mini Pumpkin Cheesecake Answered
How do I store mini pumpkin cheesecakes?
Keep them in an airtight container in the refrigerator for up to five days. I stack them in layers with parchment paper between each level to prevent sticking. If you’ve added toppings like whipped cream, store those separately and add them right before serving. The cheesecakes maintain their texture and flavor best when kept consistently cold. Never leave them at room temperature for more than two hours.
Can I make mini pumpkin cheesecakes ahead of time?
Absolutely, and I actually recommend it. These taste better after sitting in the fridge overnight as the flavors develop and meld together. You can make them up to three days before your event without any quality loss. If you’re adding fresh toppings like whipped cream, wait until serving time. For longer storage, freeze them individually wrapped for up to two months. They thaw beautifully in about an hour at room temperature.
What can I use instead of pumpkin puree?
Sweet potato puree works remarkably well and creates a similar texture and color. Butternut squash puree is another excellent substitute with a slightly sweeter flavor. I’ve even used mashed banana when I was completely out of options, though the flavor profile changes significantly. Make sure whatever you substitute has a similar consistency to canned pumpkin. Avoid anything too watery or your filling won’t set properly.
Are there any gluten-free options for the crust?
Gluten-free graham crackers work exactly like regular ones in this recipe. Almond flour mixed with melted butter and a bit of sugar creates a delicious nutty crust that’s naturally gluten-free. Crushed gluten-free cookies, gingersnaps, or even Rice Chex cereal can form the base. The ratios stay the same regardless of what you use. I’ve served these to gluten-sensitive friends who couldn’t tell the difference.
Why did my mini cheesecakes crack on top?
Cracks usually happen from sudden temperature changes or overbaking. Make sure you’re baking at 325 degrees, not higher, and don’t skip the cooling step in the turned-off oven with the door cracked. Overmixing the batter after adding eggs incorporates too much air, which also causes cracks. If they do crack, don’t stress, just cover them with toppings and nobody will know.
Can I use low-fat cream cheese?
You can, but the texture won’t be as rich and creamy. I tested this once to save calories and regretted it. The filling turned out slightly grainy and less flavorful. If you must use low-fat cream cheese, consider adding a tablespoon of sour cream to improve the texture. For the best results, stick with full-fat cream cheese even though it has more calories.
How do I prevent soggy crusts?
Pre-baking your crust for five minutes before adding the filling creates a barrier that prevents sogginess. Make sure you pack the crust firmly into the bottom of each cup. Using paper liners can sometimes trap moisture, so consider spraying the muffin tin directly instead. Let the cheesecakes cool completely before refrigerating to avoid condensation issues. Proper cooling makes a huge difference in crust texture.
What’s the best way to remove them from the muffin tin?
Paper liners make removal effortless since you just peel them away from the sides. If you baked directly in the tin, run a thin knife around the edge of each cheesecake while they’re still slightly warm. Let them cool completely before trying to lift them out. A small offset spatula slides underneath perfectly and helps you lift without breaking. Patience here prevents frustration and broken cheesecakes.
Can I double this recipe?
Definitely, and I do it all the time for large gatherings. The recipe scales up perfectly without any adjustments needed to the ingredient ratios or baking time. Just make sure your oven can accommodate multiple muffin tins at once. If you’re baking in batches, keep the second batch of filled cups in the refrigerator while the first batch bakes. This prevents the filling from sitting at room temperature too long.
Why is my filling too runny?
This usually means you added too much liquid or didn’t bake them long enough. Make sure you’re using pure pumpkin puree, not the watery stuff that sometimes separates in the can. The eggs should be mixed in gently and not overbeaten. If your batter seems thin before baking, add a tablespoon of flour or cornstarch. Always check for that slight jiggle in the center when they’re done, then let them cool completely to firm up.
These little treats have become my go-to solution for everything from last-minute gatherings to planned celebrations. Start with the basic recipe, get comfortable with the process, and then let your creativity loose with whatever flavors and toppings call to you.
Equipment
- Mixing Bowl
- Electric Mixer
- Rubber Spatula
- Muffin Tin
- Plastic Bag
Ingredients
- 1.5 cups graham cracker crumbs
- 3 tbsp unsalted butter, melted
- 2 tbsp sugar (optional)
- 16 oz cream cheese, room temperature
- 0.75 cup granulated sugar
- 1 cup pumpkin puree
- 2 large eggs, room temperature
- 1 tsp cinnamon
- 0.5 tsp ginger
- 0.25 tsp nutmeg
- pinch cloves
- 1 tsp vanilla extract
- 2 tbsp flour or cornstarch
Instructions
- Preheat your oven to 325°F (163°C).
- In a plastic bag, crush the graham crackers into fine crumbs.
- Mix the graham cracker crumbs with melted butter and sugar until it feels like wet sand.
- Press about a tablespoon of the crumb mixture into the bottom of each muffin cup.
- Bake the crusts for 5 minutes, then remove from oven.
- In a mixing bowl, beat the cream cheese until smooth.
- Gradually add granulated sugar to the cream cheese while mixing.
- Add pumpkin puree and mix until well combined.
- Add eggs one at a time, mixing gently after each addition.
- Mix in cinnamon, ginger, nutmeg, cloves, and vanilla extract.
- Optionally, reserve a third of the filling for a swirl effect, then fill each muffin cup about ¾ full with the pumpkin mixture.
- Swirl reserved filling on top if desired.
- Bake for 20 to 25 minutes, until centers jiggle slightly.
- Turn off the oven, crack the door open, and let them sit in the oven for 10 minutes.
- Remove from oven and cool completely on a wire rack.
- Chill in the fridge for at least 2 hours before serving.
Notes
Nutrition

Hello! I’m Sarah Mitchell, and I’m passionate about bringing creativity and innovation to baking. My love for baking started in high school when I first tried my hand at decorating cupcakes for a class project. What began as a fun hobby quickly became a full-time passion. I’ve spent the past decade working in bakeries and dessert shops, honing my skills in everything from simple cookies to intricate wedding cakes.
After working in some of the top bakeries across the country, I realized that baking was about more than just following recipes — it was about infusing your personality into each creation. At BakingSecret.com, I love creating recipes that push boundaries while staying true to the heart of classic baking. I specialize in creating delicious and visually stunning pastries that will wow your guests.
When I’m not baking, I enjoy teaching baking classes, trying out new cake decoration techniques, and traveling to find inspiration in global dessert traditions. I’m so excited to share my tips and tricks with you to help elevate your baking game!