
My Secret to Summer Bliss? This Easy Pineapple Cheesecake!
Have you ever had a dessert that just tastes like sunshine? That’s this Creamy Pineapple Cheesecake for me. Picture a steamy July afternoon. The kids are begging for something sweet, but turning on the oven feels like a crime. I remember pulling out my trusty mixing bowl, a can of that bright, juicy pineapple, and knowing I had a winner. In just minutes, I whipped up a dessert that vanished faster than a popsicle in August. It’s become our family’s go-to for every potluck, picnic, and “just because” celebration. Let me share this little slice of tropical heaven with you!
A Tropical Twist on a Classic Favorite
The cheesecake is a legend, from its ancient Greek roots to the famous New York style. My Creamy Pineapple Delight is a playful, modern spin. It ditches the oven entirely for a method that’s pure simplicity. While I adore a rich, baked cheesecake sometimes, this version celebrates the no-bake trend. It’s light, airy, and bursting with fruit. It’s like taking the classic cheesecake on a vacation to the tropics! Many cultures have fruit-topped versions, but putting the pineapple right in the filling? That’s a game-changer for flavor in every bite.
Why You’ll Fall in Love With This Pineapple Dessert
Honestly, why wouldn’t you? First, it’s incredibly easy. No water baths, no cracked tops, no stress. Second, it’s a total crowd-pleaser. The creamy, tangy filling with sweet pineapple is a combination nobody can resist. And third, it’s refreshing. It feels light enough after a big BBQ meal, yet completely satisfying. It’s the dessert that says “fun” and “fancy” at the same time. Plus, you can make it ahead of time, which is my secret weapon for stress-free hosting.
Perfect Occasions for Your Tropical Treat
This cheesecake is your new culinary best friend. Bring it to summer potlucks—it travels like a dream. Serve it at baby showers or birthdays for a cheerful, bright centerpiece. It’s perfect for Easter brunch or a Mother’s Day lunch. Honestly, any time you want to bring a smile to someone’s face, this is the ticket. It’s also a lifesaver on busy weeknights when you need a quick sweet fix without any fuss.
What You’ll Need for Your Creamy Pineapple Delight
Gather these simple ingredients. The beauty is in their simplicity!
- 8 oz. cream cheese, softened: This is key for a smooth, lump-free filling. Take it out of the fridge at least 30 minutes ahead.
- 2 cups Cool Whip, thawed: This gives our cheesecake its dreamy, cloud-like texture.
- 1 (15 oz) can crushed pineapple, well-drained (Use 2 cans for extra pineapple flavor!)*: Don’t skip the draining! We want the flavor, not the extra juice.
- 1/2 cup granulated sugar: Sweetens the deal perfectly.
- 1 prepared graham cracker pie crust: The buttery, crunchy foundation. You can make your own, but the store-bought ones are fantastic.
- Whipped cream and maraschino cherries for garnish: The classic, pretty finish!
No Problem! Handy Substitution Options
Out of something? No worries, here are some easy swaps:
- Cool Whip: You can use an equal amount of homemade whipped cream, stabilized with a little powdered sugar.
- Graham Cracker Crust: Try a vanilla wafer or shortbread cookie crust for a different vibe.
- Canned Pineapple: Fresh pineapple is great, but make sure to chop it very fine and drain any excess liquid well.
- Full-Fat Cream Cheese: Reduced-fat works, but the filling might be a bit softer. I don’t recommend fat-free.
Creating Your No-Bake Pineapple Cheesecake Masterpiece
Follow these simple steps for the perfect creamy pineapple cheesecake every single time.
Step 1: Cream the Cheese and Sugar
Grab your trusty mixing bowl and your softened cream cheese. Toss in the granulated sugar. Now, beat them together on medium-high speed. You want to go for a full two minutes, maybe three. Watch the magic happen! That grainy texture transforms into a beautifully smooth, pale, and creamy base. This step is crucial. It ensures your sugar dissolves completely, so you won’t have a gritty filling. Pro tip: Scrape down the sides of the bowl halfway through to make sure everything gets incorporated evenly.
Step 2: Gently Fold in the Cool Whip
Okay, here’s where we get light and fluffy! Take your thawed Cool Whip. Add it all to the bowl with the cream cheese mixture. Now, put the mixer away. We’re using a spatula for this. Gently turn the mixture over onto itself, folding from the bottom up. We want to keep as much of that airy volume as possible. Keep folding until no white streaks remain and you have a uniform, cloud-like mixture. It should look invitingly fluffy!
Step 3: Incorporate the Juicy Pineapple
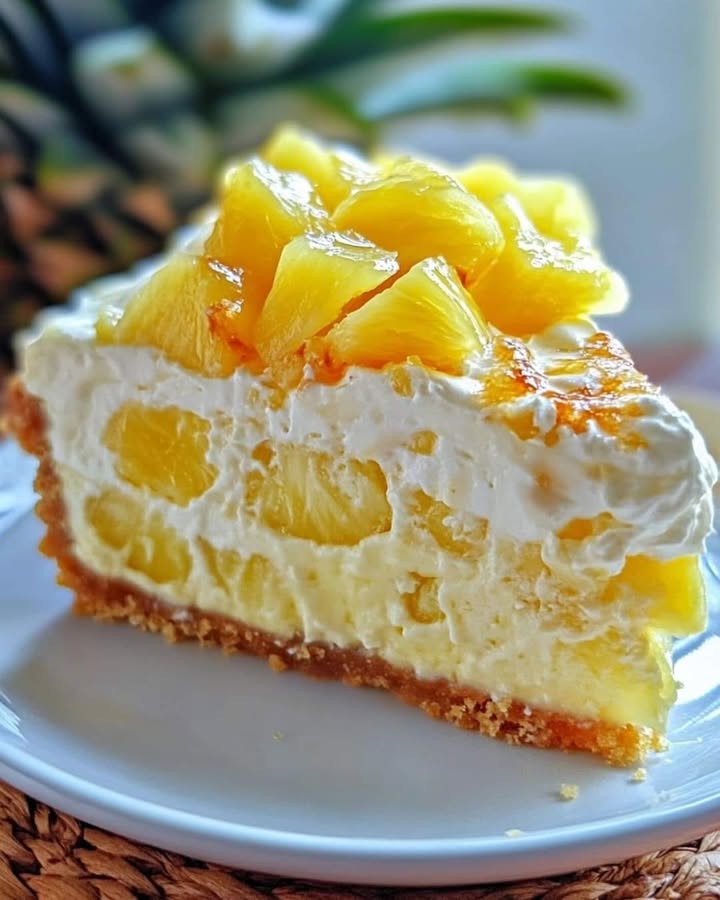
Remember that can of crushed pineapple you drained really well? It’s showtime! Dump it right into the creamy, fluffy mixture. Using that same folding motion with your spatula, gently stir it in. You’ll see lovely bits of golden pineapple speckled throughout the white cream. The aroma starts to get really tropical now! Make sure it’s evenly mixed so every single bite gets a taste of pineapple sunshine.
Step 4: Fill Your Crust and Smooth It Out
Get your prepared graham cracker crust ready. Pour all of that gorgeous pineapple filling right into the center. Take your spatula and spread it out gently, pushing it towards the edges. Aim for an even, smooth top. Don’t press down too hard; just guide it into place. Admire how the golden crust and creamy yellow-white filling look together already. It’s starting to look like the tropical treat you’ve been dreaming of!
Step 5: The Essential Chill Time
Patience is a virtue, especially here! Carefully lift your pie plate and slide it into the refrigerator. You need to let it chill for at least 4 hours, but overnight is truly best. This quiet time allows the filling to firm up perfectly, so you get neat, clean slices later. If you’re in a huge rush, the freezer for 2-3 hours works, but the fridge is the gold standard for texture. Watch it set—it’s worth the wait!
Step 6: The Grand Finale Garnish
The moment of truth! Pull your beautifully set Creamy Pineapple Delight from the fridge. Just before serving, add the final flourishes. Pipe or dollop some fresh whipped cream around the edges. Pop a few bright red maraschino cherries on top. That pop of red against the creamy yellow is just gorgeous. This step makes it look special and adds a little extra sweetness. Now, slice, serve, and get ready for the compliments!
Chef’s Tip
For the absolute smoothest, most luxurious texture, sift your granulated sugar before adding it to the cream cheese. It sounds fancy, but it takes two seconds and guarantees no little sugar granules are left undissolved. It makes the filling silky-perfect.
Timing is Everything
This recipe is wonderfully quick to put together, but it does need time to set. Here’s your timeline:
- Prep Time: 15 minutes
- Chill Time: Minimum 4 hours (Overnight is ideal)
- Total Time: 4 hours 15 minutes
- Servings: 8 happy people
A Little Extra Info on Our Star Ingredient
Pineapple isn’t just tasty; it’s fascinating! It contains an enzyme called bromelain, which is a natural meat tenderizer. That’s why your mouth can sometimes feel a little tingly—it’s gently breaking down proteins! In our cheesecake, using canned pineapple is perfect because the canning process deactivates most of this enzyme, so it doesn’t affect our creamy filling texture.
Kitchen Tools You’ll Need
You likely have everything already:
- A large mixing bowl
- Electric hand mixer or stand mixer
- Rubber spatula
- Measuring cups
- Can opener
- Fine mesh strainer (for draining pineapple)
Storing Your Leftover Tropical Treat
Cover any leftover cheesecake tightly with plastic wrap or aluminum foil, or transfer slices to an airtight container. Store it in the refrigerator. It will stay fresh and delicious for 3-4 days. The crust may soften slightly after a day or two, but the flavor will still be fantastic.
You can also freeze this cheesecake for longer storage. Wrap the whole pie or individual slices very well in plastic wrap, then in foil. It will keep in the freezer for 1-2 months. To serve, thaw it overnight in the refrigerator.
I do not recommend leaving the cheesecake out at room temperature for more than 2 hours, as the dairy-based filling can spoil. Always keep it chilled until you’re ready to serve and enjoy!
My Best Tips for a Perfect Pineapple Dessert
- Drain, Drain, Drain! Press the crushed pineapple in a strainer, even give it a little squeeze with a spoon. Too much liquid makes a runny filling.
- Soften that Cream Cheese! Really, let it sit out. Room temp cheese blends smoothly and avoids lumps.
- Chill Thoroughly. Don’t rush this. A well-set cheesecake is the difference between a perfect slice and a puddle.
- Use a Hot Knife. For clean slices, run your knife under very hot water, wipe it dry, and then cut. Repeat between each slice.
Presentation Ideas to Impress Your Guests
- Serve on a bright, tropical-themed platter.
- Garnish with a twist of fresh pineapple or a mint sprig alongside the cherries.
- Drizzle a little extra pineapple juice or caramel sauce on the plate under each slice.
- For a party, make mini versions in a muffin tin with graham cracker crusts!
Feeling Adventurous? Try These Healthier Twists!
Love the idea but want to lighten it up or change the flavor? Here are six fun variations:
- Greek Yogurt Swap: Replace half the cream cheese with plain Greek yogurt for a protein boost and tangy flavor.
- Coconut Dream: Add 1/2 cup of toasted coconut to the filling and use a coconut cookie crust for a piña colada vibe.
- Mango Tango: Swap the pineapple for pureed, well-drained mango. It’s a beautifully smooth and vibrant alternative.
- Vegan Delight: Use vegan cream cheese, coconut whipped cream, and a vegan graham crust. Just as creamy, completely plant-based.
- Sugar-Free Version: Use a sugar substitute designed for baking (like erythritol) and sugar-free pineapple packed in juice.
- Berry Pineapple Fusion: Fold in 1 cup of fresh raspberries or chopped strawberries with the pineapple for a berry blast. If you love fruit and chocolate, you must try our decadent mixed berry chocolate cheesecake for another incredible flavor combination.
Common Mistakes to Avoid
Avoid these simple pitfalls for the best Creamy Pineapple Cheesecake every time.
Mistake 1: Not Draining the Pineapple Enough
This is the number one reason a no-bake cheesecake turns out soupy. That liquid in the can is extra, and it will thin out your filling. If you don’t drain it well, you’ll end up with a cheesecake that won’t set properly. Always use a fine-mesh strainer and press the pineapple gently with the back of a spoon. Let it sit for a few minutes to get as much juice out as possible. Your perfect slice depends on it!
Mistake 2: Using Cold Cream Cheese
Hard, cold cream cheese straight from the fridge is a lump’s best friend. It won’t blend smoothly with the sugar, leaving you with a grainy texture. Always plan ahead. Let your cream cheese soften on the counter for 30-60 minutes. It should yield to gentle pressure. If you’re in a pinch, you can microwave it on low power for 10-15 seconds, but be careful not to melt it!
Mistake 3: Overmixing After Adding Cool Whip
Once you fold in the Cool Whip or whipped cream, switch to a spatula and be gentle. If you keep using the electric mixer, you’ll deflate all that lovely air. This makes the filling dense instead of light and fluffy. Fold just until the mixture is uniform and no white streaks remain. It’s okay if it looks a little soft—it will firm up in the fridge.
Mistake 4: Skipping the Long Chill
Impatience is the enemy here! This no-bake cheesecake needs time for the filling to hydrate and set properly. Slicing into it after just an hour or two will give you a delicious but messy pudding-like texture. For perfect, clean slices, chill it for the full 4 hours, and overnight is truly the best. It’s a great make-ahead dessert because of this.
Mistake 5: Forgetting the Garnish
It might seem like just a pretty extra, but that whipped cream and cherry topping does two things. First, it adds a lovely visual pop that makes your dessert look special. Second, it adds a different texture and a burst of extra sweetness that complements the tangy pineapple perfectly. Don’t skip that finishing touch!
Frequently Asked Questions
Can I use fresh pineapple instead of canned?
You absolutely can use fresh pineapple! It will give a brighter, more vibrant flavor. The key is to chop it very finely, almost crushing it yourself, and then drain it extremely well. Fresh pineapple tends to release more liquid than canned as it sits. I’d even recommend placing the chopped pineapple in a fine-mesh strainer over a bowl and letting it drain in the fridge for 30 minutes before using. This extra step ensures your filling stays firm and perfect.
How long does this cheesecake last in the fridge?
When stored properly in the refrigerator, covered tightly with plastic wrap or in an airtight container, this Creamy Pineapple Delight will stay fresh for 3 to 4 days. The crust will gradually soften from the moisture in the filling, but it will still taste wonderful. I find it’s best enjoyed within the first 2-3 days for the ideal texture contrast between the creamy filling and the crunchy crust.
Can I freeze this no-bake cheesecake?
Yes, this cheesecake freezes very well, making it a fantastic make-ahead dessert. To freeze, first let it set completely in the refrigerator. Then, wrap the entire pie plate tightly in plastic wrap, followed by a layer of aluminum foil. You can also slice it and wrap individual portions. It will keep frozen for 1-2 months. Thaw it overnight in the refrigerator before serving. The texture might be slightly different but still delicious.
My filling is runny. What did I do wrong and can I fix it?
A runny filling almost always points to under-drained pineapple or not enough chilling time. First, make sure it has chilled for the full 4 hours, or even longer. If it’s still runny, pop it in the freezer for an hour to firm up quickly. To prevent this next time, be ruthless about draining that pineapple! You can also try adding an extra tablespoon or two of graham cracker crumbs to the filling to help absorb excess moisture and thicken it.
What can I use if I don’t have Cool Whip?
No Cool Whip? No problem! You can make your own stabilized whipped cream. Simply whip 1 cup of heavy whipping cream with 2 tablespoons of powdered sugar and 1/2 teaspoon of vanilla extract until you get stiff peaks. The powdered sugar helps stabilize it a bit. Gently fold this into your cream cheese mixture just like you would with Cool Whip. The texture will be similarly light and airy.
Can I make this into mini cheesecakes?
Mini cheesecakes are a fantastic idea for parties! Instead of one big pie crust, use a muffin tin lined with cupcake liners. Press about 2 tablespoons of graham cracker crumbs mixed with a little melted butter into the bottom of each liner. Divide the filling evenly among them. Chill as usual. They’ll set faster and are adorable individual portions. They’re perfect alongside other bite-sized appetizers like savory Taco Ranch Bites.
Is there a way to make this recipe less sweet?
If you prefer a less sweet dessert, you can easily reduce the sugar by a quarter cup. Start with 1/4 cup of granulated sugar instead of 1/2 cup. Taste the cream cheese mixture before adding the Cool Whip to see if it’s sweet enough for you. Remember, the pineapple and any garnish also add sweetness. You can also look for pineapple canned in its own juice (not syrup) and ensure it’s well-drained.
Can I add other fruits to this recipe?
Absolutely! This recipe is wonderfully adaptable. Feel free to fold in 1/2 cup of other finely chopped, well-drained fruits like mango, peaches, or strawberries along with the pineapple. For a more decadent dessert, consider pairing pineapple with other rich flavors, like in our banana caramel peanut butter cheesecake, which is a different but equally delightful indulgence.
Why is my cheesecake filling lumpy?
Lumps come from the cream cheese not being soft enough before mixing. Always ensure your cream cheese is at true room temperature. If you find lumps in your mixture, you can try beating it longer with the sugar, which can sometimes smooth them out. For the silkiest texture, you can even press the finished filling through a fine-mesh sieve before adding it to the crust, though this is an extra step.
Can I use a different type of crust?
Of course! While graham cracker is classic, you can use any crumb crust you love. Vanilla wafers (Nilla Wafers) make a delicious, slightly sweeter crust. Ginger snap cookies would add a lovely spicy note. You could even use a pre-made shortbread crust. The method of slow cooking a savory dish is wonderful for developing deep flavors, but for this dessert, we stick with a quick, no-bake crust for maximum ease and freshness.
I hope this recipe brings as much joy to your kitchen as it has to mine. It’s a testament to how simple ingredients can create something truly special. For more sweet inspirations like this, be sure to explore our entire collection of creamy and dreamy cheesecake recipes.
Your New Go-To Summer Dessert is Ready!
So there you have it! My beloved, foolproof recipe for a Creamy Pineapple Cheesecake that’s guaranteed to be a hit. It’s the dessert I turn to when I want something impressive without the stress. It’s sweet, tangy, creamy, and crunchy all at once. It’s a little reminder that the best things in life—and in the kitchen—don’t have to be complicated. Now, go grab that mixing bowl, put on some sunny music, and whip up your own taste of tropical paradise. Don’t forget the cherry on top!
Equipment
- Grand bol
- Fouet électrique
- Spatule en caoutchouc
- Tamise
- Papier sulfurisé
Ingredients
- 8 oz fromage à la crème ramolli
- 2 tasses Cool Whip décongelé
- 1 boîte ananas broyé bien égoutté
- 1/2 tasse sucre granulé
- 1 croûte croûte de biscuit Graham préparée
- q.s. crème fouettée et cerises maraschino pour garnir
Instructions
- Crémez le fromage à la crème ramolli et le sucre granulé ensemble dans un grand bol jusqu'à ce que le mélange soit lisse.
- Incorporez délicatement le Cool Whip décongelé jusqu'à ce qu'il n'y ait plus de stries visibles.
- Ajoutez l'ananas broyé bien égoutté et incorporez délicatement jusqu'à ce que le mélange soit homogène.
- Versez la garniture dans la croûte de biscuit Graham préparée et lissez le dessus.
- Laissez refroidir au réfrigérateur pendant au moins 4 heures, de préférence toute la nuit.
- Avant de servir, décorez avec de la crème fouettée et des cerises maraschino.
Notes
Nutrition

Hi, I’m Olivia Parker, the founder of BakingSecret.com and a lifelong lover of all things sweet and homemade. I grew up in a small town in Oregon, where the smell of fresh cookies in my family’s kitchen sparked my passion for baking. Over the years, I turned that passion into a mission: to help home bakers feel confident, inspired, and creative.
After studying food science and working in several artisan bakeries across the U.S., I decided to create a space where everyone from beginners to seasoned bakers can find reliable recipes, expert tips, and a warm, welcoming community. BakingSecret.com is my way of sharing the magic of baking with the world. When I’m not testing new recipes, you’ll find me exploring farmers’ markets, collecting vintage cookbooks, or perfecting my sourdough technique.