
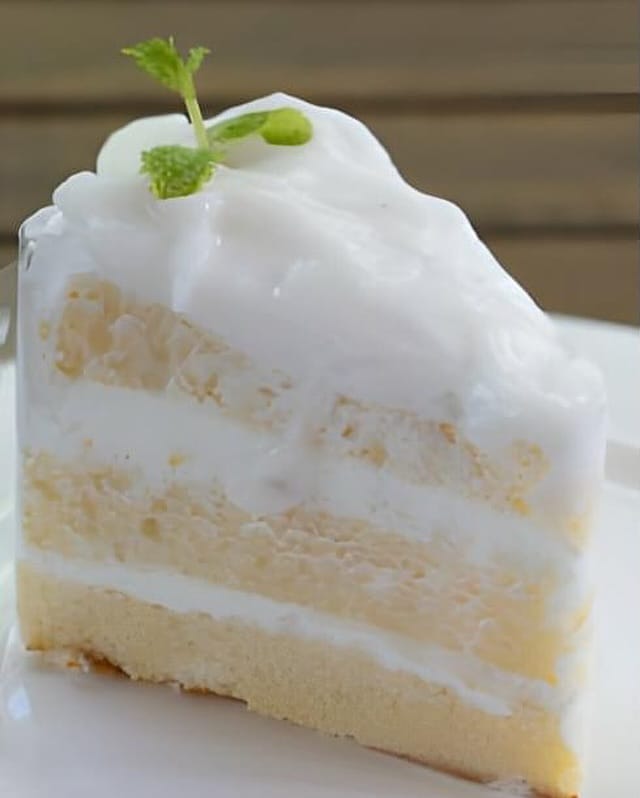
A Slice of Heaven: Why This Vanilla Layer Cake is a Game-Changer
Picture this: you’re at a family birthday party, and the star of the show is a towering vanilla cake layered with fluffy frosting. The first bite melts in your mouth, light yet rich, sweet yet balanced. That’s the magic of a Heavenly Vanilla Layer Cake. I made this cake for my niece’s 10th birthday last summer, and let me tell you, it was a hit! The room filled with oohs and aahs as I sliced into its soft, golden layers. If you love baking something that feels like a warm hug, this recipe is for you.
The Story Behind This Classic Treat
Vanilla layer cakes have been gracing tables for generations. Their origins trace back to simple butter cakes brought over by European settlers, who turned them into celebratory masterpieces. Over time, bakers added their own twists—richer frostings, creative decorations—but the heart of the dish remains the same. It’s versatile enough for birthdays, anniversaries, or even just because Tuesday needs a little sweetness. My family calls it the “go-to” cake because it works for any occasion without breaking a sweat—or the bank!
Why You’ll Love This Recipe
This recipe shines because it’s foolproof and delivers incredible results every time. The vanilla flavor sings through without overpowering, making it perfect for pairing with almost anything—from fresh berries to chocolate drizzle. Plus, it comes together quickly with basic pantry ingredients. Did I mention how easy it is? Even if you’re new to baking, this Heavenly Vanilla Layer Cake will make you feel like a pro.
Perfect Occasions to Whip Up This Cake
Birthdays are an obvious choice, but don’t stop there. Bring this beauty to baby showers, potlucks, or holiday gatherings. I’ve also made it as a comforting dessert on cozy Sunday afternoons when life felt a bit too hectic. Everyone deserves cake sometimes, right?
What You’ll Need
- 2 ½ cups all-purpose flour
- 2 ½ teaspoons baking powder
- ½ teaspoon salt
- ¾ cup unsalted butter, room temperature
- 1 ½ cups sugar
- 3 large eggs
- 1 tablespoon vanilla extract
- 1 cup of milk
- For the Vanilla Buttercream Frosting:
- 1 cup unsalted butter, room temperature
- 4 cups powdered sugar
- 2 teaspoons vanilla extract
- 2-4 tablespoons heavy cream
Ingredient Substitutes
If you’re missing certain items, no worries! Swap all-purpose flour for gluten-free flour blends if needed. Use almond milk instead of regular milk for a dairy-free version. For the frosting, coconut cream can replace heavy cream for a slightly tropical twist. Just remember, substitutions might change the texture or taste ever so slightly, but they won’t ruin your masterpiece.
Step 1: Preparing Your Kitchen
Start by preheating your oven to 350°F (176°C). Greasing and flouring two 9-inch round pans ensures your cake slides out smoothly later. Trust me; nobody wants a stuck layer ruining their vibe. As you prep, imagine the aroma of vanilla wafting through your kitchen—it’s worth every minute of effort.
Pro tip: Line the bottom of your pans with parchment paper for extra insurance against sticking.
Step 2: Mixing Dry Ingredients
In a medium bowl, whisk together flour, baking powder, and salt. This step is crucial because evenly distributing these ingredients prevents lumps in your batter. Think of it like building the foundation of a house—you want everything nice and sturdy before moving forward.
Chef’s tip: Sifting your dry ingredients adds airiness to the mix, enhancing the cake’s fluffiness.
Step 3: Creaming Butter and Sugar
Grab your stand mixer or handheld beaters and cream the butter and sugar until light and fluffy. Watch the transformation—it goes from crumbly to cloud-like in minutes. Add the eggs one at a time, followed by the vanilla extract. The fragrance will fill your kitchen, teasing everyone nearby.
Practical tip: Make sure your butter is truly softened but not melted. Cold butter won’t incorporate properly, while melted butter makes the batter greasy.
Step 4: Combining Wet and Dry
Alternate adding the flour mixture and milk to the butter blend, starting and ending with the flour. Why alternate? Because it keeps the batter smooth and prevents overmixing, which could lead to dense cakes. The final result should be silky and creamy, ready to become fluffy layers of joy.
Step 5: Baking Magic
Pour the batter evenly into your prepared pans and pop them in the oven for 25-30 minutes. Check for doneness with a toothpick—if it comes out clean, you’re golden. Literally golden, since these cakes have a lovely pale hue.
Gentle reminder: Rotate the pans halfway through baking for even browning.
Step 6: Creating Dreamy Frosting
Beat room-temperature butter until creamy, then gradually add powdered sugar, vanilla, and heavy cream. Adjust the cream based on how spreadable you want your frosting. A good frosting shouldn’t just sit there; it should dance between layers and melt in your mouth.
Step 7: Assembly Time
Once the cakes cool completely, frost generously. Stack one layer atop the other, pressing lightly so they stick together. Finish with swoops and swirls for a bakery-worthy look. Don’t stress about perfection—it’s homemade charm that counts!
Timing Breakdown
Preparation takes around 30 minutes, and baking another 30. Total time? One hour. Rest assured, the wait is worth it when you see those smiling faces dive into your creation. (Click here for more tips on food transparency.)
Chef’s Secret
Add an extra teaspoon of vanilla extract to both the cake and frosting for a deeper flavor profile.
Something Extra Special
Did you know vanilla beans were once considered so precious that only royalty could afford them? Thankfully, today we can all enjoy their heavenly essence.
Necessary Equipment
You’ll need mixing bowls, a stand mixer or hand mixer, measuring cups/spoons, spatulas, and 9-inch round cake pans. Keep a toothpick handy for testing doneness.
Storage Tips
Store leftover slices in an airtight container at room temperature for up to three days. Beyond that, refrigerate to extend freshness. However, chilling dulls flavors slightly, so bring slices to room temp before serving again.
To freeze, wrap individual portions tightly in plastic wrap and store in freezer bags. They’ll keep beautifully for up to two months. When thawing, place on the counter overnight or gently reheat in the microwave.
Remember, proper storage protects moisture and flavor, ensuring each bite tastes freshly baked.
Tips and Tricks
- Level your cakes before frosting for a professional finish.
- Dust counters with flour sparingly—a little goes a long way.
- Keep ingredients at room temperature for best consistency.
Presentation Ideas
- Sprinkle edible flowers for elegance.
- Top with fresh berries for color contrast.
- Pipe decorative borders using a pastry bag.
- Serve alongside a dollop of whipped cream.
Healthier Alternatives
Let’s explore some variations of this Heavenly Vanilla Layer Cake:
- Gluten-Free Option: Substitute all-purpose flour with a certified GF blend.
- Dairy-Free Delight: Use plant-based butter and nut milk.
- Low-Sugar Version: Replace granulated sugar with monk fruit or stevia.
- Whole Grain Goodness: Incorporate whole wheat pastry flour for added nutrients.
- Vegan Twist: Follow the dairy-free adjustments and use applesauce instead of eggs.
- Protein-Packed Cake: Blend protein powder directly into the batter.
Related Recipes
If you adore this Heavenly Vanilla Layer Cake, try our vibrant Colorful Funfetti Delight, packed with rainbow sprinkles. Or indulge in rich decadence with our Indulgent Chocolate Bliss. Chocolate lovers might appreciate the gooey goodness of our M&M Chocolate Cake. For tropical vibes, check out the Mango Bliss Cake. And finally, browse more desserts under our dessert collection.
Common Mistakes to Avoid
Mistake 1: Skipping Room-Temperature Ingredients
Baking with cold butter or eggs leads to uneven textures and poor incorporation. Always set ingredients out ahead of time.
Handy hint: Forgot to soften butter? Cut it into cubes and let it sit for 15 minutes.
Mistake 2: Overmixing the Batter
Overmixing develops gluten, resulting in tough cakes. Stir just until combined to maintain tenderness.
Mistake 3: Rushing Cooling Time
Frosting warm cakes causes melting disasters. Patience is key here—let them cool completely on wire racks.
Frequently Asked Questions
Can I halve this recipe?
Absolutely! Halving works perfectly for smaller gatherings. Adjust accordingly and bake in smaller pans.
How do I prevent my cake from doming?
Domed cakes happen due to uneven heat distribution. Simply tap the pans on the counter post-bake to deflate slightly.
Is it okay to use self-rising flour?
Nope! Self-rising flour contains leavening agents already, altering the rise significantly. Stick to all-purpose plus baking powder.
Can I freeze unfrosted layers?
Yes, double-wrap unfrosted cakes in plastic for freezing. Thaw overnight before decorating.
What’s the best type of vanilla extract?
Pure vanilla extract offers superior flavor compared to imitation. Splurge here—it’s worth it!
How long does the frosting last?
The buttercream stays fresh at room temperature for 2 days or refrigerated for a week. Bring to room temp before spreading.
Can I make this recipe eggless?
Swap eggs with flaxseed gel—1 tbsp ground flax + 3 tbsp water equals one egg substitute.
Why did my frosting turn grainy?
Graininess happens when powdered sugar isn’t fully incorporated. Beat longer to achieve smoothness.
Should I chill the frosted cake?
Refrigerating briefly helps set the frosting, especially during humid weather. Remove 30 mins prior to serving.
Where can I find more dessert ideas?
Explore our dessert category for endless inspiration.
Closing Thoughts
Baking a Heavenly Vanilla Layer Cake isn’t just about creating dessert—it’s about crafting memories. Whether celebrating milestones or simply treating yourself, this cake promises happiness in every slice. So grab your apron, crank up the tunes, and get ready to wow your loved ones. Happy baking!
Equipment
- Mixing bowls
- Stand mixer or hand mixer
- Measuring cups and spoons
- Spatulas
- 9-inch round cake pans
- Toothpick
Ingredients
- 2 ½ cups all-purpose flour
- 2 ½ tsp baking powder
- ½ tsp salt
- ¾ cup unsalted butter, room temperature
- 1 ½ cups sugar
- 3 large eggs
- 1 tbsp vanilla extract
- 1 cup milk
- 1 cup unsalted butter, room temperature (for frosting)
- 4 cups powdered sugar
- 2 tsp vanilla extract (for frosting)
- 2-4 tbsp heavy cream
Instructions
- Preheat your oven to 350°F (176°C) and grease and flour two 9-inch round pans.
- In a medium bowl, whisk together flour, baking powder, and salt.
- Cream the room temperature butter and sugar until light and fluffy, then add eggs one at a time followed by vanilla extract.
- Alternate adding the flour mixture and milk to the butter blend, starting and ending with flour.
- Pour the batter evenly into the prepared pans and bake for 25-30 minutes.
- Check for doneness with a toothpick. Let the cakes cool completely.
- For the frosting, beat room-temperature butter until creamy, add powdered sugar, vanilla, and heavy cream gradually.
- Frost the cooled cakes generously, stacking one layer on top of the other.
Notes
Nutrition

Hi, I’m Olivia Parker, the founder of BakingSecret.com and a lifelong lover of all things sweet and homemade. I grew up in a small town in Oregon, where the smell of fresh cookies in my family’s kitchen sparked my passion for baking. Over the years, I turned that passion into a mission: to help home bakers feel confident, inspired, and creative.
After studying food science and working in several artisan bakeries across the U.S., I decided to create a space where everyone from beginners to seasoned bakers can find reliable recipes, expert tips, and a warm, welcoming community. BakingSecret.com is my way of sharing the magic of baking with the world. When I’m not testing new recipes, you’ll find me exploring farmers’ markets, collecting vintage cookbooks, or perfecting my sourdough technique.