
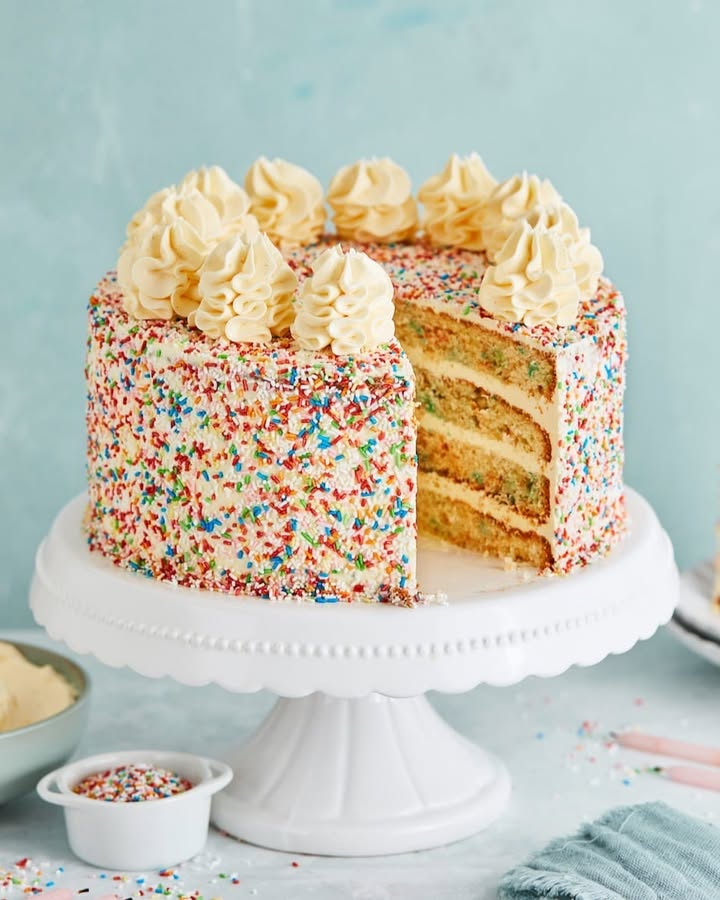
What Makes Colorful Funfetti Delight So Special?
There’s just something magical about a cake that makes you smile the moment you see it. I remember the first time I baked a **Colorful Funfetti Delight** for my niece’s birthday – her eyes lit up like fireworks. This cake is not just dessert; it’s an experience full of color, sweetness, and joy. Whether you’re baking for a celebration or just because, this funfetti beauty never fails to impress. The sprinkle-speckled layers scream happiness, while the buttercream ties it all together with creamy perfection.
A Peek Into Funfetti Cake’s History
Funfetti cakes have been around since the 1980s when boxed mixes introduced colorful sprinkles as their secret weapon for fun. It was revolutionary at the time – no need for fancy decorations, the “fun” was baked right in! My version takes things a step further, giving you the nostalgia of that retro favorite but with a homemade twist. Over the years, I’ve added little tweaks that make it stand out. Trust me, once you go homemade, you’ll never settle for anything less!
Why You’ll Love This Recipe
This recipe is all about simplicity and wow factor rolled into one. It’s beginner-friendly but still delivers bakery-quality results. The dough is easy to prepare, the sprinkles are the life of the party, and the buttercream? Oh, it’s pure heaven. Plus, the cake layers are light and fluffy, making every bite a delight. Best of all, you can customize it endlessly – add more sprinkles, experiment with flavors, or even try different frostings.
Perfect Occasions to Bring Out This Sweet Surprise
The **Colorful Funfetti Delight** shines on birthdays, anniversaries, and baby showers. But honestly, who needs an excuse? I’ve made this cake for family movie nights, backyard barbecues, and even “just because” Tuesdays. Its vibrant colors and playful vibe brighten any day, turning ordinary moments into special ones. If you’re hosting a brunch, consider pairing it with Mango Bliss Cake for a tropical twist.
What You’ll Need: Ingredients for the Batter
To get started, here’s everything you’ll need:
- 400 g wheat flour type 405
- 1 packet of baking powder
- 1 pinch of salt
- 250 g soft butter (room temperature)
- 180 g sugar
- 3 eggs (size M)
- 200 g sour cream
- 2 tsp vanilla extract
- 5 tbsp milk
- 100 g colored sugar sprinkles
- Some butter for the molds
For the Buttercream & Decoration
- 500 ml milk
- 1 tsp vanilla extract
- 2 packets of vanilla pudding powder (37 g each)
- 100 g sugar
- 1 egg yolk (size M)
- 500 g soft butter (room temperature)
- 200 g colored sugar sprinkles
Substitution Options
Not everyone has all these ingredients sitting in their pantry, so here are some swaps:
- If you don’t have sour cream, Greek yogurt works fine.
- You can swap vanilla extract with almond extract for a nuttier taste.
- Non-dairy milk alternatives like almond or oat milk work perfectly too.
Step 1: Mixing Up the Batter
Start by whisking together your dry ingredients – flour, baking powder, and a pinch of salt. In another bowl, beat the softened butter and sugar until they become light and creamy. Imagine how clouds would taste if they were sweet – that’s what you’re aiming for! Slowly add the eggs one by one, mixing after each addition. Blend in the sour cream and vanilla extract, then gently stir in the flour mixture and milk until smooth. Finally, fold in those cheerful colored sprinkles. Pro tip: Be quick here to prevent the sprinkles from bleeding into the batter.
Step 2: Baking the Layers
Preheat your oven to 180°C (fan oven: 160°C). Grease two round springform pans (20 cm in diameter) and line them with parchment paper for extra safety. Divide the batter evenly between the pans. As they bake, your kitchen will fill with the warm scent of vanilla and butter – pure bliss! Bake for 35-40 minutes until golden brown. Insert a toothpick to ensure the layers are fully cooked through. Let them cool completely before moving on.
Step 3: Preparing the Frosting
Now comes the crown jewel of our cake – the buttercream. Heat the milk and prepare the vanilla pudding according to the package instructions. Once cooled, whip the room-temperature butter until fluffy, then gradually mix in the pudding. Add sprinkles on top for that final pop of color. Chef’s tip: Chill the frosting briefly before spreading for better consistency.
Timing Breakdown
Here’s how long things take:
- Prep Time: 20 minutes
- Cooking Time: 40 minutes
- Cooling Time: 1 hour
- Total Time: Approximately 2 hours
Chef’s Secret for Perfect Sprinkles
Add sprinkles last to keep their vibrant hue intact. For healthier choices, check out this guide on lowering sodium levels without sacrificing flavor.
Necessary Equipment
You’ll need:
- Mixing bowls
- Electric mixer
- Baking pans
- Parchment paper
- Spatula
Storage Tips
Store this cake in an airtight container at room temperature for up to three days. After that, refrigeration is key. Bring it back to room temp before serving for optimal texture. For longer storage, freeze individual slices wrapped tightly in plastic.
Tips and Advice
- Use room-temperature ingredients for smoother blending.
- Don’t overmix the batter – it can make the cake dense.
- Experiment with different types of sprinkles for variety.
Presentation Ideas
Top your **Colorful Funfetti Delight** with edible flowers or candles for birthdays. A dollop of whipped cream adds elegance, while pairing with Indulgent Chocolate Bliss creates contrast.
Healthier Alternatives
Try these variations:
- Gluten-Free Funfetti: Swap regular flour with almond or oat flour.
- Lactose-Free Option: Use coconut oil instead of butter.
- Lower Sugar: Replace sugar with stevia.
See all options under our cake recipes category.
Mistake 1: Skipping Room Temperature Ingredients
Room-temperature ingredients emulsify better. Cold butter won’t cream properly, leaving lumps behind. Pro tip: Let ingredients sit out an hour beforehand.
Mistake 2: Overbaking the Layers
Baking too long dries out the cake. To avoid this, set a timer and rely on the toothpick test rather than visual cues alone.
Frequently Asked Questions
Can I use a bundt pan instead?
Absolutely! Just adjust the baking time accordingly.
Do I have to use vanilla pudding for the frosting?
Nope, custard or pastry cream works wonderfully too.
And so on…
A Final Thought
A **Colorful Funfetti Delight** isn’t just a cake; it’s a slice of happiness. Dive into the full range of desserts in our cake collection, including gems like Pineapple Cupcake Delights. Happy baking!
Equipment
- Electric mixer
- Mixing bowls
- Baking pans (20 cm round springform pans)
- Parchment paper
- Spatula
Ingredients
- 400 g wheat flour type 405
- 1 packet baking powder
- 1 pinch salt
- 250 g soft butter (room temperature)
- 180 g sugar
- 3 size M eggs
- 200 g sour cream
- 2 tsp vanilla extract
- 5 tbsp milk
- 100 g colored sugar sprinkles
- some butter for the molds
- 500 ml milk (for frosting)
- 1 tsp vanilla extract (for frosting)
- 2 packets vanilla pudding powder (37 g each)
- 100 g sugar (for frosting)
- 1 size M egg yolk
- 500 g soft butter (room temperature, for frosting)
- 200 g colored sugar sprinkles (for decoration)
Instructions
- Whisk together flour, baking powder, and salt in a bowl.
- In another bowl, beat softened butter and sugar until light and creamy.
- Add eggs one at a time, mixing after each addition.
- Blend in sour cream and vanilla extract.
- Gradually stir in the flour mixture and milk until smooth.
- Fold in colored sprinkles gently to avoid bleeding.
- Preheat the oven to 180°C (160°C for a fan oven).
- Grease two 20 cm round springform pans and line with parchment paper.
- Divide the batter evenly between the pans.
- Bake for 35-40 minutes until golden brown and cooked through.
- Let the layers cool completely before frosting.
- Heat milk and prepare the vanilla pudding according to package instructions.
- Once cooled, whip room-temperature butter until fluffy.
- Gradually mix in pudding and add sprinkles on top of frosting for decoration.
Notes
Nutrition

Hi, I’m Olivia Parker, the founder of BakingSecret.com and a lifelong lover of all things sweet and homemade. I grew up in a small town in Oregon, where the smell of fresh cookies in my family’s kitchen sparked my passion for baking. Over the years, I turned that passion into a mission: to help home bakers feel confident, inspired, and creative.
After studying food science and working in several artisan bakeries across the U.S., I decided to create a space where everyone from beginners to seasoned bakers can find reliable recipes, expert tips, and a warm, welcoming community. BakingSecret.com is my way of sharing the magic of baking with the world. When I’m not testing new recipes, you’ll find me exploring farmers’ markets, collecting vintage cookbooks, or perfecting my sourdough technique.