
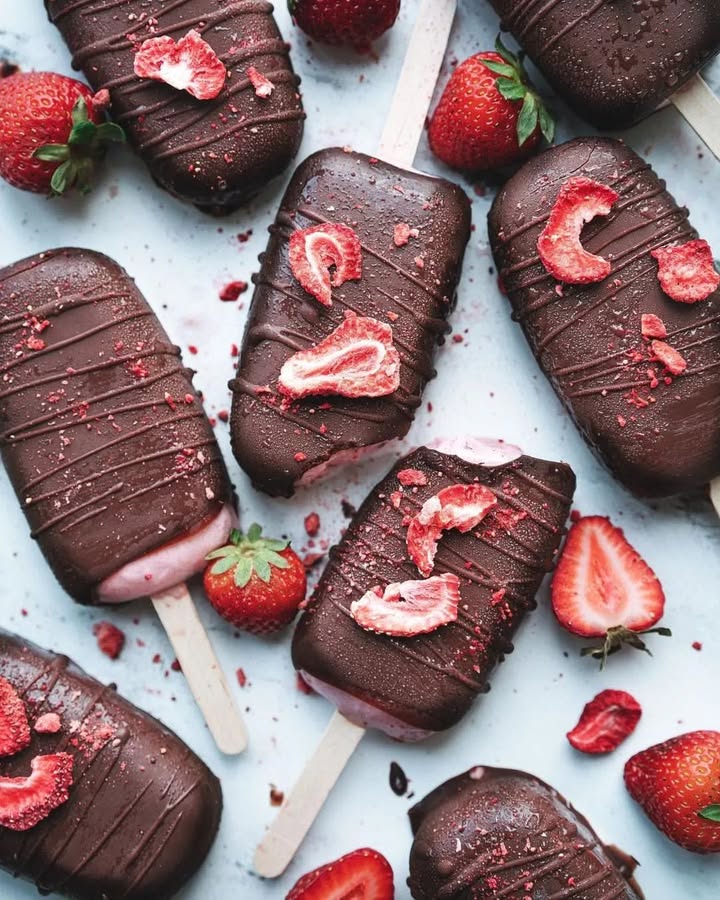
Why You’ll Love These Strawberry & Banana Magnum Popsicles
Let’s talk about the magic of summer treats. Imagine this: you’re lounging in your backyard, the sun is shining, and the kids are running around with sticky fingers from some sugary snack. Then you pull out these creamy, dreamy Strawberry Banana Popsicles, dipped in rich chocolate, and suddenly, you’re the hero of the day. Trust me; I’ve been there! I first made these for a family BBQ last summer, and they were such a hit that my nephew still asks me to bring them every time we gather. What makes this recipe so special? It’s dairy-free, naturally sweetened, and oh-so-delicious!
A Bit About the Origins
Back in the day, ice cream was all about heavy cream and sugar, which meant it wasn’t always the healthiest choice. But as more folks started exploring plant-based options, recipes like this one popped up (pun totally intended!). The blend of banana and strawberries gives you that nostalgic fruity flavor, while the coconut custard adds creaminess without dairy. When I discovered how easy it is to make at home, I decided to ditch store-bought versions forever. Plus, the chocolate dip takes this treat to a whole new level of indulgence.
Why You’ll Be Obsessed with This Recipe
This isn’t just any old popsicle recipe. The flavors are bright, fresh, and comforting all at once. You get the tangy sweetness of strawberries, the mellow creaminess of bananas, and the tropical richness of coconut. And let’s not forget the chocolate coating! Unlike store-bought versions, making these at home lets you control the ingredients. You can adjust the sweetness, skip additives, and tailor them to fit your taste. Best of all? They’re surprisingly simple to whip up.
Perfect Occasions for These Popsicles
Need a crowd-pleasing dessert for a birthday party? Done. Want something refreshing after a long day of backyard gardening? Check. Hosting a summer cookout or a cozy movie night? These pops work for that too. Seriously, they’re versatile enough for casual snacking but fancy enough to impress guests. Bonus: they’re a kid-favorite and a great way to sneak some fruit into their diet.
Ingredients for 8 Dreamy Popsicles
- For Strawberry & Banana Ice Cream:
- 1 can coconut custard
- 1 banana (about 120g)
- 200g fresh strawberries
- 2 Tbsp maple syrup
- 1 tsp vanilla extract
- For Chocolate Coating:
- 150g coconut oil
- 50g raw cacao powder
- 5-6 Tbsp maple syrup
Substitution Options for Flexibility
No coconut custard? No problem! Use full-fat coconut milk instead—it works just as well. If maple syrup isn’t your thing, swap it for honey or agave nectar. For those avoiding refined sugars, try using stevia or monk fruit sweetener. Instead of raw cacao powder, regular cocoa powder will do fine if that’s what you have on hand. Feel free to switch up the fruits too—raspberries or mangoes pair beautifully here.
Step 1: Blend Your Ice Cream Base
Start by tossing all the ingredients for your ice cream into a blender. Pop in the coconut custard, slice up your banana (use one that’s ripe but not mushy!), chop those juicy strawberries, drizzle in the maple syrup, and splash in that vanilla extract. Now blend until smooth and creamy. Take a little taste test—does it need more sweetness? Add another spoonful of maple syrup if your sweet tooth demands it. Pro tip: freeze your fruit beforehand for an extra frosty texture.
Step 2: Freeze Your Popsicles
Once blended, pour the mixture into ice cream molds. Carefully insert wooden sticks into each mold before transferring them to the freezer. Let them chill for at least 6 hours—or even better, overnight. Patience pays off here because you want these popsicles rock-solid before dipping them in chocolate. Trust me, rushing this step leads to melty disasters!
Step 3: Prep for Dipping
When your popsicles are frozen solid, lay out a baking sheet lined with parchment paper. Gently unmold the pops and place them on the sheet. Slide the tray back into the freezer while you prep the chocolate coating. This keeps the pops cold and firm, preventing any sad drips during the next step. Chef’s tip: Have everything ready before starting the melting process—it’s a game-changer for smooth execution.
Step 4: Melt That Chocolate Magic
To make the chocolate shell, combine the coconut oil, cacao powder, and maple syrup in a metal mixing bowl. Place it over a pot of simmering water (double boiler style) and stir until melted and glossy. Pour the warm chocolate into a tall glass or cup—it makes the dipping easier and cleaner. Now grab your pops from the freezer and get ready to coat!
Step 5: Dip, Chill, Repeat
Dunk each pop into the chocolate, twisting it gently to cover evenly. I recommend working in batches—dip four, return them to the freezer, then tackle the rest. This prevents the chocolate from softening too much and ensures a crisp, crunchy shell once frozen again. Store your finished masterpieces in the freezer until it’s time to serve. Voilà! Pure bliss.
Timing Breakdown
| Task | Time |
|---|---|
| Preparation | 15 minutes |
| Freezing Time | 6+ hours |
| Melting Chocolate | 10 minutes |
| Total Active Time | 25 minutes |
Chef’s Secret for Success
Here’s a golden nugget: always temper your expectations (and your chocolate). Coconut oil helps create a snap-worthy shell, but moving slowly and carefully is key. Also, if you notice the chocolate thickening too quickly, simply reheat it slightly to loosen it up.
An Interesting Fact
Did you know that blending strawberries releases their natural pectin, which helps thicken the mixture? That means no gums or stabilizers needed—just pure, wholesome goodness!
Necessary Equipment
- Blender
- Ice cream molds with sticks
- Baking sheet with parchment paper
- Double boiler or a heatproof bowl
- Tall glass or container for dipping
Storage Tips for Long-Term Enjoyment
These delightful Strawberry Banana Popsicles are best kept in the freezer. Wrap each pop individually in plastic wrap or parchment paper, then stash them in a sealed container or ziplock bag. This keeps freezer burn at bay. Always ensure your freezer is set below 0°F (-18°C) for optimal storage.
If you live somewhere with power outages, consider investing in a small backup cooler filled with dry ice for emergencies. And remember, leftovers rarely happen—but if they do, they’ll keep perfectly for up to two weeks.
Lastly, don’t stack the pops directly on top of each other unless they’re wrapped tightly. Otherwise, the chocolate shells may crack under pressure.
Tips and Advice to Elevate Your Game
Always use fresh, high-quality ingredients—they shine through in the final product. If possible, pick organic strawberries to avoid pesticides. Keep your workspace organized; having everything prepped and ready streamlines the process. Finally, experiment with textures—try rolling the dipped pops in crushed nuts or sprinkles for added flair.
Presentation Ideas
- Serve on a platter surrounded by fresh berries and mint leaves.
- Drizzle extra melted chocolate over the top for decorative flair.
- Wrap in colorful foil wrappers for a retro touch.
- Add edible glitter for a festive vibe.
Healthier Alternative Recipes
If you’re looking to lighten things up further, here are six variations:
- Low-Sugar Option: Replace maple syrup with stevia drops—you won’t miss the sugar!
- Vegan Dark Chocolate: Swap cacao powder for unsweetened dark chocolate chips for a richer flavor.
- Tropical Twist: Add pineapple chunks to the base for a piña colada vibe.
- Protein-Packed: Stir in a scoop of vanilla protein powder to the ice cream mix.
- Antioxidant Boost: Mix a handful of spinach leaves into the blend—don’t worry, you won’t taste them!
- Spiced Delight: Infuse the chocolate with cinnamon or chili powder for a bold kick.
Mistakes to Avoid When Making These Popsicles
Mistake 1: Skipping the Taste Test
One rookie error is neglecting to taste the ice cream base before freezing. Without proper seasoning, your pops could end up bland. Sweeten according to your preference and give it a quick sample before proceeding.
Mistake 2: Rushing the Freezing Process
Patience is essential here. Failing to fully freeze the pops will result in soggy messes when you attempt to dip them. Stick to the recommended 6+ hours to achieve perfection.
Mistake 3: Overheating the Chocolate
Scorching the chocolate ruins its texture and flavor. Use low heat and constant stirring to prevent burning. Practical tip: Remove the bowl from the heat just before the chocolate fully melts—it’ll continue melting off-residual heat.
Mistake 4: Using Low-Quality Ingredients
If you skimp on good-quality cacao powder or fresh fruit, your pops won’t reach their full potential. Splurge a little here—it’s worth it!
Mistake 5: Not Wrapping Properly
Storing improperly leads to dreaded freezer burn. Make sure to wrap each pop tightly or seal them in an airtight container. Here’s a handy guide on saturated fat to help choose healthier alternatives without sacrificing taste.
Frequently Asked Questions
Can I Use Frozen Strawberries?
Absolutely! Just thaw them slightly before blending to soften, ensuring a smoother consistency. Freshness matters less than quality here.
How Long Do These Last in the Freezer?
With proper storage, your homemade Strawberry Banana Popsicles will stay fresh for about two weeks. Beyond that, quality might decline slightly, though they’d still be safe to eat.
What Can I Do if My Chocolate Gets Too Thick?
No worries—simply reheat gently over low heat or microwave briefly in 10-second intervals, stirring between each zap. Easy fix!
Is There a Dairy-Free Alternative to Coconut Custard?
Yes! Try swapping with almond yogurt or cashew cream for similar results. Both options offer amazing texture without dairy.
Can I Add Other Fruits Besides Strawberries and Bananas?
Of course! Mango, blueberries, raspberries—they all pair wonderfully within the same framework. Experiment to find your faves!
Do I Need Special Equipment?
You don’t need anything extravagant—an average blender and standard ice cream molds suffice. Simpler is often better.
Are These Suitable for Kids?
Totally! Naturally sweetened and featuring hidden veggies (if you add spinach), they’re perfect snacks even for picky eaters.
Why Did My Chocolate Coating Crack?
Cracking usually happens due to temperature differences. Ensure your pops remain icy-cold while handling, and avoid touching them excessively.
Can I Make These Ahead for Party Planning?
Definitely. Their durability in the freezer makes them ideal for advance preparation. Read more about planning desserts here.
Final Thoughts
If you’re looking for a treat that combines fun, flavor, and health benefits, look no further. Whether shared with loved ones or savored solo, these homemade Strawberry Banana Popsicles are guaranteed to delight. So why wait? Grab those ingredients, crank up the blender, and turn your kitchen into a popsicle paradise today!
Equipment
- Blender
- Ice cream molds with sticks
- Baking sheet with parchment paper
- Double boiler or a heatproof bowl
- Tall glass or container for dipping
Ingredients
- 1 can coconut custard
- 1 medium banana about 120g
- 200 g fresh strawberries
- 2 Tbsp maple syrup
- 1 tsp vanilla extract
- 150 g coconut oil
- 50 g raw cacao powder
- 5-6 Tbsp maple syrup for chocolate coating
Instructions
- Blend coconut custard, banana, strawberries, maple syrup, and vanilla extract until smooth and creamy.
- Pour the mixture into ice cream molds and insert sticks; freeze for at least 6 hours or preferably overnight.
- Prepare a baking sheet lined with parchment paper and unmold the frozen pops, placing them on the sheet.
- Melt coconut oil, cacao powder, and maple syrup over a double boiler until glossy, then pour into a tall container.
- Dip each popsicle into the melted chocolate, return to the freezer, and store until ready to serve.
Notes
Nutrition

Hi, I’m Olivia Parker, the founder of BakingSecret.com and a lifelong lover of all things sweet and homemade. I grew up in a small town in Oregon, where the smell of fresh cookies in my family’s kitchen sparked my passion for baking. Over the years, I turned that passion into a mission: to help home bakers feel confident, inspired, and creative.
After studying food science and working in several artisan bakeries across the U.S., I decided to create a space where everyone from beginners to seasoned bakers can find reliable recipes, expert tips, and a warm, welcoming community. BakingSecret.com is my way of sharing the magic of baking with the world. When I’m not testing new recipes, you’ll find me exploring farmers’ markets, collecting vintage cookbooks, or perfecting my sourdough technique.