
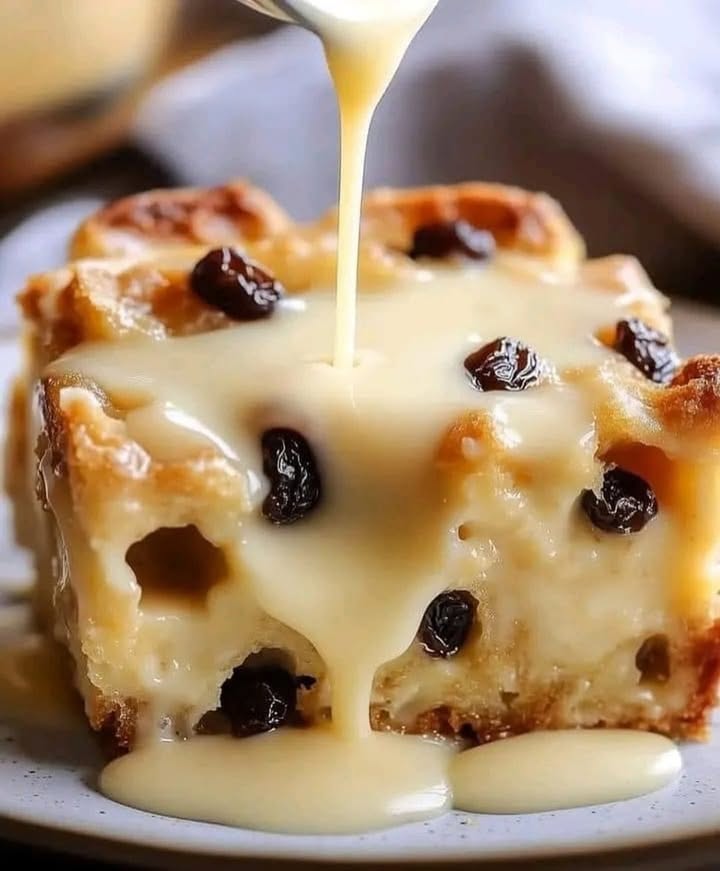
Grandma’s Vanilla Pudding: A Heartwarming Treat from the Past
There’s something incredibly comforting about a warm, creamy Grandma’s Vanilla Pudding. It reminds me of lazy Sunday afternoons spent in my grandmother’s kitchen, where the aroma of baking bread and sweet vanilla would fill the air. This recipe is not just a dessert; it’s a slice of nostalgia, a connection to the past, and a way to share love through food. Let’s dive into this delightful dish and explore why it has stood the test of time.
The History and Background of Grandma’s Vanilla Pudding
Bread pudding is an age-old recipe that has its roots in frugality. In the old days, people would use stale bread to create a delicious and satisfying dessert. My grandma, with her clever and resourceful nature, perfected this recipe by adding a touch of vanilla and a generous amount of butter. The result? A rich, custardy delight that has become a family favorite for generations. Over the years, I’ve tweaked the recipe slightly, but the essence remains the same: a simple, homey treat that brings people together.
Why You’ll Love This Recipe
This Grandma’s Vanilla Pudding is a crowd-pleaser for several reasons. First, the combination of soft, golden bread cubes and plump raisins creates a delightful texture. Second, the creamy, vanilla-infused milk mixture adds a luxurious, comforting flavor. Lastly, it’s incredibly easy to make, requiring only a few simple ingredients and steps. This makes it perfect for both seasoned bakers and those new to the kitchen.
Perfect Occasions to Prepare This Recipe
Whether you’re hosting a cozy family dinner, preparing a special dessert for a holiday gathering, or simply looking for a weekend treat, Grandma’s Vanilla Pudding is always a hit. It’s one of those desserts that can turn an ordinary day into a memorable one. Plus, it’s a great way to use up any leftover bread, making it both practical and delicious.
Ingredients for Grandma’s Vanilla Pudding
- 4 cups (8 slices) white bread, cubed
- 1/2 cup raisins
- 2 cups milk
- 1/4 cup butter
- 1/2 cup sugar
Substitution Options
If you don’t have all the ingredients on hand, you can still make this pudding. Try using whole wheat bread for a nuttier flavor, cranberries or dried cherries instead of raisins, or even coconut milk for a dairy-free version. The possibilities are endless, and each substitution can add a unique twist to the classic recipe.
Step 1: Bread Preparation
Start by preheating your oven to 350°F (175°C). Grease a baking dish and place the bread cubes inside. Sprinkle the raisins over the top. The bread should be evenly distributed and the raisins should be scattered throughout, creating a beautiful, textured base for your pudding. Pro tip: Toast the bread cubes lightly before adding them to the dish for a slightly crispier texture.
Step 2: Milk and Sugar Mixture
In a saucepan, heat the milk and butter together until the butter is completely melted. Add the sugar and whisk until it dissolves. The mixture should be smooth and creamy. As you pour this over the bread, you’ll see the bread start to soak up the liquid, turning a lovely golden color. Make sure every piece of bread is well coated, as this will ensure a perfectly moist and flavorful pudding. Chef’s tip: Add a pinch of cinnamon to the milk mixture for an extra layer of flavor.
Step 3: Pour Over the Bread
Pour the milk mixture over the bread cubes, making sure to cover every piece. Use a spatula to gently press down on the bread, helping it to absorb the liquid. The bread should be completely saturated, and you might see some of the milk pooling at the bottom. This is normal and will help create a rich, custardy texture once baked.
Step 4: Bake
Place the dish in the preheated oven and bake for 45-50 minutes, or until the pudding is golden and firm. The top should be slightly crispy, while the inside remains soft and creamy. You’ll know it’s done when a toothpick inserted into the center comes out clean. The kitchen will be filled with the most wonderful, comforting aroma, and you’ll be eager to dig in!
Timing for Grandma’s Vanilla Pudding
Prep Time: 10 minutes
Cooking Time: 45-50 minutes
Total Time: 55-60 minutes
Resting Time: 10-15 minutes (optional)
Allowing the pudding to rest for a few minutes before serving helps it set and cool slightly, making it easier to cut and serve. But if you can’t wait, it’s just as delicious served warm and fresh from the oven.
Chef’s Secret
One of my favorite tricks is to add a splash of vanilla extract to the milk mixture. This enhances the vanilla flavor and adds a subtle sweetness that takes the pudding to the next level. It’s a small detail, but it makes a big difference in the overall taste.
Extra Info
Did you know that bread pudding was originally a way to use up stale bread? This humble beginning has evolved into a beloved dessert that can be found in many cultures around the world. Each region has its own unique twist, but the heart of the recipe remains the same: a simple, comforting treat made with love.
Necessary Equipment
- Baking dish
- Saucepan
- Whisk
- Spatula
- Toothpick (for testing doneness)
Storage Tips
Store the pudding in an airtight container in the refrigerator for up to 3-4 days. If you want to keep it longer, you can freeze it for up to 2 months. To reheat, simply place a portion in the microwave for 30-45 seconds or in a preheated oven at 350°F (175°C) for 10-15 minutes. The pudding will be just as delicious and comforting as the day you made it.
Pro tip: If you’re freezing the pudding, wrap individual portions in plastic wrap and then place them in a freezer bag. This makes it easy to grab a single serving whenever you need a quick, tasty treat.
Tips and Advice
For the best results, use day-old bread. Fresh bread can become too soggy, while stale bread soaks up the liquid beautifully. Also, feel free to experiment with different types of bread. Brioche, challah, or even croissants can add a unique and delicious twist to the classic recipe.
Presentation Tips
Garnish the pudding with a sprinkle of powdered sugar and a dollop of whipped cream for a festive touch. You can also add a few fresh berries or a drizzle of caramel sauce to make it look even more inviting. Serve it in pretty, rustic bowls or on a plate with a side of the homemade vanilla sauce for a complete and elegant presentation.
Healthier Alternative Recipes
If you’re looking to make a healthier version of Grandma’s Vanilla Pudding, here are some variations you can try:
- Whole Wheat Bread Pudding: Use whole wheat bread for a healthier, nuttier flavor. Add nuts like almonds or walnuts for extra crunch and nutrition.
- Fruit-Infused Pudding: Incorporate fresh fruits like apples, pears, or peaches for a natural sweetness and a burst of flavor.
- Dairy-Free Pudding: Substitute the milk with almond milk or coconut milk. Use vegan butter or coconut oil for a dairy-free alternative.
- Low-Sugar Pudding: Reduce the amount of sugar or use a natural sweetener like honey or maple syrup. Add a touch of cinnamon or nutmeg for extra flavor.
- Chia Seed Pudding: Instead of bread, use chia seeds soaked in milk and spices. This version is high in fiber and omega-3s, making it a nutritious twist on the classic.
- Quinoa Pudding: Use cooked quinoa as the base for a gluten-free and protein-rich pudding. Add milk, vanilla, and a touch of sugar for a comforting, healthy treat.
Common Mistakes to Avoid
Mistake 1: Using Too Much Liquid
Using too much liquid can make the pudding overly soggy and unappetizing. Make sure to measure the milk and other liquids carefully. Pro tip: Start with a little less liquid and add more if needed. This way, you can control the consistency better.
Mistake 2: Not Soaking the Bread Enough
If the bread isn’t soaked enough, the pudding can end up dry and tough. Take the time to press the bread down gently and let it sit for a few minutes to absorb the liquid. This will ensure a uniformly moist and delicious pudding.
Mistake 3: Overbaking
Overbaking can cause the pudding to dry out and lose its custardy texture. Keep an eye on the pudding and remove it from the oven when it’s golden and just set. A toothpick inserted into the center should come out clean, but the pudding should still be slightly jiggly in the middle.
Mistake 4: Not Preheating the Oven
Not preheating the oven can lead to uneven cooking and a less-than-desirable texture. Make sure to preheat your oven to the correct temperature before placing the pudding inside. This ensures that the pudding bakes evenly and comes out perfect.
Mistake 5: Forget to Grease the Pan
A common oversight is forgetting to grease the pan. This can make it difficult to remove the pudding and can even ruin its shape. Always remember to grease the pan before adding the bread cubes. This small step can make a big difference in the final result.
FAQ
Can I use different types of bread for this pudding?
Absolutely! While the traditional recipe calls for white bread, you can use any type of bread you like. Whole wheat, brioche, challah, or even croissants can add a unique and delicious twist to the pudding. The key is to use bread that is slightly stale, as it will soak up the liquid better and hold its shape during baking.
What can I use instead of raisins?
If you’re not a fan of raisins, you can substitute them with other dried fruits like cranberries, chopped apricots, or dates. You can also use fresh fruits like blueberries, sliced apples, or pears for a different flavor profile. The choice is yours, and the combination of flavors can be quite exciting.
Can I make this pudding dairy-free?
Yes, you can easily make this pudding dairy-free. Substitute the milk with almond milk, coconut milk, or any other plant-based milk. Use vegan butter or coconut oil in place of regular butter. This way, you can enjoy the same creamy and comforting dessert without any dairy products.
How long does the pudding last in the fridge?
The pudding can be stored in the refrigerator for up to 2-3 days. Make sure to cool it completely before storing it in an airtight container. When you’re ready to serve, you can reheat it in the microwave or in the oven to regain its warmth and coziness.
Can I freeze the pudding?
Yes, you can freeze the pudding for up to 2 months. Wrap individual portions in plastic wrap and then place them in a freezer bag. This makes it easy to grab a single serving whenever you need a quick, tasty treat. Thaw the pudding in the refrigerator overnight before reheating.
What is the best way to reheat the pudding?
The best way to reheat the pudding is to place a portion in the microwave for 30-45 seconds or in a preheated oven at 350°F (175°C) for 10-15 minutes. This will bring out the flavors and textures, making it just as delicious and comforting as the day you made it. You can also add a drizzle of the vanilla sauce for an extra touch of flavor.
Can I add other flavors to the pudding?
Definitely! Feel free to get creative with the flavors. You can add a pinch of cinnamon, nutmeg, or even a dash of vanilla extract to the milk mixture. For a fun twist, try adding a hint of orange or lemon zest for a citrusy note. The possibilities are endless, and each addition can add a unique layer of flavor to the pudding.
Is this pudding suitable for a large gathering?
Yes, this pudding is perfect for a large gathering. It’s easy to make in large quantities and can be prepared ahead of time. Simply double or triple the recipe and bake it in a larger dish. The pudding can be served warm or at room temperature, making it a convenient and delicious option for any event.
Can I make this pudding in individual ramekins?
Absolutely! Making the pudding in individual ramekins adds a charming and elegant touch. Divide the bread and milk mixture among the ramekins and bake them at the same temperature and time as the regular recipe. This presentation makes it easy to serve and adds a personal touch to each portion.
What are some toppings I can add to the pudding?
There are many toppings you can add to enhance the flavor and presentation of the pudding. A sprinkle of powdered sugar, a dollop of whipped cream, a drizzle of caramel or chocolate sauce, or a handful of fresh berries can make the pudding look and taste even more inviting. Choose the toppings that you and your guests will love.
Enjoy making and sharing this Grandma’s Vanilla Pudding with your loved ones. It’s a timeless treat that brings joy and comfort to any table. For more delicious dessert ideas, check out our Desserts section. Happy baking!
Equipment
- Baking dish
- Saucepan
- Whisk
- Spatula
- Toothpick for testing doneness
Ingredients
- 4 cups white bread, cubed
- 1/2 cup raisins
- 2 cups milk
- 1/4 cup butter
- 1/2 cup sugar
Instructions
- Preheat your oven to 350°F (175°C) and grease a baking dish.
- Place the cubed bread in the baking dish and sprinkle raisins over the top.
- In a saucepan, heat milk and butter until melted, then whisk in sugar until dissolved.
- Pour the milk mixture over the bread cubes, ensuring each piece is covered.
- Gently press down on the bread to help it absorb the liquid.
- Bake for 45-50 minutes until golden and firm, and a toothpick inserted comes out clean.
Notes
Nutrition

Hi, I’m Olivia Parker, the founder of BakingSecret.com and a lifelong lover of all things sweet and homemade. I grew up in a small town in Oregon, where the smell of fresh cookies in my family’s kitchen sparked my passion for baking. Over the years, I turned that passion into a mission: to help home bakers feel confident, inspired, and creative.
After studying food science and working in several artisan bakeries across the U.S., I decided to create a space where everyone from beginners to seasoned bakers can find reliable recipes, expert tips, and a warm, welcoming community. BakingSecret.com is my way of sharing the magic of baking with the world. When I’m not testing new recipes, you’ll find me exploring farmers’ markets, collecting vintage cookbooks, or perfecting my sourdough technique.