
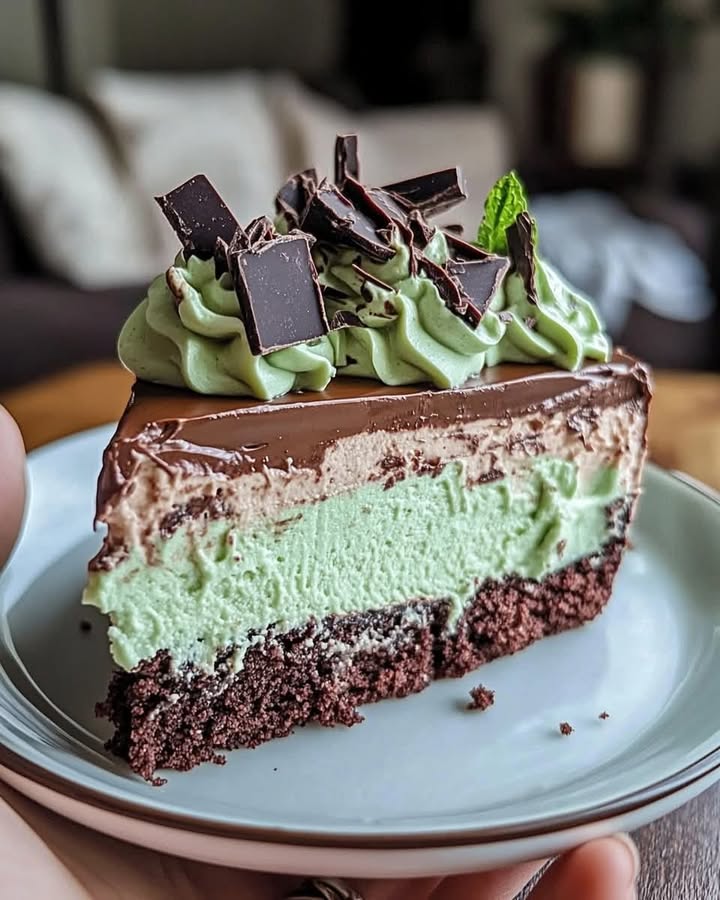
A Minty and Chocolaty Treat: The Perfect Mint Chocolate Cheesecake
There’s something magical about combining the refreshing zing of mint with the rich, decadent flavor of chocolate. This Mint Chocolate Cheesecake is a delightful blend of these two flavors, making it an absolute favorite among my family and friends. It’s not just a dessert; it’s a conversation starter, a sweet ending to any meal, and a perfect treat for those special moments.
The Story Behind This Sweet Sensation
I first tasted this recipe at a friend’s holiday party, and I was instantly hooked. The combination of creamy cheesecake, cool mint, and luscious chocolate was sheer perfection. After begging for the recipe, I’ve made it countless times, tweaking it here and there to make it my own. Originally, it was a simple no-bake version, but I’ve added a few touches to make it even more scrumptious.
Why You’ll Love This Mint Chocolate Delight
This cheesecake is a feast for the senses. The creamy texture of the cheesecake, the crunch of the chocolate wafer crust, and the burst of mint flavor make every bite a joy. Plus, it’s incredibly easy to make, requiring minimal effort for maximum flavor. Trust me, once you try this, it’ll become a staple in your dessert repertoire.
Perfect Occasions to Prepare This Recipe
This Mint Chocolate Cheesecake is perfect for a variety of occasions. Whether it’s a summer barbecue, a holiday gathering, or a cozy night in, this dessert is sure to impress. It also makes a wonderful gift—just wrap it up and share the love!
Ingredients
- 1 cup mint chocolate chips
- 1 cup heavy cream
- 18 ounces cream cheese, softened
- 1/4 cup unsalted butter, melted
- 1 cup chocolate wafer crumbs
- 1 cup powdered sugar
- 1 teaspoon peppermint extract
Substitution Options
- Mint Chocolate Chips: If you can’t find mint chocolate chips, use dark or semi-sweet chocolate chips and add a drop of green food coloring and a bit more peppermint extract.
- Heavy Cream: Substitute with whipped topping or a mixture of half-and-half and a little vanilla extract.
- Chocolate Wafer Crumbs: Use crushed Oreo cookies (without the filling) or graham cracker crumbs for a different twist.
Preparation Section
Step 1: Preheat Your Oven
Start by preheating your oven to 325°F (163°C). This step is crucial to ensure your cheesecake bakes evenly. While the oven is heating up, take a moment to gather all your ingredients and prepare your springform pan.
Step 2: Create the Crust
In a mixing bowl, combine the chocolate wafer crumbs with the melted butter, stirring until the crumbs are evenly coated. Press this mixture firmly into the bottom of your springform pan. The crust should be compact and even, creating a solid base for your cheesecake. Pro tip: Use the bottom of a measuring cup to press the crumbs for a smooth, even surface.
Step 3: Beat the Cream Cheese
In a separate bowl, beat the softened cream cheese until it’s creamy and smooth, about 2-3 minutes. This step is essential for achieving that velvety, luxurious texture. Make sure there are no lumps, as they can affect the final consistency of your cheesecake.
Step 4: Whip the Heavy Cream
In another bowl, whip the heavy cream with an electric mixer until soft peaks form. This airy, light cream will give your cheesecake a wonderfully fluffy texture. Be careful not to over-whip, as this can turn the cream into butter!
Step 5: Combine the Mixtures
Carefully fold the whipped cream into the cream cheese mixture until well combined and smooth. This step requires a gentle touch to avoid deflating the whipped cream. Gradually mix in the powdered sugar, mint chocolate chips, and peppermint extract until everything is well blended. The aroma of peppermint and chocolate will fill your kitchen, making it hard to resist a taste!
Step 6: Pour and Set
Pour the cheesecake filling over the prepared crust in the springform pan, spreading it out evenly. Smooth the top with a spatula to create a uniform layer. Chef’s tip: Tap the pan gently on the counter to release any air bubbles and ensure the filling settles nicely.
Step 7: Chill and Serve
Refrigerate the cheesecake for at least 4 hours, or until it’s completely set. This chilling time is essential for the cheesecake to firm up and for the flavors to meld together. Once it’s ready, slice your Mint Chocolate Cheesecake and enjoy! The wait is worth it, trust me.
Timing
Here’s a quick breakdown of the time required for this delicious treat:
– Prep Time: 15 minutes
– Relaxation Time: 4 hours
– Total Time: 4 hours and 15 minutes
Secrets from the Chef
One of my favorite secrets for this recipe is to let the cheesecake chill overnight. This extra time allows the flavors to develop even more, making each bite absolutely divine. Plus, it’s a great make-ahead option for busy days.
Extra Info
Did you know that mint and chocolate have been a beloved combination for centuries? The ancient Aztecs used cacao beans as currency and mixed them with various spices and herbs, including mint, to create unique and delectable treats. This Mint Chocolate Cheesecake is a modern twist on that classic pairing, and it’s just as irresistible today.
Necessary Equipment
- Springform pan
- Mixing bowls
- Electric mixer
- Spatula
- Measuring cups and spoons
Storage
To store your Mint Chocolate Cheesecake, cover it tightly with plastic wrap or aluminum foil and keep it in the refrigerator. This will help maintain its freshness and prevent it from drying out. It should last for up to 5 days in the fridge. For longer storage, you can freeze the cheesecake. Just make sure to wrap it well to prevent freezer burn. When you’re ready to serve, thaw it in the refrigerator overnight.
If you’re freezing individual slices, place them on a baking sheet lined with parchment paper and freeze until solid. Then, transfer the slices to a freezer-safe container or zip-top bag. This way, you can enjoy a slice whenever a craving strikes, without having to thaw the entire cake.
Remember, the key to keeping your cheesecake fresh is to minimize exposure to air. Always use airtight containers or wraps to ensure the best quality.
Tips and Advice
- Be sure to bring your cream cheese to room temperature before mixing. This ensures a smooth and lump-free batter.
- Don’t overmix the filling. Overmixing can incorporate too much air, which can make the cheesecake crack while baking.
- For a smoother texture, you can strain the cream cheese mixture through a fine-mesh sieve before adding the other ingredients.
Presentation Tips
- Garnish with a few extra mint chocolate chips and a sprinkle of cocoa powder for a professional look.
- Add a dollop of whipped cream and a fresh mint leaf for a festive touch.
- Create a mint chocolate sauce by melting additional mint chocolate chips and drizzling it over the top of each slice.
Variations of the Mint Chocolate Delight
Here are six possible variations of this delicious cheesecake, each with its own unique twist:
- White Chocolate Mint: Swap the mint chocolate chips for white chocolate and add a few drops of green food coloring to the filling for a beautiful pastel effect.
- Double Chocolate: Use both dark and white chocolate chips for a rich and layered chocolate experience. Add a hint of espresso for a mocha flavor.
- Raspberry Mint: Incorporate a raspberry puree into the filling and garnish with fresh raspberries for a sweet and tangy twist.
- Matcha Mint: Stir in a tablespoon of matcha powder to the cream cheese mixture for a unique and vibrant green color. The subtle earthiness of matcha pairs beautifully with the cool mint.
- Espresso Mint: Add a shot of espresso to the filling for a caffeine kick. Top with a dusting of cocoa powder and a few coffee beans for a sophisticated touch.
- Almond Mint: Mix in some chopped almonds for added texture and a nutty flavor. Garnish with sliced almonds and a drizzle of almond extract for an aromatic finish.
Common Mistakes to Avoid
Mistake 1: Using Cold Ingredients
Using cold ingredients, especially cream cheese, can result in a lumpy and unsmooth cheesecake. Be sure to let your cream cheese come to room temperature before mixing. This will ensure a silky, smooth texture. Pro tip: If you’re in a hurry, you can cut the cream cheese into small pieces and let it sit on the counter for a few minutes to soften.
Mistake 2: Overmixing the Filling
Overmixing the filling can incorporate too much air, leading to a cracked cheesecake. Mix the ingredients just until they are well combined. This will help you achieve a smooth and creamy texture without the risk of cracking. Pro tip: Use a spatula to fold in the whipped cream gently, making sure not to deflate it.
Mistake 3: Not Chilling Long Enough
Not allowing the cheesecake to chill long enough can result in a runny and messy dessert. Make sure to refrigerate the cheesecake for at least 4 hours, or better yet, overnight. This will give it the perfect texture and allow the flavors to meld together. Pro tip: If you’re in a rush, you can place the cheesecake in the freezer for 1-2 hours, then move it to the refrigerator until fully set.
Mistake 4: Improper Crust Preparation
An uneven or loose crust can make the cheesecake difficult to slice and serve. Press the crust mixture firmly into the bottom of the pan to ensure it holds together. Pro tip: Use the back of a measuring cup or a flat-bottomed glass to press the crumbs into the pan, creating a compact and even base.
Mistake 5: Forgetting to Add Extracts
Forgetful moments happen, but forgetting to add the peppermint extract can make a big difference in the flavor. Double-check that you’ve added all the necessary ingredients before moving on to the next step. Pro tip: Measure out all your ingredients beforehand to avoid missing any.
Frequently Asked Questions
Can I use regular chocolate chips instead of mint chocolate chips?
Yes, you can use regular chocolate chips, but you’ll need to add a bit more peppermint extract to get the right flavor. Alternatively, you can add a few drops of green food coloring to the filling for a visual pop. Check out our Tropical Pineapple Delight for another creative use of chocolate chips.
How long does the cheesecake need to chill?
The cheesecake needs to chill for at least 4 hours, or preferably overnight. This allows it to set properly and for the flavors to meld together. If you’re in a rush, you can place it in the freezer for 1-2 hours, then move it to the refrigerator until fully set.
Can I use a different type of crust?
Absolutely! While the chocolate wafer crust is delicious, you can use crushed Oreos (without the filling) or graham cracker crumbs for a different flavor. Just make sure to press the crumbs firmly into the pan to create a solid base. For a tropical twist, try using the coconut crust from our Tropical Coconut Flan.
What if I don’t have an electric mixer?
If you don’t have an electric mixer, you can use a whisk and a bit of elbow grease. Whisk the heavy cream until soft peaks form, and beat the cream cheese until it’s smooth. It may take a bit longer, but it’s still possible to achieve a great texture. If you’re looking for a simpler alternative, check out our Creamy Ricotta Cheesecake.
How do I store leftover cheesecake?
Store leftover cheesecake in the refrigerator, covered tightly with plastic wrap or aluminum foil. It will last for up to 5 days. For longer storage, you can freeze the cheesecake. Wrap it well and place it in a freezer-safe container or bag. When you’re ready to serve, thaw it in the refrigerator overnight. For more tips on storing baked goods, visit myplate.gov for advice on maintaining a balanced and healthy diet.
Can I make this cheesecake ahead of time?
Yes, you can definitely make this cheesecake ahead of time. In fact, it’s recommended to let it chill overnight for the best flavor and texture. Just make sure to cover it tightly and store it in the refrigerator or freezer. For more make-ahead dessert ideas, explore our Desserts category.
Is this cheesecake suitable for a party?
Absolutely! This Mint Chocolate Cheesecake is perfect for parties, gatherings, and special occasions. It’s a crowd-pleaser and can be easily made ahead of time, making it a stress-free option. For another party-friendly dessert, try our Cinnamon Roll Cheesecake.
Can I use a different flavored extract?
Yes, you can experiment with different flavored extracts. For example, you could use vanilla or almond extract for a different flavor profile. Just keep in mind that the mint extract is what gives this cheesecake its signature flavor. For a fun, tropical twist, try using coconut extract, like in our Tropical Pineapple Delight.
Is this cheesecake gluten-free?
As written, this recipe is not gluten-free due to the chocolate wafer crumbs. However, you can easily make it gluten-free by using gluten-free cookie crumbs or a gluten-free flour blend for the crust. Just make sure to check the labels of all your ingredients to ensure they are gluten-free.
Can I make individual servings?
Yes, you can make individual servings by using a muffin tin or mini springform pans. Follow the same recipe, but divide the crust and filling among the smaller pans. Adjust the baking time as needed, keeping an eye on them to ensure they don’t overbake.
What’s the best way to slice the cheesecake?
To get clean, even slices, use a sharp knife dipped in hot water. Wipe the knife clean between each cut. This will help you achieve neat, professional-looking slices. For a show-stopping presentation, try using a pastry bag to pipe some whipped cream around the edges of the slices.
Final Thoughts
This Mint Chocolate Cheesecake is a true delight, combining the best of both worlds: the cool, refreshing taste of mint and the rich, indulgent flavor of chocolate. Whether you’re baking for a special occasion or just treating yourself, this recipe is sure to be a hit. Enjoy the process, and remember, the secret is in the details. Happy baking!
Equipment
- Springform pan
- Mixing bowls
- Electric mixer
- Spatula
- Measuring cups and spoons
Ingredients
- 1 cup mint chocolate chips
- 1 cup heavy cream
- 18 ounces cream cheese, softened
- 1/4 cup unsalted butter, melted
- 1 cup chocolate wafer crumbs
- 1 cup powdered sugar
- 1 tsp peppermint extract
Instructions
- Preheat your oven to 325°F (163°C).
- In a mixing bowl, combine the chocolate wafer crumbs with the melted butter, stirring until the crumbs are evenly coated. Press this mixture firmly into the bottom of your springform pan.
- In a separate bowl, beat the softened cream cheese until it’s creamy and smooth, about 2-3 minutes.
- In another bowl, whip the heavy cream with an electric mixer until soft peaks form.
- Carefully fold the whipped cream into the cream cheese mixture until well combined and smooth. Gradually mix in the powdered sugar, mint chocolate chips, and peppermint extract.
- Pour the cheesecake filling over the prepared crust in the springform pan, smoothing the top with a spatula.
- Refrigerate the cheesecake for at least 4 hours, or until it’s completely set.
Notes
Nutrition

Hi, I’m Olivia Parker, the founder of BakingSecret.com and a lifelong lover of all things sweet and homemade. I grew up in a small town in Oregon, where the smell of fresh cookies in my family’s kitchen sparked my passion for baking. Over the years, I turned that passion into a mission: to help home bakers feel confident, inspired, and creative.
After studying food science and working in several artisan bakeries across the U.S., I decided to create a space where everyone from beginners to seasoned bakers can find reliable recipes, expert tips, and a warm, welcoming community. BakingSecret.com is my way of sharing the magic of baking with the world. When I’m not testing new recipes, you’ll find me exploring farmers’ markets, collecting vintage cookbooks, or perfecting my sourdough technique.