
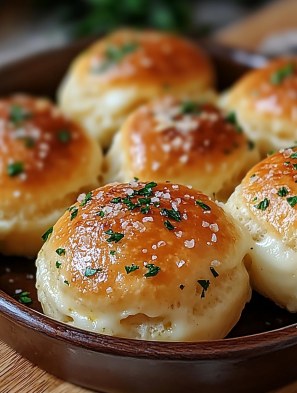
Garlic Butter Cheese Bombs: A Bite-Sized Delight
Imagine this: you’re at a party, and the host brings out a tray of warm, golden, gooey Garlic Butter Cheese Bombs. The aroma of garlic and melted cheese fills the air, and you can’t resist diving in. That’s the magic of these little bites! They’re perfect for any occasion, from a cozy night in to a festive gathering with friends.
The Story Behind Garlic Butter Cheese Bombs
These Garlic Butter Cheese Bombs are a modern twist on the classic bread and cheese combo. I first tried them at a friend’s house, and I was hooked! The combination of flaky biscuits, rich garlic butter, and melty cheese is a match made in heaven. It’s a recipe that’s easy to make and even easier to love.
Why You’ll Love These Garlic Cheese Bombs
These Garlic Butter Cheese Bombs are a crowd-pleaser for a reason. The flavors are simple yet robust, and the texture is perfectly balanced—flaky on the outside and ooey-gooey on the inside. Plus, they’re super easy to prepare, making them a go-to for busy weeknights or last-minute gatherings.
Perfect Occasions for Garlic Butter Cheese Bombs
Whether you’re looking for a fun appetizer, a comforting snack, or a delicious side dish, these Garlic Butter Cheese Bombs fit the bill. They’re great for game days, potlucks, or just a casual family dinner. Trust me, once you try them, you’ll be making them for every get-together!
Ingredients for Garlic Butter Cheese Bombs
- 1 can (16.3 oz) Pillsbury Grands! Biscuits
- ½ cup unsalted butter, melted
- ¼ cup grated Parmesan cheese
- 1 ½ cups shredded mozzarella cheese
- 2 cloves garlic, minced
- 1 tbsp fresh parsley, chopped
- ¼ tsp salt
- ¼ tsp black pepper
- 1 tbsp olive oil (optional)
Substitution Options
- Instead of mozzarella, you can use cheddar, gouda, or even a blend of your favorite cheeses.
- If you don’t have fresh parsley, dried parsley works too; just use half the amount.
- You can substitute the Pillsbury Grands! Biscuits with homemade biscuit dough if you prefer.
Preparation: Step-by-Step Guide
Step 1: Preheat Oven
Start by preheating your oven to 375°F (190°C). This will ensure that your oven is at the right temperature when you’re ready to bake. While the oven is heating up, you can start preparing the other ingredients.
Step 2: Prepare the Biscuits
Open the Pillsbury Grands! biscuit can and separate the biscuits. Flatten each biscuit slightly with your hands. This makes it easier to fill and shape the cheese bombs. The biscuits should be about ½ inch thick after flattening.
Step 3: Mix the Garlic Butter
In a small bowl, combine the melted butter, minced garlic, salt, pepper, and fresh parsley. The garlic adds a wonderful aroma, and the parsley gives a nice freshness. Make sure everything is well mixed so that the flavors are evenly distributed.
Step 4: Assemble the Cheese Bombs
Place 1 tablespoon of shredded mozzarella cheese in the center of each flattened biscuit. Fold the edges up around the cheese and pinch to seal, forming a ball. It’s like a little cheesy surprise waiting to be discovered!
Step 5: Coat with Garlic Butter
Roll each biscuit ball in the garlic butter mixture, ensuring it’s fully coated. This step is crucial because it infuses the biscuits with all that garlicky goodness. The butter helps the Parmesan cheese stick to the surface, adding a nice crispy layer.
Step 6: Arrange and Top
Place the biscuit balls in a greased baking dish, leaving a little space between each one. Sprinkle the grated Parmesan cheese over the top of each ball. The Parmesan will add a lovely golden color and a bit of crunch.
Step 7: Bake
Bake for 15-18 minutes, or until the biscuits are golden brown and the cheese inside is melted. The smell of garlic and cheese will fill your kitchen, making it hard to wait! Keep an eye on them to make sure they don’t burn.
Step 8: Optional Finishing Touch
Drizzle with olive oil before serving for extra flavor. The olive oil adds a nice richness and a touch of sophistication. It’s optional but highly recommended.
Timing: Prep, Cook, and Total Time
Prep Time: 10 minutes
Cook Time: 15-18 minutes
Total Time: 25-28 minutes
Chef’s Secret: A Little Extra Something
To take these Garlic Butter Cheese Bombs to the next level, add a pinch of red pepper flakes to the garlic butter mixture. The slight heat complements the rich, creamy cheese perfectly. It’s a small touch that makes a big difference.
Extra Info: A Fun Fact About Mozzarella
Mozzarella cheese is known for its stringy, gooey texture, which is why it’s perfect for these cheese bombs. It’s also incredibly versatile and can be used in a variety of dishes, from pizza to salads. Fun fact: mozzarella is traditionally made from buffalo milk in Italy, though cow’s milk is more common in the U.S.
Necessary Equipment
- Baking dish
- Mixing bowl
- Measuring spoons and cups
- Knife and cutting board (for mincing garlic and chopping parsley)
Storage: Keeping Your Cheese Bombs Fresh
If you have any leftovers, store them in an airtight container in the refrigerator. They should keep for up to 3 days. Reheat them in the oven or microwave to restore their gooey, melty texture. For a longer shelf life, you can freeze them for up to 3 months. Just make sure to let them cool completely before freezing and reheat them in the oven when you’re ready to enjoy them again.
Tips and Advice
- Make sure the butter is fully melted before adding the other ingredients. This ensures a smooth and consistent garlic butter mixture.
- Don’t overfill the biscuits with cheese, or they might not seal properly. One tablespoon per biscuit is just right.
- For a more vibrant flavor, use fresh, high-quality ingredients. Fresh parsley and garlic make a big difference.
Presentation Tips
- Arrange the cheese bombs on a platter and garnish with some fresh herbs like parsley or basil for a pop of color.
- Serve them with a side of marinara or aioli for dipping. It adds an extra layer of flavor and fun.
- For a rustic look, place the cheese bombs in a woven basket lined with a clean cloth. It’s charming and inviting.
Healthier Alternative Recipes
Here are six possible variations to make these Garlic Butter Cheese Bombs a bit healthier:
- Whole Wheat Biscuits: Use whole wheat biscuit dough for a healthier, fiber-rich option. It adds a nutty flavor and a bit more texture.
- Low-Fat Cheese: Substitute the full-fat mozzarella with a low-fat or part-skim version. It still provides the same gooey goodness with fewer calories.
- Herb Butter: Replace the garlic butter with an herb butter. Use a mix of fresh herbs like thyme, rosemary, and oregano for a burst of flavor without the added fat.
- Vegetable Filling: Add some finely chopped spinach, bell peppers, or zucchini to the cheese filling for a boost of vitamins and minerals.
- Spelt Flour Biscuits: If you’re into experimenting with different flours, try using spelt flour for a nutty, hearty biscuit. It’s a great alternative for those who are gluten-sensitive.
- Reduced Sodium: Use reduced-sodium butter and cheese to cut down on the salt. This is especially helpful if you’re watching your sodium intake.
If you’re a fan of these Garlic Butter Cheese Bombs, you might also enjoy our Cinnamon Apple Bread, which is perfect for a sweet treat or a light breakfast. Or, if you’re looking for something a bit tangy, our Lemon Cream Cheese Bread is a must-try. And if you’re in the mood for more savory options, check out our Garlic Butter Cheese Bombs page for more ideas. For a festive and flavorful muffin, give our Cranberry Orange Pecan Muffins a try.
Common Mistakes to Avoid
Mistake 1: Overstuffing the Biscuits
One of the most common mistakes is overstuffing the biscuits with too much cheese. This can make them difficult to seal and may result in a messy, leaking bomb. Stick to 1 tablespoon of cheese per biscuit, and you’ll have perfectly sealed, gooey bombs every time.
Mistake 2: Not Sealing the Biscuits Properly
Make sure to pinch the edges of the biscuit tightly to seal in the cheese. If the edges aren’t sealed properly, the cheese will leak out during baking, creating a mess and losing that gooey, melty goodness. Take your time to ensure a good seal, and you’ll be rewarded with perfectly contained cheese bombs.
Mistake 3: Overcooking
Overcooking the cheese bombs can lead to a dry, tough exterior. Keep an eye on them and remove them from the oven as soon as they turn golden brown. The key is to get that perfect balance of a golden, crispy outside and a gooey, melty inside. If you notice the tops browning too quickly, tent them with aluminum foil to prevent burning.
Mistake 4: Using Cold Butter
Using cold butter can cause the garlic butter mixture to be lumpy and uneven. Make sure the butter is fully melted and smooth before adding the other ingredients. This ensures that the garlic, salt, and pepper are evenly distributed, giving each bite a consistent and delicious flavor.
Mistake 5: Skipping the Olive Oil Drizzle
While the olive oil drizzle is optional, it adds a lot of flavor and richness to the cheese bombs. Don’t skip this step unless you absolutely have to. The olive oil not only enhances the taste but also adds a beautiful sheen, making the cheese bombs look and taste irresistible.
FAQs
Can I use different types of cheese for these Garlic Butter Cheese Bombs?
Absolutely! While mozzarella is traditional, you can use cheddar, gouda, or even a blend of your favorite cheeses. Experiment with different combinations to find what you like best. The key is to choose a cheese that melts well, giving you that gooey, melty texture.
How do I store leftover Garlic Butter Cheese Bombs?
Store leftover cheese bombs in an airtight container in the refrigerator for up to 3 days. Reheat them in the oven or microwave to restore their gooey, melty texture. For a longer shelf life, you can freeze them for up to 3 months. Just make sure to let them cool completely before freezing and reheat them in the oven when you’re ready to enjoy them again.
Can I make these ahead of time?
Yes, you can prepare the cheese bombs ahead of time and store them in the refrigerator. Just assemble them, cover the baking dish with plastic wrap, and refrigerate. When you’re ready to bake, remove the plastic wrap, brush with the garlic butter, and sprinkle with Parmesan cheese. Adjust the baking time as needed, as the cheese bombs will be starting from a cold state.
What can I use instead of parsley?
If you don’t have fresh parsley, you can use dried parsley. Just use half the amount of dried parsley as you would fresh. Alternatively, you can use other fresh herbs like chives or dill to add a different flavor profile. The key is to use a herb that complements the garlic and cheese.
Can I make these with homemade biscuit dough?
Definitely! You can use homemade biscuit dough if you prefer. Just make sure the dough is similar in consistency to the Pillsbury Grands! Biscuits. Roll out the dough, cut it into circles, and proceed with the recipe as directed. Homemade dough can add a special touch and a bit more flavor complexity.
Can I use a different type of bread?
While the Pillsbury Grands! Biscuits are ideal for this recipe, you can experiment with other types of bread. For example, you can use pita bread, crescent roll dough, or even slices of baguette. Just make sure to adjust the baking time and size of the cheese bombs accordingly.
Are these Garlic Butter Cheese Bombs kid-friendly?
Absolutely! These Garlic Butter Cheese Bombs are a hit with kids. The combination of bread and cheese is always a winner, and the fun, bite-sized format makes them easy for little ones to enjoy. Just make sure the cheese is not too hot when you serve them to avoid burns.
Can I make these in an air fryer?
Yes, you can make these in an air fryer. Preheat the air fryer to 375°F (190°C), and follow the recipe instructions for assembling the cheese bombs. Place them in a single layer in the air fryer basket and cook for about 8-10 minutes, or until golden brown and the cheese is melted. The air fryer will give you a crispier, faster result.
Do I need to use unsalted butter?
It’s best to use unsalted butter in this recipe so you can control the salt content. If you only have salted butter, you can still use it, but reduce the amount of added salt. Taste the garlic butter mixture and adjust the salt as needed to get the right balance of flavors.
Can I add other seasonings to the garlic butter?
Yes, feel free to add other seasonings to the garlic butter. Some great options include a pinch of red pepper flakes for a bit of heat, a dash of paprika for smokiness, or a sprinkle of Italian seasoning for a herby touch. Just be mindful of the overall flavor profile and adjust the quantities accordingly.
These Garlic Butter Cheese Bombs are a delightful addition to any meal, and I hope you enjoy making and eating them as much as I do. For more recipes and tips, visit our main category page. Happy cooking!
Equipment
- Baking dish
- Mixing bowl
- Measuring spoons and cups
- Knife and cutting board for mincing garlic and chopping parsley
- Olive oil (optional)
Ingredients
- 1 can Pillsbury Grands! Biscuits 16.3 oz
- ½ cup unsalted butter melted
- ¼ cup grated Parmesan cheese
- 1 ½ cups shredded mozzarella cheese
- 2 cloves garlic minced
- 1 tbsp fresh parsley chopped
- ¼ tsp salt
- ¼ tsp black pepper
- 1 tbsp olive oil optional
Instructions
- Preheat your oven to 375°F (190°C).
- Open the Pillsbury Grands! biscuit can and separate the biscuits. Flatten each biscuit slightly to about ½ inch thick.
- In a small bowl, combine melted butter, minced garlic, salt, pepper, and fresh parsley. Mix well.
- Place 1 tablespoon of shredded mozzarella cheese in the center of each flattened biscuit. Fold the edges up and pinch to seal, forming a ball.
- Roll each biscuit ball in the garlic butter mixture until fully coated.
- Place the biscuit balls in a greased baking dish, leaving space between each one. Sprinkle the grated Parmesan cheese on top.
- Bake for 15-18 minutes, or until golden brown and cheese is melted.
- Optional: Drizzle with olive oil before serving.
Notes
Nutrition

Hi, I’m Olivia Parker, the founder of BakingSecret.com and a lifelong lover of all things sweet and homemade. I grew up in a small town in Oregon, where the smell of fresh cookies in my family’s kitchen sparked my passion for baking. Over the years, I turned that passion into a mission: to help home bakers feel confident, inspired, and creative.
After studying food science and working in several artisan bakeries across the U.S., I decided to create a space where everyone from beginners to seasoned bakers can find reliable recipes, expert tips, and a warm, welcoming community. BakingSecret.com is my way of sharing the magic of baking with the world. When I’m not testing new recipes, you’ll find me exploring farmers’ markets, collecting vintage cookbooks, or perfecting my sourdough technique.