
Discover the Delightful Russian Plucked Cake
Imagine a warm, inviting kitchen filled with the aroma of freshly baked cake. That’s exactly what you get with this Russian Plucked Cake. It’s a delightful treat that combines a rich, chocolatey dough with a creamy, tangy filling. I first tried this recipe at a friend’s house, and it was love at first bite. Since then, it’s become a staple in my baking repertoire, especially for family gatherings and special occasions.
The Story Behind Russian Plucked Cake
This cake is a traditional delight from Eastern Europe, with a history that dates back to the 18th century. It’s known for its unique plucking technique, where the dough is torn into small pieces and placed over the filling, creating a charming, rustic look. Over the years, this recipe has evolved, blending traditional flavors with modern twists. Whether you’re a fan of the classic version or prefer a contemporary take, this Russian Plucked Cake is sure to win your heart and your taste buds.
Why You’ll Love This Recipe
This Russian Plucked Cake is a crowd-pleaser for several reasons. First, the combination of chocolate and quark (a type of creamy cheese) creates a perfect balance of sweetness and tanginess. Second, it’s surprisingly simple to make, even for beginners. And finally, the plucked appearance adds a homemade charm that makes it feel extra special.
Perfect Occasions to Prepare This Recipe
Whether you’re hosting a family gathering, celebrating a birthday, or simply looking for a comforting treat, this Russian Plucked Cake is an excellent choice. It’s also a great option for potlucks and holiday feasts, as it always gets rave reviews and disappears quickly!
Ingredients
- For the Dough
- 300 g wheat flour Type 405
- 4 – 5 tbsp baking cocoa
- 150g sugar
- 1 pack of baking powder
- 1 egg size M
- 150 g cold butter
- 1 pinch of salt
- Some butter for the mold
- For the Filling
- 3 eggs size M
- 150g sugar
- 200 g soft butter
- 500 g low-fat quark
- 1 pack vanilla sugar
- 1 pack of vanilla pudding powder
- Some powdered sugar for sprinkling
Substitution Options
If you’re missing a few ingredients, no worries! Here are some substitution options:
- Butter: Use margarine or coconut oil if you prefer.
- Eggs: For a vegan alternative, use applesauce or a chia egg.
- Quark: Substitute with cream cheese or Greek yogurt.
- Vanilla Sugar: Use vanilla extract instead.
Preparation
Step 1: Preheat and Prepare the Pan
Preheat your oven to 180 degrees (or 160 degrees for a fan oven). Grease a springform pan Ø 26 cm well. This step is crucial to ensure the cake doesn’t stick and comes out beautifully. The smell of butter melting in the pan is a sure sign you’re off to a great start.
Step 2: Make the Dough
In a large mixing bowl, combine the flour, cocoa powder, sugar, baking powder, egg, butter, and salt. Knead until you have a homogeneous dough. Press half of the dough into the prepared springform pan, forming an edge of about 3 cm. Set the remaining dough aside. The dark, rich color of the dough is visually appealing and promises a delectable treat.
Pro Tip:
To make the edge more even, run a knife along the edge and cut off any excess and uneven dough. This will make the edge of your plucked cake perfect.
Step 3: Prepare the Filling
In another bowl, whisk the eggs with the sugar and butter. Add the low-fat quark, vanilla sugar, and vanilla pudding powder, and stir well. Pour the mixture onto the dough in the springform pan. The creamy, smooth consistency of the filling is a joy to work with and adds a lovely texture to the cake.
Step 4: Add the Topping
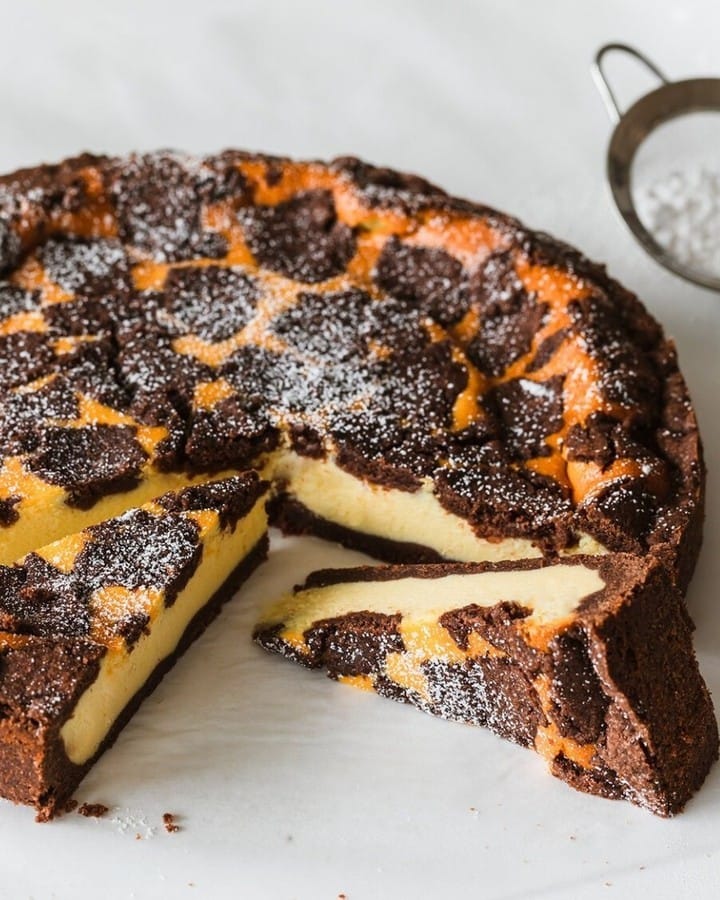
Tear the reserved half of the dough into small pieces and carefully place them on the filling with small gaps. This plucking technique gives the cake its unique, rustic look. Bake the cake in the preheated oven for about 60 minutes. If necessary, cover with aluminum foil after 45 minutes to prevent it from getting too dark.
Chef’s Tip:
At the end, the cake should no longer wobble too much but shouldn’t be completely firm either. This ensures a perfect, moist texture. Let the cake cool completely before taking it out of the tin. Sprinkle with powdered sugar if desired. The cake makes about 12 pieces, so there’s plenty to share!
Timing
Total preparation time for this Russian Plucked Cake is about 1 hour. Here’s the breakdown:
– Prep Time: 20 minutes
– Cooking Time: 60 minutes
– Resting Time: 30 minutes
– Total Time: 1 hour 50 minutes
Chef’s Secret
To enhance the flavor, add a hint of cinnamon or nutmeg to the dough. This subtle spice addition complements the chocolate and quark perfectly, giving the cake a warm, comforting touch.
Extra Info
Did you know that the term “plucking” in this context refers to the way the dough is torn and placed on top of the filling? This technique not only adds a unique, rustic look to the cake but also helps to create a delicious, crumbly texture. It’s a little detail that makes a big difference in the final result.
Necessary Equipment
- Springform pan (Ø 26 cm)
- Mixing bowls
- Whisk
- Knife
- Aluminum foil
Storage
Storing this Russian Plucked Cake is easy and straightforward. Once cooled, you can store it in an airtight container at room temperature for up to 3 days. If you want it to last a bit longer, refrigerate it for up to 5 days. Just make sure to bring it to room temperature before serving for the best flavor and texture.
For those who like to plan ahead, you can also freeze the cake. Wrap it tightly in plastic wrap and then in aluminum foil. It will keep in the freezer for up to 3 months. When you’re ready to enjoy it, just thaw it in the refrigerator overnight and come to room temperature before serving.
Whether you’re storing it for a short or long time, this Russian Plucked Cake retains its delicious flavor and texture, making it a perfect make-ahead dessert.
Tips and Advice
Here are a few tips to make your Russian Plucked Cake even better:
– Use Cold Butter: Cold butter helps to create a crumbly, tender dough.
– Don’t Overmix the Dough: Mix just until the dough comes together to avoid a tough texture.
– Let the Cake Cool Completely: Patience is key here. Cooling the cake completely allows the flavors to meld and the texture to set.
Presentation Tips
Make your Russian Plucked Cake look extra special with these presentation ideas:
– Sprinkles of Powdered Sugar: A light dusting of powdered sugar adds a professional, elegant touch.
– Fresh Berries: Top the cake with fresh berries for a pop of color and a burst of freshness.
– Whipped Cream Swirls: Add a dollop of whipped cream on each slice for a luscious, creamy finish.
Healthier Alternative Recipes
Here are six possible variations of this Russian Plucked Cake for those looking for a healthier or different twist:
- Gluten-Free Version: Substitute regular wheat flour with gluten-free flour. This option is perfect for those with gluten sensitivities. Check out our Decadent Rocky Road for another delicious, gluten-free treat.
- Vegan Version: Use plant-based butter and a vegan egg substitute. The Lemon Yogurt Cake is a great example of a successful vegan adaptation.
- Low-Sugar Version: Reduce the sugar and use a natural sweetener like stevia or honey. This can help you maintain a balanced diet while still enjoying a sweet treat.
- High-Protein Version: Add a scoop of protein powder to the filling for an extra boost. This is a great post-workout treat that’s both satisfying and nutritious.
- Mini Cakes: Make individual mini cakes using a muffin tin. This is a fun and easy way to serve and share the cake. Perfect for a party or a cozy night in.
- Fruit-Infused Filling: Mix in some fruit puree or chopped fresh fruits into the filling for a burst of flavor. Try adding strawberries or blueberries for a fruity twist. Our Hawaiian Coconut Cake offers a similar tropical delight.
Common Mistakes to Avoid
Mistake 1: Overworking the Dough
Overworking the dough can make it tough and dense. To avoid this, mix the dough just until it comes together. This will ensure a tender, crumbly texture that melts in your mouth.
Mistake 2: Not Greasing the Pan Enough
A common mistake is not greasing the pan sufficiently, which can cause the cake to stick. Be generous with the butter or use a non-stick spray to ensure the cake slides out easily. This will save you from a messy cleanup and a ruined dessert.
Mistake 3: Overbaking the Cake
Overbaking can dry out the cake and make it overly firm. Keep an eye on the cake and check it after 50 minutes. If it’s starting to brown too much, cover it with aluminum foil. This will help it bake evenly without getting too dark.
Mistake 4: Not Letting the Cake Cool Completely
Patience is a virtue when it comes to cooling the cake. Jumping the gun and cutting the cake too soon can result in a messy, crumbly mess. Let it cool completely to room temperature. This will allow the flavors to meld and the texture to set, resulting in a perfect slice.
Mistake 5: Skipping the Vanilla Pudding Powder
The vanilla pudding powder is a key ingredient that adds structure and flavor to the filling. Skipping it can result in a runny, less flavorful filling. Don’t skip this step; it’s worth the extra effort for a delicious, creamy filling.
FAQ
What is Russian Plucked Cake?
The Russian Plucked Cake is a traditional Eastern European dessert featuring a rich, chocolatey dough and a creamy, tangy quark filling. The “plucked” appearance comes from tearing the dough into small pieces and placing them over the filling, creating a charming, rustic look.
Can I use a different type of flour?
Yes, you can substitute the Type 405 wheat flour with all-purpose flour or a gluten-free flour blend. Just make sure to adjust the liquid content if necessary to achieve the right dough consistency.
Is this recipe suitable for vegans?
With a few substitutions, this recipe can be made vegan. Use plant-based butter, a vegan egg substitute, and a dairy-free quark alternative. The Lemon Yogurt Cake is a great example of a successful vegan adaptation.
How long does the cake need to cool?
It’s important to let the cake cool completely, which usually takes about 30-40 minutes. This allows the flavors to meld and the texture to set, resulting in a perfect slice.
Can I make this cake ahead of time?
Absolutely! You can make the cake a day or two in advance. Store it in an airtight container at room temperature or in the refrigerator. Just make sure to bring it to room temperature before serving for the best flavor and texture.
What can I do with leftover cake?
Leftover Russian Plucked Cake can be stored in an airtight container at room temperature for up to 3 days or in the refrigerator for up to 5 days. You can also freeze it for up to 3 months. Thaw it in the refrigerator overnight and bring it to room temperature before serving.
Can I use a different type of cheese for the filling?
Yes, you can use cream cheese or Greek yogurt as a substitute for quark. These alternatives will give you a similar creamy and tangy flavor profile. Just make sure to adjust the consistency of the filling as needed.
How do I know when the cake is done?
The cake is done when it is golden brown and the center is set but still slightly jiggly. Insert a toothpick into the center; it should come out clean or with a few moist crumbs. If it wobbles too much, return it to the oven for a few more minutes.
Can I add other flavors to the filling?
Definitely! You can add a variety of flavors to the filling, such as lemon zest, a dash of cinnamon, or even a bit of orange extract. These additions can complement the quark and add a new dimension of flavor to the cake.
How can I make the cake look more presentable?
For a more polished look, sprinkle some powdered sugar on top of the cake or add a dollop of whipped cream to each slice. You can also garnish with fresh berries or a drizzle of chocolate sauce. These simple touches can make the cake look extra special.
Final Thoughts
This Russian Plucked Cake is a delightful and versatile dessert that’s sure to impress. Whether you’re baking for a family gathering, a special occasion, or just because, this cake is a winner. If you’re looking for more baking inspiration, check out our World’s Softest Cake for another delicious treat. Happy baking!
Equipment
- Springform pan (Ø 26 cm)
- Mixing bowls
- Whisk
- Knife
- Aluminum foil
Ingredients
- 300 g wheat flour Type 405
- 4 - 5 tbsp baking cocoa
- 150 g sugar
- 1 pack baking powder
- 1 size M egg
- 150 g cold butter
- 1 pinch salt
- Some butter for the mold
- 3 size M eggs for the filling
- 150 g sugar for the filling
- 200 g soft butter for the filling
- 500 g low-fat quark for the filling
- 1 pack vanilla sugar for the filling
- 1 pack vanilla pudding powder for the filling
- Some powdered sugar for sprinkling
Instructions
- Preheat the oven to 180 degrees (or 160 degrees for a fan oven) and grease a springform pan Ø 26 cm.
- In a large mixing bowl, combine flour, cocoa powder, sugar, baking powder, egg, butter, and salt, and knead until homogeneous.
- Press half of the dough into the prepared springform pan, forming an edge of about 3 cm, and set the remaining dough aside.
- In another bowl, whisk the eggs with sugar and butter; then add quark, vanilla sugar, and vanilla pudding powder, stirring well.
- Pour the filling mixture onto the dough in the springform pan.
- Tear the reserved dough into small pieces and place them over the filling with small gaps.
- Bake for about 60 minutes, covering with aluminum foil after 45 minutes if it gets too dark.
- Let the cake cool completely before removing it from the tin, and sprinkle with powdered sugar if desired.
Notes
Nutrition

Hi, I’m Olivia Parker, the founder of BakingSecret.com and a lifelong lover of all things sweet and homemade. I grew up in a small town in Oregon, where the smell of fresh cookies in my family’s kitchen sparked my passion for baking. Over the years, I turned that passion into a mission: to help home bakers feel confident, inspired, and creative.
After studying food science and working in several artisan bakeries across the U.S., I decided to create a space where everyone from beginners to seasoned bakers can find reliable recipes, expert tips, and a warm, welcoming community. BakingSecret.com is my way of sharing the magic of baking with the world. When I’m not testing new recipes, you’ll find me exploring farmers’ markets, collecting vintage cookbooks, or perfecting my sourdough technique.