
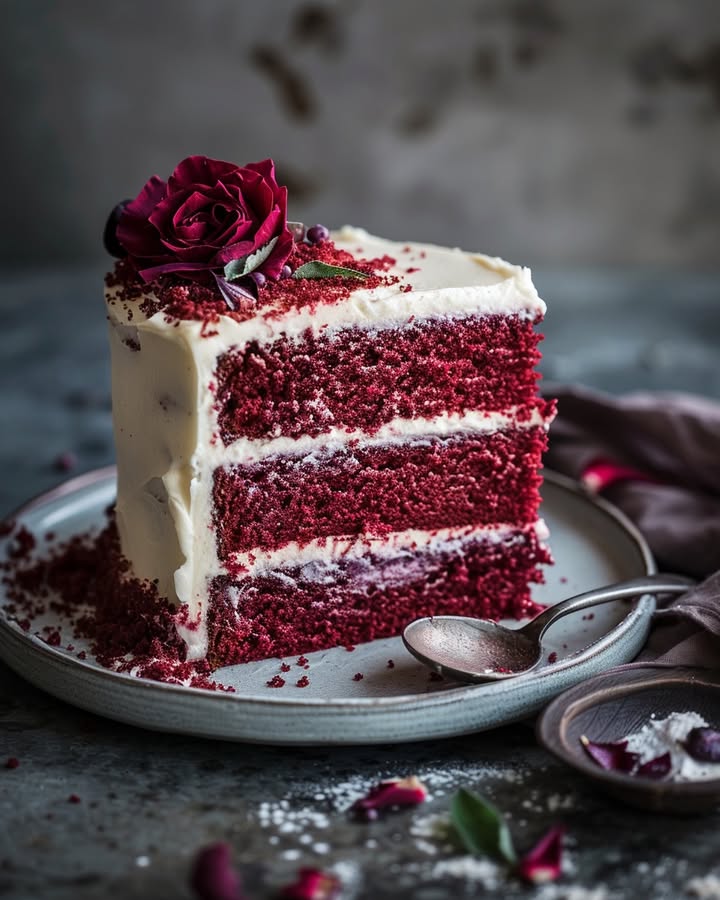
The Ultimate Velvet Indulgence: A Red Velvet Cake Recipe to Treasure
Imagine a rich, velvety cake that’s as delightful to the eyes as it is to the taste buds. That’s what you get with this Ultimate Velvet Indulgence red velvet cake. It’s a recipe I’ve perfected over years of baking for my family and friends, and it always receives rave reviews. Let’s dive into why this cake is so special and how you can make it at home.
A Sweet Slice of History: The Story Behind Red Velvet Cake
Red velvet cake has a fascinating history. It originated in the 1920s, when bakers used natural cocoa powder that contained more anthocyanin, giving the cake its signature red color. Over time, the use of food coloring became more common, and the cake gained popularity, especially in the Southern United States. Today, it’s a classic favorite, often associated with celebrations and special occasions.
Why You’ll Love This Recipe
This red velvet cake is not just a feast for the eyes; it’s also incredibly delicious. The combination of buttermilk and cocoa powder creates a unique, tangy flavor that’s perfectly balanced by the sweet cream cheese frosting. Plus, the texture is moist and tender, making every bite a pure delight. And the best part? It’s surprisingly easy to make, even for beginners.
Perfect Occasions to Prepare This Recipe
Whether it’s a birthday, Valentine’s Day, or just a cozy family gathering, this red velvet cake is sure to impress. Its vibrant red color and luscious frosting make it a standout dessert for any celebration. It’s also a great choice for a festive holiday treat or a thoughtful gift for a friend.
Ingredients
- For the Cake:
- 1/2 cup plain hot coffee or boiling water
- 1/4 cup (21 grams) unsweetened natural cocoa powder
- 2 1/4 cups (279 grams) all-purpose flour
- 1/2 teaspoon baking powder
- 1 teaspoon baking soda
- 1 teaspoon fine sea salt
- 1/4 teaspoon ground cinnamon (optional)
- 2 cups (400 grams) granulated sugar
- 1/2 cup (109 grams) vegetable oil
- 1 stick (113 grams) unsalted butter, melted
- 2 large eggs, at room temperature
- 1 large egg yolk, at room temperature
- 1 cup buttermilk, at room temperature
- 2 teaspoons vanilla extract
- 3 teaspoons red gel food coloring (plus more if needed)
- 1 teaspoon distilled white vinegar
- For the Cream Cheese Frosting:
- 16 ounces (454 grams) cream cheese, at room temperature
- 2 sticks (227 grams) unsalted butter, at room temperature
- 2 teaspoons vanilla extract
- 4 cups (500 grams) powdered sugar, sifted
Substitution Options
If you don’t have some of the ingredients, here are some substitutions you can try:
– Cocoa Powder: Dutch-processed cocoa powder can be used, but it may alter the color slightly.
– Buttermilk: If you don’t have buttermilk, you can make a substitute by adding 1 tablespoon of white vinegar to 1 cup of milk and letting it sit for a few minutes.
– Red Gel Food Coloring: Liquid food coloring can be used, but you will need more to achieve the same vibrant color.
Preparation Section
Step 1: Prepare the Oven and Pans
Start by preheating your oven to 325°F (163°C). Line three 8-inch cake pans with parchment rounds and spray them with nonstick cooking spray. This ensures that your cake layers will come out cleanly and easily.
Step 2: Make the Cake Batter
In a glass measuring cup, whisk together the hot coffee and cocoa powder. Let it stand for 5 minutes to allow the flavors to meld. In a medium mixing bowl, whisk together the flour, baking powder, baking soda, salt, and cinnamon. In a large mixing bowl, whisk together the sugar, vegetable oil, and melted butter. Add the eggs and yolk, then whisk until well combined. Add the buttermilk, vanilla, and food coloring, and whisk to combine. Stir in the vinegar and coffee mixture. Sift the flour mixture into the wet ingredients in thirds, folding until incorporated after each addition. The batter should be smooth and shiny.
Step 3: Bake the Cake
Divide the batter evenly between the prepared pans. Tap the pans on the counter to release any air bubbles. Bake for 25-30 minutes, or until a cake tester comes out clean. The top may look slightly spongy, which is perfect. Cool the cakes in the pans on a wire rack. When cool enough to handle, run a knife around the edges and invert onto the racks. Let them cool completely before frosting.
Step 4: Make the Cream Cheese Frosting
In a stand mixer fitted with the paddle attachment, beat the cream cheese and butter until light and creamy. Scrape down the bowl. Add the vanilla and mix until combined. Gradually add the powdered sugar on low speed until the frosting is fluffy. Adjust the consistency with a little milk or more powdered sugar if needed. The frosting should be smooth and spreadable.
Step 5: Assemble the Cake
Place one cake layer flat-side up on a cake plate. Spread about a third of the frosting on top. Add the second cake layer and repeat. Top with the final layer and use the remaining frosting to ice the sides and top of the cake. For a professional look, use an offset spatula to create smooth, even layers.
Pro Tip:
To ensure your cake layers are perfectly level, use a cake leveler or a long, sharp knife to trim off any domed tops before frosting.
Chef’s Tip:
For an extra touch of elegance, sprinkle a few red velvet crumbs on top of the frosting. This adds a lovely textural element and a pop of color.
Timing
Prep Time: 20 minutes
Baking Time: 25-30 minutes
Resting Time: 1 hour
Total Time: 2 hours 25 minutes
Chef’s Secret
One of my favorite secrets to enhance the flavor of this red velvet cake is to use freshly brewed coffee instead of water. The caffeine in the coffee enhances the chocolate flavor, making the cake even more delicious.
Extra Info
Did you know that the red food coloring used in red velvet cakes was originally made from beets? While modern recipes often use artificial food coloring, you can still find natural options made from plant-based ingredients to achieve that vibrant red hue.
Necessary Equipment
To make this red velvet cake, you’ll need:
– 3 8-inch cake pans
– Parchment paper
– Nonstick cooking spray
– Measuring cups and spoons
– Mixing bowls
– Whisk
– Stand mixer with paddle attachment
– Offset spatula
– Wire cooling rack
Storage
This red velvet cake can be stored in the refrigerator for up to 3 days. Make sure to cover it with a cake dome or wrap it in plastic wrap to prevent it from drying out. If you want to freeze the cake, wrap the individual layers in plastic wrap and aluminum foil, and store them in the freezer for up to 3 months. Just thaw them in the refrigerator overnight before frosting.
When storing the cake in the refrigerator, it’s best to keep it in a cool, dry place. Avoid placing it near strong-smelling foods, as it can absorb odors. For best results, bring the cake to room temperature before serving to let the flavors fully develop.
Remember, the cream cheese frosting needs to be refrigerated, so if you’re preparing the cake in advance, store the frosting separately and frost the cake just before serving. This way, the cake will stay fresh and the frosting will be at its best.
Tips and Advice
– Room Temperature Ingredients: Make sure all your ingredients, especially the eggs, buttermilk, and cream cheese, are at room temperature. This helps them blend together smoothly and ensures a consistent texture.
– Measure Carefully: Use a kitchen scale to measure your ingredients for the most accurate results. This is especially important for the flour and sugar, as too much or too little can affect the texture of the cake.
– Don’t Overmix: Be gentle when folding the dry ingredients into the wet ingredients. Overmixing can lead to a tough, dense cake. Fold just until the flour is incorporated.
Presentation Tips
- Add a sprinkle of red velvet cake crumbs on top of the frosting for a whimsical touch.
- Use a piping bag to create a decorative border around the edges of the cake.
- Garnish with fresh berries or a dusting of powdered sugar for a simple yet elegant look.
Healthier Alternative Recipes
Here are six possible variations of this red velvet cake recipe, each with a healthier twist:
- Low-Sugar Red Velvet Cake: Reduce the amount of granulated sugar and use a natural sweetener like honey or maple syrup. This version maintains the rich, velvety texture but with fewer calories.
- Gluten-Free Red Velvet Cake: Substitute the all-purpose flour with a gluten-free flour blend. This option is perfect for those with gluten sensitivities and still delivers a delicious, moist cake.
- Vegan Red Velvet Cake: Replace the eggs with flax eggs and use dairy-free butter and cream cheese alternatives. This vegan version is just as delectable and cruelty-free.
- Keto-Friendly Red Velvet Cake: Use almond flour and a sugar substitute like erythritol. This low-carb version is ideal for those following a ketogenic diet.
- Whole Wheat Red Velvet Cake: Swap half of the all-purpose flour with whole wheat flour. This version adds a nutty flavor and a boost of fiber, making it a healthier choice.
- Protein-Rich Red Velvet Cake: Add a scoop of protein powder to the batter. This not only enhances the nutritional value but also helps to balance the protein balance in your diet.
Common Mistakes to Avoid
Mistake 1: Using Too Much Food Coloring
Using too much food coloring can make the cake look overly bright and artificial. Start with a few teaspoons and adjust as needed. Remember, a little goes a long way. If you prefer a more natural look, consider using beet juice as a natural food coloring alternative.
Mistake 2: Overbeating the Batter
Overbeating the batter can lead to a dense, tough cake. Mix the ingredients just until they are combined. The batter should be smooth and free of lumps, but avoid overmixing to keep the cake light and airy.
Mistake 3: Not Leveling the Cake Layers
Uneven cake layers can make frosting and assembling the cake challenging. Use a serrated knife or a cake leveler to trim any domes or uneven areas. This ensures that the layers are flat and even, making the cake look and taste better.
Mistake 4: Using Cold Ingredients
Using cold ingredients, especially the eggs, buttermilk, and cream cheese, can result in a lumpy, unsmooth cake. Always bring your ingredients to room temperature before starting. This allows them to blend together more easily and ensures a consistent texture.
Mistake 5: Not Chilling the Cake Before Frosting
Frosting a warm cake can cause the frosting to melt and slide off. Make sure the cake layers are completely cooled before frosting. For best results, chill the cake in the refrigerator for at least 30 minutes before applying the frosting. This makes the process easier and ensures a neat, professional finish.
FAQ
Q: Can I use regular cocoa powder instead of natural cocoa powder?
Yes, you can use regular cocoa powder, but it may alter the color and flavor slightly. Natural cocoa powder is less processed and gives the cake a more authentic red velvet flavor. If you only have regular cocoa powder, reduce the baking soda by 1/4 teaspoon to balance the acidity.
Q: How do I make buttermilk if I don’t have it?
To make a buttermilk substitute, add 1 tablespoon of white vinegar or lemon juice to 1 cup of milk. Let it sit for 5-10 minutes until it thickens. This homemade buttermilk works just as well in the recipe and adds the necessary tanginess.
Q: Can I use a different type of food coloring?
Yes, you can use liquid food coloring, but you will need more to achieve the same vibrant red color. Start with a few drops and add more as needed. Natural food coloring made from beets is another option, but it may give a slightly different shade of red.
Q: How do I store the cake if I’m not eating it right away?
Store the cake in the refrigerator for up to 3 days. Cover it with a cake dome or plastic wrap to prevent it from drying out. If you want to freeze the cake, wrap the individual layers in plastic wrap and aluminum foil, and store them in the freezer for up to 3 months.
Q: Can I make this cake in advance?
Yes, you can make the cake layers in advance and store them in the freezer. Just wrap them in plastic wrap and aluminum foil, and freeze for up to 3 months. Thaw the layers in the refrigerator overnight before frosting.
Q: Is there a substitute for buttermilk?
You can make a buttermilk substitute by adding 1 tablespoon of white vinegar or lemon juice to 1 cup of milk. Let it sit for 5-10 minutes until it thickens. This works as a great substitute in the recipe.
Q: Can I use a different type of frosting?
While the cream cheese frosting is a classic pairing with red velvet cake, you can experiment with other frostings. A vanilla buttercream or a whipped cream frosting are both delicious alternatives. Just make sure the frosting complements the tangy flavor of the cake.
Q: How do I get the cake layers to come out cleanly?
To ensure the cake layers come out cleanly, line the pans with parchment paper and spray them with nonstick cooking spray. After baking, let the cakes cool in the pans for 10-15 minutes before running a knife around the edges and inverting them onto a wire rack to cool completely.
Q: Can I use a 9-inch pan instead of an 8-inch pan?
Yes, you can use 9-inch pans, but you will need to adjust the baking time. Fill each pan 3/4 full and reduce the baking time to 20-25 minutes. Check for doneness with a cake tester. The cake should be springy to the touch and the tester should come out clean.
Q: Why is my cake not red enough?
If your cake is not red enough, you may need to add more food coloring. Start with a few more drops and adjust as needed. Remember, the color will deepen as the cake bakes, so it’s best to add a little at a time. If you prefer a more natural approach, consider using beet juice as a natural food coloring.
Now that you know the secrets to making the perfect Ultimate Velvet Indulgence, you’re ready to wow your friends and family with this stunning red velvet cake. Don’t forget to check out our other delightful recipes, like the Strawberry Meringue Cake or the Heavenly Almond Cake. Happy baking!
Equipment
- 3 8-inch cake pans
- Parchment paper
- Nonstick cooking spray
- Measuring cups and spoons
- Mixing bowls
Ingredients
- 1/2 cup plain hot coffee or boiling water
- 1/4 cup unsweetened natural cocoa powder
- 2 1/4 cups all-purpose flour
- 1/2 teaspoon baking powder
- 1 teaspoon baking soda
- 1 teaspoon fine sea salt
- 1/4 teaspoon ground cinnamon (optional)
- 2 cups granulated sugar
- 1/2 cup vegetable oil
- 1 stick unsalted butter, melted
- 2 large eggs, at room temperature
- 1 large egg yolk, at room temperature
- 1 cup buttermilk, at room temperature
- 2 teaspoons vanilla extract
- 3 teaspoons red gel food coloring (plus more if needed)
- 1 teaspoon distilled white vinegar
- 16 ounces cream cheese, at room temperature
- 2 sticks unsalted butter, at room temperature
- 2 teaspoons vanilla extract
- 4 cups powdered sugar, sifted
Instructions
- Preheat your oven to 325°F (163°C). Line three 8-inch cake pans with parchment and spray with nonstick cooking spray.
- In a glass measuring cup, whisk together the hot coffee and cocoa powder and let it stand for 5 minutes.
- In a medium bowl, whisk together the flour, baking powder, baking soda, salt, and cinnamon.
- In a large bowl, whisk together the sugar, vegetable oil, and melted butter. Add eggs and yolk, mixing well.
- Add buttermilk, vanilla, and food coloring to the egg mixture and whisk to combine. Stir in vinegar and coffee mixture.
- Sift the flour mixture into the wet ingredients in thirds, folding until incorporated. The batter should be smooth and shiny.
- Divide the batter evenly between prepared pans. Tap pans on the counter to release air bubbles.
- Bake for 25-30 minutes or until a cake tester comes out clean. Cool cakes in pans on a wire rack.
- Once cool enough, run a knife around edges and invert onto racks. Allow to cool completely before frosting.
- In a stand mixer, beat cream cheese and butter until light and creamy. Mix in vanilla.
- Gradually add powdered sugar on low speed until frosting is fluffy.
- Place one cake layer on a plate flat-side up and spread a third of the frosting on top. Repeat with the second layer.
- Top with the final layer and frost the top and sides of the cake evenly.
Notes
Nutrition

Hi, I’m Olivia Parker, the founder of BakingSecret.com and a lifelong lover of all things sweet and homemade. I grew up in a small town in Oregon, where the smell of fresh cookies in my family’s kitchen sparked my passion for baking. Over the years, I turned that passion into a mission: to help home bakers feel confident, inspired, and creative.
After studying food science and working in several artisan bakeries across the U.S., I decided to create a space where everyone from beginners to seasoned bakers can find reliable recipes, expert tips, and a warm, welcoming community. BakingSecret.com is my way of sharing the magic of baking with the world. When I’m not testing new recipes, you’ll find me exploring farmers’ markets, collecting vintage cookbooks, or perfecting my sourdough technique.