
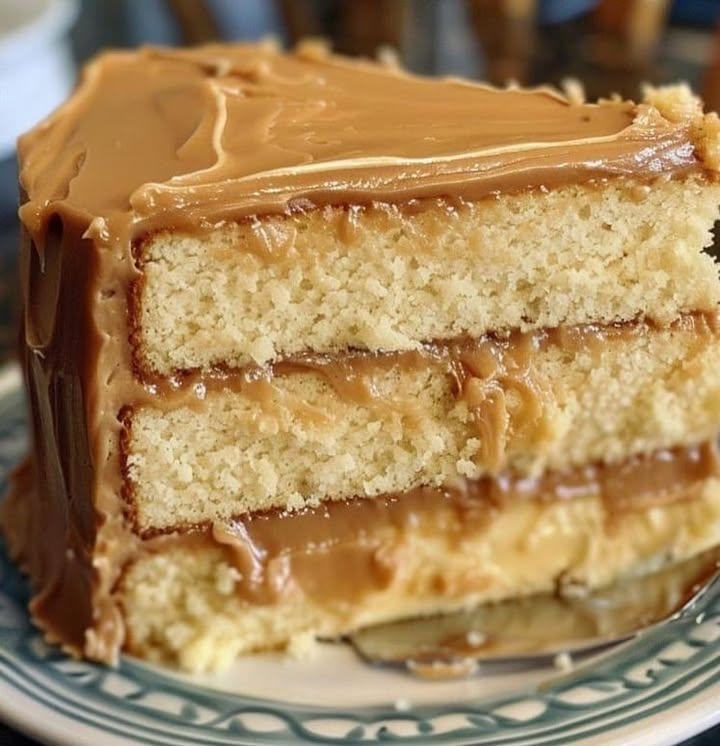
A Heavenly Slice of Home: Classic Southern Caramel Cake
Oh, how I love a good Southern Caramel Cake! It’s one of those desserts that makes you feel like you’re back in your grandma’s kitchen, surrounded by warmth and the sweet aroma of caramel. This cake is a true Southern delight, with its rich, buttery layers and a silky caramel frosting that just melts in your mouth. Let me tell you, it’s not just a cake; it’s a hug from the South wrapped in caramel.
Where It All Began: The History of Southern Caramel Cake
Believe it or not, Southern Caramel Cake has a rich history that dates back to the early 19th century. It was a staple at family gatherings and church potlucks, where everyone would rave about the perfectly balanced sweetness and the soft, airy texture. My own grandmother used to make this cake for every special occasion, and it always brought the family together. Over the years, the recipe has seen some modern twists, but the heart of it remains the same—simple, delicious, and full of love.
Why You’ll Love This Classic Southern Caramel Cake
This cake is a perfect blend of flavors and textures. The cake itself is light and fluffy, thanks to the careful beating of the butter and sugar. The caramel frosting is what truly sets it apart, with its rich, creamy texture and deep, caramel flavor. It’s a dessert that’s both comforting and luxurious, making it perfect for any occasion. Plus, it’s surprisingly easy to make, so you can impress your friends and family without breaking a sweat!
Perfect Occasions to Prepare This Sweet Treat
Whether it’s a birthday, a baby shower, or just a cozy Sunday afternoon, this Southern Caramel Cake is sure to be a hit. It’s also a great choice for holiday gatherings, where it can take center stage on the dessert table. No matter when you serve it, it’s bound to bring smiles and create cherished memories.
Ingredients for Your Southern Caramel Cake
- 1 cup (2 sticks) butter
- 2 cups granulated sugar
- 4 eggs
- 3 cups wheat flour, with yeast incorporated
- 1 cup buttermilk
- 2 teaspoons vanilla extract
- For the Southern Caramel Frosting:
- 2 cups sugar
- 1 cup buttermilk
- 1/2 cup vegetable shortening (Crisco)
- 1/2 cup butter
- 1 teaspoon baking soda
Substitution Options for Your Convenience
- Butter: If you need to, you can use margarine, but it won’t have the same rich flavor.
- Buttermilk: In a pinch, you can make your own by adding 1 tablespoon of lemon juice or white vinegar to 1 cup of milk and letting it sit for 5 minutes.
- Flour: You can use all-purpose flour, but self-rising flour will give you a lighter texture.
Preparation Section: Step-by-Step Instructions
Step 1: Preheat and Prep
Preheat your oven to 350°F (180°C). Grease three 9-inch (23 cm) pans and line the bottoms with parchment paper. This little extra step ensures that your cakes come out clean and perfect. Trust me, it’s worth the effort!
Step 2: Cream the Butter and Sugar
In a large mixing bowl, beat the butter until it’s light and fluffy. Add the sugar and continue beating for about 5 minutes. This step is key to getting that lovely, airy texture in your cake. It should look pale and creamy when you’re done.
Step 3: Add the Eggs
Add the eggs one by one, mixing well after each addition. This helps the eggs incorporate evenly, giving your cake a smooth, even texture. The batter should be nice and smooth by now.
Step 4: Mix in the Flour and Buttermilk
Alternate adding the flour and buttermilk, starting and ending with the flour. This method keeps the batter from becoming too dense. Finally, add the vanilla extract and mix until everything is well combined. The batter should be thick but pourable.
Step 5: Bake the Cakes
Divide the batter evenly among the prepared pans. Bake for 25-30 minutes, or until a toothpick inserted into the center comes out clean. The kitchen will start to smell amazing, and you’ll know it’s almost time to enjoy your creation!
Step 6: Cool the Cakes
Let the cakes cool on a wire rack before unmolding. This is important to prevent the cakes from sticking or breaking. Once they are completely cool, you can start working on the caramel frosting.
Step 7: Make the Caramel Frosting
In a cast iron saucepan, mix all the frosting ingredients and cook over medium-high heat. Stir constantly to prevent burning. Cook until the mixture reaches the softball stage, or about 235°F – 245°F (use a candy thermometer for accuracy). You can also do the cold water test: drop a small amount of the caramel into a bowl of cold water and see if it forms a smooth ball. Remove from heat and beat with a wooden spoon until creamy and ready to spread.
Step 8: Assemble the Cake
Spread the frosting between the cake layers, and then cover the top and sides of the cake. The frosting should be smooth and creamy, making your cake look and taste like a dream. Now, it’s time to share and enjoy!
Timing: A Quick Breakdown
- Prep Time: 20 minutes
- Cooking Time: 25-30 minutes
- Cooling Time: 30 minutes
- Total Time: 1 hour 20 minutes (including cooling time)
Chef’s Secret: A Pro Tip for Perfect Caramel
To get the perfect caramel consistency, make sure to stir continuously while cooking. This prevents any hot spots from forming and ensures a smooth, creamy texture. Also, using a candy thermometer really helps in achieving the right temperature. It’s a small tool that makes a big difference!
Extra Info: A Fun Fact About Caramel
Did you know that caramel is actually a type of sugar syrup? When sugar is heated and melted, it undergoes a chemical reaction called caramelization, which gives it that rich, golden-brown color and that delicious, nutty flavor. It’s a simple yet magical process that transforms ordinary sugar into something truly special.
Necessary Equipment
- Three 9-inch (23 cm) cake pans
- Parchment paper
- Mixing bowls
- Electric mixer or stand mixer
- Candy thermometer
- Cast iron saucepan
- Wooden spoon
- Wire rack
Storage Tips for Your Southern Caramel Cake
Storing your Southern Caramel Cake is quite simple. First, let it cool completely. Then, place it in an airtight container or cover it with a cake dome. It will stay fresh at room temperature for up to 3 days. If you live in a warmer climate, you can store it in the refrigerator, but make sure to bring it to room temperature before serving to enjoy the best texture and flavor.
If you want to freeze the cake, wrap it tightly in plastic wrap, then in foil, and store it in a freezer bag. It will keep for up to 3 months. Just thaw it in the refrigerator overnight before serving. This way, you can enjoy a slice of homemade goodness whenever you need a little pick-me-up.
Pro tip: It’s best to store the cake without any decorative elements, as they can become soggy or harden in the fridge or freezer. Add them just before serving for the best presentation and taste.
Tips and Advice
- Room Temperature Ingredients: Make sure all your ingredients, especially the butter and eggs, are at room temperature. This helps them mix together more smoothly and evenly.
- Don’t Overmix: When adding the flour and buttermilk, mix just until they are incorporated. Overmixing can lead to a tough, dense cake.
- Patience is Key: Be patient when cooking the caramel. It takes time to reach the right temperature, and stirring constantly is crucial to prevent burning.
Presentation Tips: Making Your Cake a Showstopper
- Layer It Up: For a classic look, stack the cake layers with a generous amount of frosting in between each layer.
- Decorate with Flair: Add a few sprinkles or a dusting of powdered sugar on top for a festive touch.
- Serve with Berries: A few fresh berries, like strawberries or raspberries, around the base of the cake can add a pop of color and a fresh, fruity flavor.
Healthier Alternative Recipes
- Reduced Sugar Version: Cut down on the sugar in the cake and frosting by substituting part of the granulated sugar with a natural sweetener like stevia or monk fruit.
- Whole Wheat Option: Use whole wheat flour instead of regular flour for a healthier twist. This adds fiber and nutrients while keeping the cake deliciously moist.
- Coconut Milk Frosting: Replace the buttermilk in the frosting with coconut milk for a dairy-free option. It adds a subtle coconut flavor that complements the caramel beautifully.
- Fruit-Infused Delight: Add a layer of fresh fruit, like sliced peaches or berries, between the cake layers for a burst of natural sweetness and freshness.
- Maple Syrup Glaze: Use maple syrup in place of some of the sugar in the frosting for a rich, deep flavor that complements the caramel beautifully.
- Zesty Lemon Version: Add a touch of lemon zest to the cake batter for a zesty, refreshing twist. The lemon complements the caramel and adds a bright, fresh note to the cake.
Common Mistakes to Avoid
Mistake 1: Overbeating the Batter
Overbeating the batter can lead to a tough, dense cake. Once the flour and buttermilk are added, mix just until they are incorporated. Overmixing activates the gluten in the flour, resulting in a tough texture. Pro tip: Stop mixing as soon as the ingredients are combined, and your cake will be light and fluffy.
Mistake 2: Not Reaching the Right Caramel Temperature
One of the most common mistakes when making caramel is not reaching the right temperature. The softball stage (235°F – 245°F) is crucial for a smooth, creamy caramel. Use a candy thermometer to ensure accuracy. Without it, the caramel might be too runny or too hard. Pro tip: If you don’t have a candy thermometer, use the cold water test to check the consistency.
Mistake 3: Not Cooling the Cakes Properly
Cooling the cakes properly is essential for a perfect finish. If you try to frost a warm cake, the frosting will melt and slide off. Make sure the cakes are completely cool before assembling and frosting. Pro tip: Use a wire rack to cool the cakes, and for an extra touch, wrap them in plastic wrap and refrigerate for a bit to make frosting easier.
Mistake 4: Using Cold Ingredients
Using cold ingredients, especially butter and eggs, can make it difficult to achieve a smooth, creamy batter. Room temperature ingredients mix together more easily and result in a better texture. Take the butter and eggs out of the fridge at least 30 minutes before you start baking. Pro tip: If you’re in a hurry, you can gently warm the eggs in a bowl of warm water and cut the butter into small pieces to help it soften faster.
Mistake 5: Not Lining the Pans
Not lining the pans with parchment paper can lead to sticking and broken cakes. Even if you grease the pans, the parchment paper ensures that the cakes come out cleanly and easily. Don’t skip this step; it’s a small detail that makes a big difference. Pro tip: Trace the bottom of the pan onto the parchment paper and cut it to fit perfectly.
FAQ: Frequently Asked Questions
Can I Substitute Buttermilk with Regular Milk?
Yes, you can substitute buttermilk with regular milk. To make a buttermilk substitute, add 1 tablespoon of lemon juice or white vinegar to 1 cup of milk and let it sit for 5 minutes. This will curdle the milk and give it the acidity needed for the recipe.
How Long Does the Cake Take to Bake?
The cake takes about 25-30 minutes to bake. Always check for doneness with a toothpick; insert it into the center of the cake, and if it comes out clean, the cake is done. If it’s still moist, bake for a few more minutes.
Can I Use Margarine Instead of Butter?
While you can use margarine, it won’t give you the same rich flavor as butter. Butter provides a richer, creamier texture and a more authentic taste. If you need to use margarine, go for a high-quality brand that contains at least 80% fat.
What Can I Do If the Caramel Is Too Runny?
If the caramel is too runny, it likely hasn’t reached the right temperature. Continue cooking and stirring until it reaches the softball stage (235°F – 245°F). Alternatively, if you’ve already removed it from the heat, you can add a small amount of corn syrup or cream to thicken it slightly.
How Can I Store the Cake?
Store the cake at room temperature in an airtight container for up to 3 days. If you live in a warmer climate, you can store it in the refrigerator, but bring it to room temperature before serving. For longer storage, you can freeze the cake for up to 3 months. Wrap it tightly in plastic wrap and foil, and place it in a freezer bag.
Can I Use a Different Type of Flour?
While you can use all-purpose flour, the cake will turn out denser. Self-rising flour, which includes baking powder and salt, will give you a lighter, airier texture. If you use all-purpose flour, you’ll need to add about 1 1/2 teaspoons of baking powder and 1/2 teaspoon of salt per cup of flour.
Is There a Way to Make the Caramel Frosting Dairy-Free?
Yes, you can make the caramel frosting dairy-free by replacing the buttermilk with coconut milk. This will give the frosting a subtle coconut flavor, which complements the caramel nicely. You can also use a vegan butter substitute for the butter in the recipe.
Can I Add Fruit to the Cake?
Absolutely! Adding a layer of fresh fruit, such as sliced strawberries, peaches, or blueberries, between the cake layers can add a nice, fresh flavor and a bit of color. Just make sure the fruit is dry to prevent the cake from getting soggy.
What If I Don’t Have a Candy Thermometer?
If you don’t have a candy thermometer, you can use the cold water test to check the consistency of the caramel. Drop a small amount of the caramel into a bowl of cold water. If it forms a soft ball, it’s ready. If it’s too runny, continue cooking, and if it’s too hard, you may have gone too far.
How Can I Make the Cake Healthier?
To make the cake healthier, you can reduce the sugar content, use whole wheat flour, and add a layer of fresh fruit between the cake layers. You can also use a natural sweetener like stevia or monk fruit in the frosting. These small changes can make a big difference in the nutritional value of the cake without sacrificing taste.
Now that you’ve mastered the art of making a Classic Southern Caramel Cake, why not explore some other delightful recipes? Try the Pineapple Juice Poundcake, or whip up a batch of Fluffy Pancake Delight. You can also check out the Merry Nougat Roll for a festive treat. And for a decadent chocolate experience, try the Juicy Chocolate Delight.
Remember, the key to a healthy and balanced diet is moderation and variety. For more tips on healthy eating habits, visit the CDC’s nutrition website. Happy baking, and enjoy every sweet moment!
Conclusion: A Sweet Ending
There you have it, a classic Southern Caramel Cake that’s as comforting as it is delicious. This cake is a true labor of love, and it brings a taste of the South to your table. Whether you’re celebrating a special occasion or just craving a little sweetness, this cake is sure to satisfy. So, preheat your oven, gather your ingredients, and let’s create a little piece of heaven right in your kitchen. Happy baking, and may your cakes always be as sweet as your memories!
Equipment
- Three 9-inch (23 cm) cake pans
- Parchment paper
- Mixing bowls
- Electric mixer or stand mixer
- Candy thermometer
- Cast iron saucepan
- Wooden spoon
- Wire rack
Ingredients
- 1 cup butter softened
- 2 cups granulated sugar
- 4 large eggs
- 3 cups wheat flour with yeast incorporated
- 1 cup buttermilk
- 2 tsp vanilla extract
- 2 cups sugar for frosting
- 1 cup buttermilk for frosting
- 1/2 cup vegetable shortening (Crisco)
- 1/2 cup butter for frosting
- 1 tsp baking soda
Instructions
- Preheat your oven to 350°F (180°C). Grease three 9-inch (23 cm) pans and line the bottoms with parchment paper.
- In a large mixing bowl, beat the butter until it’s light and fluffy. Add the sugar and continue beating for about 5 minutes.
- Add the eggs one by one, mixing well after each addition.
- Alternate adding the flour and buttermilk, starting and ending with the flour. Add the vanilla extract and mix until well combined.
- Divide the batter evenly among the prepared pans. Bake for 25-30 minutes, until a toothpick inserted into the center comes out clean.
- Let the cakes cool on a wire rack before unmolding.
- In a cast iron saucepan, mix all frosting ingredients and cook over medium-high heat, stirring constantly. Cook until the mixture reaches the softball stage (235°F - 245°F) using a candy thermometer.
- Spread the frosting between the cake layers, and cover the top and sides of the cake.
Notes
Nutrition

Hi, I’m Olivia Parker, the founder of BakingSecret.com and a lifelong lover of all things sweet and homemade. I grew up in a small town in Oregon, where the smell of fresh cookies in my family’s kitchen sparked my passion for baking. Over the years, I turned that passion into a mission: to help home bakers feel confident, inspired, and creative.
After studying food science and working in several artisan bakeries across the U.S., I decided to create a space where everyone from beginners to seasoned bakers can find reliable recipes, expert tips, and a warm, welcoming community. BakingSecret.com is my way of sharing the magic of baking with the world. When I’m not testing new recipes, you’ll find me exploring farmers’ markets, collecting vintage cookbooks, or perfecting my sourdough technique.