
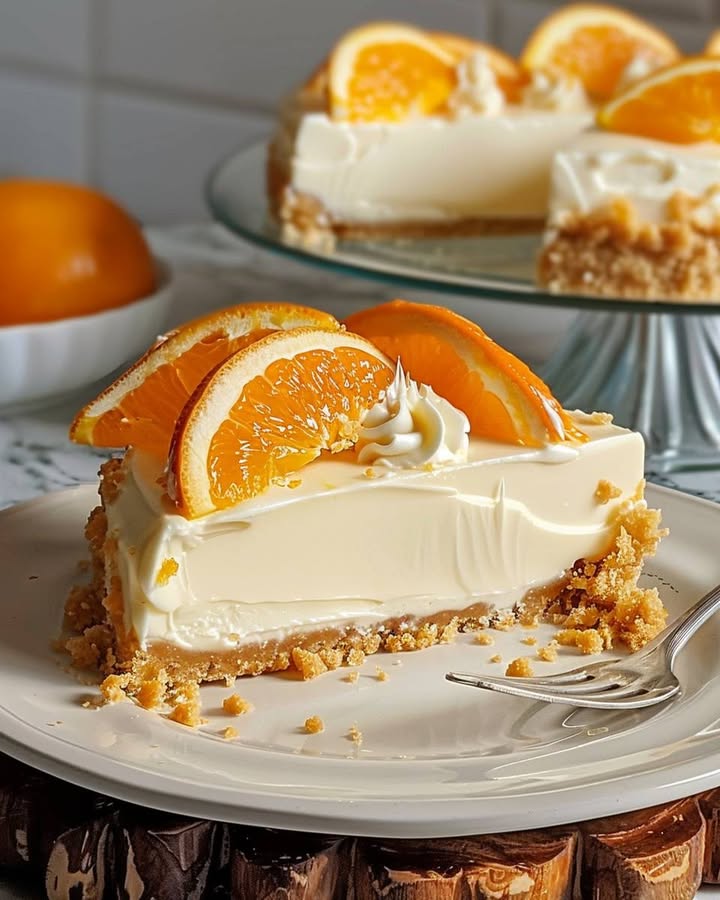
A Summery Twist on a Classic: No-Bake Orange Creamsicle Cheesecake
Imagine a warm summer day, the sun shining bright and the smell of fresh-cut grass in the air. What better way to cool off than with a slice of No-Bake Orange Creamsicle Cheesecake? This refreshing dessert is like a burst of sunshine on your taste buds, perfect for any gathering or just a sweet treat on a hot day. Let me tell you, this recipe has been a hit at my family picnics, and I’m excited to share it with you.
The Story Behind No-Bake Orange Creamsicle Cheesecake
When I first tried this No-Bake Orange Creamsicle Cheesecake, I was instantly transported back to my childhood summers. The combination of tangy orange and creamy cheesecake reminded me of the classic creamsicle popsicles we used to enjoy. It’s a modern twist on a nostalgic treat, blending the best of both worlds. This dessert has become a tradition in my family, and I hope it becomes one in yours too!
Why You’ll Love This No-Bake Orange Cheesecake
This no-bake wonder is not just about the flavors; it’s also about the ease of preparation. With no need to turn on the oven, it’s a lifesaver during the summer months. The layers of creamy orange and classic cheesecake, topped with a zesty jello, create a delightful texture and flavor experience. Plus, it’s a showstopper at any table, making it a hit with both kids and adults.
Celebrations and Gatherings Perfect for This Dessert
Whether you’re planning a summer barbecue, a birthday party, or just a casual get-together, this No-Bake Orange Creamsicle Cheesecake fits right in. Its refreshing citrusy goodness makes it ideal for any occasion. I’ve served it at potlucks, family reunions, and even as a special treat for my friends. Trust me, everyone will be asking for seconds!
Ingredients You’ll Need
- 1 1/2 cups graham cracker crumbs
- 1/3 cup granulated sugar
- 6 tablespoons unsalted butter, melted
- 16 ounces cream cheese, softened (for each layer)
- 1 cup powdered sugar (for each layer)
- 3/4 cup orange juice concentrate
- 1 teaspoon orange zest (optional)
- 2 teaspoons powdered gelatin (for each layer)
- 6 tablespoons cold water (for each layer)
- 1 cup heavy cream (for each layer)
- 1 teaspoon vanilla extract (for the classic layer)
- 1 package (3 ounces) orange-flavored gelatin dessert mix
- 1 cup boiling water
- 1/2 cup cold water
Substitution Options
If you can’t find graham cracker crumbs, you can use cookie crumbs or even crushed pretzels for a salty-sweet twist. For the orange juice concentrate, you can use fresh orange juice, but it might not have the same intense flavor. And if you’re looking for a dairy-free option, try using coconut cream instead of heavy cream.
Step-by-Step Preparation
Step 1: Preparing the Crust
In a mixing bowl, combine the graham cracker crumbs, granulated sugar, and melted butter until well-mixed. Press the mixture into the bottom of a 9-inch springform pan, making sure it’s even and compact. Chill the crust in the refrigerator while you prepare the fillings. Pro tip: Use the back of a spoon or a flat-bottomed glass to press the crust firmly.
Step 2: Creating the Orange Cream Cheese Layer
Bloom the gelatin by sprinkling it over 3 tablespoons of cold water and letting it sit for a few minutes. In another bowl, whip the heavy cream to stiff peaks. In a separate bowl, beat the cream cheese, powdered sugar, orange juice concentrate, and orange zest until smooth. Stir in the bloomed gelatin, then gently fold in the whipped cream. Pour this mixture over the chilled crust and return it to the refrigerator to set. The colors and textures will remind you of a sunny day at the beach!
Step 3: Assembling the Classic Cheesecake Layer
Bloom another 2 teaspoons of gelatin in 3 tablespoons of cold water. Whip another cup of heavy cream to stiff peaks. In a clean bowl, beat the cream cheese, powdered sugar, and vanilla extract until smooth. Mix in the bloomed gelatin and fold in the whipped cream. Carefully spread this layer over the set orange layer, making sure it’s even. Chill again until firm. The layers coming together are like a beautiful sunset, aren’t they?
Step 4: Topping with Orange Jello
Dissolve the orange-flavored gelatin in boiling water, then stir in 1/2 cup of cold water. Let the mixture cool slightly, then pour it gently over the chilled cheesecake layers. Return the cheesecake to the refrigerator and chill until the jello layer is completely set. The jello adds a vibrant, glossy finish that makes the dessert look like a work of art.
Chef’s Tip: Enhance the Flavor
To take this No-Bake Orange Creamsicle Cheesecake to the next level, add a splash of orange liqueur like Cointreau or Grand Marnier to the orange cream cheese layer. It gives an extra oomph to the citrus flavor, making it even more irresistible.
Timing Breakdown
- Prep Time: 30 minutes
- Cooking Time: 0 minutes (It’s no-bake!)
- Resting Time: 4-6 hours (or overnight)
- Total Time: 4-6 hours 30 minutes
Chef’s Secret
One of the secrets to a perfectly smooth and creamy cheesecake is to make sure all your ingredients, especially the cream cheese, are at room temperature before you start. This ensures a silky texture and easy mixing. Give it a try and see the difference it makes!
Extra Info
Did you know that the original creamsicle was invented in 1905 by Frank Epperson? He accidentally left a cup filled with water, powder, and a stirring stick outside on a cold night, and it froze. The rest, as they say, is history. This No-Bake Orange Creamsicle Cheesecake is a modern tribute to that accidental invention, but with a twist that’s sure to please everyone at your table.
Necessary Equipment
- 9-inch springform pan
- Mixing bowls
- Electric mixer or whisk
- Spatulas
- Measuring cups and spoons
- Kitchen scale (optional, but helpful)
Storage Tips
This No-Bake Orange Creamsicle Cheesecake is best stored in the refrigerator. Make sure to cover it tightly with plastic wrap or place it in an airtight container to prevent it from drying out. It will stay fresh for up to 5 days, but trust me, it won’t last that long! If you want to freeze it, do so without the jello topping. Wrap it well and store it in the freezer for up to 2 months. Thaw it in the refrigerator overnight before adding the jello layer.
Tips and Advice
To ensure the layers set properly, make sure to follow the chilling times carefully. If you’re short on time, you can speed up the process by placing the cheesecake in the freezer for 30 minutes at a time between layers. Just be careful not to let it freeze solid. Another tip is to use a piping bag to add the jello layer for a more controlled and even pour.
Presentation Tips
- Garnish with fresh orange slices and a sprinkle of orange zest for a pop of color.
- Add a dollop of whipped cream and a sprig of mint for an elegant touch.
- Use a sharp, hot knife to slice the cheesecake for clean, professional-looking slices.
Healthier Alternatives
Here are some healthier alternatives to the classic No-Bake Orange Creamsicle Cheesecake:
- Low-Sugar Version: Substitute the granulated sugar with a sugar substitute like stevia. Use a low-sugar orange juice concentrate and sugar-free gelatin for the topping.
- Dairy-Free Option: Replace the cream cheese and heavy cream with vegan alternatives like cashew cream. Use coconut oil instead of butter for the crust.
- Fruit-Topped Delight: Add a layer of fresh fruit compote between the orange and classic layers for a burst of natural sweetness and added texture.
- Reduced-Fat Cheesecake: Use reduced-fat cream cheese and whipped cream to cut down on the fat content. You can also use a lighter version of the orange jello mix.
- Gluten-Free Crust: Swap the graham cracker crumbs for gluten-free cookie crumbs or almond flour to make it gluten-free friendly.
- Protein-Packed Treat: Add a scoop of protein powder to the cream cheese mixture for an extra boost. Use Greek yogurt instead of heavy cream for a thicker consistency.
For more delicious and creative cheesecake recipes, check out our other favorites like the Creamy Banana Cheesecake, Biscoff Cheesecake Delight, Cinnamon Roll Cheesecake, and Air Fryer Cherry Rolls.
Common Mistakes to Avoid
Mistake 1: Over-mixing the Cream Cheese Filling
Over-mixing the cream cheese filling can lead to a dense and unappealing texture. To avoid this, mix the cream cheese, powdered sugar, and other ingredients until just combined. A light and fluffy texture is key to a great cheesecake. Pro tip: Use a spatula to fold in the whipped cream, ensuring it stays light and airy.
Mistake 2: Not Chilling Enough
Not allowing the cheesecake to chill sufficiently can result in a runny and messy dessert. Each layer needs ample time to set, so make sure to follow the chilling times carefully. If you’re in a hurry, you can place the cheesecake in the freezer for 30-minute intervals, but be cautious not to freeze it solid. Pro tip: Use a timer to keep track of the chilling times.
Mistake 3: Adding Hot Jello Too Quickly
Pouring the hot jello directly onto the cheesecake can cause the layers to melt and mix. To avoid this, let the jello cool slightly before pouring it over the cheesecake. This ensures that the layers remain distinct and the jello sets beautifully. Pro tip: Test the jello by feeling the bottom of the bowl; it should feel lukewarm, not hot.
Mistake 4: Using Cold Ingredients
Using cold ingredients, especially the cream cheese, can result in lumps and a less smooth texture. Make sure all your ingredients are at room temperature before starting. This will ensure a silky and smooth cheesecake. Pro tip: Take the cream cheese out of the fridge an hour before you start baking.
Mistake 5: Not Cleaning Your Work Surface
A clean workspace is essential for food safety and quality. Bacteria can easily transfer from your hands or surfaces to your ingredients. Make sure to wash your hands and clean your cooking surfaces thoroughly before starting. This simple step can make a big difference in the overall quality of your dessert.
For more cheesecake inspiration and tips, explore our cheesecake recipes category. Happy baking!
FAQ
Can I use regular orange juice instead of orange juice concentrate?
Yes, you can use regular orange juice, but it may not have the same intense flavor. Orange juice concentrate is more concentrated and provides a stronger, more authentic orange taste. If you choose to use regular orange juice, you may need to reduce it to intensify the flavor.
How long does the cheesecake need to set in the refrigerator?
The cheesecake needs to set in the refrigerator for at least 4-6 hours, or overnight for the best results. This allows the layers to firm up and the flavors to meld together. Be patient; it’s worth the wait!
Can I use a different type of crust?
Absolutely! You can experiment with different crusts such as cookie crumbs, crushed pretzels, or even a nut crust. Just make sure to use the same amount of crumbs and butter to ensure it holds together well.
Is there a way to make this recipe dairy-free?
Yes, you can make this recipe dairy-free by using vegan cream cheese and whipping coconut cream instead of heavy cream. You can also use coconut oil instead of butter for the crust. These substitutions will give you a similar texture and flavor without the dairy.
Can I add other flavors to the cheesecake?
Of course! You can add different flavors to the cheesecake by using different extracts or fruit purees. For example, adding a bit of lemon zest or strawberry puree can give you a unique twist. Just make sure to adjust the liquid content if you add purees to keep the cheesecake from becoming too runny.
How do I get the jello to set perfectly on top?
To get the jello to set perfectly on top, make sure to let it cool slightly before pouring it over the cheesecake. The jello should be lukewarm, not hot, when you pour it. This prevents the layers from melting and ensures a smooth, even top layer.
Can I make this cheesecake ahead of time?
Absolutely! This No-Bake Orange Creamsicle Cheesecake is perfect for making ahead of time. You can prepare it up to 2 days in advance and store it in the refrigerator. Just make sure to add the jello layer on the day you plan to serve it.
What if I don’t have a springform pan?
If you don’t have a springform pan, you can use a regular 9-inch pie dish. However, a springform pan makes it easier to remove the cheesecake without damaging it. If you use a pie dish, consider lining it with parchment paper for easier removal.
How do I make the cheesecake layers even?
To make the cheesecake layers even, use a spatula or the back of a spoon to spread the mixture evenly. Tap the pan gently on the counter to help the mixture settle and remove any air bubbles. This will give you a smooth and even surface for each layer.
Can I use a different type of jello for the topping?
Yes, you can use a different type of jello for the topping. Just make sure to use a flavor that complements the orange and cream cheese layers. For example, you could use lemon, lime, or even a mixed berry jello for a different twist. Experiment and find the combination that you love the most!
Conclusion
There you have it, a No-Bake Orange Creamsicle Cheesecake that’s sure to be a hit at any gathering or just as a special treat for yourself. With its refreshing citrusy flavors and creamy texture, it’s the perfect dessert to enjoy on a warm summer day. Give it a try and let us know how it turns out. Happy baking, and I hope you enjoy this delightful and easy-to-make dessert!
Equipment
- Mixing bowls
- Electric mixer or whisk
- Spatulas
- 9-inch springform pan
- Measuring cups and spoons
Ingredients
- 1 1/2 cups graham cracker crumbs
- 1/3 cup granulated sugar
- 6 tablespoons unsalted butter, melted
- 16 ounces cream cheese, softened for each layer
- 1 cup powdered sugar for each layer
- 3/4 cup orange juice concentrate
- 1 tsp orange zest optional
- 2 tsp powdered gelatin for each layer
- 6 tablespoons cold water for each layer
- 1 cup heavy cream for each layer
- 1 tsp vanilla extract for the classic layer
- 1 package orange-flavored gelatin dessert mix
- 1 cup boiling water
- 1/2 cup cold water
Instructions
- In a mixing bowl, combine the graham cracker crumbs, granulated sugar, and melted butter until well-mixed. Press the mixture into the bottom of a 9-inch springform pan, making sure it's even and compact. Chill the crust in the refrigerator while you prepare the fillings.
- Bloom the gelatin by sprinkling it over 3 tablespoons of cold water and letting it sit for a few minutes. In another bowl, whip the heavy cream to stiff peaks. In a separate bowl, beat the cream cheese, powdered sugar, orange juice concentrate, and orange zest until smooth. Stir in the bloomed gelatin, then gently fold in the whipped cream. Pour this mixture over the chilled crust and return it to the refrigerator to set.
- Bloom another 2 teaspoons of gelatin in 3 tablespoons of cold water. Whip another cup of heavy cream to stiff peaks. In a clean bowl, beat the cream cheese, powdered sugar, and vanilla extract until smooth. Mix in the bloomed gelatin and fold in the whipped cream. Carefully spread this layer over the set orange layer, making sure it’s even. Chill again until firm.
- Dissolve the orange-flavored gelatin in boiling water, then stir in 1/2 cup of cold water. Let the mixture cool slightly, then pour it gently over the chilled cheesecake layers. Return the cheesecake to the refrigerator and chill until the jello layer is completely set.
Notes
Nutrition

Hi, I’m Olivia Parker, the founder of BakingSecret.com and a lifelong lover of all things sweet and homemade. I grew up in a small town in Oregon, where the smell of fresh cookies in my family’s kitchen sparked my passion for baking. Over the years, I turned that passion into a mission: to help home bakers feel confident, inspired, and creative.
After studying food science and working in several artisan bakeries across the U.S., I decided to create a space where everyone from beginners to seasoned bakers can find reliable recipes, expert tips, and a warm, welcoming community. BakingSecret.com is my way of sharing the magic of baking with the world. When I’m not testing new recipes, you’ll find me exploring farmers’ markets, collecting vintage cookbooks, or perfecting my sourdough technique.