
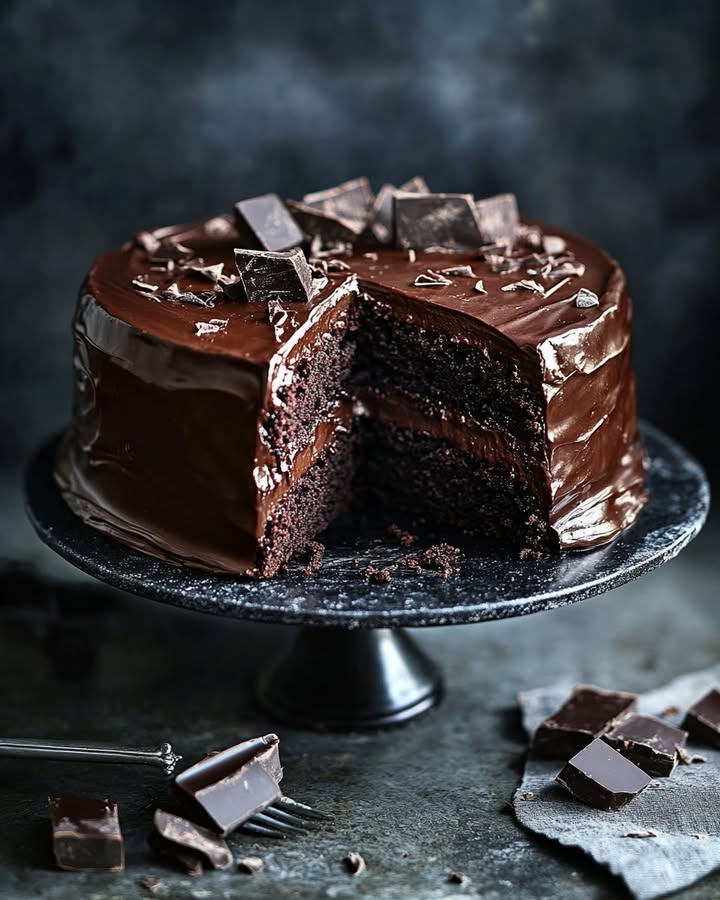
A Decadent Chocolate Delight You’ll Crave
There’s nothing quite like a slice of chocolate cake to brighten up a gloomy day or celebrate a special moment. My Best Matildas Chocolate Cake is a recipe that has been perfected over years of trial and error. It’s rich, moist, and so delicious that it disappears in no time whenever I make it for my family and friends.
The Story Behind This Indulgent Recipe
This recipe was handed down to me by my grandmother, who used to make it for every family gathering. Over the years, I’ve added a few tweaks to make it even more decadent. The original recipe was a simple one, but with a little extra cocoa powder and the addition of coffee, it now stands out as a true chocolate indulgence.
Why You’ll Fall in Love with This Recipe
What makes this cake so special is its deep, rich flavor and incredibly moist texture. The combination of cocoa powder and hot coffee brings out the best in the chocolate, creating a depth of flavor that is simply irresistible. Plus, the fudge frosting adds a luscious, creamy finish that takes this cake to the next level.
Perfect Occasions to Prepare This Decadent Chocolate Delight
Whether you’re hosting a birthday party, a holiday gathering, or just need a sweet pick-me-up, this cake is always a hit. It’s also perfect for potlucks, where you can be sure it will be the star of the dessert table. I’ve even made it for a romantic dinner, and it never fails to impress!
Ingredients for the Best Matildas Chocolate Cake
- 2 cups Flour
- 1 cup Granulated sugar
- 2 tsp Baking powder
- 1 tsp Baking soda
- tsp Kosher salt
- cup Cocoa powder
- cup Vegetable oil
- 1 tsp Vanilla extract
- 3 Eggs (room temperature)
- cup Buttermilk
- 1 cup Hot coffee
Chocolate Fudge Frosting:
- 11.11 oz Unsalted butter
- 14.1 oz Dark chocolate 60%-70%
- cup Cocoa powder
- 1 cup Heavy cream
- 1 cup Powdered sugar
- tsp Kosher salt
- 1 tsp Vanilla extract
Substitution Options for Your Convenience
- Flour: You can use all-purpose, whole wheat, or almond flour.
- Cocoa powder: Dutch-processed or natural cocoa powder work well.
- Vegetable oil: Melted coconut oil or melted butter can be used instead.
- Buttermilk: If you don’t have buttermilk, mix 1 cup of milk with 1 tbsp of lemon juice or white vinegar.
Preparation Section: A Step-by-Step Guide
Step 1: Preheat and Prepare
Start by preheating your oven to 180C (350F). Prepare two 8-inch baking pans by lining them with parchment paper. This ensures your cake will come out easily and won’t stick to the pan.
Step 2: Mix the Dry Ingredients
In a large mixing bowl, combine the flour, granulated sugar, kosher salt, baking powder, and baking soda. Sift in the cocoa powder and whisk everything together until it’s well combined. The sifting step helps to get rid of any lumps and ensures a smooth batter.
Step 3: Add Wet Ingredients
Add the buttermilk, vegetable oil, vanilla extract, and eggs to the dry ingredients. Mix until almost combined. The mixture should be slightly lumpy, which is perfect. Avoid overmixing, as this can lead to a tough cake.
Step 4: Add the Coffee
Pour in the hot coffee and mix until the batter is smooth. The batter will be runny, which is exactly what you want. The coffee enhances the chocolate flavor without making the cake taste like coffee. Trust me, it’s a game-changer!
Step 5: Bake to Perfection
Divide the batter evenly between the two prepared pans. Use cake strips if you have them; they help to bake the cake more evenly. Bake for 25-30 minutes, or until a toothpick inserted into the center comes out clean. The kitchen will fill with a heavenly aroma, and you’ll know it’s almost done when the edges start to pull away from the sides of the pan.
Step 6: Cool the Cake
Let the cakes cool completely in the pans on a wire rack before removing them. This step is crucial because a warm cake will cause the frosting to melt and become a mess. Patience is key here!
Step 7: Make the Fudge Frosting
In a saucepan, combine the butter, heavy cream, dark chocolate, cocoa powder, powdered sugar, and kosher salt. Heat over medium-high heat, stirring until the mixture is smooth and glossy. Strain the mixture into a bowl to remove any lumps and cool it slightly. Cover with plastic wrap and refrigerate for 1-2 hours, or until it’s thick enough to spread.
Step 8: Assemble the Cake
Once the cake and frosting are ready, it’s time to assemble. Place one cake layer on a serving plate and spread a generous amount of frosting on top. Place the second layer on top and frost the top and sides of the cake. Use an offset spatula to create a wave pattern, which gives the cake a beautiful, professional look.
Timing: Plan Your Baking Schedule
- Prep Time: 15 minutes
- Cooking Time: 25-30 minutes
- Resting Time: 1 hour (for cooling) + 1-2 hours (for frosting to set)
- Total Time: About 2 hours
Chef’s Secret: The Perfect Texture
To achieve the perfect texture, use room temperature ingredients and avoid overmixing the batter. This ensures that the cake is light and fluffy, not dense and heavy. Room temperature ingredients blend together more smoothly, resulting in a better overall texture.
Extra Info: A Fun Fact about Cocoa Powder
Did you know that cocoa powder is a superfood? It’s packed with antioxidants and can provide a boost of energy. So, not only is this cake delicious, but it’s also good for you (in moderation, of course!) To learn more about food quality and food expiration dates, check out the FDA’s guidelines for safe and healthy eating.
Necessary Equipment: Tools for Success
- Two 8-inch baking pans
- Parchment paper
- Mixing bowls
- Whisk
- Spatula
- Wire rack
- Saucepan
- Offset spatula
Storage: Keep Your Cake Fresh
Store the cake in an airtight container at room temperature for up to 5 days. If you live in a warm climate, store it in the refrigerator to keep the frosting from melting. For longer storage, you can freeze the cake. Wrap individual slices in plastic wrap and place them in a freezer-safe bag. They can last up to 3 months in the freezer. Just thaw them at room temperature when you’re ready to indulge again.
Tips and Advice: Enhance Your Baking Experience
- Use a kitchen scale to measure ingredients accurately. This ensures consistent results every time.
- Don’t skip the coffee. It brings out the chocolate flavor and makes the cake extra moist.
- Use cake strips for even layers. They help to prevent the cake from doming in the middle and ensure a flat, even surface.
Presentation Tips: Make It Look Professional
- Add a sprinkle of cocoa powder or a dusting of powdered sugar on top for a touch of elegance.
- Garnish with fresh berries like strawberries or raspberries for a pop of color and freshness.
- Create a pretty border with chocolate chips or a piped chocolate design around the edge.
Healthier Alternative Recipes: Variations for Every Taste
If you’re looking for a healthier version, try these variations:
- Cherry Chocolate Delight: Add a handful of cherries to the batter for a fruity twist. Visit this recipe for more details.
- Ultimate Velvet Indulgence: Swap some of the flour for finely ground almonds for a nutty, gluten-free option. Check out this recipe for a delicious variation.
- Strawberry Meringue Cake: Add a layer of fresh strawberries and a meringue topping for a light and airy alternative. Get the full recipe here.
- Heavenly Almond Cake: Replace the cocoa powder with almond flour for a nutty, gluten-free treat. Find the recipe here.
Common Mistakes to Avoid
Mistake 1: Using Cold Ingredients
Using cold ingredients, especially eggs and buttermilk, can result in a lumpy, uneven batter. Make sure all your ingredients are at room temperature before starting. This allows for a smoother, more homogeneous mixture, which is key to a light and fluffy cake.
Mistake 2: Overmixing the Batter
Overmixing the batter can lead to a tough, dense cake. Mix until the ingredients are just combined, and stop once you see a few lumps. Overmixing activates the gluten in the flour, which can make the cake chewy and unpleasant.
Mistake 3: Skipping the Coffee
Some people skip the coffee, thinking it will make the cake taste like coffee. Don’t! The coffee enhances the chocolate flavor without adding a coffee taste. It’s a key ingredient that makes the cake extra rich and moist. Trust the recipe and add the coffee—you won’t regret it.
FAQ: Answers to Your Burning Questions
Can I use a different type of flour?
Yes, you can use all-purpose, whole wheat, or even almond flour. Just keep in mind that the texture and flavor may vary slightly. Whole wheat flour, for example, will give the cake a heartier, denser texture, while almond flour will make it more delicate and nutty.
Can I substitute the vegetable oil?
Absolutely! Melted coconut oil or melted butter are great substitutes. Each will add a slightly different flavor, but the cake will still turn out wonderfully. Just make sure to use the same amount as the vegetable oil called for in the recipe.
What if I don’t have buttermilk?
No problem! You can make a buttermilk substitute by mixing 1 cup of milk with 1 tablespoon of lemon juice or white vinegar. Let it sit for 5-10 minutes to curdle, and then use it in the recipe. This homemade buttermilk works just as well as store-bought.
Can I use a different type of chocolate for the frosting?
Yes, you can use milk chocolate or even a mix of dark and milk chocolate. Just make sure to use high-quality chocolate for the best results. The flavor and texture of the frosting will vary depending on the type of chocolate you choose.
How do I store the leftover cake?
Store the cake in an airtight container at room temperature for up to 5 days. If you live in a warm climate, it’s best to store it in the refrigerator to prevent the frosting from melting. You can also freeze the cake for longer storage. Wrap individual slices in plastic wrap and place them in a freezer-safe bag. They can last up to 3 months in the freezer.
Can I make this cake ahead of time?
Absolutely! You can bake the cake layers a day or two in advance and store them in the refrigerator. Just make sure to let them come to room temperature before assembling the cake. The frosting can also be made a day ahead and stored in the refrigerator. Let it come to room temperature and stir it before using.
What if I don’t have cake strips?
While cake strips are helpful for even baking, they’re not essential. If you don’t have them, you can still make a beautiful cake. Just keep an eye on the cake as it bakes and rotate the pans halfway through to ensure even cooking. The cake may dome a bit without the strips, but you can always trim the top to level it before frosting.
Can I make this cake without the frosting?
Yes, you can! The cake is delicious on its own. Just serve it with a dusting of powdered sugar or a dollop of whipped cream. You can also add a drizzle of chocolate sauce or a sprinkle of berries for a simple yet elegant touch.
Is this cake suitable for special diets?
With a few modifications, this cake can be adapted to suit various dietary needs. For a gluten-free version, use a gluten-free flour blend. To make it dairy-free, use a plant-based milk and vegan butter. Just be sure to check the labels of all your ingredients to ensure they meet your dietary requirements.
Can I add other flavors to the cake?
Definitely! You can add a variety of flavors to the cake to make it your own. Try adding a teaspoon of espresso powder for a mocha flavor, a dash of cinnamon for a hint of spice, or a handful of chopped nuts for a bit of crunch. The possibilities are endless, so feel free to experiment and find your favorite combination.
Now that you’ve got all the tips and tricks, it’s time to get baking! Whether you’re making this Decadent Chocolate Delight for a special occasion or just because, it’s sure to be a hit. And if you’re looking for more amazing cake recipes, be sure to explore our cake category for more inspiration. Happy baking!
Equipment
- Two 8-inch baking pans
- Parchment paper
- Mixing bowls
- Whisk
- Spatula
- Wire rack
- Saucepan
- Offset spatula
Ingredients
- 2 cups Flour
- 1 cup Granulated sugar
- 2 tsp Baking powder
- 1 tsp Baking soda
- 1 tsp Kosher salt
- 1 cup Cocoa powder
- 1 cup Vegetable oil
- 1 tsp Vanilla extract
- 1 cup Buttermilk
- 1 cup Hot coffee
Instructions
- Preheat your oven to 180C (350F) and prepare two 8-inch baking pans with parchment paper.
- In a large mixing bowl, combine flour, granulated sugar, kosher salt, baking powder, and baking soda.
- Sift in the cocoa powder and whisk everything together until well combined.
- Add buttermilk, vegetable oil, vanilla extract, and eggs to the dry ingredients and mix until almost combined.
- Pour in the hot coffee and mix until the batter is smooth.
- Divide the batter evenly between the two prepared pans and bake for 25-30 minutes, or until a toothpick comes out clean.
- Let the cakes cool completely in the pans on a wire rack before removing.
- In a saucepan, combine butter, heavy cream, dark chocolate, cocoa powder, powdered sugar, and kosher salt. Heat until smooth.
- Strain the mixture, cool it slightly, cover with plastic wrap, and refrigerate for 1-2 hours.
- Once the cake and frosting are ready, assemble by placing one cake layer on a serving plate and spreading frosting on top, then add the second layer and frost the top and sides.
Notes
Nutrition

Hi, I’m Olivia Parker, the founder of BakingSecret.com and a lifelong lover of all things sweet and homemade. I grew up in a small town in Oregon, where the smell of fresh cookies in my family’s kitchen sparked my passion for baking. Over the years, I turned that passion into a mission: to help home bakers feel confident, inspired, and creative.
After studying food science and working in several artisan bakeries across the U.S., I decided to create a space where everyone from beginners to seasoned bakers can find reliable recipes, expert tips, and a warm, welcoming community. BakingSecret.com is my way of sharing the magic of baking with the world. When I’m not testing new recipes, you’ll find me exploring farmers’ markets, collecting vintage cookbooks, or perfecting my sourdough technique.