
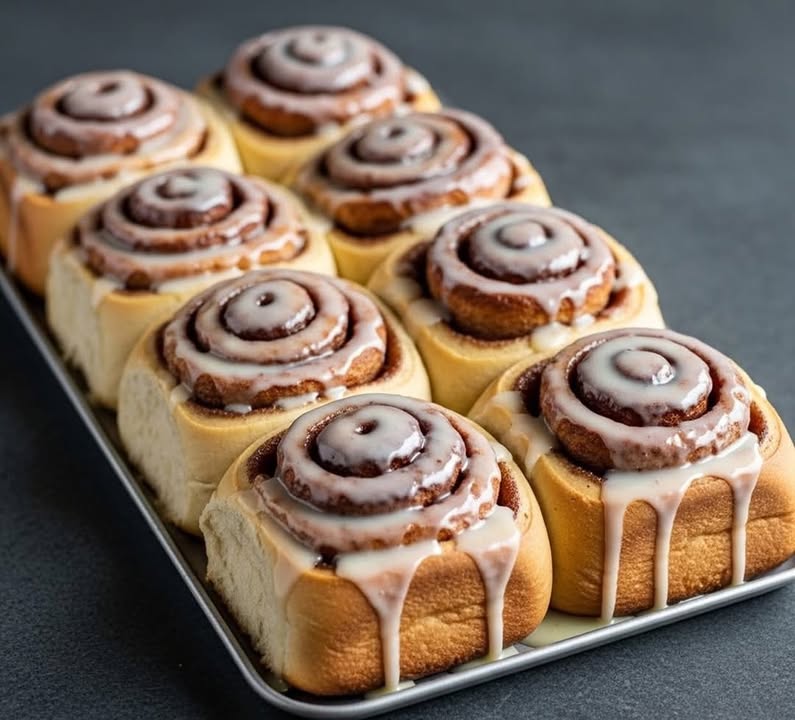
Indulge in the Sweetness of Cinnamon Roll Bliss
Picture this: a warm, cozy kitchen filled with the aroma of cinnamon and baking bread. It’s a Sunday morning, and you’re about to dig into a plate of homemade cinnamon rolls, fresh from the oven. This is what I call Cinnamon Roll Bliss. It’s not just a recipe; it’s a feeling that warms the heart and the tummy. Let me share with you how to make these delectable treats that will become a staple in your home, just like they are in mine.
A Pinch of History: The Journey of Cinnamon Rolls
Cinnamon rolls, or “schnecken” as they are known in some parts of Europe, have a rich history dating back to the 18th century. They were originally created in Sweden and quickly became a beloved treat across the globe. Today, they come in various forms, from classic and traditional to modern and innovative. Each variation has its own unique twist, but the essence—soft, sweet, and cinnamony—remains the same. In my family, we’ve been making cinnamon rolls for as long as I can remember, and each batch tells a story of love and tradition.
Why You’ll Adore This Cinnamon Roll Recipe
These cinnamon rolls are a hit for several reasons. First, the combination of soft, pillowy dough with the rich, spicy cinnamon filling is simply irresistible. Second, the recipe is straightforward and doesn’t require any fancy equipment. Third, they’re perfect for sharing with family and friends, making them a go-to for special occasions and lazy weekends. Plus, the delightful aroma that fills your kitchen is an added bonus!
Your Perfect Moments with Cinnamon Roll Bliss
There’s no better time to whip up a batch of cinnamon rolls than when you’re hosting a brunch, celebrating a birthday, or just needing a little pick-me-up. They’re also a great gift to give to neighbors or friends. Trust me, once you start making these, people will be asking for more!
Ingredients for Your Cinnamon Roll Bliss
- 2 tablespoons of dry yeast
- 1 cup of warm milk
- 1/2 cup of white sugar
- 1 egg
- 55 g of melted and cold butter
- 3 cups of wheat flour
- A pinch of salt
- 90 g of melted and cold butter (for the filling)
- 2 tablespoons of ground cinnamon
- 1 cup of muscovado sugar
- Optional: chopped nuts
- For the glaze:
- 1 cup of powdered sugar
- Lemon milk or juice to taste
Substitution Options for Your Cinnamon Roll Bliss
- Butter: You can use margarine or coconut oil if you prefer.
- Wheat Flour: All-purpose flour works well too.
- White Sugar: Brown sugar is a great alternative.
- Muscovado Sugar: Regular brown sugar or white sugar can be used.
- Egg: For a vegan version, try using flax eggs or applesauce.
Let’s Get Baking: Step-by-Step Guide to Cinnamon Roll Bliss
Step 1: Activate the Yeast
In a small bowl, combine the warm milk, 1 tablespoon of sugar, and the dry yeast. Give it a gentle stir and let it sit for about 10 minutes. You should see some bubbles forming, indicating that the yeast is active and ready to go. This step is crucial for getting that perfectly fluffy dough.
Step 2: Mix the Dough
In a large mixing bowl, combine the flour, egg, remaining sugar, salt, and 55 g of melted and cooled butter. Add the yeast mixture and mix until a soft dough forms. Knead the dough on a floured surface for a few minutes until it becomes smooth and elastic. The dough should feel slightly sticky but not too wet. If it’s too sticky, add a bit more flour.
Step 3: Let the Dough Rise
Place the dough in a greased bowl, cover it with a clean kitchen towel, and let it rise in a warm, draft-free place for about 1 hour, or until it doubles in size. This step is all about patience, but trust me, the wait is worth it. The dough will become nice and puffy, giving you those fluffy rolls you dream of.
Step 4: Prepare the Filling
While the dough is rising, prepare the filling. In a small bowl, mix the ground cinnamon and muscovado sugar. If you like, you can add some chopped nuts for extra crunch. Melt the 90 g of butter and set it aside. The combination of cinnamon and sugar creates a magical aroma that will fill your kitchen, making it hard to resist diving in early.
Step 5: Roll and Fill the Dough
Once the dough has risen, punch it down and roll it out on a floured surface into a large rectangle, about 1/4 inch thick. Brush the melted butter evenly over the dough, leaving a 1-inch border around the edges. Sprinkle the cinnamon-sugar mixture over the buttered dough, and if you’re using nuts, sprinkle them over the top. The key here is to spread everything evenly so that every bite is full of flavor.
Step 6: Roll and Cut the Dough
Roll the dough tightly from the long side, jelly-roll style. Use a sharp knife or dental floss to cut the log into 12 even slices. Place the slices, cut side down, in a greased baking dish. Cover the dish and let the rolls rise for another 30-40 minutes, or until they’re puffy and touching. This second rise is important for creating those soft, fluffy rolls.
Step 7: Bake the Rolls
Preheat your oven to 180°C (350°F). Once the rolls have risen, bake them for 30-40 minutes, or until they’re golden brown and the aroma is irresistible. The tops should be nicely browned, and the rolls should be firm to the touch. Resist the urge to open the oven door during baking, as this can affect the rise and texture of the rolls.
Step 8: Glaze and Serve
While the rolls are baking, prepare the glaze by mixing the powdered sugar with lemon milk or juice. Start with a small amount of liquid and add more as needed to reach the desired consistency. Drizzle the glaze over the warm rolls and serve immediately. The glaze adds a lovely sweetness and a beautiful finish to your cinnamon rolls.
Chef’s Tip: Perfecting the Texture
To get the perfect texture, make sure your dough is soft and slightly sticky after kneading. If it’s too dry, it will result in tough rolls. Also, brushing the dough with a little extra butter before rolling and adding the filling can help create a richer, more decadent flavor. Don’t be afraid to experiment with the filling too. Try adding a touch of vanilla or a sprinkle of nutmeg for extra depth.
Timing Breakdown
- Prep Time: 20 minutes
- Rising Time: 1 hour 30 minutes (total for both rises)
- Baking Time: 30-40 minutes
- Total Time: About 2 hours 30 minutes
Chef’s Secret: The Perfect Rise
The key to a perfect rise is to create a warm, draft-free environment. One trick is to preheat your oven to the lowest setting, then turn it off and place the covered dough inside. This creates a cozy, warm spot for the dough to rise. Another tip is to use a clean shower cap instead of a kitchen towel to cover the dough. The shower cap seals in the warmth and prevents the dough from drying out.
Extra Info: Did You Know?
Cinnamon is not just a delicious spice; it’s also packed with antioxidants. In fact, according to Healthline, cinnamon is one of the most antioxidant-rich foods on the planet, which means it’s not only tasty but good for you too. So, go ahead and indulge in a little cinnamon roll bliss—it’s a guilt-free treat!
Necessary Equipment
- Large mixing bowl
- Measuring cups and spoons
- Whisk and spatula
- Kitchen towel or shower cap
- Sharp knife or dental floss
- Glass measuring cup
- Baking dish
Storage Tips
Storing your cinnamon rolls properly is key to keeping them fresh and delicious. If you plan to enjoy them within a day or two, store them in an airtight container at room temperature. For longer storage, wrap them tightly in plastic wrap or aluminum foil and place them in the refrigerator. They should last for up to a week. If you want to freeze them, wrap individual rolls in plastic wrap and aluminum foil, then place them in a freezer bag. They can be frozen for up to 3 months. When you’re ready to enjoy, simply thaw them at room temperature and reheat in the oven or microwave.
Tips and Advice
- For a gooey center, don’t over-bake the rolls. They should be golden brown but still slightly soft in the middle.
- If you’re short on time, you can speed up the rising process by placing the dough in a warm oven (turned off) or a warm spot in your kitchen.
- For a creamier filling, you can add a tablespoon of cream cheese to the cinnamon and sugar mixture.
- Don’t skimp on the butter. A generous amount of butter makes the rolls extra rich and delicious.
- If you find the dough too sticky, add a little more flour, but be careful not to add too much, as this can make the rolls tough.
Presentation Tips
- You can drizzle the glaze over the rolls in a zigzag pattern for a fun and festive look.
- Add a sprinkle of cinnamon or a dash of nutmeg on top of the glaze for an extra touch of flavor.
- Arrange the rolls in a decorative spiral or flower shape for a stunning presentation.
- Serve the cinnamon rolls on a pretty platter or in a wicker basket for a rustic, charming look.
Variations: Healthier Alternatives
- Whole Wheat Cinnamon Rolls: Replace half of the wheat flour with whole wheat flour for a healthier version. This adds fiber and nutrients without sacrificing the taste. Check out our Homemade Soft Rolls recipe for more ideas on how to incorporate whole grains.
- Apple Cinnamon Rolls: Add finely chopped apples to the cinnamon-sugar mixture for a fruity twist. The apples add natural sweetness and a delightful texture. If you love apples, you might also enjoy our Mushroom Nut Cake.
- Banana Cinnamon Rolls: Mash a ripe banana and mix it with the cinnamon-sugar filling for a naturally sweet and nutritious option. Bananas are a great source of potassium and add a creamy texture. Try our Banana Cinnamon Rolls for a similar recipe.
- Zucchini Cinnamon Rolls: Finely grated zucchini can be added to the dough for a sneaky way to include more vegetables. The zucchini adds moisture and a subtle flavor. If you’re looking for more innovative recipes, check out our Orange Blossom Fougasse Delight.
- Pumpkin Cinnamon Rolls: Substitute pumpkin puree for some of the milk in the dough for a fall-inspired treat. Pumpkin is rich in vitamins and adds a warm, comforting flavor. This is a great option for autumn gatherings.
- Carrot Cinnamon Rolls: Add finely grated carrots to the dough for a boost of color and nutrition. Carrots are high in vitamin A and add a subtle sweetness. This is a great way to sneak in some veggies, especially for picky eaters.
Common Mistakes to Avoid
Mistake 1: Overworking the Dough
One common mistake is over-kneading the dough, which can make the rolls tough and chewy. To avoid this, knead the dough for about 5-6 minutes, or until it’s smooth and elastic. Stop kneading once the dough feels soft and slightly sticky. If you overwork it, the gluten in the flour will develop too much, resulting in a dense, tough texture. Remember, soft and slightly sticky is the key.
Mistake 2: Not Using Warm Enough Milk
Using milk that’s either too cold or too hot can affect the yeast’s ability to rise. The ideal temperature for the milk is around 110-115°F (43-46°C). If the milk is too cold, the yeast won’t activate, and if it’s too hot, it can kill the yeast. To ensure the right temperature, check the milk with a thermometer or use the “wrist test”—the milk should feel warm to the touch but not hot. This step is crucial for a successful rise.
Mistake 3: Overfilling the Rolls
Another common mistake is overfilling the rolls with the cinnamon-sugar mixture. While it’s tempting to pile on the filling, too much can cause the rolls to spill over and become messy. Aim for an even layer of filling, leaving a 1-inch border around the edges. This will ensure that the rolls hold their shape and bake evenly. If you love a lot of filling, consider adding a little extra on top of the rolls after they’re baked, rather than inside the rolls.
Mistake 4: Not Letting the Dough Rise Enough
Not letting the dough rise enough is a common pitfall. The first rise should take about 1 hour, or until the dough doubles in size. The second rise, after the rolls are cut and placed in the baking dish, should take about 30-40 minutes. If the dough doesn’t rise enough, the rolls will be dense and heavy. To ensure a good rise, place the dough in a warm, draft-free place, such as a turned-off oven with the light on, or near a warm window. Patience is key here.
Mistake 5: Overbaking the Rolls
Overbaking the rolls can result in a dry, tough texture. The rolls should be golden brown but still slightly soft in the center. To check for doneness, gently press the center of a roll. If it springs back, it’s done. If it feels firm, it needs a little more time. Keep a close eye on the rolls during the last 10 minutes of baking, as they can go from perfectly golden to burnt very quickly. A good rule of thumb is to remove them from the oven when they’re just starting to turn golden and the aroma is irresistible.
FAQ: Frequently Asked Questions
What is the best type of yeast to use for cinnamon rolls?
The best type of yeast for cinnamon rolls is active dry yeast. It activates quickly and reliably, making it perfect for this recipe. Make sure the yeast is fresh and stored in a cool, dry place. If you’re unsure if your yeast is still active, you can test it by adding a little sugar and warm water. If it foams up within 10 minutes, it’s still good to use.
Can I use a different type of flour instead of wheat flour?
Yes, you can use all-purpose flour or even whole wheat flour for a healthier option. If you use whole wheat flour, start by substituting half of the wheat flour with whole wheat flour. This will add fiber and nutrients without making the rolls too dense. If you’re interested in more whole grain recipes, check out our Homemade Soft Rolls.
How can I make the cinnamon rolls vegan?
To make the cinnamon rolls vegan, you can replace the egg with a flax egg (1 tablespoon of ground flaxseed mixed with 3 tablespoons of water) or applesauce. Use a plant-based butter or margarine for the filling and glaze. For the glaze, use a non-dairy milk and a touch of vanilla extract. These substitutions will give you a delicious, cruelty-free version of the classic cinnamon roll.
Can I add other flavors to the cinnamon rolls?
Absolutely! You can add a variety of flavors to the cinnamon rolls. Some popular options include adding a touch of vanilla or almond extract to the dough, or adding a sprinkle of nutmeg or cardamom to the filling. You can also experiment with different fruits, such as finely chopped apples, bananas, or even pumpkin puree. The sky’s the limit, so get creative and enjoy the process!
How can I make the cinnamon rolls less sweet?
If you prefer your cinnamon rolls less sweet, you can reduce the amount of sugar in the dough and the filling. Start by reducing the sugar by 1/4 cup and adjust to your taste. You can also use a less sweet sugar, such as dark brown sugar or a blend of regular and brown sugar. The key is to balance the flavors, so don’t reduce the sugar too much, as it plays a crucial role in the dough’s texture and flavor.
How do I know if the cinnamon rolls are done?
To check if the cinnamon rolls are done, look for a golden brown color on the top. The rolls should be firm to the touch but still slightly soft in the center. Gently press the center of a roll; if it springs back, it’s done. If it feels firm, it needs a little more time. Another sign is the irresistible aroma that fills your kitchen. When the smell is too good to resist, the rolls are likely done.
How can I keep the cinnamon rolls fresh?
To keep the cinnamon rolls fresh, store them in an airtight container at room temperature for up to 2 days. If you need to store them longer, wrap them tightly in plastic wrap or aluminum foil and place them in the refrigerator for up to a week. For longer storage, you can freeze the rolls for up to 3 months. When you’re ready to enjoy, thaw them at room temperature and reheat in the oven or microwave. This will help maintain their freshness and flavor.
Can I make the cinnamon rolls ahead of time?
Yes, you can make the cinnamon rolls ahead of time. After cutting the rolls and placing them in the baking dish, cover them with plastic wrap and refrigerate overnight. The next day, let them come to room temperature and rise for about 30-40 minutes before baking. This method saves time and ensures that you have fresh, warm cinnamon rolls whenever you want them. It’s a great way to prep for a busy morning or a special occasion.
How do I make the glaze for the cinnamon rolls?
To make the glaze, mix 1 cup of powdered sugar with a little lemon milk or juice until you reach the desired consistency. Start with a small amount of liquid and add more as needed. The glaze should be thick enough to drizzle but still pourable. You can also add a pinch of vanilla extract for extra flavor. Drizzle the glaze over the warm cinnamon rolls and serve immediately. The glaze adds a lovely sweetness and a beautiful finish to your cinnamon rolls.
How can I make the cinnamon rolls extra gooey?
To make the cinnamon rolls extra gooey, don’t over-bake them. Bake them for 30-40 minutes, or until they’re golden brown but still slightly soft in the center. The key is to remove them from the oven when they’re just starting to turn golden and the aroma is irresistible. Additionally, you can add a touch of cream cheese to the cinnamon-sugar mixture for a creamy, gooey center. This will give you a delicious, ooey-gooey cinnamon roll experience.
Can I use a different type of sugar for the filling?
Yes, you can use different types of sugar for the filling. Muscovado sugar is a great option because it adds a rich, molasses-like flavor. You can also use regular brown sugar, white sugar, or even a blend of different sugars. Each type of sugar will give a slightly different flavor, so feel free to experiment and find the one you like best. Just make sure to mix the sugar with the cinnamon and butter evenly for the best results.
Now that you’ve mastered the art of Cinnamon Roll Bliss, why not explore more delightful recipes? Check out our Baking Secrets for more scrumptious treats and tips. Happy baking, and enjoy the sweet, cinnamony goodness!
Equipment
- Large mixing bowl
- Measuring cups and spoons
- Whisk and spatula
- Kitchen towel or shower cap
- Sharp knife or dental floss
Ingredients
- 2 tbsp dry yeast
- 1 cup warm milk
- 1/2 cup white sugar
- 1 large egg
- 55 g melted and cold butter
- 3 cups wheat flour
- a pinch salt
- 90 g melted and cold butter (for the filling)
- 2 tbsp ground cinnamon
- 1 cup muscovado sugar
- optional chopped nuts
- 1 cup powdered sugar
- to taste lemon milk or juice
Instructions
- In a small bowl, combine the warm milk, 1 tablespoon of sugar, and dry yeast; stir and let sit for about 10 minutes.
- In a large mixing bowl, combine flour, egg, remaining sugar, salt, and 55 g of melted butter; add yeast mixture and mix until a soft dough forms.
- Knead the dough on a floured surface for a few minutes until smooth and elastic.
- Place dough in a greased bowl, cover with a kitchen towel, and let rise in a warm place for about 1 hour, or until doubled in size.
- Prepare the filling by mixing ground cinnamon and muscovado sugar in a small bowl.
- Roll out the risen dough into a large rectangle; brush with melted butter, then sprinkle the cinnamon-sugar mixture evenly over the dough.
- Roll the dough tightly from the long side, cut into 12 even slices, and place in a greased baking dish; cover and let rise for another 30-40 minutes.
- Preheat the oven to 180°C (350°F) and bake rolls for 30-40 minutes until golden brown.
- Prepare the glaze by mixing powdered sugar with lemon milk or juice, then drizzle over warm rolls and serve immediately.
Notes
Nutrition

Hi, I’m Olivia Parker, the founder of BakingSecret.com and a lifelong lover of all things sweet and homemade. I grew up in a small town in Oregon, where the smell of fresh cookies in my family’s kitchen sparked my passion for baking. Over the years, I turned that passion into a mission: to help home bakers feel confident, inspired, and creative.
After studying food science and working in several artisan bakeries across the U.S., I decided to create a space where everyone from beginners to seasoned bakers can find reliable recipes, expert tips, and a warm, welcoming community. BakingSecret.com is my way of sharing the magic of baking with the world. When I’m not testing new recipes, you’ll find me exploring farmers’ markets, collecting vintage cookbooks, or perfecting my sourdough technique.