
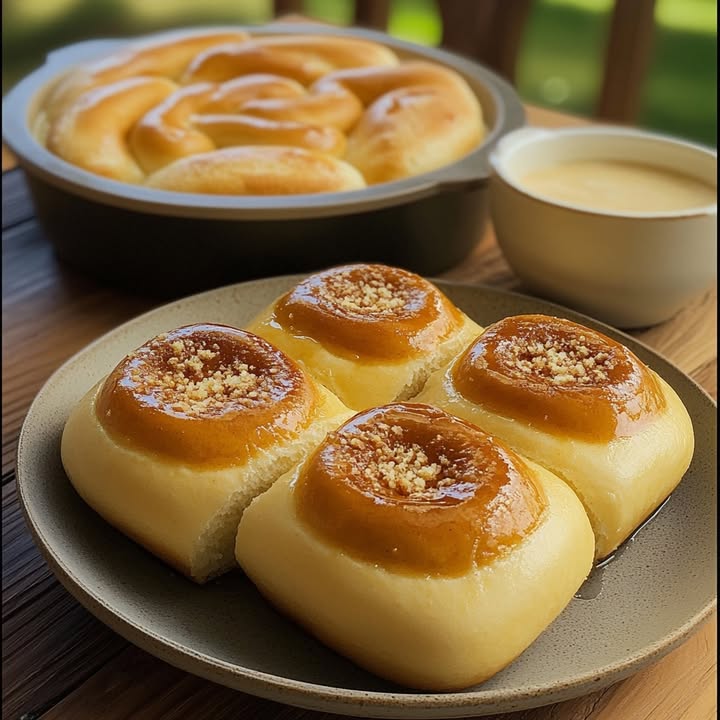
Get Ready to Bake Some Yummy Homemade Soft Rolls!
There’s nothing quite like the aroma of freshly baked bread wafting through your home. It’s a simple pleasure that brings comfort and joy, and today, I’m excited to share my favorite recipe for Homemade Soft Rolls. These rolls are not just any ordinary bread; they’re soft, fluffy, and perfect for any occasion. Trust me, once you try these, you’ll be hooked!
A Little History Behind the Deliciousness
These Homemade Soft Rolls have a rich history that dates back to traditional French baking. Over the years, they’ve evolved into a staple in many kitchens around the world. In my family, we’ve been making this recipe for generations, and every time I bake them, I’m transported back to my grandmother’s cozy kitchen. The original recipe was passed down from her, and it’s a piece of our family’s heritage.
Why You’ll Love This Recipe
These rolls are not only delicious but also incredibly easy to make. The combination of simple ingredients and straightforward steps makes them accessible even for beginners. Plus, the soft, pillowy texture and the subtle sweetness make them a hit with both kids and adults alike. They’re perfect for breakfast, lunch, or as a snack, and they pair wonderfully with butter, jam, or even a hearty soup.
Perfect Occasions to Prepare This Recipe
Whether you’re hosting a family gathering, a casual brunch, or just looking for a comforting treat, these Homemade Soft Rolls are the perfect addition. They’re a crowd-pleaser at holiday dinners, potlucks, or even a cozy weekend at home. Serve them warm, and watch them disappear in no time!
Ingredients
- 50 ml olive oil
- 10 g sugar
- 300 ml lukewarm water
- 10 g active dry yeast
- 500 g all-purpose flour
- 10 g salt
Substitution Options
If you don’t have all the exact ingredients, don’t worry! You can substitute the all-purpose flour with whole wheat flour for a healthier twist. You can also use honey instead of sugar for a different flavor profile. Just remember to adjust the amount of liquid if needed.
Preparation Section
Step 1: Activate the Yeast
In a small bowl, mix the lukewarm water and yeast. Stir gently until the yeast dissolves. Let it sit for about 10 minutes. You’ll know it’s ready when it becomes frothy and bubbly. This is a sign that the yeast is active and will help your rolls rise beautifully.
Step 2: Mix the Dry Ingredients
In a large mixing bowl, whisk together the flour, salt, and sugar. This step ensures that all the dry ingredients are evenly distributed and will help create a consistent dough. The gentle aroma of the flour and the slight sweetness of the sugar set the stage for something delicious.
Step 3: Combine the Wet and Dry Ingredients
Make a well in the center of the dry ingredients and pour in the activated yeast mixture and olive oil. Start mixing with a wooden spoon until a rough dough forms. The dough will start to come together, and you’ll see the ingredients blending harmoniously. Pro tip: Use a spatula to scrape the sides of the bowl to ensure no flour is left behind.
Step 4: Knead the Dough
Turn the dough out onto a lightly floured surface and knead for about 10 minutes. The dough should become smooth and elastic. As you knead, you’ll notice the dough becoming more pliable and less sticky. This is the magic of gluten development, which gives the rolls their wonderful texture.
Step 5: Let the Dough Rise
Place the dough in a clean, oiled bowl and cover it with a damp cloth. Let it rise in a warm, draft-free place for about 1 hour, or until it doubles in size. The rising process is essential for creating those light, airy rolls. Pro tip: If your kitchen is cold, you can place the bowl near a warm stove or in a slightly warm oven (turned off) to speed up the rising process.
Step 6: Shape the Rolls
Once the dough has risen, punch it down to release any air bubbles. Divide the dough into small, equal portions and shape each one into a smooth ball. Place the balls on a lined baking tray, leaving some space between them. As you shape the rolls, you’ll feel the dough’s soft, spongy texture, which is a sign that you’re on the right track.
Step 7: Second Rise
Cover the shaped rolls with a clean cloth and let them rest for another 30 minutes. During this time, the rolls will puff up and become even more tender. This second rise is crucial for achieving that perfect, soft texture. Chef’s tip: For an extra golden crust, brush the tops of the rolls with a little bit of egg wash before baking.
Step 8: Bake the Rolls
Preheat your oven to 220°C (425°F). Place the tray in the oven and bake for about 15-20 minutes, or until the rolls are golden brown. The smell of baking bread will fill your kitchen, and you’ll know they’re done when they are crispy on the outside and soft on the inside. Pro tip: Rotate the tray halfway through baking to ensure even browning.
Timing
Let’s break down the timing for this recipe:
- Preparation: 30 minutes
- First Rise: 1 hour
- Second Rise: 30 minutes
- Baking: 15-20 minutes
- Total Time: 2 hours 15 minutes
Chef’s Secret
One of my secret tricks is to add a small pat of butter on top of each roll right after they come out of the oven. This creates a shiny, glossy finish and adds a touch of richness to the rolls. It’s a simple step that makes a big difference in the final product.
Extra Info
Did you know that the quality of the yeast you use can significantly impact the rise and texture of your bread? Investing in high-quality yeast, like instant or active dry yeast, can make your Homemade Soft Rolls turn out even better. Also, using lukewarm water instead of hot water is key, as too hot water can kill the yeast, and too cold water won’t activate it properly.
Necessary Equipment
- Large mixing bowl
- Wooden spoon
- Measuring cups and spoons
- Clean, oiled bowl for rising
- Damp cloth
- Lined baking tray
- Oven mitts
Storage
To keep your Homemade Soft Rolls fresh, store them in an airtight container or a plastic bag at room temperature for up to 3 days. If you want to extend their shelf life, you can refrigerate them, but they might lose some of their softness. To reheat, simply wrap the rolls in foil and warm them in the oven at 180°C (350°F) for about 5-10 minutes. This will help them regain their soft, fluffy texture.
If you want to make a large batch, you can freeze the rolls. Just place them in a freezer-safe bag or container and store them in the freezer for up to 3 months. When you’re ready to use them, thaw them overnight in the refrigerator and then reheat them in the oven as described above.
For the best results, always allow the rolls to cool completely before storing them. This prevents steam from getting trapped, which can lead to a soggy texture. By following these storage tips, you can enjoy your Homemade Soft Rolls for days to come, and they’ll taste just as delicious as the day you baked them.
Tips and Advice
Here are a few tips to help you perfect your Homemade Soft Rolls:
- Make sure your ingredients are at room temperature before starting. This helps the yeast to activate properly.
- If you find the dough is too sticky, add a little more flour. Conversely, if it’s too dry, add a splash of water.
- Don’t over-bake the rolls. They should be golden brown and slightly firm to the touch, but still soft on the inside.
Presentation Tips
Here are some creative ways to present your Homemade Soft Rolls:
- Serve them in a basket lined with a clean, pretty cloth.
- Arrange them in a circle on a serving plate, with a small dish of butter or jam in the center.
- Garnish with a sprinkle of sea salt or a dusting of powdered sugar for a touch of elegance.
Healthier Alternative Recipes
If you’re looking for some variations to keep things interesting, here are six possible recipes:
- Mushroom Nut Cake: A savory twist with a unique blend of flavors.
- Banana Cinnamon Rolls: Sweet and aromatic, perfect for a special breakfast.
- Orange Blossom Fougasse Delight: A fragrant and flavorful option for a change of pace.
- Sweet Potato Cornbread: A hearty and wholesome choice for a comforting meal.
- Whole Wheat Soft Rolls: Substitute half of the all-purpose flour with whole wheat flour for a healthier version.
- Honey Whole Grain Rolls: Use honey instead of sugar and add a variety of grains for added nutrition and texture.
Common Mistakes to Avoid
Mistake 1: Using Expired Yeast
Using expired yeast is a common mistake that can ruin your entire batch of rolls. Yeast that has lost its potency won’t activate properly, resulting in flat, dense rolls. Always check the expiration date on the yeast package before using it. If you’re unsure, you can test the yeast by mixing it with warm water and a pinch of sugar. If it doesn’t foam up within 10 minutes, it’s time to get a new packet.
Mistake 2: Over-Mixing the Dough
Over-mixing the dough can lead to tough, chewy rolls. The key is to knead the dough just enough to develop the gluten, but not so much that it becomes overly elastic. Aim for about 10 minutes of kneading, or until the dough is smooth and springy. If you notice the dough becoming too tight and difficult to work with, it’s likely over-mixed. Pro tip: Use a timer to keep track of the kneading time.
Mistake 3: Not Allowing Proper Rising Time
Patience is key when it comes to letting the dough rise. If you rush this step, the rolls may not rise fully, resulting in a dense, heavy texture. Make sure to let the dough rise for at least 1 hour, or until it doubles in size. Similarly, don’t skip the second rise, as it contributes to the final texture and appearance of the rolls. Find a warm, draft-free spot in your kitchen, and be patient. The wait is worth it!
Mistake 4: Baking at Too High a Temperature
Baking the rolls at too high a temperature can cause them to brown too quickly on the outside while remaining undercooked on the inside. Preheat your oven to 220°C (425°F) and bake the rolls for 15-20 minutes, or until they are a nice, golden brown. If you notice the rolls browning too quickly, you can tent them with aluminum foil. This will help prevent the tops from burning while allowing the insides to bake thoroughly.
Mistake 5: Not Letting the Rolls Cool Before Storing
Storing the rolls while they are still warm can trap steam, leading to a soggy texture. Always allow the rolls to cool completely on a wire rack before storing them. This step is crucial for maintaining their soft, fluffy texture. Once cooled, you can store them in an airtight container or plastic bag. If you’re in a hurry, you can speed up the cooling process by placing the rolls in a single layer on the counter, away from direct sunlight.
FAQ
Can I use whole wheat flour instead of all-purpose flour?
Yes, you can use whole wheat flour instead of all-purpose flour. However, keep in mind that whole wheat flour absorbs more liquid, so you might need to add a little extra water to achieve the right consistency. Start with a 1:1 substitution and adjust as needed. The rolls will have a denser, nuttier flavor and a slightly different texture, but they’ll still be delicious.
How long can I store the Homemade Soft Rolls?
You can store the Homemade Soft Rolls in an airtight container or a plastic bag at room temperature for up to 3 days. For longer storage, you can freeze them for up to 3 months. When you’re ready to use them, thaw them in the refrigerator overnight and reheat them in the oven at 180°C (350°F) for about 5-10 minutes. This will help them regain their soft, fluffy texture.
Can I use honey instead of sugar?
Yes, you can use honey instead of sugar for a natural sweetener. Honey adds a unique, subtle flavor to the rolls. Start with about 2 tablespoons of honey and adjust to taste. Keep in mind that honey is a liquid, so you might need to reduce the amount of water in the recipe slightly to maintain the right consistency. The rolls will have a slightly softer, more delicate crumb, but they’ll still be delicious.
What is the best way to reheat the rolls?
The best way to reheat the rolls is to wrap them in foil and warm them in the oven at 180°C (350°F) for about 5-10 minutes. This method helps to retain their soft, fluffy texture without drying them out. If you prefer, you can also reheat them in a microwave for a few seconds, but the texture might not be as perfect. For a quick and easy option, you can also slice the rolls and toast them lightly in a toaster or on a skillet with a little bit of butter.
Can I add any other flavors to the rolls?
Absolutely! You can add various flavors to the rolls to make them even more delicious. Consider adding a tablespoon of dried herbs like rosemary or thyme for a savory twist, or a teaspoon of cinnamon and a handful of raisins for a sweeter version. You can also mix in finely chopped nuts, such as almonds or walnuts, for added texture. Get creative and experiment with different combinations to find your favorite flavor.
How do I know if the yeast is active?
To check if the yeast is active, mix it with lukewarm water and a pinch of sugar. Let it sit for about 10 minutes. If the mixture becomes frothy and bubbly, the yeast is active and ready to use. If there’s no reaction, the yeast is likely expired and won’t work. Always check the expiration date on the yeast package and store it in a cool, dry place to keep it fresh.
What if I don’t have a stand mixer?
No problem! While a stand mixer can make the process easier, you can definitely make the rolls by hand. Mix the dry ingredients in a large bowl, then add the wet ingredients and stir until a dough forms. Turn the dough out onto a floured surface and knead it for about 10 minutes, or until it becomes smooth and elastic. The process might take a little longer, but the end result will be just as good. Plus, there’s something satisfying about the hands-on experience of kneading the dough yourself.
What if I don’t have an oven?
If you don’t have an oven, you can still make the rolls using a stovetop method. After shaping the rolls, place them in a greased skillet or a pan with a lid. Cover the skillet and cook the rolls over low heat for about 15-20 minutes, or until they are cooked through and golden brown. This method won’t give you the same oven-baked effect, but the rolls will still be soft and delicious. Just make sure to monitor the heat carefully to prevent burning.
How can I make the rolls extra soft?
To make the rolls extra soft, you can add a little bit of milk or yogurt to the dough. These ingredients add moisture and help create a softer, more tender crumb. You can replace about 1/4 of the water with milk or add a tablespoon or two of plain yogurt. Additionally, brushing the tops of the rolls with a little bit of melted butter right after they come out of the oven can also help to create a soft, glossy finish.
Is it okay to use salted butter?
While unsalted butter is generally preferred in baking to control the salt content, you can use salted butter if that’s what you have. Just omit the additional salt in the recipe, or reduce the amount of salt by half. The rolls will still be delicious, but the flavor might be a little different. If you’re worried about the saltiness, you can always start with a smaller amount of salted butter and adjust to taste.
What if I don’t have a kitchen scale?
If you don’t have a kitchen scale, you can still measure the ingredients accurately using measuring cups and spoons. Flour can be measured by spooning it into the cup and leveling it off with a straight edge, like a knife. This method helps to avoid packing the flour too tightly, which can lead to a dry, tough dough. For liquids, use a measuring cup with clear markings. With a little care, you can still achieve great results without a scale.
Happy baking, and I’d love to hear how your Homemade Soft Rolls turn out! Share your creations with me, and let’s savor the joy of homemade goodness together. Check out our main category for more delightful recipes and baking tips.
Equipment
- Large mixing bowl
- Wooden spoon
- Measuring cups and spoons
- Clean, oiled bowl for rising
- Damp cloth
- Lined baking tray
- Oven mitts
Ingredients
- 50 ml olive oil
- 10 g sugar
- 300 ml lukewarm water
- 10 g active dry yeast
- 500 g all-purpose flour
- 10 g salt
Instructions
- In a small bowl, mix the lukewarm water and yeast, then let it sit for about 10 minutes until frothy.
- In a large mixing bowl, whisk together the flour, salt, and sugar.
- Make a well in the center of the dry ingredients and pour in the activated yeast mixture and olive oil; mix until a rough dough forms.
- Turn the dough out onto a lightly floured surface and knead for about 10 minutes until smooth and elastic.
- Place the dough in a clean, oiled bowl and cover with a damp cloth; let it rise in a warm place for about 1 hour until doubled in size.
- Punch down the risen dough, divide it into small equal portions, and shape each into a smooth ball.
- Place the shaped rolls on a lined baking tray, cover with a cloth, and let them rise for another 30 minutes.
- Preheat your oven to 220°C (425°F) and bake the rolls for about 15-20 minutes, until golden brown.
Notes
Nutrition

Hi, I’m Olivia Parker, the founder of BakingSecret.com and a lifelong lover of all things sweet and homemade. I grew up in a small town in Oregon, where the smell of fresh cookies in my family’s kitchen sparked my passion for baking. Over the years, I turned that passion into a mission: to help home bakers feel confident, inspired, and creative.
After studying food science and working in several artisan bakeries across the U.S., I decided to create a space where everyone from beginners to seasoned bakers can find reliable recipes, expert tips, and a warm, welcoming community. BakingSecret.com is my way of sharing the magic of baking with the world. When I’m not testing new recipes, you’ll find me exploring farmers’ markets, collecting vintage cookbooks, or perfecting my sourdough technique.