
Why Make a Rainbow Cake?
I still remember the first time I made a rainbow cake rainbow. It was for my niece’s birthday. She loves bright colors, and I wanted to surprise her with something special. When I pulled that colorful dessert out of the oven, her eyes lit up like fireworks. That moment reminded me how food can do more than just fill our stomachs—it can spark joy.
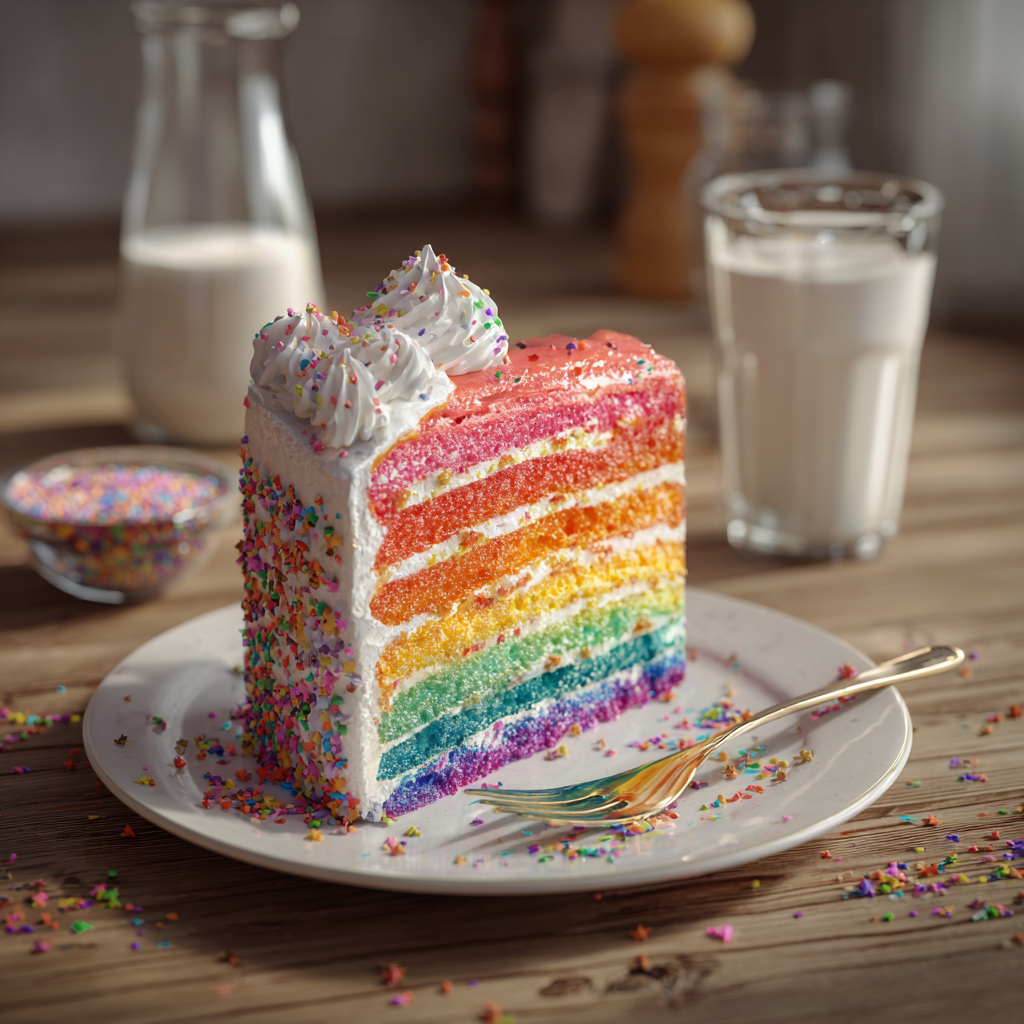
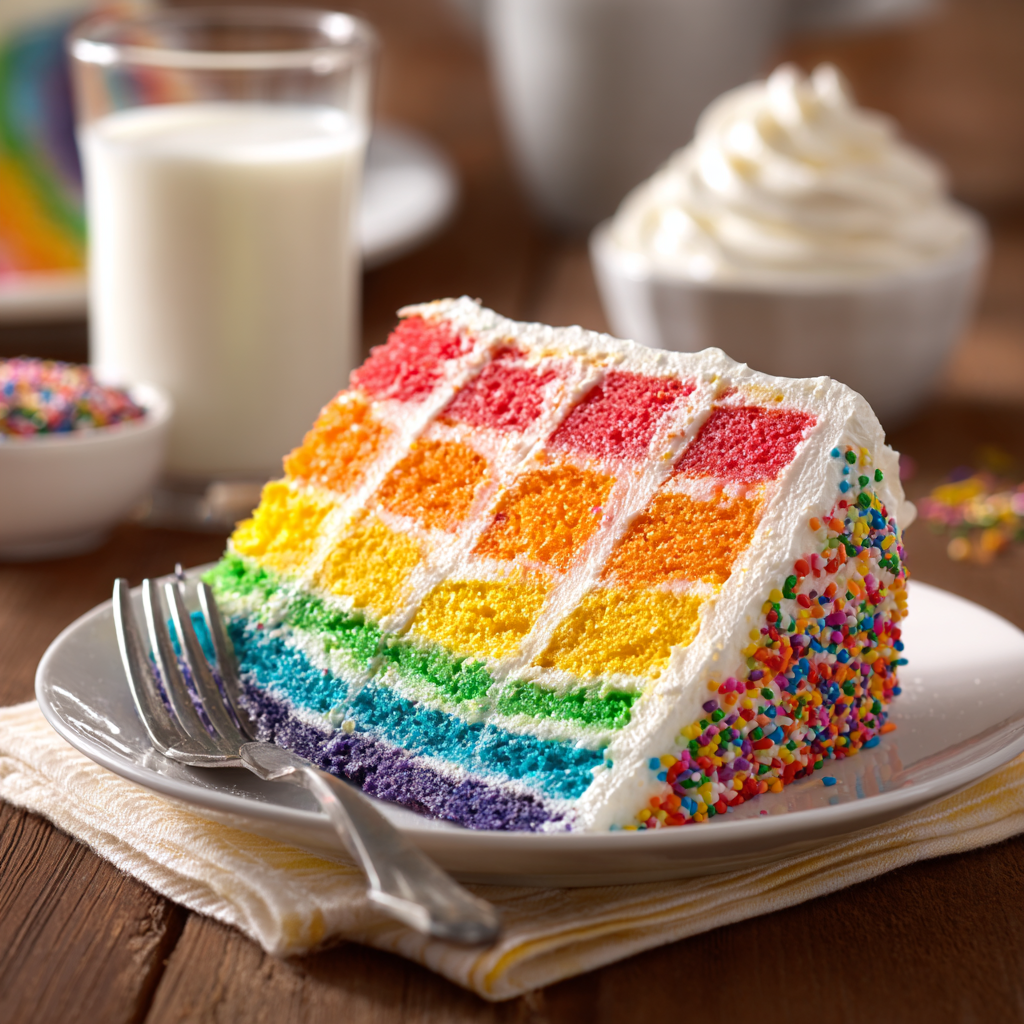
A rainbow cake rainbow is one of those desserts that feels magical. Whether it’s for a birthday, wedding, or holiday, its layers of vibrant colors instantly grab attention. This festive treat has a way of turning any gathering into a celebration. Imagine slicing into a cake and revealing those bold, colorful layers. It’s not just a dessert; it’s an experience.
What makes this colorful dessert so appealing? For starters, it’s visually stunning. The bright hues feel playful and fun, making it perfect for parties. Kids love it because it’s cheerful. Adults love it because it’s unexpected. Plus, there’s something about cutting into a cake and seeing all those colors stacked neatly together that feels satisfying. A rainbow cake rainbow isn’t just tasty—it’s a centerpiece that brings people together.
Is a Rainbow Cake Hard to Make?
If you’re new to baking, the idea of making a rainbow cake rainbow might seem overwhelming. I get it. At first glance, it looks complicated. How do you get those perfect layers? Is it hard to mix all those colors? What if the batter doesn’t bake evenly? These are common concerns, but here’s the truth: it’s easier than it looks.
With the right steps and tools, anyone can make a rainbow cake rainbow at home. You don’t need fancy equipment—just some food coloring, basic baking supplies, and patience. One tip I always share is to prepare everything ahead of time. Lay out your bowls, measure your ingredients, and have your colors ready before you start mixing. This simple step saves a lot of stress later on.
Another thing to keep in mind is that perfection isn’t the goal. Sure, professional bakers create flawless cakes, but at home, it’s okay if your layers aren’t perfectly even. What matters most is the effort and love you put into it. Trust me, no one will care about tiny imperfections when they take their first bite of this delicious, colorful dessert.
Here’s a quick list of what you’ll need to get started:
- A good cake recipe (vanilla works best for vibrant colors)
- Gel food coloring (it’s brighter and won’t thin out your batter)
- Six small bowls for dividing the batter
- A spatula for smoothing the layers
- Parchment paper to line your pans
Don’t worry if you’ve never baked a layered cake before. In the next section, I’ll walk you through every step, from mixing the batter to stacking the layers. I’ll also share tips to avoid common mistakes, like overmixing or uneven baking. By the end, you’ll feel confident enough to try it yourself.
Making a rainbow cake rainbow is about more than following a recipe. It’s about creating something that brings happiness to others. Every slice tells a story—of celebration, creativity, and connection. So roll up your sleeves, grab your mixing bowl, and let’s get started.
Ingredients You’ll Need for Your Rainbow Cake Rainbow
Alright, let’s talk ingredients. If you’re anything like me, you’ve probably stood in the baking aisle staring at rows of food coloring bottles, wondering which one to pick. Choosing the right ingredients is key to creating a rainbow cake rainbow that not only looks amazing but tastes delicious too. Here’s what I recommend having on hand:
For the base of your cake, you’ll need the usual suspects: all-purpose flour, granulated sugar, eggs, unsalted butter, whole milk, and vanilla extract. These form the foundation of any good cake, so don’t skimp on quality. Trust me—I learned this the hard way once when I used bargain-brand vanilla extract, and my cake tasted more like chemicals than dessert. Now, I always go for pure vanilla extract or even a splash of vanilla bean paste for extra depth.
Speaking of flavor, here’s the thing: high-quality ingredients really do make a difference. When it comes to the best ingredients for rainbow cake, fresh eggs give your batter a rich texture, while real butter adds a creamy richness that margarine just can’t replicate. And hey, if you’re feeling adventurous, why not swap out regular milk for buttermilk? It makes the crumb tender and gives the cake a slight tang that pairs beautifully with sweet frosting.
Now, onto the star of the show: food coloring. This is where things get fun—and maybe a little overwhelming. There are so many options, from liquid dyes to gel-based colors. For vibrant results, I highly recommend using gel food coloring. Unlike liquid versions, gels won’t thin out your batter, and they deliver bold, eye-catching hues every time. If you’re curious about how to choose food coloring, look for brands known for their intensity, like Americolor or Wilton.
Funny enough, I had a friend ask me recently, “Can I use natural food coloring?” The short answer is yes—but there are trade-offs. Natural alternatives like beet juice (for red), turmeric (for yellow), or spirulina powder (for green) can work wonders if you want an all-natural option. However, they might not produce the same vivid shades as artificial colors. Plus, some natural dyes can subtly alter the taste of your cake. Beet juice, for instance, has a faint earthy flavor that could clash with your vanilla base. Still, if avoiding artificial additives is important to you, these swaps are worth experimenting with. Just be prepared for slightly muted tones.
Step-by-Step Instructions for Baking a Rainbow Cake
Okay, now that we’ve covered the essentials, let’s dive into the nitty-gritty of actually making your rainbow cake rainbow. Don’t worry—it’s easier than it sounds! Let’s break it down step by step.
1. Preparing the Batter
Start by creaming together your butter and sugar until light and fluffy. This part is crucial because it incorporates air into the batter, giving your cake a soft, airy texture. Once that’s done, add your eggs one at a time, mixing well after each addition. Then, gently fold in your dry ingredients (flour, baking powder, salt) alternately with the wet ones (milk and vanilla). Be careful not to overmix; otherwise, your cake layers might turn out dense instead of light and fluffy.
By the way, if you’re looking for inspiration for another fun project, check out this recipe for baby shower cakes. They’re perfect for adding a personal touch to special occasions!
2. Dividing the Batter Into Bowls
Once your batter is ready, divide it evenly among six small bowls. You can eyeball it, but if precision matters to you, grab a kitchen scale. Weighing the batter ensures your layers will bake uniformly, which is especially helpful if you’re aiming for a professional-looking finish. Pro tip: Line your workspace with parchment paper before starting. That way, cleanup is a breeze later.
3. Adding Vibrant Hues Using Food Coloring
This is where the magic happens. Grab your gel food coloring and start tinting each bowl of batter. Go wild with your color choices—I usually stick to classic rainbow shades like red, orange, yellow, green, blue, and purple, but feel free to mix it up. Want pastels? Add less coloring. Going for neon? Use a bit more. Whatever you decide, remember that a little goes a long way with gel-based dyes.
If you love creative recipes, you’ll adore this pineapple upside-down cake shot. It’s a playful twist on a classic dessert that’s sure to impress guests.
4. Layering the Batter in Cake Pans
Next, pour each colored batter into its own greased and parchment-lined cake pan. Make sure the pans are the same size to ensure even baking. Spread the batter smoothly with a spatula, then tap the pans gently on the counter to release any air bubbles. Pop them in the oven and let the magic happen.
Here’s a random thought: Did you know that layering isn’t just for cakes? Try making a heart-shaped cake next—it’s perfect for Valentine’s Day or anniversaries!
How Do I Get Even Layers?
Achieving even layers is easier than you think. First, measure your batter carefully when dividing it between bowls. Second, use a ruler or measuring tape to check the height of each layer as you stack them. Finally, level your cakes after baking by trimming off any domed tops with a serrated knife. Trust me, taking these extra steps makes a world of difference when assembling your layered rainbow cake.
Oh, and if you’re worried about wasting trimmed cake scraps, don’t be! Crumble them up and mix with frosting to make cake pops. Talk about zero waste!
Tips for Success
Before we wrap up this section, let me share a few final tips. First, patience is everything. Allow your cakes to cool completely before frosting; otherwise, the heat will melt the icing, and no one wants a melty mess. Second, consider using an angel food cake mix as a base if you’re short on time. It’s light, airy, and pairs beautifully with colorful layers.
Lastly, have fun with it! A rainbow cake rainbow is meant to bring joy, so don’t stress over perfection. Every cake tells a story, and yours will be uniquely yours. Happy baking!
Decorating Your Rainbow Cake Rainbow Like a Pro
Okay, so you’ve baked your rainbow cake rainbow, and now it’s time to make it look like a showstopper. Decorating is where you can really let your creativity shine—literally. Whether you’re going for smooth, sleek frosting or something more playful with piping and textures, there are endless ways to make your cake stand out.
One of my favorite techniques is using an offset spatula to create a smooth finish. It sounds fancy, but honestly? It’s just about patience and the right tools. Start by applying a thin “crumb coat” of frosting all over the cake. This locks in any loose crumbs and gives you a clean base to work with. Chill the cake for about 15 minutes, then go back in with a thicker layer of frosting. Use gentle, sweeping motions with the spatula to get that glassy-smooth look. If you’re aiming for perfection, a bench scraper can help you achieve sharp edges.
For those who love a bit more flair, try decorative piping. I always keep a few piping tips on hand because they’re game-changers. A star tip is perfect for creating swirls around the edges, while a round tip works great for writing messages or adding dots. Funny enough, I once tried to pipe flowers for the first time without practicing, and let’s just say it looked more like abstract art than a floral arrangement. But hey, it still tasted amazing, and everyone loved it!
Suggesting Complementary Colors for Frosting
When it comes to choosing frosting colors, think about how they’ll interact with the vibrant layers inside. You don’t want the exterior to compete too much with the rainbow theme—it should enhance it. For example, white frosting is classic and lets the colorful layers steal the spotlight when you cut into the cake. On the other hand, pastel shades like baby blue or soft pink add a whimsical touch that complements the boldness of the rainbow.
If you’re feeling adventurous, why not match the frosting color to one of the layers inside? Let’s say your top layer is purple; a lavender-hued frosting ties everything together beautifully. Or, if you’re going for drama, deep jewel tones like emerald green or royal blue can give your cake a luxurious vibe. Just remember: less is often more. Too many competing colors might overwhelm the design.
Here’s a pro tip for achieving those dreamy pastel tones: mix a tiny drop of gel food coloring into your frosting and gradually build up the shade. Gel-based colors blend seamlessly and won’t water down your frosting like liquid dyes might.
Creative Ways to Decorate a Rainbow Cake
Looking for some fresh ideas? Try sprinkles! They’re a simple yet effective way to jazz up your cake. Rainbow nonpareils or jimmies scattered across the top instantly amp up the fun factor. I also love edible glitter—it gives cakes a magical shimmer that kids (and adults!) adore.
Another idea is to stack your layered rainbow cake slightly off-center for a modern, rustic look. Leave part of each layer exposed so the colors peek through, almost like a deconstructed cake. This approach feels artsy and unique, plus it saves time on frosting. By the way, speaking of creative designs, check out this guide on cakes and cupcakes. It’s packed with inspiration for all kinds of baking projects.
Oh, and here’s a random thought: have you ever considered adding themed decorations? For instance, if you’re making a rainbow cake rainbow for a unicorn party, add horns or ears made from fondant. Or, for a tropical twist, garnish with fresh fruit slices like kiwi, mango, and strawberries. These little touches make your cake feel extra special.
What Frosting Works Best for a Rainbow Cake?
Now, let’s talk frosting options. Honestly, this is where personal preference comes into play. Each type has its pros and cons, so it depends on what you’re looking for in terms of taste and appearance.
Buttercream is my go-to choice for a rainbow cake rainbow. It’s rich, creamy, and super versatile. Plus, it holds up well for piping and intricate designs. The only downside? It can be a bit heavy if you’re not careful. To lighten things up, I sometimes whip mine for an extra minute or two before spreading it onto the cake.
Cream cheese frosting is another solid option, especially if you’re pairing your cake with flavors like red velvet or carrot cake. Its tangy flavor balances out the sweetness of the rainbow layers. However, it tends to be softer, which makes it trickier to work with for detailed piping.
Finally, there’s whipped cream frosting. Light, airy, and refreshing, it’s perfect for summer gatherings or anyone who prefers less sugar. That said, whipped cream doesn’t hold its shape as well as buttercream or cream cheese frostings, so it’s better suited for simpler designs.
Tips for Frosting a Layered Cake
- Chill your cake layers before assembling. Cold cakes are easier to handle and less likely to crumble.
- Use dowels or straws to stabilize tall cakes. This prevents them from leaning or collapsing under their own weight.
- Don’t rush the process. Take breaks between steps to let the frosting set properly.
- If you mess up, no big deal! Scrape off the frosting and start again. Practice makes perfect.
Here’s the thing: even professional bakers have off days. The key is to enjoy the process and embrace imperfections. After all, every cake you make tells a story—and trust me, people will remember the effort and love you put into it long after the last slice is gone.
FAQ Section
How do I prevent my rainbow cake from being dry?
Dry cakes happen when they’re overbaked or lack moisture. To avoid this, don’t overmix your batter, and stick to the recommended baking time. Adding ingredients like sour cream or buttermilk can also help keep your cake moist. Oh, and always store leftovers in an airtight container!
Can I bake a rainbow cake without multiple cake pans?
Absolutely! If you only have one pan, bake each layer individually and let them cool completely before moving on to the next. It takes longer, but the results are just as good. Just make sure to clean the pan between batches to avoid color contamination.
What are some fun variations of a rainbow cake?
Why not try a galaxy-themed version with dark purple and blue layers? Or swap the traditional vanilla batter for chocolate to create a “chocolate rainbow” effect. Another fun twist is adding flavored extracts like almond or coconut to each layer for variety.
How far in advance can I prepare a rainbow cake?
You can bake the layers up to two days ahead and store them wrapped tightly in plastic wrap. Assemble and frost the cake the day before serving. Keep it refrigerated, but bring it to room temperature before slicing for the best texture.
Do I need special equipment to make a rainbow cake?
Not really! While tools like a stand mixer and offset spatula make life easier, you can absolutely make a stunning cake with basic kitchen gear. A hand mixer and a regular spatula will get the job done just fine.
Can I use boxed cake mix for a rainbow cake?
Sure thing! Boxed mixes save time and still yield delicious results. Just divide the batter into bowls and add your colors as usual. For extra flair, doctor up the mix with pudding packets or flavored extracts.
How do I fix uneven layers in my cake?
Trimming is your friend! Use a serrated knife or cake leveler to shave off domed tops. This ensures your layers stack evenly and gives your cake a polished look.
Is it okay to freeze a rainbow cake?
Yes! Wrap the unfrosted layers tightly in plastic wrap and foil, then freeze for up to three months. Thaw overnight in the fridge before decorating.
What’s the best way to transport a rainbow cake?
Invest in a sturdy cake carrier or box. Secure the cake inside with non-slip mats, and drive carefully to avoid jostling. If possible, assemble the cake at the venue to minimize risk.
Can I make a gluten-free rainbow cake?
Of course! Swap out the all-purpose flour for a gluten-free blend, and double-check that all your other ingredients are certified gluten-free. The rest of the process remains the same.
Final Thoughts
Baking a rainbow cake rainbow isn’t just about following a recipe—it’s about creating joy. Every step, from mixing the batter to adding the finishing touches, brings you closer to something truly magical. So grab your bowls, crank up your favorite playlist, and dive in. Trust me, the smiles on your loved ones’ faces will make it all worth it.
Equipment
- Mixing bowls
- Spatula
- Measuring cups and spoons
- Cake pans (six small)
- Offset spatula
Ingredients
- 2.5 cups all-purpose flour
- 2.5 tsp baking powder
- 0.5 tsp salt
- 1.75 cups granulated sugar
- 1 cup unsalted butter, softened
- 5 large eggs
- 1 cup whole milk
- 2 tsp pure vanilla extract
- q.s. gel food coloring (various colors) red, orange, yellow, green, blue, purple
- q.s. parchment paper for lining pans
Instructions
- Cream together butter and sugar until light and fluffy.
- Add eggs one at a time, mixing well after each addition.
- Gently fold in dry ingredients (flour, baking powder, salt) alternately with the wet ones (milk and vanilla).
- Divide the batter evenly among six small bowls.
- Tint each bowl of batter with different shades of gel food coloring.
- Pour each colored batter into greased and parchment-lined cake pans.
- Bake in a preheated oven until a toothpick inserted into the center comes out clean.
- Let cakes cool completely before frosting.
Notes
Nutrition

Hi, I’m Olivia Parker, the founder of BakingSecret.com and a lifelong lover of all things sweet and homemade. I grew up in a small town in Oregon, where the smell of fresh cookies in my family’s kitchen sparked my passion for baking. Over the years, I turned that passion into a mission: to help home bakers feel confident, inspired, and creative.
After studying food science and working in several artisan bakeries across the U.S., I decided to create a space where everyone from beginners to seasoned bakers can find reliable recipes, expert tips, and a warm, welcoming community. BakingSecret.com is my way of sharing the magic of baking with the world. When I’m not testing new recipes, you’ll find me exploring farmers’ markets, collecting vintage cookbooks, or perfecting my sourdough technique.