
Introduction to No-Bake Salted Caramel Bars
There’s something magical about a dessert that combines sweet and salty flavors, and these No-Bake Salted Caramel Bars are no exception. I first made them for a family gathering, and they were such a hit that I’ve been asked to bring them to every event since! These bars are rich, gooey, and perfectly balanced with a hint of saltiness. If you’re looking for a quick yet impressive treat, this recipe will soon become your go-to.
The Sweet Origins of Salted Caramel Treats
Salted caramel has its roots in France, where chefs began experimenting with adding sea salt to caramel in the 1970s. Since then, it has become a beloved flavor combination worldwide. The beauty of sweet caramel slices lies in their versatility—whether enjoyed as decadent desserts or even as a topping for ice cream. Today’s version simplifies the process by skipping the oven, making it perfect for busy bakers who still want to create something special.
Why You’ll Love This Recipe
Besides being incredibly delicious, these caramel slice bars are easy to make and require no baking. They’re perfect for anyone who loves creamy textures paired with a crunchy crust. Plus, the balance of sweetness from the caramel and a sprinkle of flaky sea salt is simply irresistible. Trust me; one bite, and you’ll be hooked!
Perfect Occasions to Prepare No-Bake Salted Caramel Bars
These bars are ideal for casual get-togethers, potlucks, or even cozy nights at home. They’re also a fantastic option for holiday parties or as gifts during festive seasons. Whether you’re hosting friends or surprising loved ones, these no-bake caramel treats are sure to impress.
Ingredients for No-Bake Salted Caramel Bars
- 1 cup graham cracker crumbs
- 6 tablespoons unsalted butter, melted
- 1/4 cup granulated sugar
- 1 can (14 oz) sweetened condensed milk
- 1/2 cup light corn syrup
- 3 tablespoons unsalted butter
- 1 teaspoon vanilla extract
- 1/2 teaspoon sea salt flakes, plus more for sprinkling
- 1 cup semi-sweet chocolate chips
Substitution Options
Feel free to swap out some ingredients based on what you have on hand:
- Use digestive biscuits instead of graham crackers for the crust.
- Replace light corn syrup with honey or golden syrup.
- Vegan? Opt for plant-based butter and dairy-free chocolate chips.
Preparation Steps
Step 1: Prepare the Crust
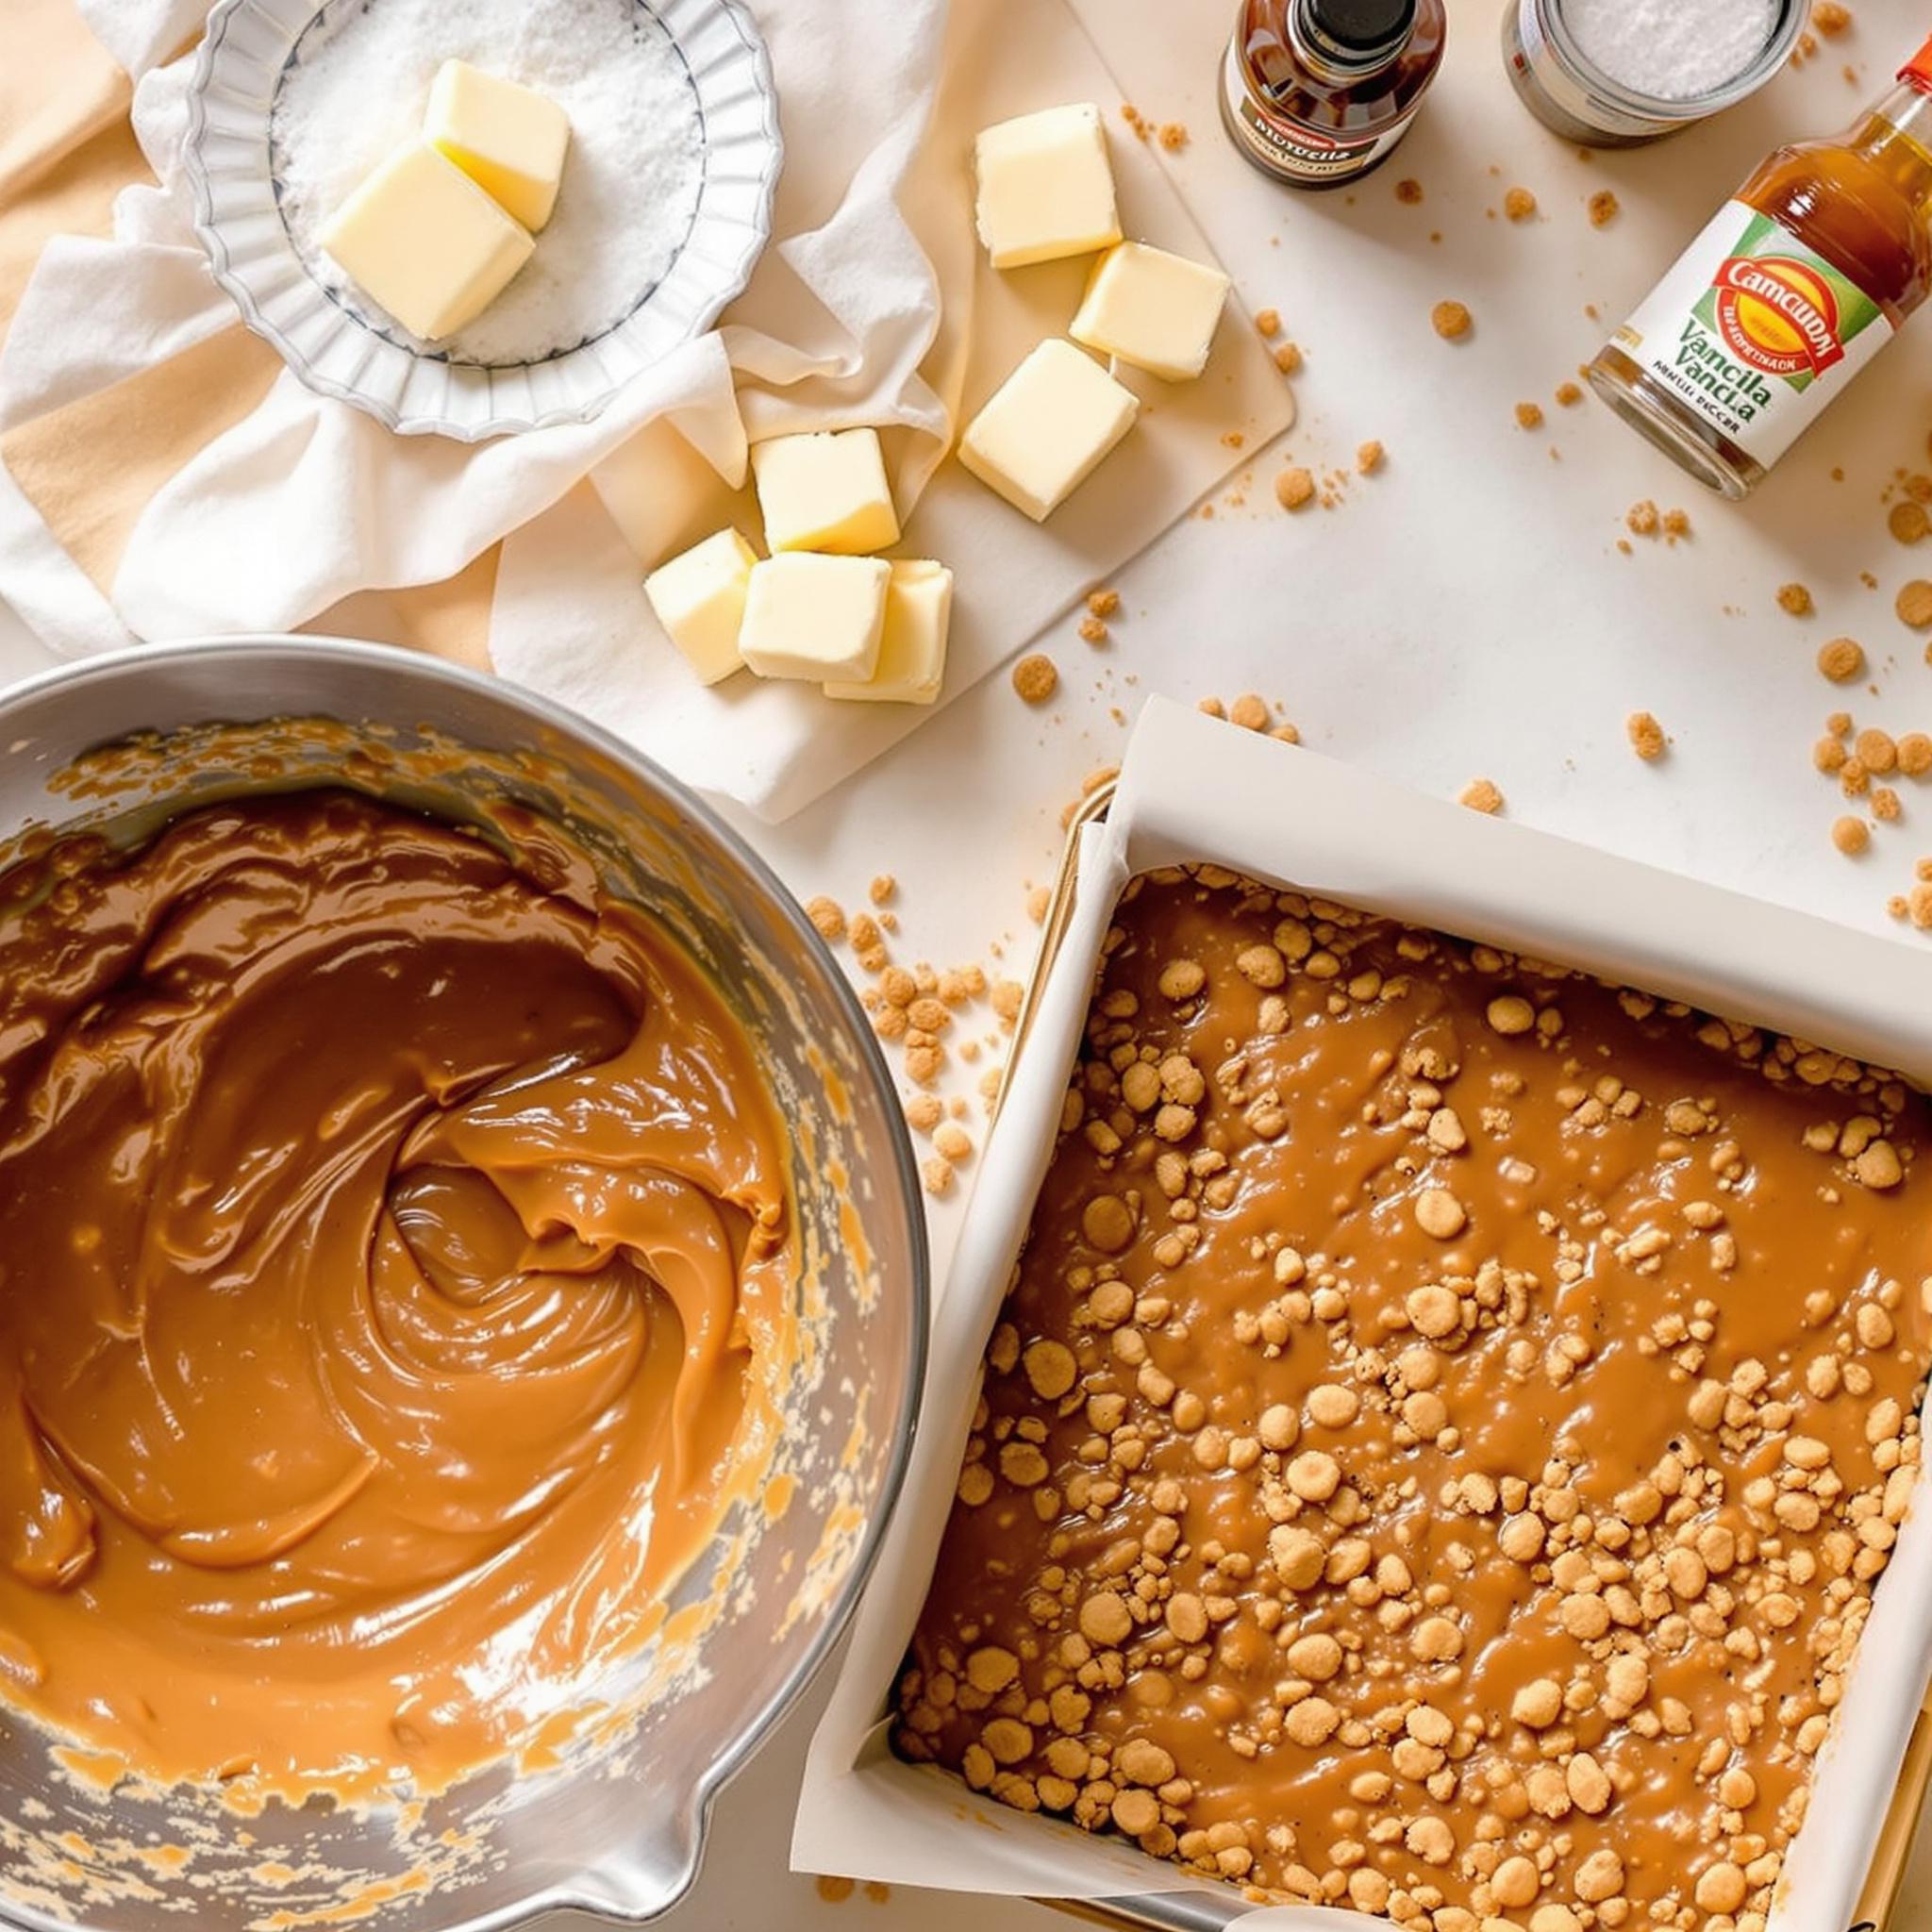
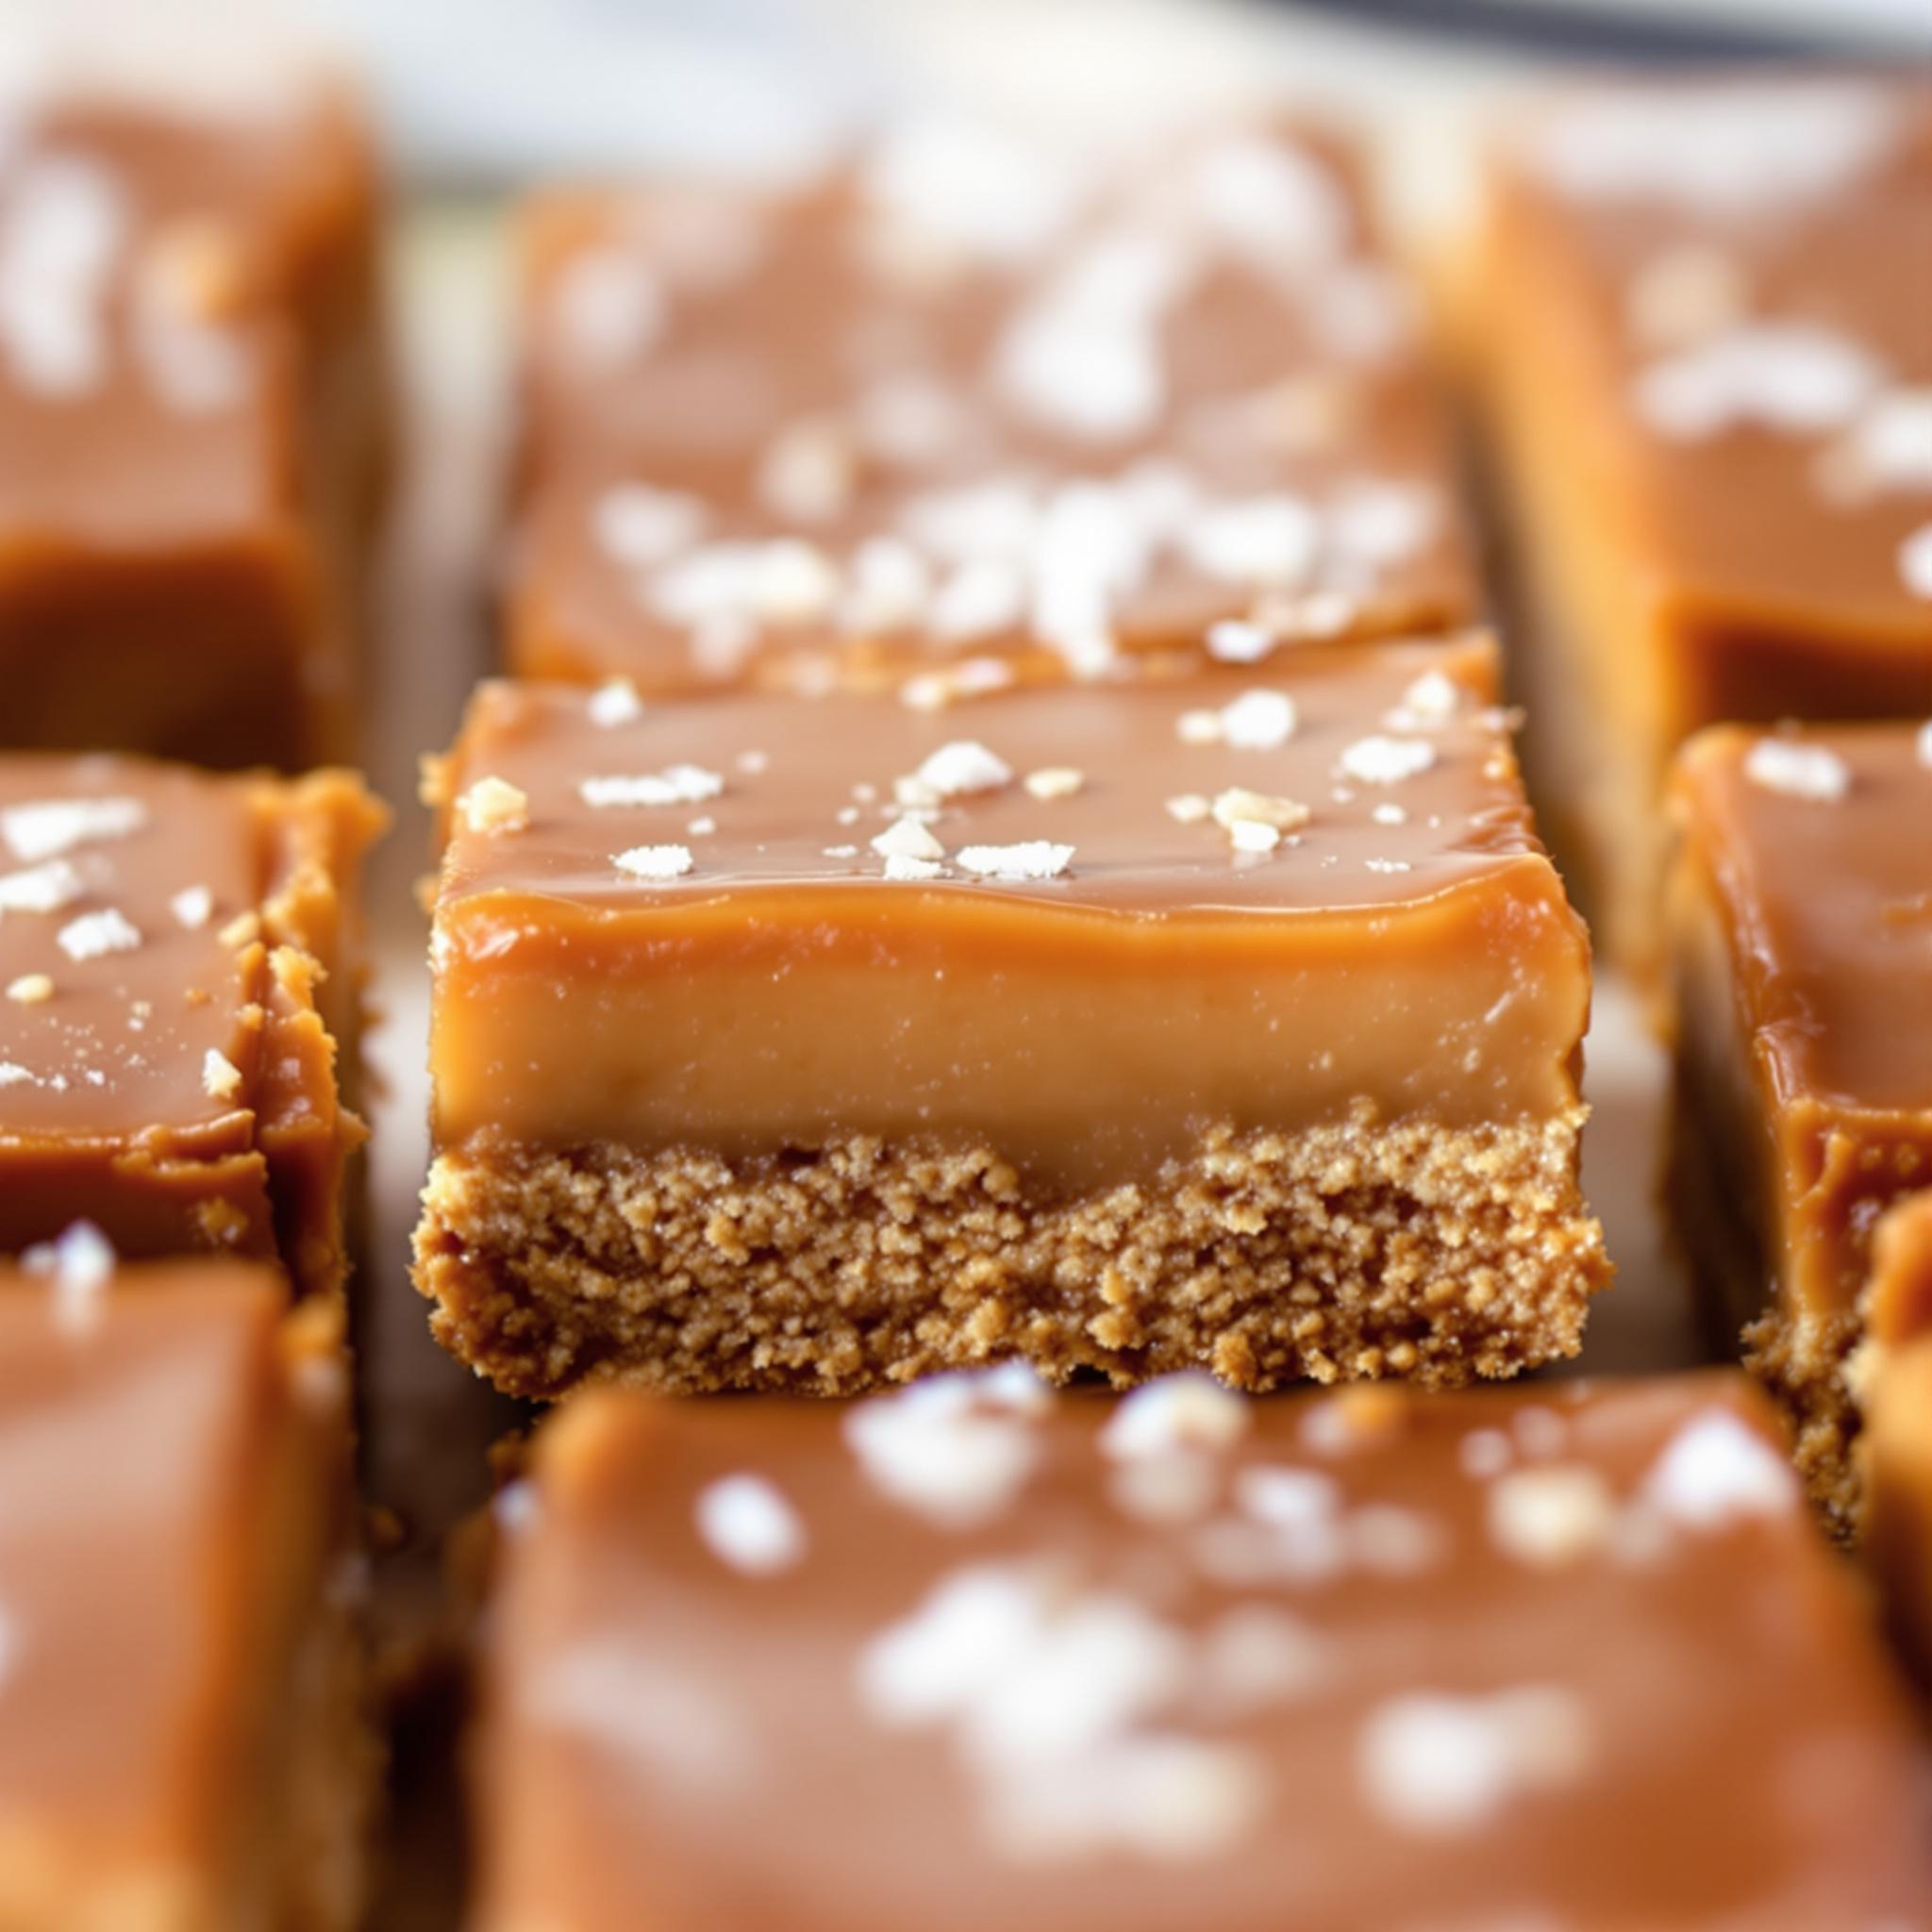
To start, mix the graham cracker crumbs, melted butter, and granulated sugar in a bowl until well combined. Press the mixture firmly into the bottom of an 8×8-inch baking pan lined with parchment paper. This forms the base of your sweet caramel bars. Pro tip: Use the back of a spoon or a flat-bottomed glass to press down evenly for a smooth surface.
Step 2: Make the Caramel Layer
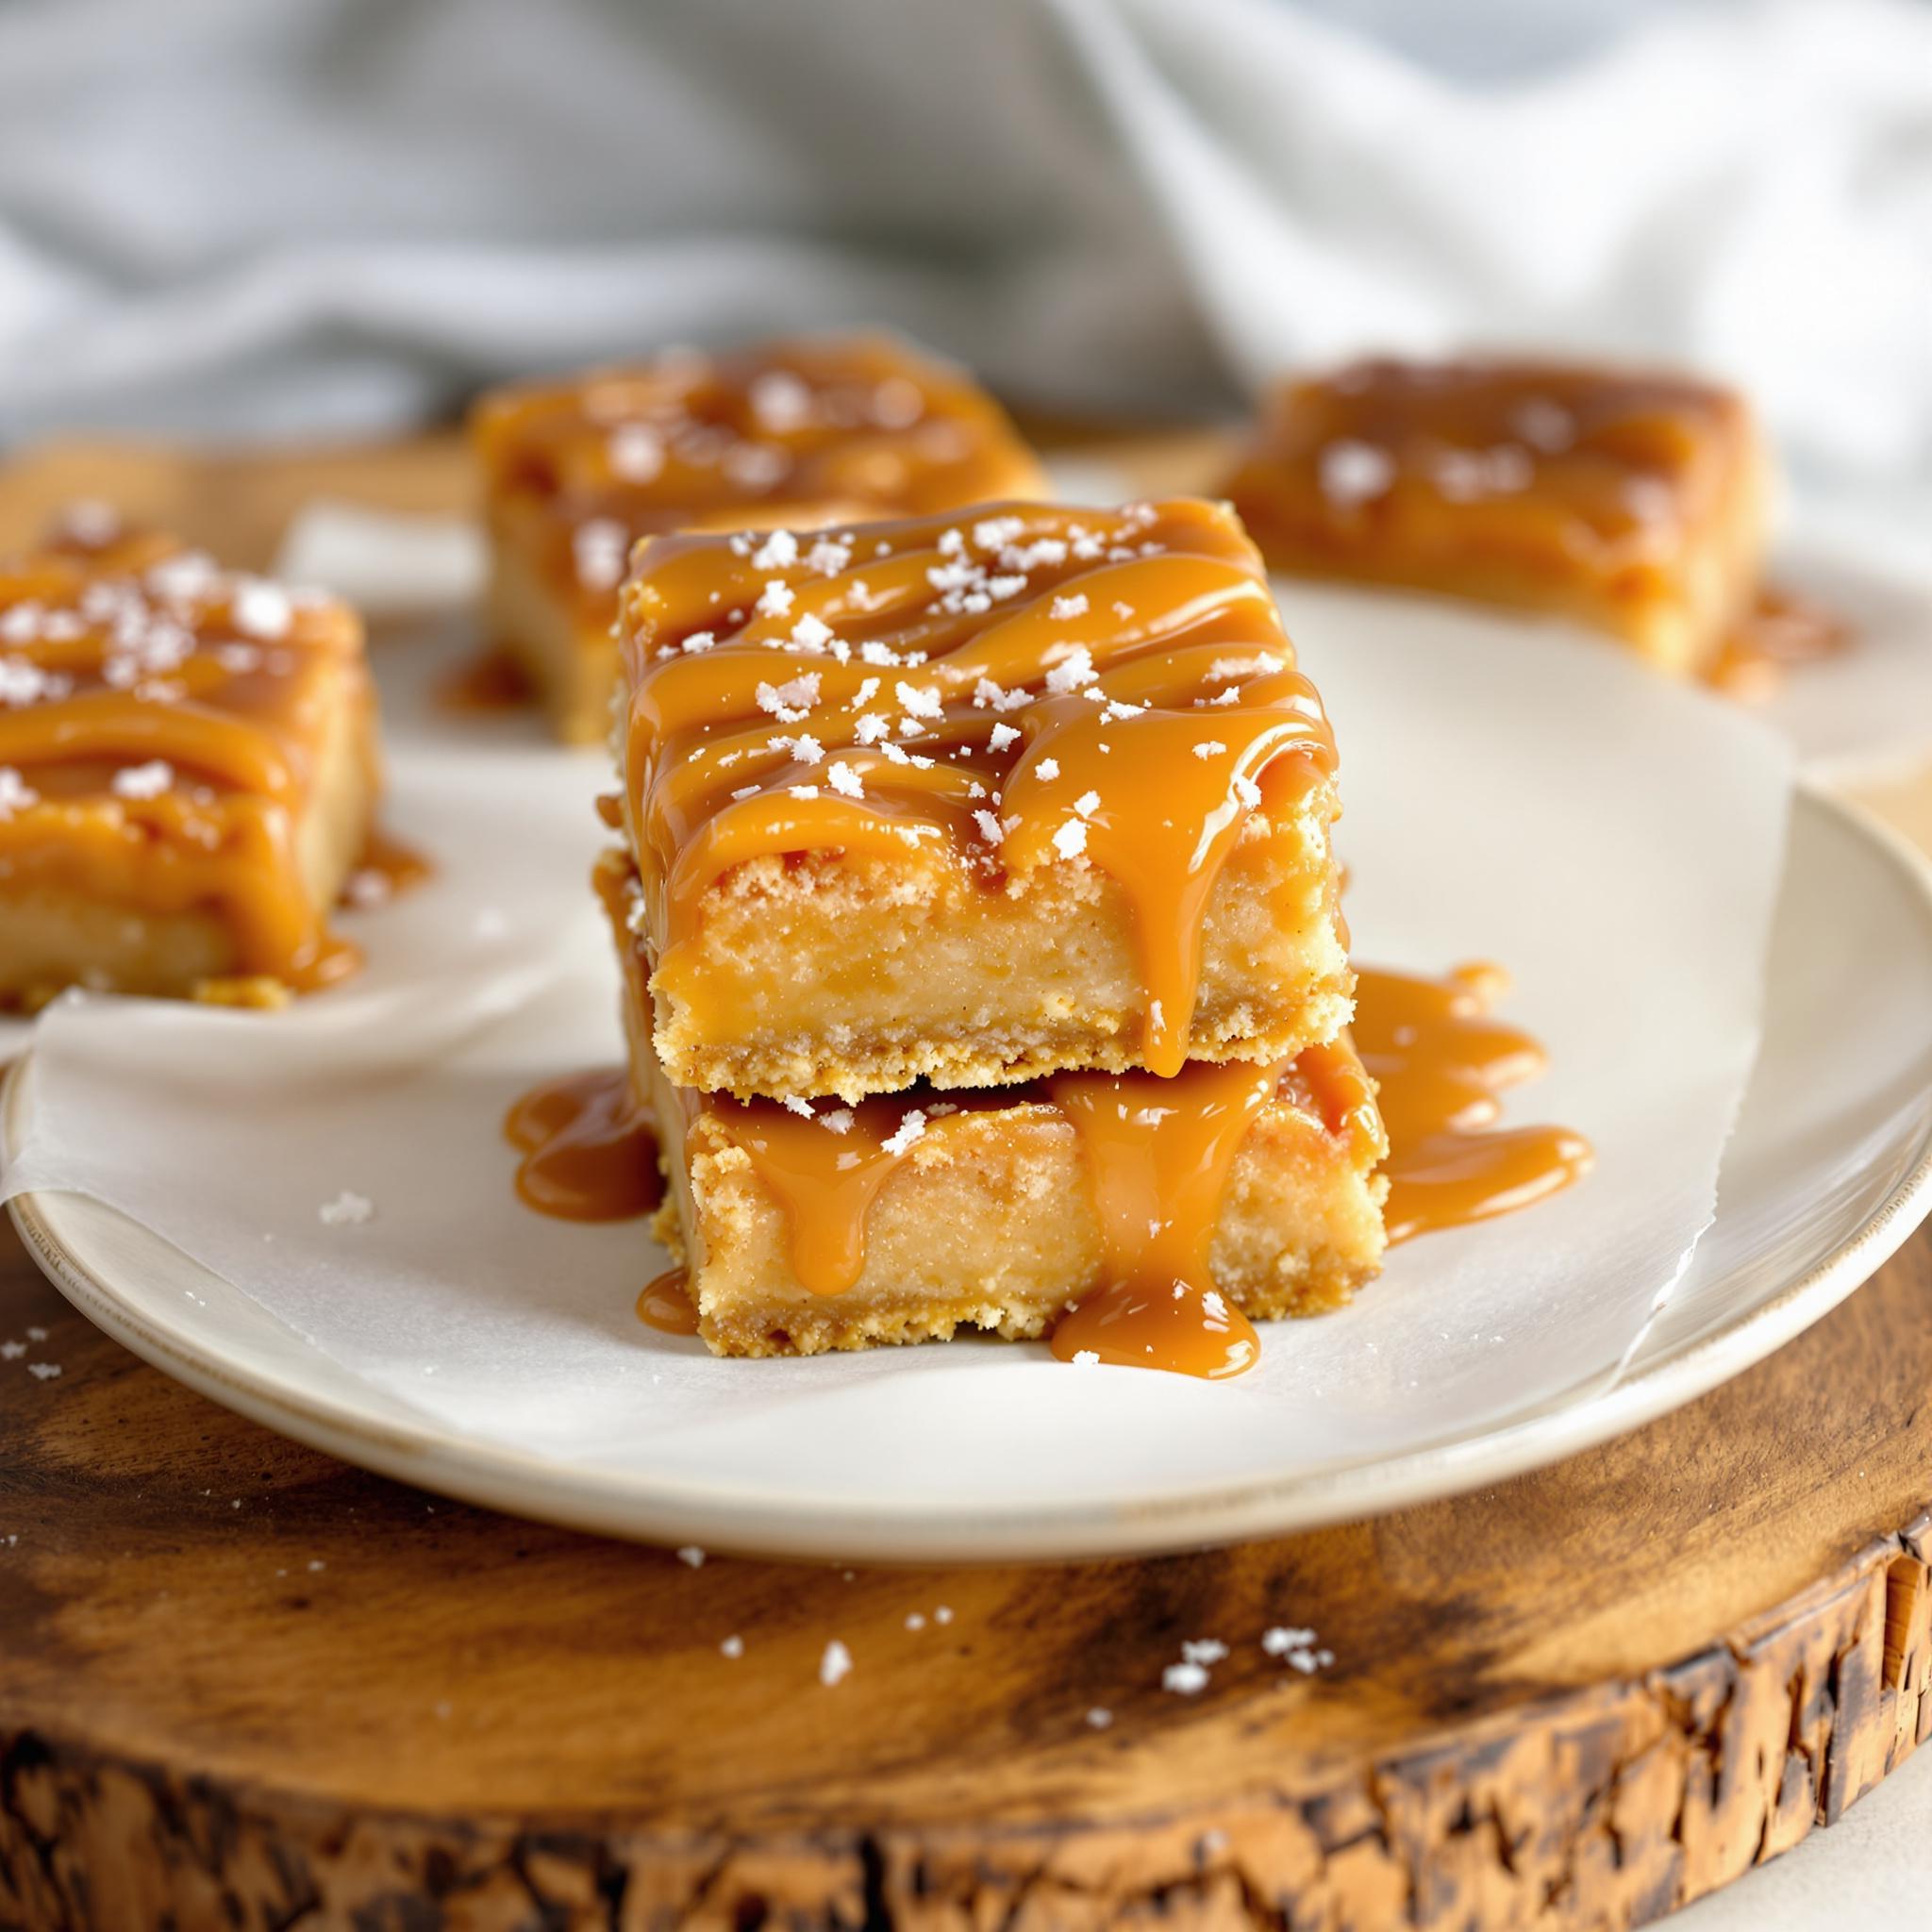
In a saucepan over medium heat, combine the sweetened condensed milk, corn syrup, and 3 tablespoons of butter. Stir continuously until the mixture thickens and turns a golden caramel color, which should take about 8-10 minutes. Once done, remove from heat and stir in the vanilla extract and sea salt. Pour this luscious caramel over the prepared crust and spread it evenly. Sprinkle a pinch of sea salt on top for that signature salty kick.
Step 3: Add the Chocolate Topping
Melt the chocolate chips either in the microwave or using a double boiler. Pour the melted chocolate over the cooled caramel layer and use a spatula to smooth it out. For added flair, sprinkle a few extra flakes of sea salt on top before letting the bars set in the refrigerator for at least two hours.
Chef’s Tip
For an extra glossy finish on the chocolate layer, let the melted chocolate cool slightly before pouring it over the caramel. This helps prevent cracking when slicing the bars later.
Time Breakdown
- Preparation Time: 20 minutes
- Chilling Time: 2 hours
- Total Time: 2 hours 20 minutes
Nutritional Information
Per serving (1 bar): Calories: 250 | Protein: 3g | Fat: 14g | Carbohydrates: 28g | Fiber: 1g | Sugar: 20g
Extra Information
Did you know that salted caramel was originally created by accident? A French chef mistakenly added too much salt to his caramel but decided to keep it—and the rest is history!
Necessary Tools
- 8×8-inch baking pan
- Parchment paper
- Saucepan
- Whisk
- Spatula
Storage Instructions
Store your no-bake caramel delights in an airtight container in the refrigerator for up to one week. To maintain freshness, place a piece of parchment paper between layers if stacking. Before serving, allow the bars to sit at room temperature for 10 minutes to soften slightly.
If freezing, wrap individual bars tightly in plastic wrap and store them in a freezer-safe bag for up to three months. Thaw overnight in the fridge before enjoying.
Avoid leaving these bars at room temperature for extended periods, as the chocolate may soften too much.
Tips and Tricks
- Toast the graham cracker crumbs lightly before mixing with butter for enhanced flavor.
- Use high-quality chocolate for a richer taste.
- Let the bars chill completely before slicing for clean edges.
Serving Suggestions
- Serve alongside a scoop of vanilla ice cream for an indulgent dessert.
- Pair with a cup of coffee or tea for an afternoon treat.
Healthier Alternatives for No-Bake Salted Caramel Bars
Here are six variations to lighten up this classic:
- Coconut Oil Swap: Replace butter with coconut oil for a dairy-free option.
- Dark Chocolate Topping: Use dark chocolate instead of semi-sweet for less sugar.
- Oatmeal Base: Substitute graham crackers with rolled oats for added fiber.
- Maple Syrup Caramel: Make caramel using maple syrup instead of corn syrup.
- Almond Flour Crust: Use almond flour for a gluten-free base.
- Reduced Sugar Option: Cut the sugar in half for a less sweet version.
Common Mistakes to Avoid
Mistake 1: Overheating the Caramel
One common mistake is cooking the caramel too long, causing it to burn. Keep a close eye on the saucepan and stir constantly to avoid scorching. Pro tip: Remove the pan from heat just before the caramel reaches your desired consistency—it will continue to thicken as it cools.
Mistake 2: Skipping the Chill Time
Rushing the chilling process can lead to messy slices. Patience is key here; allow the bars to firm up completely in the fridge for clean cuts.
Mistake 3: Using Low-Quality Ingredients
Since this recipe has few components, each ingredient shines through. Opt for premium chocolate and fresh sea salt for the best results.
Frequently Asked Questions
Can I make these bars ahead of time?
Absolutely! These sweet caramel bars can be made up to three days in advance and stored in the fridge. Just ensure they’re covered tightly to prevent any odors from seeping in.
Do I need a candy thermometer for the caramel?
No, you don’t! Simply watch for the caramel to thicken and turn a golden hue while stirring consistently.
Can I freeze these bars?
Yes, they freeze beautifully. Wrap individually and store in a freezer-safe container for up to three months.
What can I use instead of graham crackers?
Digestive biscuits or crushed cookies work wonderfully as substitutes.
How do I slice them neatly?
Run a sharp knife under hot water, dry it, and then cut through the chilled bars for clean lines.
Is it possible to reduce the sweetness?
Definitely! Reduce the sugar in the crust or opt for dark chocolate to balance the sweetness.
Can I add nuts to the recipe?
Of course! Chopped pecans or almonds would add a delightful crunch to the caramel layer.
Will the bars hold their shape outside the fridge?
They’ll stay firm for a couple of hours, but prolonged exposure to room temperature may soften them.
Are these suitable for vegans?
With simple swaps like plant-based butter and dairy-free chocolate, this recipe can easily be veganized.
What occasions are best for serving these bars?
From casual family dinners to fancy holiday parties, these no-bake caramel treats fit any occasion perfectly.
Conclusion
These No-Bake Salted Caramel Bars are proof that simplicity doesn’t mean sacrificing flavor. With their creamy caramel center, crunchy crust, and rich chocolate topping, they’re sure to become a favorite in your dessert repertoire. So grab your ingredients, follow these steps, and get ready to wow everyone with your baking skills—no oven required!
Equipment
- Bowl
- Whisk
- Spatula
- 8x8-inch baking pan
- Parchment paper
Ingredients
- 1 cup graham cracker crumbs
- 6 tablespoons unsalted butter melted
- 1/4 cup granulated sugar
- 14 oz sweetened condensed milk
- 1/2 cup light corn syrup
- 3 tablespoons unsalted butter
- 1 teaspoon vanilla extract
- 1/2 teaspoon sea salt flakes plus more for sprinkling
- 1 cup semi-sweet chocolate chips
Instructions
- Mix the graham cracker crumbs, melted butter, and granulated sugar in a bowl until well combined. Press the mixture firmly into the bottom of an 8x8-inch baking pan lined with parchment paper.
- In a saucepan over medium heat, combine the sweetened condensed milk, corn syrup, and 3 tablespoons of butter. Stir continuously until the mixture thickens and turns a golden caramel color, which should take about 8-10 minutes. Once done, remove from heat and stir in the vanilla extract and sea salt. Pour the caramel over the prepared crust and spread it evenly. Sprinkle a pinch of sea salt on top.
- Melt the chocolate chips either in the microwave or using a double boiler. Pour the melted chocolate over the cooled caramel layer and use a spatula to smooth it out. Sprinkle extra sea salt flakes on top before setting the bars in the fridge for at least two hours.
Notes
Nutrition

Hi, I’m Olivia Parker, the founder of BakingSecret.com and a lifelong lover of all things sweet and homemade. I grew up in a small town in Oregon, where the smell of fresh cookies in my family’s kitchen sparked my passion for baking. Over the years, I turned that passion into a mission: to help home bakers feel confident, inspired, and creative.
After studying food science and working in several artisan bakeries across the U.S., I decided to create a space where everyone from beginners to seasoned bakers can find reliable recipes, expert tips, and a warm, welcoming community. BakingSecret.com is my way of sharing the magic of baking with the world. When I’m not testing new recipes, you’ll find me exploring farmers’ markets, collecting vintage cookbooks, or perfecting my sourdough technique.