
Why You Need to Try This Hippo Cake Delight Recipe
Picture this: a cake so whimsical and delightful that it brings a smile to everyone’s face. That’s exactly what happened when I baked my first Hippo Cake Delight for my niece’s birthday. The kids went wild over the cute hippo theme, and the adults couldn’t stop raving about the rich chocolatey layers. It’s not just a dessert; it’s an experience that combines fun, flavor, and flair. Whether you’re a seasoned baker or a beginner, this recipe is sure to become a family favorite.
The Story Behind the Hippo Cake Delight
This cake was inspired by those iconic Happy Hippo chocolate bars we all grew up loving. One day, while munching on one, I thought, “Why not turn these into a cake?” After some trial and error (and a few chocolate-stained countertops), I perfected this recipe. It’s a modern twist on classic chocolate cakes, with layers of creamy goodness and crunchy textures. The name “Hippo Cake Delight” came naturally because it’s as joyful and playful as its namesake.
Why You’ll Love This Recipe
If you’re looking for a show-stopping dessert, this is it. The Hippo Cake Delight is decadent yet surprisingly easy to make. The combination of fluffy sponge, velvety cream, and chunks of Happy Hippo bars creates a symphony of flavors. Plus, decorating it feels like playtime—perfect for unleashing your inner artist. Trust me, once you try this recipe, you’ll want to make it again and again.
Perfect Occasions for Your Hippo Cake Delight
This cake is ideal for birthdays, baby showers, or any celebration where you want to add a touch of whimsy. I’ve also served it at casual gatherings, and it never fails to impress. Even if there’s no special occasion, baking this cake just because will instantly lift your spirits—and maybe earn you a few new fans!
Ingredients You’ll Need
For the Dough:
- 7 medium eggs
- 100 g sugar
- 1 teaspoon vanilla extract
- 200 g wheat flour Type 405
- 1 teaspoon baking powder
- 100 g chocolate drops
- 50 g butter
For the Cream:
- 7 Happy Hippo bars
- 500 ml cream
- 1 pack gelatin powder
- 2 tablespoons cocoa powder
- 1 pack vanilla sugar
For Decoration:
- 300 ml cream
- 1 pack cream stiffener
- 8 Happy Hippo bars
- 80 g chocolate drops
- 2 tablespoons crocants (crispy chocolate pearls)
Substitution Options
Not every pantry is stocked perfectly, so here are some swaps you can make. Replace wheat flour Type 405 with all-purpose flour if needed. If you don’t have vanilla sugar, use regular granulated sugar plus an extra splash of vanilla extract. Instead of gelatin powder, agar-agar works well for vegetarians. And if you can’t find Happy Hippo bars, other chocolate wafer bars will do in a pinch.
Step 1: Preheat and Prep
Start by preheating your oven to 180°C (160°C fan). Line a springform pan with baking paper—it makes removing the cake later a breeze. Melt the butter gently on the stovetop and let it cool. This step ensures your butter won’t scramble the eggs when you mix everything together. Pro tip: Keep your eggs at room temperature for fluffier results.
Step 2: Whip Up the Dough
In a large bowl, beat the eggs, sugar, and vanilla extract until thick and pale—about 10 minutes. Watching the mixture transform from liquid to a frothy cloud is oddly satisfying. Gradually sift in the flour and baking powder, folding gently to keep the airiness intact. Fold in the chocolate drops and cooled butter last. Pour the batter into the prepared pan and bake for 30 minutes. Let it cool completely before moving on.
Step 3: Make the Dreamy Cream
Crush the Happy Hippo bars into small pieces using a fork or mixer. Whip the cream until stiff peaks form, then sprinkle in the gelatin powder according to package instructions. Stir in the cocoa powder and vanilla sugar for a rich, aromatic flavor. Gently fold in the crushed bars—they’ll add delightful bursts of texture throughout the cream. Chef’s tip: Chill the cream briefly before assembling the cake for easier spreading.
Step 4: Assemble Your Masterpiece
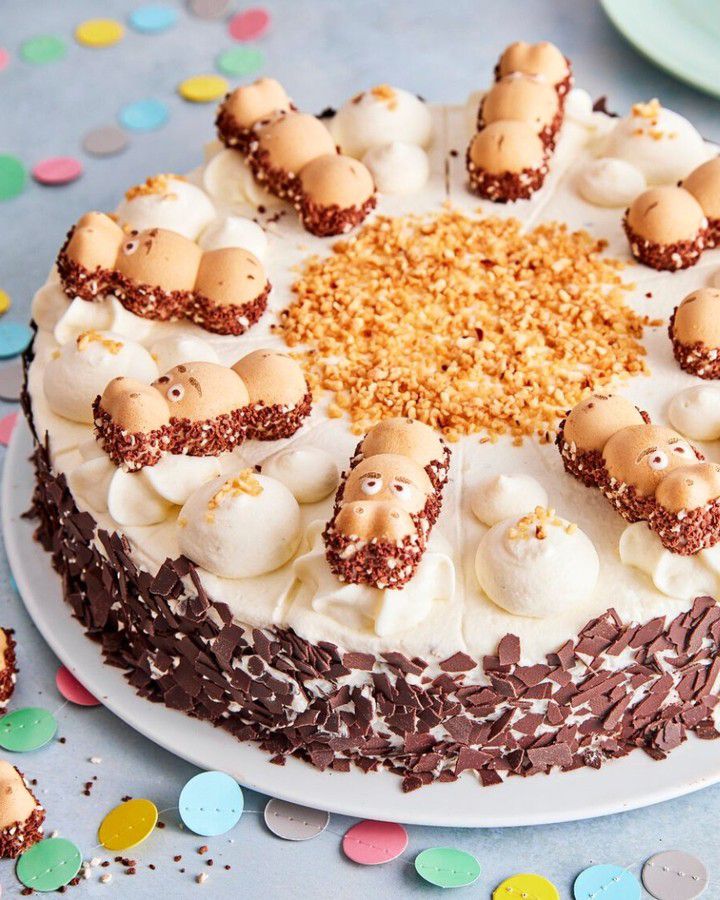
Cut the cooled cake horizontally in half. Place the bottom layer in a cake ring and spread the cream evenly over it. Top with the second layer, pressing lightly to secure. Decorate with whipped cream, more chocolate drops, and whole Happy Hippo bars for that wow factor. Finish with a sprinkle of crocants for crunch. Voilà—you’ve created a Hippo Cake Delight worthy of applause.
Timing
Preparation takes about 30 minutes, baking another 30, and assembly adds around 20 more. Resting time? About 60 minutes in the fridge. All told, you’re looking at roughly 2 hours and 20 minutes from start to finish.
Chef’s Secret
Here’s a little secret: brush each cake layer with a light syrup made from water and sugar before adding the cream. It keeps the cake moist and adds a subtle sweetness that ties everything together beautifully.
Extra Info
Did you know Happy Hippo bars were originally created in Germany? Their unique combination of crispy wafers and creamy filling has made them a beloved snack worldwide. Incorporating them into a cake felt like giving a nod to their heritage while creating something entirely new.
Necessary Equipment
You’ll need a springform pan, electric mixer, spatula, cake ring, and a sharp knife for slicing the layers. A grater or food processor helps crush the chocolate bars quickly.
Storage Tips
To store your Hippo Cake Delight, cover it tightly with plastic wrap or place it in an airtight container. Refrigerate for up to 3 days. For longer storage, freeze individual slices wrapped in parchment paper and foil. Thaw in the fridge overnight before serving.
Avoid leaving the cake at room temperature for too long, especially in warm weather, as the cream may soften. When reheating leftovers, microwave briefly to bring out the flavors without melting the decorations.
If you’re transporting the cake, secure the layers with toothpicks and carry it in a sturdy box to prevent shifting during travel.
Tips and Advice
- Use fresh eggs for better volume in your batter.
- Don’t rush the cooling process—it prevents the cream from melting.
- Experiment with different toppings like edible glitter or sprinkles.
Presentation Ideas
- Arrange whole Happy Hippo bars around the edges for a border effect.
- Write a message in piped cream for personalized touches.
- Add themed figurines or candles for extra charm.
Healthier Alternatives
Want to lighten things up? Here are six variations:
- Gluten-Free Option: Swap wheat flour for almond or oat flour.
- Dairy-Free Delight: Use coconut cream instead of heavy cream.
- Low-Sugar Version: Substitute sugar with stevia or monk fruit sweetener.
- Vegan Twist: Replace eggs with flaxseed meal mixed with water.
- Fruit-Filled Fun: Add a layer of fresh berries between the cake layers.
- Protein-Packed: Mix protein powder into the batter for a fitness-friendly treat.
Common Mistakes to Avoid
Mistake 1: Overmixing the Batter
Overmixing deflates the air bubbles, resulting in a dense cake. To avoid this, fold ingredients gently and stop mixing as soon as everything is combined. Pro tip: Use a spatula instead of a whisk for folding.
Mistake 2: Skipping the Cooling Step
Rushing the cooling process causes the cream to melt unevenly. Patience pays off—let the cake cool completely before assembling. Tip: Pop it in the fridge for 15 minutes if you’re short on time.
Mistake 3: Uneven Layer Cutting
An uneven cut makes the cake look messy. Use a serrated knife and rotate the cake slowly for precision. Practice makes perfect!
FAQ
Can I use margarine instead of butter?
Yes, but butter gives a richer flavor. Margarine works fine if you prefer a dairy-free option.
How far ahead can I prepare this cake?
You can bake the layers a day in advance and assemble the cake the next day. Just store the components separately.
What if I don’t have a cake ring?
No problem! Use strips of acetate or even clean cereal box cardboard wrapped in foil to create a makeshift ring.
Can I substitute gelatin with agar-agar?
Absolutely. Agar-agar sets firmer, so adjust quantities slightly based on package instructions.
Is this cake kid-friendly?
Definitely! Kids love the playful design and chocolatey taste. Just skip alcohol-based extracts if they’re very young.
How do I prevent the cream from curdling?
Ensure the gelatin is fully dissolved before mixing it into the cream. Cold cream straight from the fridge helps stabilize it too.
Can I freeze the assembled cake?
Yes, wrap it tightly and freeze for up to a month. Thaw in the fridge overnight before serving.
What’s the best way to crush chocolate bars?
A food processor does the job quickly, but a rolling pin works great for smaller batches.
Why did my cake sink in the middle?
This usually happens if the batter wasn’t mixed properly or the oven door was opened too early. Stick to the recipe timings and resist peeking!
How can I make the decoration stand out?
Use contrasting colors like white whipped cream against dark chocolate shavings. Add height with stacked bars for visual impact.
Final Thoughts
Baking a Hippo Cake Delight isn’t just about making dessert—it’s about creating memories. Whether you’re celebrating a milestone or simply treating yourself, this cake promises joy in every bite. So grab your apron, gather your ingredients, and let’s get baking. Your friends and family will thank you!
Equipment
- Springform pan
- Electric mixer
- Spatula
- Cake ring
- Sharp knife
- Grater or food processor
Notes
Nutrition

Hi, I’m Olivia Parker, the founder of BakingSecret.com and a lifelong lover of all things sweet and homemade. I grew up in a small town in Oregon, where the smell of fresh cookies in my family’s kitchen sparked my passion for baking. Over the years, I turned that passion into a mission: to help home bakers feel confident, inspired, and creative.
After studying food science and working in several artisan bakeries across the U.S., I decided to create a space where everyone from beginners to seasoned bakers can find reliable recipes, expert tips, and a warm, welcoming community. BakingSecret.com is my way of sharing the magic of baking with the world. When I’m not testing new recipes, you’ll find me exploring farmers’ markets, collecting vintage cookbooks, or perfecting my sourdough technique.