
Why This Apple and Lemon Delight Will Win Your Heart
There’s something magical about the combination of sweet apples and tangy lemon. I remember the first time I tried this Apple and Lemon Cake. It was at a cozy family gathering, and my cousin brought it out as a surprise dessert. The aroma alone had everyone leaning in for a closer look. One bite, and I knew I had to recreate it. This cake is light, zesty, and utterly delightful—perfect for anyone who loves a balance of fruity freshness and rich creaminess.
A Little History Behind the Apple and Lemon Delight
Cakes with fruit have been around for centuries, and it’s no wonder why. Apples bring natural sweetness and moisture to baked goods, while lemon adds a refreshing zing that cuts through the richness. This particular recipe blends British baking traditions with a modern twist. I’ve tweaked it over the years to suit my taste, but the heart of the dish remains the same: simple ingredients transformed into something extraordinary. When I tested this version, my friends couldn’t stop raving about how the grated apples made the sponge so tender. It’s become a staple at our Sunday brunches!
Why You’ll Fall in Love with This Recipe
This Apple and Lemon Delight is perfect for beginners and seasoned bakers alike. The steps are straightforward, and the results are consistently delicious. The grated apples keep the sponge moist, while the lemon curd filling adds a burst of citrusy goodness. Plus, it’s versatile—you can serve it as a casual snack or dress it up for special occasions. And let’s not forget the smell! Your kitchen will be filled with the warm, inviting scent of apples and vanilla as it bakes.
Perfect Occasions for Your Apple and Lemon Delight
This cake shines on so many occasions. It’s ideal for afternoon tea, birthday parties, or even potlucks. I once brought it to a summer picnic, and it disappeared within minutes. The zesty flavor pairs beautifully with fresh fruit salads or a cup of hot tea. If you’re looking for a dessert that feels fancy but doesn’t require hours of effort, this is your go-to recipe.
Ingredients You’ll Need
- For the sponge:
- 225g chilled baking spread (plus extra for greasing)
- 225g caster sugar
- 225g self-raising flour
- 1 tsp baking powder
- 4 large eggs, beaten
- 2 medium apples, peeled, cored, and grated
- Icing sugar for dusting
- For the lemon filling:
- 250g double cream
- 50g lemon curd
Substitution Options
If you’re missing an ingredient, don’t worry! Here are some easy swaps:
- Use butter instead of baking spread for a richer flavor.
- Swap caster sugar for granulated sugar if needed.
- Replace self-raising flour with all-purpose flour and 2 tsp of baking powder.
- If you can’t find lemon curd, mix lemon juice and zest with a bit of sugar and butter for a DIY version.
Step 1: Preheat and Prepare
Start by preheating your oven to 180°C (160°C for fan ovens) or Gas Mark 4 (350°F). Grease two 20cm (8-inch) round cake tins and line them with baking paper. I always double-check that the paper fits snugly—it prevents any batter from sticking. Pro tip: Chill your baking spread beforehand; it makes creaming easier and keeps the texture light.
Step 2: Mix the Batter
In a large bowl, beat together the baking spread, sugar, flour, baking powder, and eggs until smooth. The mixture should be pale and fluffy, almost like clouds in a bowl. Gently fold in the grated apples. Watch how they add a soft golden hue to the batter. Don’t overmix—just fold until everything is combined. This step ensures your sponge stays airy.
Step 3: Bake to Perfection
Divide the batter evenly between the prepared tins, smoothing the tops with a spatula. Pop them into the oven and bake for 25-30 minutes. Keep an eye on them—they’re done when they turn golden brown and spring back when lightly touched. The kitchen will smell heavenly during this step, so try not to sneak a taste too soon!
Step 4: Cool and Whip
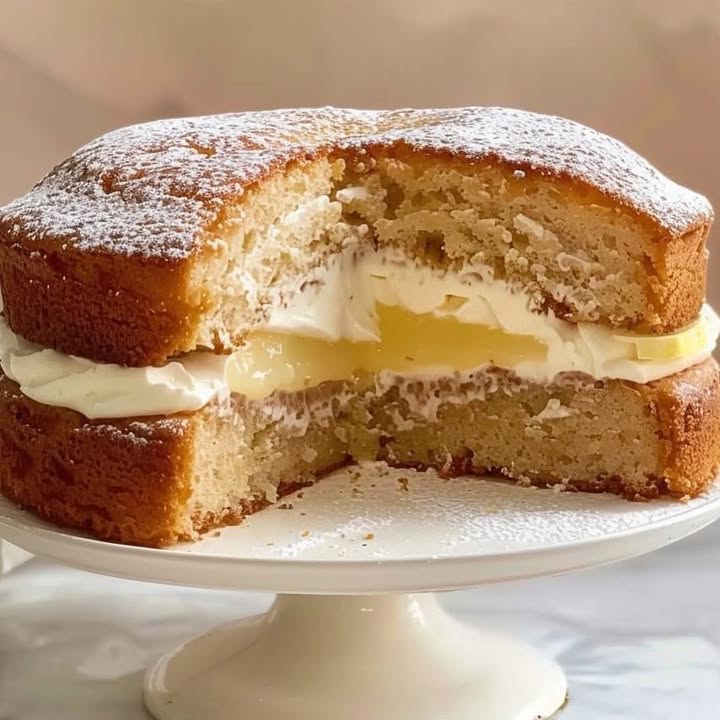
Let the cakes cool in the tins for a few minutes before transferring them to a wire rack. While they cool, whip the double cream until soft peaks form. Stir in the lemon curd gently to create a marbled effect. I love how the bright yellow swirls look against the white cream—it’s almost too pretty to eat. Leave some aside for the middle layer.
Step 5: Assemble the Cake
Place one cake layer upside down on a serving plate. Spread the lemon cream mixture generously on top, adding extra curd if you wish. Top it with the second cake layer. Dust the top with icing sugar for a final touch. Chef’s tip: Use a sieve for an even dusting of sugar—it looks professional and adds elegance.
Timing Breakdown
Here’s how long each stage takes:
- Prep time: 15 minutes
- Cooking time: 30 minutes
- Resting time: 20 minutes (for cooling)
- Total time: About 1 hour and 5 minutes
Chef’s Secret
For an extra burst of flavor, soak the grated apples in a splash of lemon juice before folding them into the batter. This enhances the citrus notes and prevents the apples from browning.
An Interesting Tidbit
Did you know that lemons are one of the most versatile fruits? They’ve been used in cooking, cleaning, and even skincare for centuries. Their acidity makes them perfect for balancing sweetness, which is exactly what happens in this cake.
Necessary Equipment
You’ll need:
- Two 20cm (8-inch) round cake tins
- Baking paper
- A large mixing bowl
- An electric mixer or whisk
- A spatula
- A wire cooling rack
- A sieve for dusting
Storage Tips
To store your Apple and Lemon Delight, wrap it tightly in cling film or place it in an airtight container. It will stay fresh for up to three days at room temperature. For longer storage, refrigerate it—but bring it back to room temperature before serving for the best flavor.
If you want to freeze it, slice the cake first. Wrap each slice individually in plastic wrap and then foil. Thaw overnight in the fridge before enjoying.
Avoid leaving the cake uncovered, as it can dry out quickly. A little care goes a long way in keeping it moist and delicious.
Tips and Advice
Here are a few pointers to make your cake shine:
- Grate the apples finely to ensure they blend seamlessly into the batter.
- Don’t skip the resting time—it allows the flavors to meld beautifully.
- Serve with a dollop of whipped cream on the side for extra indulgence.
Presentation Ideas
Make your cake stand out with these tips:
- Garnish with thin slices of apple or a sprinkle of lemon zest.
- Use edible flowers for a pop of color.
- Serve on a vintage cake stand for a rustic touch.
Healthier Alternatives
If you’re looking for lighter options, here are six variations:
- Gluten-Free: Swap self-raising flour for a gluten-free blend.
- Dairy-Free: Use coconut oil instead of baking spread and dairy-free cream.
- Low-Sugar: Replace caster sugar with a sugar substitute like stevia.
- Vegan: Substitute eggs with flaxseed gel and use plant-based cream.
- Spiced Version: Add cinnamon or nutmeg for warmth.
- Fruit Swaps: Try pears or peaches instead of apples.
Mistake 1: Overmixing the Batter
Overmixing can lead to a dense cake instead of a light, fluffy one. To avoid this, mix just until the ingredients are combined. Remember, a few lumps are okay!
Mistake 2: Skipping the Cooling Step
Rushing the cooling process can cause the filling to melt and make assembly messy. Be patient—let the cakes cool completely before layering.
Mistake 3: Using Stale Lemons
Old lemons won’t give you the vibrant flavor you need. Always choose firm, fragrant ones for the best results.
Mistake 4: Not Greasing the Tins Properly
A poorly greased tin means stuck cake. Take the extra minute to grease and line properly—it’s worth it.
Mistake 5: Overfilling the Tins
Too much batter can cause uneven baking. Fill each tin only halfway to ensure even layers.
FAQs
Can I use store-bought lemon curd?
Absolutely! Store-bought lemon curd works perfectly fine. Just make sure it’s high-quality for the best flavor.
How do I know when the cake is fully baked?
The cake should be golden brown and springy to the touch. Insert a toothpick—if it comes out clean, it’s ready.
Can I make this cake ahead of time?
Yes! You can bake the layers a day in advance and assemble just before serving.
What type of apples work best?
Firm varieties like Granny Smith or Honeycrisp hold their shape well and add a nice tartness.
Is this cake suitable for kids?
Definitely! The sweetness and fun textures make it a hit with children.
Can I freeze leftovers?
Yes, wrap slices individually and freeze for up to a month.
How can I make the cake more decorative?
Add piped cream borders or edible decorations for a polished look.
Can I use margarine instead of baking spread?
Yes, but baking spread gives a lighter texture.
Why is my cake dry?
This could happen if you overbake it. Stick to the recommended time and check frequently.
Can I add nuts to the recipe?
Of course! Walnuts or almonds pair beautifully with the flavors.
Final Thoughts
This Apple and Lemon Delight is more than just a cake—it’s a celebration of simple, wholesome ingredients coming together in harmony. Whether you’re baking for loved ones or treating yourself, this recipe promises joy in every bite. So grab your apron, gather your ingredients, and get ready to create a dessert that’s as delightful to make as it is to eat. Happy baking!
Equipment
- Large mixing bowl
- Electric mixer or whisk
- Spatula
- Two 20cm (8-inch) round cake tins
- Sieve for dusting
Ingredients
- 225 g chilled baking spread (plus extra for greasing)
- 225 g caster sugar
- 225 g self-raising flour
- 1 tsp baking powder
- 4 large eggs, beaten
- 2 medium apples, peeled, cored, and grated
- q.s. icing sugar for dusting
Instructions
- Preheat the oven to 180°C (160°C for fan ovens) or Gas Mark 4 (350°F), and grease two 20cm (8-inch) round cake tins lined with baking paper.
- In a large bowl, beat together the baking spread, sugar, flour, baking powder, and eggs until smooth and fluffy.
- Gently fold in the grated apples, being careful not to overmix.
- Divide the batter evenly between the prepared tins and smooth the tops. Bake for 25-30 minutes, until golden brown and springy to the touch.
- Cool the cakes in the tins for a few minutes before transferring them to a wire rack.
- While cooling, whip the double cream until soft peaks form and mix in the lemon curd gently to create a marbled effect.
- Place one cake layer upside down on a serving plate, spread the lemon cream mixture generously on top, and add extra curd if desired.
- Top with the second cake layer and dust with icing sugar.
Notes
Nutrition

Hi, I’m Olivia Parker, the founder of BakingSecret.com and a lifelong lover of all things sweet and homemade. I grew up in a small town in Oregon, where the smell of fresh cookies in my family’s kitchen sparked my passion for baking. Over the years, I turned that passion into a mission: to help home bakers feel confident, inspired, and creative.
After studying food science and working in several artisan bakeries across the U.S., I decided to create a space where everyone from beginners to seasoned bakers can find reliable recipes, expert tips, and a warm, welcoming community. BakingSecret.com is my way of sharing the magic of baking with the world. When I’m not testing new recipes, you’ll find me exploring farmers’ markets, collecting vintage cookbooks, or perfecting my sourdough technique.