
Why Coconut Chocolate Bliss is a Must-Try Dessert
Picture this: a lazy Sunday afternoon, the smell of coconut wafting through the kitchen, and the rich aroma of melted chocolate making everything feel cozy. That’s how I first stumbled upon this Coconut Chocolate Bliss. It was one of those “let’s see what’s in the pantry” moments, and boy, did it turn into something magical! This dessert combines creamy coconut with decadent chocolate in a way that feels like a warm hug for your taste buds. Whether you’re a seasoned baker or just someone who loves easy, delicious treats, this recipe is for you.
A Little Background on Coconut and Chocolate Pairings
Coconut and chocolate have been a dynamic duo in desserts for ages. Growing up, my grandma used to make a simple coconut candy dipped in chocolate during the holidays. It was always the first thing to disappear from the dessert table. Fast forward to today, and this pairing has taken on new life in modern recipes like this Coconut Chocolate Bliss. It’s a nod to tradition but with a fresh twist that’s perfect for any occasion.
Why You’ll Fall in Love with This Recipe
What makes this dessert so irresistible? First, it’s incredibly easy to make—no fancy equipment or baking skills required. Second, the flavors are spot-on. The sweetness of the coconut layer balances the richness of the chocolate, creating a harmony that’s hard to resist. Plus, it’s versatile! You can tweak it to suit your taste or dietary preferences. Trust me, once you try it, it’ll become a go-to dessert for family gatherings and cozy nights in.
Perfect Occasions to Whip Up This Dessert
This Coconut Chocolate Bliss is perfect for potlucks, birthday parties, or even as a thoughtful homemade gift. I’ve served it at holiday dinners, baby showers, and casual get-togethers, and it’s always a hit. It’s also great for those days when you just want to treat yourself without spending hours in the kitchen.
Ingredients You’ll Need
- Coconut Layer:
- 1 can of condensed milk
- 200 ml of coconut milk
- 1 tablespoon butter
- 1 cup of grated coconut (fresh or unsweetened)
- Chocolate Layer:
- 200 g of dark or milk chocolate, chopped
- 1 box of sour cream (200 g)
Substitution Options
If you’re out of certain ingredients or want to experiment, here are some swaps:
- Use sweetened shredded coconut if you prefer a sweeter flavor.
- Swap dark chocolate for semi-sweet or white chocolate.
- Replace sour cream with Greek yogurt for a tangier twist.
Step 1: Making the Coconut Layer
In a pan, mix the condensed milk, coconut milk, butter, and grated coconut. Cook over medium heat, stirring constantly. As the mixture heats, it thickens into a creamy, golden paste. Imagine the scent of toasted coconut filling your kitchen—it’s heavenly! Keep stirring until it pulls away from the bottom of the pan, like a spoon brigadeiro. Once done, spread it evenly onto a platter. Pro tip: Use a spatula to smooth it out for an even layer.
Step 2: Preparing the Chocolate Layer
Melt the chocolate using a double boiler or microwave. If microwaving, heat it in 30-second intervals, stirring each time to avoid burning. Once melted, stir in the sour cream until the mixture is glossy and smooth. Picture the rich, velvety texture—it’s almost too tempting to eat straight from the bowl!
Step 3: Assembling the Dessert
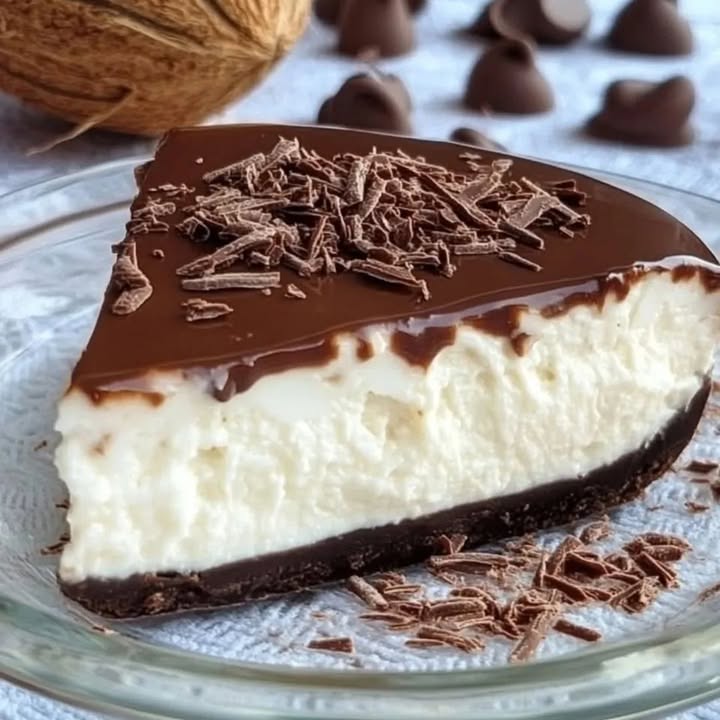
Pour the chocolate layer over the coconut base. Use a spatula to spread it evenly, ensuring every corner is covered. This step is where the magic happens—the contrast between the creamy coconut and silky chocolate is simply stunning. Chef’s tip: Gently tap the platter on the counter to remove air bubbles for a flawless finish.
Step 4: Final Touches
Refrigerate the dessert for at least 2 hours to let it set. When it’s firm, slice it into squares or rectangles. Feel free to decorate with coconut flakes or chocolate shavings for an extra touch of elegance. The first bite is pure bliss—trust me!
Timing Breakdown
- Prep Time: 20 minutes
- Chilling Time: 2 hours
- Total Time: 2 hours 20 minutes
Chef’s Secret
For an extra layer of flavor, toast the grated coconut lightly before adding it to the mixture. It adds a nutty aroma that takes this dessert to the next level.
Fun Fact About Coconut and Chocolate
Did you know that coconut is technically a fruit, not a nut? And chocolate comes from cacao beans, which are seeds. So, this dessert is basically a fruity-seed party in your mouth!
Necessary Equipment
- Saucepan
- Spatula
- Baking platter
- Mixing bowls
- Double boiler or microwave-safe bowl
Storage Tips
To store your Coconut Chocolate Bliss, keep it in an airtight container in the fridge. This prevents the chocolate from melting and keeps the coconut layer fresh. It stays good for up to 5 days, though I doubt it’ll last that long!
If you live in a hot climate, consider freezing small portions. Wrap them individually in parchment paper and store them in a freezer-safe bag. They’ll stay fresh for up to a month.
When serving leftovers, let the dessert sit at room temperature for about 10 minutes to soften slightly. This brings back its creamy texture and enhances the flavors.
Tips and Advice
- Use high-quality chocolate for the best results.
- Don’t rush the chilling process—patience pays off!
- If you’re serving kids, use milk chocolate for a sweeter taste.
Presentation Ideas
- Garnish with edible flowers for a fancy touch.
- Serve on a wooden board for a rustic vibe.
- Add colorful sprinkles for a fun, festive look.
Healthier Alternatives
Here are six ways to make this dessert healthier:
- Low-Sugar Option: Use sugar-free condensed milk and dark chocolate with at least 70% cocoa.
- Vegan Twist: Replace condensed milk with coconut cream and use dairy-free chocolate.
- Gluten-Free: Ensure all ingredients are certified gluten-free.
- Protein Boost: Add a scoop of vanilla protein powder to the coconut layer.
- Less Fat: Substitute butter with coconut oil.
- Fruit Infusion: Mix in dried fruits like cranberries or raisins for added flavor.
Mistake 1: Overcooking the Coconut Layer
One common mistake is cooking the coconut layer for too long, causing it to dry out. Stir constantly and remove it from heat as soon as it pulls away from the pan. Pro tip: Test a small spoonful—if it holds its shape, it’s ready.
Mistake 2: Rushing the Chilling Process
Skipping or shortening the chilling time can ruin the texture. Give it at least 2 hours to firm up properly. Patience ensures clean cuts and a satisfying bite.
Mistake 3: Using Low-Quality Chocolate
Cheap chocolate often contains fillers that affect the flavor and texture. Invest in good-quality chocolate for a smoother, richer result.
FAQ
Can I make this dessert ahead of time?
Absolutely! This dessert actually tastes better the next day as the flavors meld together. Just store it in the fridge and bring it to room temperature before serving.
Is this recipe kid-friendly?
Yes, kids love the sweet and creamy combination. You can adjust the sweetness by choosing milk chocolate instead of dark.
Can I freeze this dessert?
Yes, wrap individual pieces in parchment paper and freeze them in a sealed container. They’ll stay fresh for up to a month.
What’s the best way to cut it?
Use a sharp knife and wipe it clean between cuts for neat, even slices.
Can I add nuts?
Definitely! Crushed almonds or pistachios add a nice crunch to the coconut layer.
How do I prevent the chocolate from seizing?
Avoid water contamination while melting. Dry your utensils thoroughly and stir gently.
Can I use sweetened coconut?
Yes, but reduce the amount of condensed milk slightly to balance the sweetness.
What size platter should I use?
An 8×8-inch square pan works perfectly for this recipe.
How do I know when the coconut layer is done?
It’s ready when it thickens and pulls away from the sides of the pan easily.
Can I make it gluten-free?
Yes, ensure all ingredients are certified gluten-free, especially the chocolate.
Final Thoughts
This Coconut Chocolate Bliss is more than just a dessert—it’s a celebration of flavors, textures, and simplicity. Whether you’re baking for loved ones or treating yourself, it’s sure to bring joy to anyone who tries it. So grab your ingredients, put on some music, and enjoy the process. Happy baking!
Equipment
- Saucepan
- Spatula
- Baking platter
- Mixing bowls
- Double boiler or microwave-safe bowl
Ingredients
- 1 can condensed milk
- 200 ml coconut milk
- 1 tablespoon butter
- 1 cup grated coconut (fresh or unsweetened)
- 200 g dark or milk chocolate chopped
- 200 g sour cream 1 box
Instructions
- In a pan, mix the condensed milk, coconut milk, butter, and grated coconut. Cook over medium heat, stirring constantly until thickened.
- Spread the coconut mixture evenly onto a platter using a spatula.
- Melt the chocolate using a double boiler or microwave, stirring frequently to avoid burning.
- Stir in the sour cream until the chocolate mixture is glossy and smooth.
- Pour the chocolate layer over the coconut base and spread evenly.
- Refrigerate for at least 2 hours to let it set.
- Once firm, slice into squares or rectangles and decorate as desired.
Notes
Nutrition

Hi, I’m Olivia Parker, the founder of BakingSecret.com and a lifelong lover of all things sweet and homemade. I grew up in a small town in Oregon, where the smell of fresh cookies in my family’s kitchen sparked my passion for baking. Over the years, I turned that passion into a mission: to help home bakers feel confident, inspired, and creative.
After studying food science and working in several artisan bakeries across the U.S., I decided to create a space where everyone from beginners to seasoned bakers can find reliable recipes, expert tips, and a warm, welcoming community. BakingSecret.com is my way of sharing the magic of baking with the world. When I’m not testing new recipes, you’ll find me exploring farmers’ markets, collecting vintage cookbooks, or perfecting my sourdough technique.