
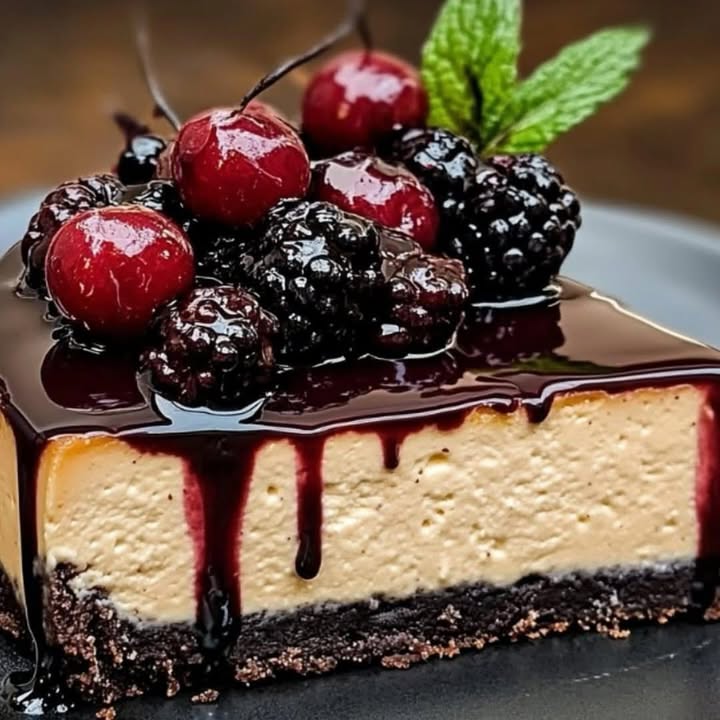
Chocolate Berry Cheesecake: A Dessert That Steals the Show
There’s something magical about cheesecake, isn’t there? Creamy, dreamy, and oh-so-versatile, it’s a dessert that never disappoints. But when you combine it with rich chocolate, tangy cream cheese, and a burst of fresh red fruits, you’ve got yourself a masterpiece. I first made this Chocolate Berry Cheesecake for my best friend’s birthday, and let me tell you—it was love at first bite. The creamy texture paired with the sweet-tart fruit topping had everyone asking for seconds (and thirds). If you’re looking for a dessert that’s as delightful to make as it is to eat, you’re in the right place.
The Story Behind This Cheesecake
Cheesecake has been around for centuries, with its origins tracing back to ancient Greece. But this modern twist—a Chocolate Berry Cheesecake—is all about indulgence with a fruity twist. I stumbled upon the idea while experimenting with leftover red fruits from a summer picnic. Cherries and blackberries were begging to be used, and pairing them with a rich chocolate base seemed like destiny. It’s a recipe that bridges tradition and innovation, making it perfect for both casual family dinners and fancy gatherings.
Why You’ll Love This Recipe
This cheesecake is a flavor bomb. The creamy cheesecake layer melts in your mouth, while the red fruit topping adds a refreshing tang. Plus, it’s surprisingly easy to make—even if you’re not a baking pro. The crushed Oreo base gives it a crunchy texture that complements the smooth filling beautifully. And let’s not forget how stunning it looks on the table. Whether you’re baking for yourself or impressing guests, this recipe is a winner.
Perfect Occasions to Prepare This Recipe
Need a show-stopping dessert for a dinner party? This Chocolate Berry Cheesecake is your answer. It’s also a hit at birthdays, holidays, or even cozy family movie nights. I once brought it to a potluck, and it disappeared within minutes. Trust me, this cheesecake is unforgettable.
Ingredients
Here’s what you’ll need to create this masterpiece:
For the Base:
- 1 pack of crushed Oreo cookies
- ½ cup of melted butter
For the Cheesecake:
- 450 g of softened cream cheese
- 1 cup of sugar
- 1 cup of whipped cream
- 3 eggs
- 1 teaspoon of vanilla extract
For the Red Fruit Topping:
- 1 cup of fresh cherries
- 1 cup of fresh blackberries
- ½ cup of sugar
- 1 tablespoon of cornstarch
- ½ cup of water
Substitution Options
No Oreo cookies? Use any chocolate sandwich cookies. If you’re out of fresh cherries or blackberries, frozen ones work just fine—just thaw them first. For a dairy-free version, swap the cream cheese with a plant-based alternative and use coconut oil instead of butter. If you’re cutting back on sugar, try a sugar substitute like stevia or monk fruit.
Step 1: Prepare the Base
Let’s start with the foundation of our cheesecake. Mix the crushed Oreos with melted butter until it resembles wet sand. Press this mixture firmly into the bottom of a removable mold. Pro tip: Use the back of a spoon or a glass to press it down evenly. Pop it in the fridge to chill while you prepare the filling. This step sets the stage for the creamy goodness to come.
Step 2: Make the Cheesecake
In a large bowl, beat the softened cream cheese with sugar until it’s smooth and creamy. Add the eggs one by one, mixing gently after each addition. Then fold in the whipped cream and vanilla extract. The batter should be silky and luscious. Pour this heavenly mixture over the chilled crust. Chef’s tip: Don’t overmix the batter; it can make the cheesecake dense instead of light and airy.
Step 3: Bake
Preheat your oven to 160°C (320°F). Bake the cheesecake for 50-60 minutes. You’ll know it’s done when the center is set but still slightly jiggly. Let it cool completely before unmolding. Pro tip: To avoid cracks, turn off the oven and leave the cheesecake inside with the door slightly ajar for 10 minutes after baking.
Step 4: Prepare the Topping
In a saucepan, combine the cherries, blackberries, sugar, cornstarch, and water. Cook over medium heat, stirring constantly, until the mixture thickens (about 5-7 minutes). Let it cool before spreading it over the cheesecake. This vibrant topping adds a pop of color and a burst of flavor that ties everything together.
Step 5: Assemble and Serve
Once the cheesecake and topping are ready, it’s time to bring it all together. Spread the red fruit mixture evenly over the cooled cheesecake. Feel free to decorate with extra fresh fruits for an Instagram-worthy finish. Slice, serve cold, and watch the smiles unfold.
Timing
Prep Time: 20 minutes
Cooking Time: 60 minutes
Resting Time: 1 hour (cooling)
Total Time: 1 hour 30 minutes
Chef’s Secret
For an extra-rich flavor, add a tablespoon of cocoa powder to the cheesecake batter. It enhances the chocolate notes without overpowering the other flavors.
Extra Info
Did you know that blackberries are packed with antioxidants? They’re not just delicious—they’re good for you too! Combining them with cherries makes this cheesecake not only a treat for your taste buds but also a nutritious option.
Necessary Equipment
You’ll need a removable-bottom cake pan, a mixing bowl, an electric mixer, a saucepan, and a spatula. Simple tools for a spectacular result!
Storage
This cheesecake keeps well in the fridge for up to 3 days. Store it in an airtight container to maintain freshness. If you want to freeze it, wrap individual slices in plastic wrap and store them in a freezer-safe bag. Thaw in the fridge overnight before serving.
For short-term storage, keep it covered with cling film to prevent it from absorbing odors from the fridge. Always serve it cold to enjoy the full texture and flavor.
If you live in a warm climate, consider storing it in the coldest part of your fridge to avoid melting or softening.
Tips and Advice
To ensure your cheesecake turns out perfectly, always use room-temperature ingredients. Cold cream cheese can lead to lumpy batter. Also, don’t skip the cooling step—it’s crucial for setting the texture.
Presentation Tips
Garnish with mint leaves or edible flowers for a touch of elegance. Serve on a decorative plate with a dusting of powdered sugar for a professional look.
Healthier Alternative Recipes
Here are six variations to make this cheesecake healthier:
- Low-Sugar Version: Replace sugar with a sugar substitute.
- Vegan Option: Use plant-based cream cheese and butter.
- Gluten-Free Base: Swap Oreos for gluten-free cookies.
- Protein-Packed: Add a scoop of protein powder to the batter.
- Fat-Free: Use low-fat cream cheese and yogurt.
- No-Bake: Skip the oven and use gelatin to set the filling.
Mistake 1: Overmixing the Batter
Overmixing incorporates too much air, leading to cracks during baking. Mix gently until just combined to avoid this pitfall. Pro tip: Use a spatula for the final mix to minimize air bubbles.
Mistake 2: Skipping the Water Bath
A water bath helps the cheesecake bake evenly. Without it, the edges can overcook while the center remains underdone. Place your pan in a larger dish filled with hot water for best results.
Mistake 3: Rushing the Cooling Process
Patience is key! Let the cheesecake cool gradually to prevent cracking. Avoid placing it directly in the fridge right after baking.
FAQ
Can I use frozen fruits?
Yes, frozen fruits work well. Just thaw and drain excess liquid before using them in the topping.
How do I prevent cracks?
Avoid overmixing, use a water bath, and cool the cheesecake slowly to minimize cracking.
Can I make this ahead?
Absolutely! This cheesecake can be made a day in advance and stored in the fridge.
What can I substitute for Oreos?
Any chocolate sandwich cookie will work. Crush them finely for the best texture.
Is this recipe kid-friendly?
Yes, kids love the creamy texture and fruity topping. Just omit any alcohol if adding flavor extracts.
Can I freeze leftovers?
Yes, wrap slices individually and freeze for up to a month.
How do I know when it’s done?
The edges should be set, and the center slightly jiggly but not liquid.
What size pan should I use?
A 9-inch removable-bottom pan is ideal for this recipe.
Can I add chocolate chips?
Definitely! Fold mini chocolate chips into the batter for extra indulgence.
What’s the best way to slice it?
Use a sharp knife dipped in hot water for clean, smooth cuts.
Final Thoughts
This Chocolate Berry Cheesecake is more than just a dessert—it’s an experience. From the creamy filling to the vibrant fruit topping, every bite is a celebration of flavors. Whether you’re baking for loved ones or treating yourself, this recipe is sure to become a favorite. So grab your apron, gather your ingredients, and get ready to wow everyone with this irresistible creation. Happy baking!
Equipment
- Removable-bottom cake pan
- Mixing bowl
- Electric mixer
- Saucepan
- Spatula
Ingredients
- 1 pack Crushed Oreo cookies
- ½ cup Melted butter
- 450 g Softened cream cheese
- 1 cup Sugar
- 1 cup Whipped cream
- 3 Eggs
- 1 tsp Vanilla extract
- 1 cup Fresh cherries
- 1 cup Fresh blackberries
- ½ cup Sugar (for topping)
- 1 tbsp Cornstarch
- ½ cup Water
Instructions
- Mix the crushed Oreos with melted butter until it resembles wet sand and press it into the bottom of a removable mold. Chill in the fridge.
- Beat the softened cream cheese with sugar until smooth. Add eggs one by one, then fold in whipped cream and vanilla extract. Pour over the chilled crust.
- Preheat oven to 160°C (320°F) and bake for 50-60 minutes until the center is slightly jiggly. Cool completely before unmolding.
- In a saucepan, combine cherries, blackberries, sugar, cornstarch, and water. Cook until thickened (5-7 minutes). Allow to cool.
- Spread the red fruit mixture over the cooled cheesecake, decorate with extra fruits if desired, slice, and serve cold.
Notes
Nutrition

Hi, I’m Olivia Parker, the founder of BakingSecret.com and a lifelong lover of all things sweet and homemade. I grew up in a small town in Oregon, where the smell of fresh cookies in my family’s kitchen sparked my passion for baking. Over the years, I turned that passion into a mission: to help home bakers feel confident, inspired, and creative.
After studying food science and working in several artisan bakeries across the U.S., I decided to create a space where everyone from beginners to seasoned bakers can find reliable recipes, expert tips, and a warm, welcoming community. BakingSecret.com is my way of sharing the magic of baking with the world. When I’m not testing new recipes, you’ll find me exploring farmers’ markets, collecting vintage cookbooks, or perfecting my sourdough technique.