
Why You’ll Love This No-Bake Raffaello Cake
Let me tell you about the time I discovered the magic of a No-Bake Raffaello Cake. It was a hot summer afternoon, and the thought of turning on my oven felt like signing up for a sweat marathon. Then it hit me—what if I could make something creamy, dreamy, and utterly delicious without breaking a sweat? Enter this coconutty delight. With its buttery crust, luscious cream cheese filling, and topping that’s pure eye candy, this cake became an instant hit at family gatherings. Trust me, once you try it, you’ll be hooked.
The Story Behind the No-Bake Raffaello Cake
The inspiration for this recipe comes from the beloved Raffaello chocolate balls. These little coconut-covered gems are a treat many of us grew up loving. Turning them into a cake just feels like giving them a VIP upgrade. While traditional cakes often involve layers of baking precision, this no-bake version is all about simplicity and indulgence. Over the years, I’ve tweaked the recipe to make it even easier while keeping that signature tropical flair. It’s perfect for anyone who loves coconut but doesn’t have hours to spend in the kitchen.
Why You’ll Fall Head Over Heels for This Recipe
First off, let’s talk flavor. The combination of rich cream cheese, sweet coconut, and buttery biscuit crumbs is like a party in your mouth. Second, there’s no oven involved, which means less heat and more chill. Finally, it’s a crowd-pleaser. Whether you’re serving it to kids or adults, everyone will rave about how smooth, creamy, and downright irresistible it is. Plus, it’s easy enough for beginner bakers to nail on their first try.
When to Whip Up This No-Bake Raffaello Cake
This cake is perfect for summer potlucks, birthday celebrations, or even as a last-minute dessert when unexpected guests drop by. It’s also a lifesaver during holidays when oven space is precious. Imagine bringing this beauty to a picnic or a cozy family dinner—it’s bound to steal the show.
Ingredients List
- For the crust:
- 100 g butter
- 120 g butter cookies
- 3 tablespoons of coconut flakes (approx. 20g)
- For the filling:
- 500 g double cream cheese
- 50 g sugar
- 10 coconut balls
- 2 tablespoons of coconut flakes (approx. 15g)
- 1 teaspoon vanilla extract
- 250 g cream
- 2 packs of whipped cream stabilizer
- For garnish:
- 150 g cream
- 10 coconut balls
- 1 tablespoon of coconut flakes
Substitution Options
Don’t have all the ingredients? No worries! Here are some swaps:
- Use digestive biscuits instead of butter cookies for the crust.
- Swap double cream cheese with mascarpone for a slightly tangier taste.
- If you can’t find coconut balls, chop up regular chocolate and mix in extra coconut flakes.
- Replace whipped cream stabilizer with gelatin if needed.
Step 1: Prepare the Crust
Start by lining the bottom of a springform pan (Ø 20 cm) with baking paper. Melt the butter in a small saucepan over low heat. Grab your butter cookies and crush them into fine crumbs using either a food processor or a sturdy freezer bag and rolling pin. Mix the crumbs, coconut flakes, and melted butter in a bowl until everything sticks together like wet sand. Press the mixture firmly onto the base of the pan using the bottom of a drinking glass for an even layer. Pop it in the fridge to firm up while you tackle the next steps.
Step 2: Make the Creamy Filling
In a large mixing bowl, combine the cream cheese, sugar, entire coconut balls, coconut flakes, and vanilla extract. Use a hand mixer to blend everything until smooth and velvety. In another bowl, whip the cream with the stabilizer until stiff peaks form. Gently fold the whipped cream into the cream cheese mixture, ensuring not to deflate it. Pour this heavenly concoction over the chilled crust and spread it evenly. Place the cake back in the fridge for at least two hours to set.
Step 3: Add the Final Touches
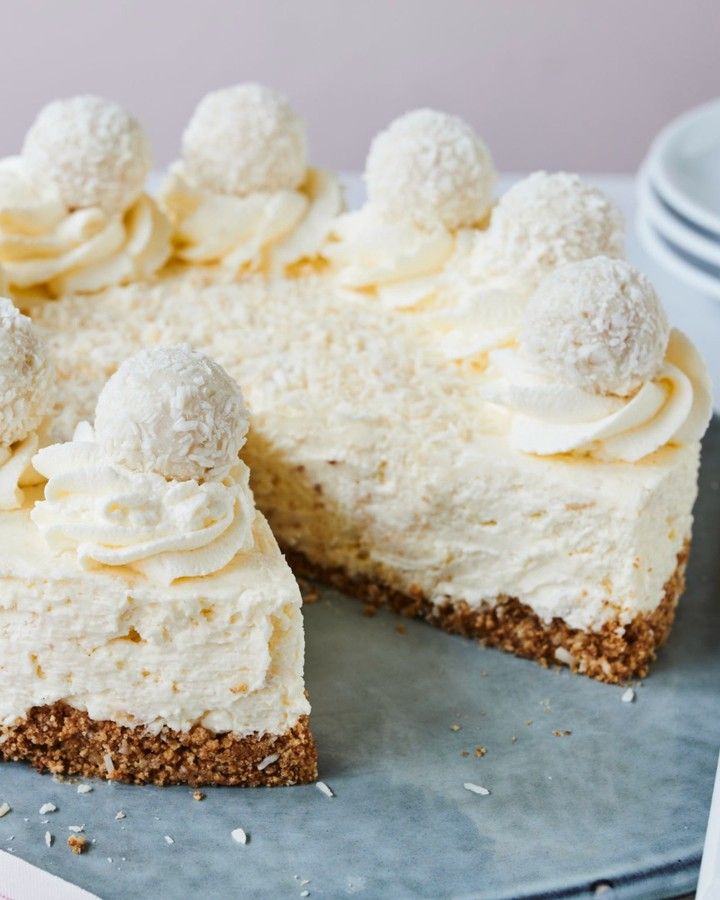
Whip the remaining cream until stiff and transfer it to a piping bag fitted with a star nozzle (about Ø 12 mm). Carefully run a knife around the edges of the springform pan to loosen the cake before removing the ring. Slide dollops of whipped cream around the surface, creating a decorative border. Top it off with whole coconut balls and a sprinkle of coconut flakes for that finishing touch. Chill the cake until you’re ready to serve.
Timing Breakdown
- Prep Time: 30 minutes
- Chilling Time: At least 2 hours
- Total Time: Approximately 2.5 hours
Chef’s Secret
For an extra burst of flavor, toast the coconut flakes lightly before adding them to the crust or garnish. This adds a subtle nuttiness that elevates the entire dessert.
Did You Know?
Coconut has been prized for centuries not only for its taste but also for its versatility. From hydrating coconut water to rich coconut milk, this tropical fruit is a true kitchen superstar.
Necessary Equipment
To make this cake, you’ll need:
- A springform pan (Ø 20 cm)
- A hand mixer or stand mixer
- A piping bag with a star nozzle
- A rolling pin or food processor for crushing cookies
Storage Tips
Once assembled, store the cake in the refrigerator. Cover it with plastic wrap or place it in an airtight container to prevent it from absorbing odors. It stays fresh for up to two days, though I doubt it’ll last that long!
If you live in a warm climate, keep the cake away from direct sunlight or heat sources. For longer storage, freeze individual slices wrapped tightly in foil. Thaw them overnight in the fridge before serving.
Lastly, always bring the cake to room temperature for about 15 minutes before slicing. This ensures the flavors shine through and the texture remains creamy.
Tips and Advice
Here are a few tricks to take your No-Bake Raffaello Cake to the next level:
- Use high-quality cream cheese for a richer taste.
- Chill your mixing bowls and beaters before whipping the cream—it helps achieve stiffer peaks.
- Be gentle when folding the whipped cream into the filling to maintain its lightness.
Presentation Ideas
Serve your cake on a rustic wooden board for a chic look. Garnish with edible flowers or gold leaf for special occasions. Alternatively, drizzle melted white chocolate over the top for added elegance.
Healthier Alternatives
Want to lighten things up? Try these variations:
- Low-Sugar Version: Replace sugar with a sugar substitute like stevia or monk fruit.
- Vegan Twist: Use plant-based cream cheese and coconut cream instead of dairy.
- Gluten-Free Option: Swap butter cookies with gluten-free biscuits.
- Protein-Packed: Add a scoop of vanilla protein powder to the filling.
- Fruit Infusion: Layer thinly sliced strawberries between the filling and crust.
- Dairy-Free Delight: Substitute cream with coconut yogurt for a tangy twist.
Common Mistakes to Avoid
Mistake 1: Skipping the Chilling Step
Rushing the process by skipping the chilling time will leave you with a soggy mess. The fridge sets the layers, so patience pays off here. Pro tip: Set a timer to remind yourself when it’s ready.
Mistake 2: Overmixing the Whipped Cream
Overmixing turns whipped cream grainy and deflated. Stop as soon as you see soft peaks forming. A quick visual check saves the day every time.
Mistake 3: Not Crushing the Cookies Fine Enough
Large chunks in the crust make it crumbly and hard to slice. Aim for sand-like consistency for a sturdy base.
FAQs
Can I use store-bought coconut flakes?
Absolutely! Just ensure they’re unsweetened unless you want an overly sugary crust.
How do I know if my cream is stiff enough?
When you lift the beaters, the cream should hold its shape without drooping. If it falls back into the bowl, keep whipping for another minute.
Can I freeze this cake?
Yes, wrap individual slices tightly in plastic wrap and foil. Freeze for up to one month. Thaw in the fridge before serving.
What size pan should I use?
A standard 8-inch (20 cm) springform pan works best. Using a larger pan may result in thinner layers.
Is this cake kid-friendly?
Definitely! Kids love the creamy texture and sweet coconut flavor. Plus, it’s fun to decorate.
Can I add other flavors?
Sure thing! Try adding a hint of almond extract or a splash of rum for a grown-up twist.
Why does my crust crumble?
You might need more melted butter to bind the crumbs. Add a teaspoon at a time until the mixture holds together.
Can I make this ahead of time?
Yes, it’s perfect for making a day in advance. Just keep it chilled until ready to serve.
What tools do I need?
A hand mixer, springform pan, and piping bag are essential. Don’t forget a good knife for slicing cleanly.
How many servings does this make?
This recipe yields about 12 generous slices, ideal for sharing with friends and family.
Final Thoughts
There’s something magical about a dessert that requires zero baking yet tastes like pure luxury. This No-Bake Raffaello Cake is proof that simple ingredients can create extraordinary results. Whether you’re a seasoned baker or a newbie in the kitchen, this recipe is sure to become a favorite. So grab those ingredients, channel your inner chef, and treat yourself—and others—to a slice of paradise.
Equipment
- Springform pan (Ø 20 cm)
- Hand mixer or stand mixer
- Piping bag with star nozzle
- Rolling pin or food processor
Ingredients
- 100 g butter
- 120 g butter cookies
- 3 tablespoons coconut flakes approx. 20g
- 500 g double cream cheese
- 50 g sugar
- 10 unit coconut balls
- 2 tablespoons coconut flakes approx. 15g
- 1 teaspoon vanilla extract
- 250 g cream
- 2 packs whipped cream stabilizer
Instructions
- Line the bottom of a springform pan (Ø 20 cm) with baking paper and melt the butter in a small saucepan over low heat.
- Crush the butter cookies into fine crumbs using a food processor or a rolling pin in a freezer bag.
- Mix the crumbs, coconut flakes, and melted butter in a bowl until the mixture holds together, then press it firmly into the base of the pan.
- Chill the crust in the fridge while preparing the filling.
- In a large mixing bowl, combine cream cheese, sugar, coconut balls, coconut flakes, and vanilla extract, blending until smooth.
- Whip the cream with the stabilizer in another bowl until stiff peaks form, then gently fold it into the cream cheese mixture.
- Pour the filling over the chilled crust and spread it evenly.
- Chill the cake in the fridge for at least two hours to set.
- Whip the remaining cream until stiff, then use a piping bag to decorate the top of the cake.
- Garnish with coconut balls and a sprinkle of coconut flakes before chilling until ready to serve.
Notes
Store assembled cake in the fridge covered to maintain freshness; it lasts up to two days.
For variety, try adding almond extract or a splash of rum to the filling for a different flavor profile.
Feel free to use substitutes for dietary needs, such as gluten-free biscuits for crust or plant-based cream cheese.
Nutrition

Hi, I’m Olivia Parker, the founder of BakingSecret.com and a lifelong lover of all things sweet and homemade. I grew up in a small town in Oregon, where the smell of fresh cookies in my family’s kitchen sparked my passion for baking. Over the years, I turned that passion into a mission: to help home bakers feel confident, inspired, and creative.
After studying food science and working in several artisan bakeries across the U.S., I decided to create a space where everyone from beginners to seasoned bakers can find reliable recipes, expert tips, and a warm, welcoming community. BakingSecret.com is my way of sharing the magic of baking with the world. When I’m not testing new recipes, you’ll find me exploring farmers’ markets, collecting vintage cookbooks, or perfecting my sourdough technique.