
Why This Banana Split Cheesecake Cake is a Showstopper
There’s something magical about combining the gooey richness of cheesecake with the playful sweetness of banana split flavors. I remember the first time I made this Banana Split Cheesecake Cake for my family—it was at my niece’s birthday party, and let me tell you, it stole the show. The kids were mesmerized by the colorful toppings, and the adults couldn’t stop raving about how creamy and dreamy each bite was. If you’re looking for a dessert that’s as fun to make as it is to eat, this recipe is your golden ticket.
The Story Behind This Sweet Creation
The classic banana split has been around since 1904 when it was invented by a young soda jerk in Pennsylvania. Fast forward to today, and its flavors have inspired countless desserts. This Banana Split Cheesecake Cake is my modern twist on tradition—a fusion of cake, cheesecake, and all the fruity, nutty goodness you’d expect from a banana split. It’s like taking a trip down memory lane while adding a touch of elegance for special occasions.
Why You’ll Fall in Love with This Recipe
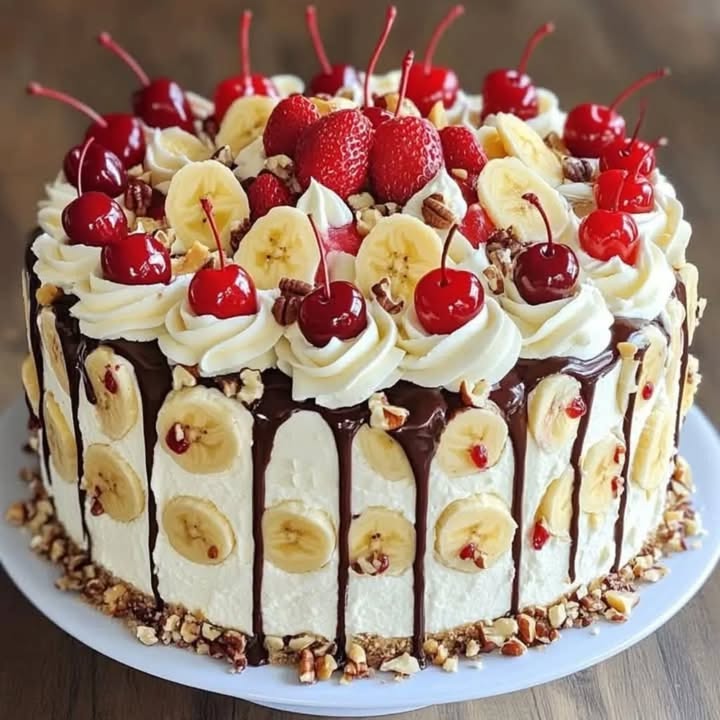
What makes this cake so irresistible? For starters, it’s got layers upon layers of flavor. The moist yellow cake infused with bananas provides a soft base, while the creamy cheesecake layer adds a luxurious texture. Top it off with fresh whipped cream, juicy pineapple, strawberries, chocolate drizzle, and crunchy nuts, and you’ve got a dessert that’s as pleasing to the eyes as it is to the palate. Plus, it’s surprisingly simple to make—no fancy techniques required!
Perfect Occasions to Whip Up This Dessert
This Banana Split Cheesecake Cake is perfect for birthdays, anniversaries, or even just because. Imagine serving it at a summer barbecue—the bright colors and refreshing fruits will be a hit. Or picture it as the centerpiece of your holiday dessert table. Honestly, any time you want to impress your guests (or treat yourself), this cake fits the bill.
Ingredients You’ll Need
Let’s get down to business! Here’s what you’ll need to create this masterpiece:
For the Cake:
- 1 box yellow cake mix + ingredients listed on the package
- 2 large, ripe bananas
For the Cheesecake Layer:
- 450 g softened cream cheese (about 2 packages)
- 1 cup granulated sugar
- 1 teaspoon vanilla extract
- 2 large eggs
- 1/2 cup sour cream
For Whipped Cream Coverage:
- 2 cups heavy whipping cream
- 1/2 cup powdered sugar
- 1 teaspoon vanilla extract
For Topping:
- 1 cup drained pineapple chunks
- 1 cup sliced strawberries
- 1/2 cup chocolate syrup
- 1/4 cup chopped nuts (walnuts work great)
- Marraschino cherries for garnish
Substitution Options
Not everyone has every ingredient on hand, and that’s okay! Here are some easy swaps:
- If you don’t have yellow cake mix, use vanilla or butter cake instead.
- Swap out pineapple for mango or kiwi if you prefer tropical vibes.
- Use almond extract instead of vanilla for a nuttier flavor profile.
- Vegan? Try dairy-free cream cheese and plant-based whipped cream.
Step-by-Step Preparation
Step 1: Bake the Yellow Cake Layers
Preheat your oven to 180°C (350°F) and grease two round pans. Mix up the yellow cake batter according to the package instructions, then mash those ripe bananas right into the mix. Bananas add natural sweetness and moisture, making the cake extra tender. Divide the batter evenly between the pans and pop them in the oven for 25–30 minutes. Insert a toothpick to check if they’re done—it should come out clean. Let the cakes cool completely before moving on.
Pro tip: Wrinkly, brown-spotted bananas are best here; they’re sweeter and easier to mash.
Step 2: Make the Cheesecake Layer
Lower the oven temp to 160°C (325°F). In a mixing bowl, beat the cream cheese until smooth and creamy. Add sugar and vanilla, blending until combined. Crack in the eggs one at a time, mixing gently to avoid air bubbles. Stir in the sour cream for added tanginess, then pour the mixture into a lined pan. Bake for 45–50 minutes until set but still slightly jiggly in the center. Cool, then chill in the fridge for at least 4 hours. Patience pays off here!
Step 3: Assemble the Cake
Place one cake layer on a serving plate. Carefully slide the chilled cheesecake layer on top, followed by the second cake layer. Take your time stacking everything neatly—it’ll make frosting easier later.
Step 4: Whip Up the Cream
In a large bowl, whip the heavy cream, powdered sugar, and vanilla until stiff peaks form. Spread this dreamy topping over the entire cake, smoothing it out with a spatula. Don’t worry about perfection; rustic swirls look charming too.
Step 5: Decorate Like a Pro
Now comes the fun part! Arrange pineapple chunks, strawberry slices, and chopped nuts on top. Drizzle generously with chocolate syrup and finish with a few shiny marraschino cherries for flair. Stand back and admire your edible artwork.
Chef’s Tip: Chill the assembled cake for 30 minutes before slicing. It helps the layers stay intact and makes serving a breeze.
Timing Breakdown
Here’s how long you’ll need to bring this beauty to life:
- Prep Time: 30 minutes
- Cooking Time: 1 hour 20 minutes (cake + cheesecake)
- Resting Time: 4+ hours (chilling cheesecake)
- Total Time: About 6 hours (mostly hands-off)
Chef’s Secret
To prevent the cheesecake from cracking, avoid opening the oven door while it bakes. Sudden temperature changes can cause cracks, and we want our cheesecake layer smooth and flawless.
Extra Info
Did you know bananas release ethylene gas as they ripen? That’s why storing them near other fruits speeds up the process. For this recipe, grab bananas that are already spotty—they’re perfect for baking.
Necessary Equipment
You won’t need anything fancy, just these kitchen essentials:
- Two 20 cm round cake pans
- Mixing bowls
- Electric mixer or whisk
- Spatula
- Parchment paper
Storage Tips
Once assembled, store the cake in the refrigerator to keep it fresh. Cover it loosely with plastic wrap or an airtight container. The cold helps the flavors meld together beautifully.
If you have leftovers, slice individual portions and freeze them in airtight containers. They’ll last up to 3 months. Just thaw overnight in the fridge before enjoying.
For optimal taste, serve within 2–3 days. After that, the fruit toppings might start losing their vibrancy, though the cake will still be delicious.
Tips and Advice
- Use room-temperature ingredients for the cheesecake layer to ensure a smooth consistency.
- Don’t skip chilling the cheesecake—it firms up during this time.
- When decorating, less is more. Overloading the toppings can overwhelm the delicate balance of flavors.
Presentation Ideas
- Serve on a decorative platter with a sprinkle of powdered sugar around the edges.
- Add a sprig of mint for a pop of green against the vibrant fruits.
- Write “Happy Birthday” or another message with chocolate syrup for a personalized touch.
Healthier Alternatives
Want to lighten things up? Try these variations:
- Gluten-Free Option: Use gluten-free cake mix and cornstarch-thickened whipped cream.
- Low-Sugar Version: Substitute sugar with stevia or monk fruit sweetener.
- Dairy-Free Delight: Swap cream cheese and sour cream for vegan alternatives.
- Fruit-Only Toppings: Skip the chocolate syrup and focus on fresh fruits.
- Mini Cakes: Portion into smaller cakes for portion control.
- Whole Grain Base: Replace yellow cake with whole wheat or oat flour blend.
Common Mistakes to Avoid
Mistake 1: Overmixing the Cheesecake Batter
Overmixing introduces too much air, which can lead to cracks during baking. Mix just until the ingredients are combined, and always scrape down the sides of the bowl.
Mistake 2: Skipping the Cooling Step
Rushing the cooling process can cause the cheesecake layer to become soggy or uneven. Always let it chill properly before assembling.
Mistake 3: Using Underripe Bananas
Green bananas lack the sweetness needed for this recipe. Stick to ripe ones for the best flavor and texture.
Mistake 4: Not Greasing the Pans Properly
A stuck cake is a sad cake. Make sure to grease and line your pans thoroughly to avoid any disasters.
Mistake 5: Overloading the Whipped Cream
Too much sugar can weigh down the whipped cream, leaving it flat instead of fluffy. Stick to the recommended amount.
FAQs About Banana Split Cheesecake Cake
Can I make this cake ahead of time?
Absolutely! You can prepare the components a day in advance and assemble the cake the next day. Just keep everything refrigerated.
How do I prevent the whipped cream from deflating?
Make sure your bowl and beaters are cold before whipping the cream. Also, don’t overbeat it once stiff peaks form.
Can I use frozen fruit for the toppings?
Yes, but thaw and drain them first to avoid excess liquid ruining the presentation.
What if I don’t have sour cream?
Greek yogurt is a great substitute for sour cream in both the cheesecake and whipped cream layers.
Is this cake kid-friendly?
Definitely! Kids love the combination of fruity toppings and creamy textures. Just omit the nuts if there are allergies.
Can I double the recipe?
Yes, simply adjust the quantities and use larger pans. Keep an eye on baking times if increasing the size.
How do I transport this cake safely?
Chill it well, then place it in a sturdy cake carrier. Secure the lid tightly to prevent shifting.
Why does my cheesecake taste eggy?
Eggy flavor often happens when the eggs aren’t fully incorporated. Beat slowly and thoroughly to distribute them evenly.
Can I use homemade cake instead of boxed mix?
Of course! A homemade yellow cake will elevate the flavor even further.
What if I forget the vanilla extract?
Vanilla enhances the overall flavor, but the cake will still taste great without it. Consider adding almond extract as a backup.
Final Thoughts
This Banana Split Cheesecake Cake is more than just a dessert—it’s a celebration of flavors, textures, and creativity. Whether you’re baking for loved ones or treating yourself, this recipe promises joy in every bite. So grab those bananas, fire up the oven, and let’s create something truly unforgettable.
Equipment
- Mixing bowls
- Electric mixer or whisk
- Spatula
- 2 20 cm round cake pans
- Parchment paper
Ingredients
- 1 box yellow cake mix plus ingredients listed on the package
- 2 large ripe bananas
- 450 g softened cream cheese about 2 packages
- 1 cup granulated sugar
- 1 teaspoon vanilla extract
- 2 large eggs
- 1/2 cup sour cream
- 2 cups heavy whipping cream
- 1/2 cup powdered sugar
- 1 teaspoon vanilla extract
- 1 cup drained pineapple chunks
- 1 cup sliced strawberries
- 1/2 cup chocolate syrup
- 1/4 cup chopped nuts walnuts work great
- to taste maraschino cherries for garnish
Instructions
- Preheat your oven to 180°C (350°F) and grease two round pans.
- Mix the yellow cake batter according to the package instructions and mash the ripe bananas into the mix.
- Divide the batter evenly between the pans and bake for 25-30 minutes. Check with a toothpick.
- After baking, let the cakes cool completely.
- Lower the oven temp to 160°C (325°F) and beat the cream cheese until smooth.
- Add sugar and vanilla, then mix in the eggs one at a time without incorporating too much air.
- Stir in the sour cream and pour the mixture into a lined pan. Bake for 45-50 minutes until set but slightly jiggly.
- Cool and chill the cheesecake layer in the fridge for at least 4 hours.
- Place one cake layer on a serving plate, top with the chilled cheesecake layer, then add the second cake layer.
- Whip the heavy cream, powdered sugar, and vanilla until stiff peaks form, then spread over the cake.
- Decorate with pineapple chunks, strawberry slices, and chopped nuts, drizzle with chocolate syrup, and add maraschino cherries on top.
- Chill the assembled cake for 30 minutes before slicing.
Notes
Nutrition

Hi, I’m Olivia Parker, the founder of BakingSecret.com and a lifelong lover of all things sweet and homemade. I grew up in a small town in Oregon, where the smell of fresh cookies in my family’s kitchen sparked my passion for baking. Over the years, I turned that passion into a mission: to help home bakers feel confident, inspired, and creative.
After studying food science and working in several artisan bakeries across the U.S., I decided to create a space where everyone from beginners to seasoned bakers can find reliable recipes, expert tips, and a warm, welcoming community. BakingSecret.com is my way of sharing the magic of baking with the world. When I’m not testing new recipes, you’ll find me exploring farmers’ markets, collecting vintage cookbooks, or perfecting my sourdough technique.