
Why This Braided Sweet Bread Is a Must-Try
There’s something magical about the smell of freshly baked bread wafting through the house. It feels like a warm hug, doesn’t it? I remember making this Braided Sweet Bread for the first time on a lazy Sunday morning. My kitchen turned into a bakery, and my family couldn’t resist the aroma. Soft, spongy, and oh-so-delicious, this sweet bread is perfect with coffee or hot chocolate. Whether you’re a seasoned baker or just starting out, this recipe will make you feel like a pro.
The Story Behind This Sweet Treat
Sweet breads have been around for centuries, with roots in many cultures. From challah in Jewish traditions to panettone in Italy, braided breads often symbolize unity and celebration. My version is inspired by these classics but simplified for busy home cooks. I tested this recipe multiple times (yes, my neighbors got plenty of samples!) until I found the perfect balance of sweetness and fluffiness. It’s become a staple at family gatherings, especially during holidays.
Why You’ll Love This Recipe
This Braided Sweet Bread is all about simplicity and flavor. The dough is easy to work with, and the result is a bread that’s light, airy, and bursting with sweetness. Plus, the braiding process is fun—almost therapeutic! Kids love helping with this part, and it makes the bread look fancy without much effort. Whether you’re baking for breakfast or dessert, this recipe will impress everyone at the table.
Perfect Occasions to Bake This Sweet Bread
This bread is versatile. Serve it as a weekend breakfast treat, bring it to brunch with friends, or gift it during the holidays. It’s also a hit at potlucks or tea parties. I once brought this bread to a book club meeting, and it disappeared within minutes. Everyone loved how soft and flavorful it was!
Ingredients List
- 650 g of wheat flour (plus 100 g extra for dusting)
- 250 g of sugar
- 200 ml of milk
- 100 ml of water
- 100 g of butter
- 2 eggs (1 for dough, 1 for brushing)
- 1 tablespoon instant yeast
- A pinch of salt
Substitution Options
If you don’t have wheat flour, all-purpose flour works fine. For a dairy-free version, swap butter with margarine or coconut oil. Instead of regular sugar, try honey or maple syrup for a different sweetness profile. If you’re out of milk, almond or oat milk can step in without compromising texture.
Step 1: Prepare the Dough
In a large mixing bowl, combine the milk, sugar, one egg, softened butter, and flour. Gradually add water while stirring until the mixture comes together into a smooth dough. Knead it for about a minute—it should feel soft and slightly sticky. Sprinkle in the instant yeast and give it another quick knead. Pro tip: Use lukewarm milk to activate the yeast faster.
Step 2: Let It Rest
Cover the dough with a clean kitchen towel and let it rest for 20 minutes. Afterward, knead it again briefly and let it sit for another 20 minutes. Repeat this process three times total. This resting method ensures your Braided Sweet Bread turns out super soft and spongy. Chef’s tip: Keep the dough in a warm spot to help it rise better.
Step 3: Form the Braid
Divide the rested dough into three equal parts. Roll each piece into long strips, pressing gently from the center outward to create even thickness. Lay the strips side by side and braid them carefully, starting from the top. Don’t press too hard—keep the braid loose for a beautiful finish. Cover it and let it rest for 10-15 minutes before baking.
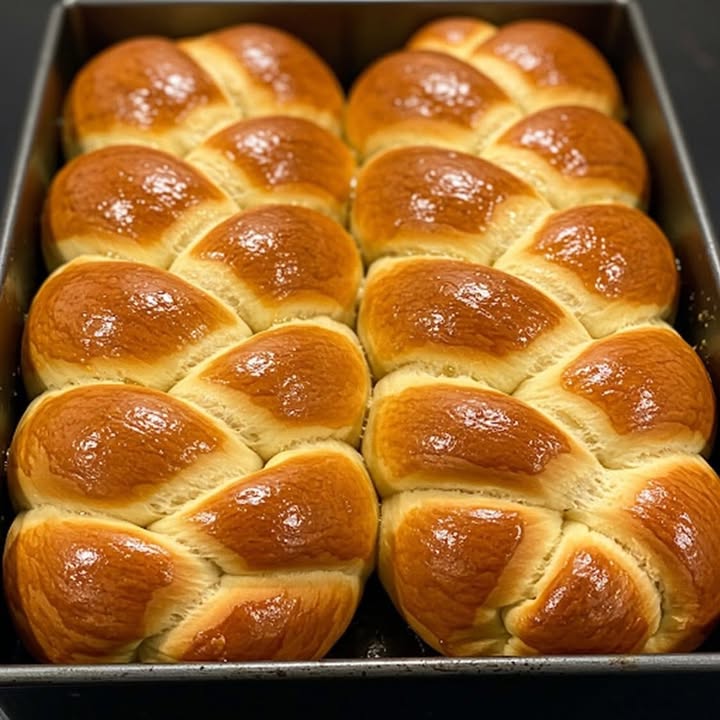
Step 4: Paint and Bake
Place the braided dough on a lined baking tray. Beat the remaining egg with a splash of water and brush it evenly over the bread. This gives it a gorgeous golden sheen once baked. Preheat your oven to 230°C (446°F) so it’s nice and hot when you slide the tray in. Bake for 30-35 minutes, reducing the temperature to 180-200°C halfway through to prevent burning.
Step 5: Cool and Enjoy
Once your Braided Sweet Bread is golden brown and smells heavenly, take it out of the oven. Let it cool completely on a wire rack before slicing. Trust me, waiting is hard, but it helps the flavors settle. Slice it up and serve with coffee, tea, or hot chocolate for an unforgettable treat.
Timing Breakdown
- Preparation Time: 30 minutes
- Resting Time: 1 hour
- Baking Time: 30-35 minutes
- Total Time: 1 hour 30 minutes
Chef’s Secret
To enhance the flavor, add a teaspoon of vanilla extract to the dough. It adds a subtle richness that pairs beautifully with the sweetness of the bread.
Extra Info
Did you know that braiding bread not only makes it look pretty but also helps it bake evenly? The twists allow heat to circulate better, ensuring every bite is perfectly cooked.
Necessary Equipment
- Large mixing bowl
- Rolling pin
- Baking tray
- Parchment paper
- Pastry brush
Storage Tips
To keep your Braided Sweet Bread fresh, store it in an airtight container at room temperature for up to two days. Avoid refrigerating it, as this can dry out the bread.
For longer storage, wrap the bread tightly in plastic wrap and freeze it for up to a month. Thaw it at room temperature before serving.
If the bread starts to stale, reheat slices in the oven at 150°C (302°F) for 5-10 minutes. This restores its softness and brings back the delightful aroma.
Tips and Advice
- Use a kitchen scale to measure ingredients accurately.
- Knead the dough just enough—overworking it can make the bread tough.
- Let the dough rise in a draft-free area for best results.
Presentation Ideas
- Dust powdered sugar over the cooled bread for a festive touch.
- Serve slices on a wooden board with jams and spreads for variety.
- Garnish with fresh berries or edible flowers for a pop of color.
Healthier Alternatives
Want to tweak this recipe? Here are six variations:
- Whole Wheat Version: Replace half the wheat flour with whole wheat for added fiber.
- Low-Sugar Option: Cut the sugar by half and use stevia or monk fruit instead.
- Vegan Twist: Use plant-based milk, vegan butter, and flaxseed “eggs.”
- Fruit-Filled Delight: Add raisins, dried cranberries, or chopped apples to the dough.
- Herb-Infused Bread: Mix in rosemary or thyme for a savory-sweet combo.
- Gluten-Free Adaptation: Swap wheat flour with a gluten-free blend.
Mistake 1: Skipping Resting Times
One common mistake is rushing the resting process. Without proper time to rise, the dough won’t develop its signature softness. Patience is key here—let the dough double in size for the best results. Pro tip: Set a timer to remind yourself when it’s ready.
Mistake 2: Overbaking
No one likes dry bread! Overbaking happens when the oven temperature is too high or the bread stays in too long. To avoid this, check for doneness by tapping the bottom—if it sounds hollow, it’s ready.
Mistake 3: Uneven Braiding
An uneven braid can lead to uneven baking. Make sure your strips are the same thickness and length before braiding. Practice makes perfect!
FAQ
Can I use active dry yeast instead of instant?
Yes, you can substitute active dry yeast, but you’ll need to proof it first. Dissolve it in warm water with a bit of sugar before adding it to the dough.
How do I know if my dough has risen enough?
Your dough should roughly double in size after resting. Gently poke it—if the indentation stays, it’s ready to go.
What if my dough is too sticky?
Add small amounts of flour, one tablespoon at a time, until the dough becomes manageable. Be careful not to add too much, though, or it may become dense.
Can I add fillings to the bread?
Absolutely! Try cinnamon sugar, chocolate chips, or nuts rolled into the dough before braiding.
Why did my bread turn out dense?
Dense bread usually happens due to insufficient rising time or over-kneading. Ensure the dough gets enough rest and handle it gently.
Is this bread freezer-friendly?
Yes, wrap it well in plastic wrap and freeze for up to a month. Reheat slices in the oven for freshness.
Can I make smaller loaves?
Definitely! Divide the dough into smaller portions and adjust the baking time accordingly.
What’s the best way to reheat leftovers?
Reheat slices in the oven at 150°C (302°F) for 5-10 minutes. This keeps the bread soft and aromatic.
Can I skip the egg wash?
Yes, but the egg wash gives the bread its shiny, golden crust. You can omit it if preferred.
How do I store the bread?
Keep it in an airtight container at room temperature for up to two days. For longer storage, freeze it wrapped tightly in plastic.
Final Thoughts
This Braided Sweet Bread is more than just a recipe—it’s a labor of love that fills your home with warmth and joy. Whether you’re baking for family, friends, or yourself, this bread promises to delight. So grab your apron, gather your ingredients, and get ready to create something truly special. Happy baking!
Equipment
- Large mixing bowl
- Rolling pin
- Baking tray
- Parchment paper
- Pastry brush
Ingredients
- 650 g wheat flour (plus 100 g extra for dusting)
- 250 g sugar
- 200 ml milk
- 100 ml water
- 100 g butter
- 1 egg (for dough)
- 1 egg (for brushing)
- 1 tablespoon instant yeast
- a pinch salt
Instructions
- In a large mixing bowl, combine the milk, sugar, one egg, softened butter, and flour. Gradually add water while stirring until a smooth dough forms.
- Knead the dough for about a minute until it's soft and slightly sticky, then add the instant yeast and knead quickly again.
- Cover the dough with a kitchen towel and let it rest for 20 minutes. Knead briefly and let it sit for another 20 minutes. Repeat this process three times total.
- Divide the rested dough into three equal parts and roll each into long strips, then braid them together.
- Cover the braided dough and let it rest for 10-15 minutes before baking.
- Place the braided dough on a lined baking tray, brush with the remaining beaten egg and water mixture, and preheat the oven to 230°C (446°F).
- Bake for 30-35 minutes, reducing the temperature to 180-200°C halfway through to prevent burning.
- Let the bread cool completely on a wire rack before slicing and serve.
Notes
Nutrition

Hi, I’m Olivia Parker, the founder of BakingSecret.com and a lifelong lover of all things sweet and homemade. I grew up in a small town in Oregon, where the smell of fresh cookies in my family’s kitchen sparked my passion for baking. Over the years, I turned that passion into a mission: to help home bakers feel confident, inspired, and creative.
After studying food science and working in several artisan bakeries across the U.S., I decided to create a space where everyone from beginners to seasoned bakers can find reliable recipes, expert tips, and a warm, welcoming community. BakingSecret.com is my way of sharing the magic of baking with the world. When I’m not testing new recipes, you’ll find me exploring farmers’ markets, collecting vintage cookbooks, or perfecting my sourdough technique.