
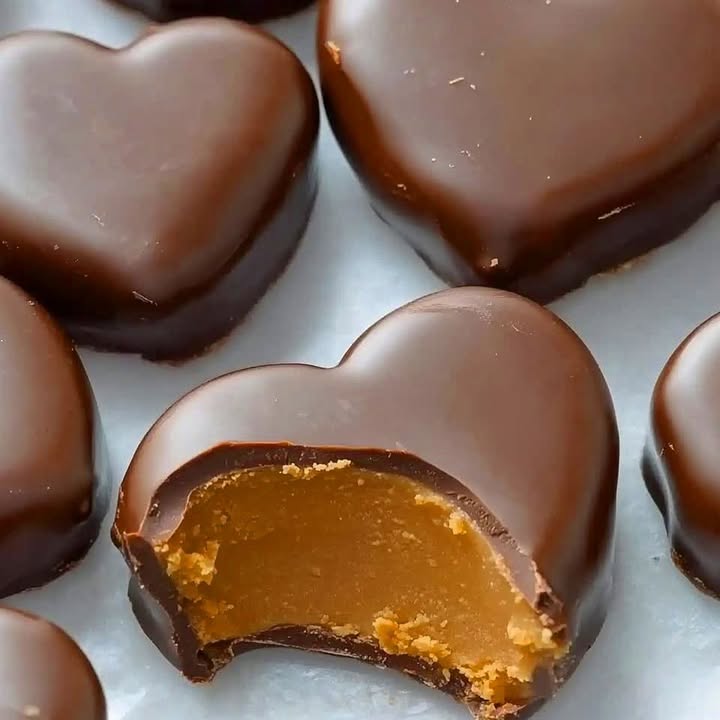
Why These Chocolate Peanut Butter Hearts Are a Must-Try
Every year, Valentine’s Day sneaks up on me. One minute, I’m sipping hot cocoa in January, and the next, I’m scrambling for a heartfelt gift idea. Last year, I decided to skip the store-bought chocolates and make something from scratch. That’s when I stumbled upon these **Chocolate Peanut Butter Hearts**. Oh my goodness, they were a hit! Creamy peanut butter filling wrapped in rich chocolate? It’s like cupid himself handed me the recipe. Trust me; once you try them, you’ll want to make them every year.
A Little Love Story Behind the Recipe
Peanut butter and chocolate are a match made in heaven. This dynamic duo has been winning hearts for decades. The combination dates back to the early 1900s when peanut butter cups first appeared in candy shops. Since then, people have been obsessed with this sweet-and-salty pairing. My version takes it up a notch by shaping them into adorable heart shapes, perfect for spreading love. Whether you’re making them for your sweetheart or just because, these treats are sure to bring smiles.
Why You’ll Fall Head Over Heels for This Recipe
What makes these **Chocolate Peanut Butter Hearts** so irresistible? First, the flavors are spot-on: creamy peanut butter meets velvety chocolate. Second, the recipe is simple enough for beginners but impressive enough for seasoned bakers. Plus, they’re no-bake, which means less time in the kitchen and more time enjoying them. Whether you’re whipping them up for a special occasion or just craving something sweet, you can’t go wrong with these little love tokens.
Perfect Occasions to Make These Sweet Treats
Valentine’s Day is the obvious choice, but don’t stop there. These **Chocolate Peanut Butter Hearts** are perfect for birthdays, anniversaries, or even as a “just because” surprise. I’ve brought them to potlucks, packaged them as gifts, and even served them at holiday parties. They’re versatile, easy to customize, and always a crowd-pleaser. Bonus: kids love helping shape the hearts!
Ingredients You’ll Need
Here’s what you’ll need to make these delightful treats:
- 1 cup creamy peanut butter (room temperature)
- 1/4 cup unsalted butter (softened)
- 1/2 cup brown sugar (packed)
- 1 tsp vanilla extract
- 1/4 tsp salt
- 1 1/2 cups powdered sugar
- 2 cups chocolate (chopped into small pieces—use milk, dark, or semi-sweet as preferred)
Substitution Options
Not everyone has the same pantry staples, and that’s okay! Here are some swaps you can make:
- Peanut Butter: If you’re out of creamy peanut butter, crunchy works too. Just note the texture will be slightly chunkier.
- Butter: You can use coconut oil or margarine if needed, though butter gives the best flavor.
- Brown Sugar: In a pinch, white granulated sugar mixed with a teaspoon of molasses works fine.
- Chocolate: Feel free to experiment with different types of chocolate chips instead of chopping bars.
Step-by-Step Instructions
Step 1: Prepare the Peanut Butter Filling
Start by gathering all your ingredients. In a large mixing bowl, combine the peanut butter, softened butter, brown sugar, vanilla extract, and salt. Mix until smooth—it should look glossy and feel soft to the touch. Gradually add the powdered sugar, mixing until a thick dough forms. If the dough feels sticky, sprinkle in a bit more powdered sugar. Pro tip: Use an electric mixer for a super-smooth consistency.
Step 2: Shape into Hearts
Now comes the fun part! Roll out the peanut butter dough between two sheets of parchment paper to about 1/4-inch thickness. Grab a heart-shaped cookie cutter and cut out as many hearts as possible. Place them on a parchment-lined baking sheet. Pop them in the freezer for 20-30 minutes until firm. This step ensures the filling holds its shape when dipped in chocolate.
Step 3: Melt the Chocolate
Break or chop your chocolate into small pieces for even melting. Place it in a microwave-safe bowl and heat in 20-30 second intervals, stirring between each session. Keep going until the chocolate is silky smooth. Be patient—melting chocolate can burn easily if rushed. Chef’s tip: Add a teaspoon of coconut oil to the melted chocolate for extra shine and smoother dipping.
Step 4: Dip the Hearts
Once the chocolate is ready, grab your chilled peanut butter hearts one by one. Using a fork or dipping tool, dip each heart fully into the chocolate, letting any excess drip off. Place the coated hearts back onto the parchment-lined tray. Work quickly to keep the filling cold and prevent smudging. Pro tip: If you want to add sprinkles or decorations, do it while the chocolate is still wet.
Step 5: Set the Chocolate
Let the magic happen! Allow the coated hearts to set at room temperature or speed things up by refrigerating them for 15-20 minutes. Once hardened, they’re ready to eat. Trust me, the wait is worth it.
Timing Breakdown
- Prep Time: 20 minutes
- Chill Time: 30 minutes
- Total Time: 50 minutes
- Servings: 20-25 hearts
Chef’s Secret
For an extra wow factor, drizzle melted white chocolate over the finished hearts. It adds a decorative touch and enhances the flavor profile. Just melt a small amount and use a piping bag or a spoon to create zigzags.
An Interesting Fact About the Ingredients
Did you know that peanut butter was invented in the late 1800s as a protein-rich food for people who couldn’t chew meat? Fast forward to today, and we’re using it to create decadent desserts like these **Chocolate Peanut Butter Hearts**. Talk about a glow-up!
Necessary Equipment
You don’t need fancy gadgets to make this recipe. A few essentials include:
- Mixing bowls
- Electric mixer (optional)
- Parchment paper
- Heart-shaped cookie cutter
- Fork or dipping tool
- Microwave-safe bowl
Storage Tips
Proper storage keeps these treats fresh and delicious. Store them in an airtight container to prevent moisture from ruining the chocolate coating. If you live in a warm climate, keep them in the fridge to avoid melting. They’ll last up to a week when stored correctly.
For gifting, wrap individual hearts in colorful foil or place them in mini cupcake liners before boxing them up. This adds a professional touch and makes them travel-friendly.
If you’re planning ahead, you can freeze the unfilled peanut butter hearts for up to a month. Simply thaw them in the fridge before dipping in chocolate.
Tips and Advice
Don’t rush the chilling process—it’s key to keeping the hearts intact during dipping. Also, work in batches to ensure the filling stays firm. Lastly, taste-test along the way. Quality control is important, right?
Presentation Ideas
Add flair by arranging the hearts on a tiered dessert stand or scattering rose petals around them. Tie ribbons around gift boxes for a romantic touch. Or serve them alongside other Valentine-themed goodies for a dessert table everyone will rave about.
Healthier Alternatives
Want to lighten things up? Try these variations:
- Reduced-Sugar Option: Use a sugar substitute in the peanut butter filling and opt for dark chocolate.
- Vegan Version: Swap dairy butter for plant-based alternatives and use vegan chocolate.
- Gluten-Free: Ensure your powdered sugar and chocolate are certified gluten-free.
- Protein-Packed: Add a scoop of protein powder to the filling mixture.
- Low-Carb: Replace powdered sugar with a keto-friendly sweetener.
- Nut-Free: Use sunflower seed butter instead of peanut butter.
Common Mistakes to Avoid
Mistake 1: Skipping the Chilling Step
Without chilling, the peanut butter filling becomes too soft to handle. Always freeze the shaped hearts before dipping. Practical tip: Prep everything ahead of time so you’re not rushing.
Mistake 2: Overheating the Chocolate
Burnt chocolate is a real buzzkill. Heat it gently in short bursts and stir frequently. Pro tip: Use a double boiler for foolproof melting.
Mistake 3: Not Coating Evenly
Uneven coatings can ruin the presentation. Tap off excess chocolate gently and rotate the fork for full coverage.
FAQs
Can I use natural peanut butter?
Natural peanut butter often contains oil separation, which can affect the texture. For best results, stick to commercial brands.
How far in advance can I make these?
You can prepare them up to three days ahead. Store them in the fridge until ready to serve.
What type of chocolate is best?
It depends on your preference. Milk chocolate is sweeter, while dark chocolate offers a richer flavor. Semi-sweet strikes a nice balance.
Can I freeze these treats?
Yes! Freeze the filled hearts before dipping, then coat them once thawed. Fully assembled hearts can also be frozen for up to a month.
Are these kid-friendly?
Absolutely! Kids love helping shape the hearts and decorate them with sprinkles.
While a heart-shaped cutter is ideal, you can shape the dough by hand into small rounds or squares.
Can I use almond butter instead?
Yes, almond butter works beautifully for a nuttier twist.
How many servings does this recipe make?
This recipe yields 20-25 hearts, depending on the size of your cutter.
Can I add flavor extracts?
Sure thing! Try peppermint or orange extract for a unique twist.
Why is my chocolate seizing?
Seizing happens when moisture gets into the chocolate. Make sure your tools and workspace are dry.
Final Thoughts
These **Chocolate Peanut Butter Hearts** are more than just a treat—they’re a labor of love. From their creamy centers to their glossy chocolate shells, they’re guaranteed to win hearts. So grab your apron, gather your loved ones, and get ready to create some edible magic. Happy baking!
Equipment
- Mixing bowls
- Electric mixer optional
- Parchment paper
- Heart-shaped cookie cutter
- Fork or dipping tool
- Microwave-safe bowl
Ingredients
- 1 cup creamy peanut butter room temperature
- 1/4 cup unsalted butter softened
- 1/2 cup brown sugar packed
- 1 tsp vanilla extract
- 1/4 tsp salt
- 1 1/2 cups powdered sugar
- 2 cups chocolate chopped into small pieces—use milk, dark, or semi-sweet as preferred
Instructions
- In a large mixing bowl, combine the peanut butter, softened butter, brown sugar, vanilla extract, and salt, and mix until smooth.
- Gradually add the powdered sugar, mixing until a thick dough forms.
- Roll out the peanut butter dough between two sheets of parchment paper to about 1/4-inch thickness and cut out heart shapes using a heart-shaped cookie cutter.
- Place the hearts on a parchment-lined baking sheet and freeze for 20-30 minutes until firm.
- Melt the chocolate in a microwave-safe bowl in 20-30 second intervals, stirring in between until smooth.
- Dip each chilled heart into the melted chocolate, letting excess chocolate drip off, and place back on the parchment-lined tray.
- Allow the coated hearts to set at room temperature or refrigerate for 15-20 minutes until hardened.
Notes
Nutrition

Hi, I’m Olivia Parker, the founder of BakingSecret.com and a lifelong lover of all things sweet and homemade. I grew up in a small town in Oregon, where the smell of fresh cookies in my family’s kitchen sparked my passion for baking. Over the years, I turned that passion into a mission: to help home bakers feel confident, inspired, and creative.
After studying food science and working in several artisan bakeries across the U.S., I decided to create a space where everyone from beginners to seasoned bakers can find reliable recipes, expert tips, and a warm, welcoming community. BakingSecret.com is my way of sharing the magic of baking with the world. When I’m not testing new recipes, you’ll find me exploring farmers’ markets, collecting vintage cookbooks, or perfecting my sourdough technique.