
Why These Chocolate Covered Strawberry Cupcakes Are a Must-Try
There’s something magical about the pairing of chocolate and strawberries. I first made these Chocolate Covered Strawberry Cupcakes for my niece’s birthday, and let me tell you—they were a hit! The rich cocoa aroma paired with the juicy burst of strawberry on top is pure bliss. It’s like Valentine’s Day in cupcake form but perfect for any occasion. Plus, they’re easy enough for beginner bakers yet impressive enough to wow your guests. If you’ve never tried this flavor combo in a cupcake, get ready to fall in love!
A Sweet History Behind the Recipe
The classic duo of chocolate and strawberries has been around for centuries. In Europe, strawberries were considered a symbol of love, while chocolate was dubbed “the food of the gods.” When I think about it, combining these two feels destined. My version adds a modern twist by turning the pairing into a portable treat—cupcakes! When I tested this recipe, I couldn’t believe how well the flavors balanced each other. The cocoa base is deep and indulgent, while the fresh strawberries bring a refreshing tang that cuts through the sweetness.
Why You’ll Love This Recipe
This recipe is a dream come true for anyone who loves baking (or eating) desserts. First off, it’s foolproof. Even if you’re not a seasoned baker, you can whip up these cupcakes without breaking a sweat. Second, it’s versatile—you can customize them to suit your taste or occasion. Finally, they’re downright delicious. Imagine biting into a moist, chocolatey cupcake topped with creamy melted chocolate and a juicy strawberry. Need I say more?
Perfect Occasions to Bake These Cupcakes
These Chocolate Strawberry Cupcakes are perfect for so many occasions. They’re ideal for Valentine’s Day because of their romantic red-and-brown color palette. I also love making them for birthdays, bridal showers, or even as a sweet surprise for friends. Once, I brought them to a potluck, and they disappeared faster than I could grab one myself! Trust me, no matter the event, these cupcakes will steal the show.
Ingredients You’ll Need
Here’s what you need to make these delightful treats:
- For the cupcakes:
- 1 cup granulated sugar
- ½ cup unsweetened cocoa powder
- 1 ½ cups all-purpose flour
- 1 tablespoon baking powder
- ½ teaspoon salt
- 2 large eggs
- ½ cup milk
- ½ cup vegetable oil
- 1 teaspoon vanilla extract
- For coverage:
- 1 cup fresh strawberries, cut into halves
- 8 oz dark or milk chocolate, chopped
- Sprinkles (optional for decoration)
Substitution Options
If you’re out of certain ingredients or want to experiment, here are some swaps:
- Use almond milk instead of regular milk for a dairy-free option.
- Swap vegetable oil with melted butter for a richer flavor.
- Replace fresh strawberries with freeze-dried ones for a crunchy twist.
- Choose white chocolate for a fun contrast to the dark cocoa base.
Step 1: Preheat the Oven
Before diving into the mixing, preheat your oven to 350°F (175°C). While it heats up, line a cupcake tray with paper liners. This step ensures your cupcakes bake evenly and don’t stick to the pan. Pro tip: Use colorful liners to make your cupcakes look festive right from the start!
Step 2: Mix the Dry Ingredients
In a large bowl, combine the sugar, cocoa powder, flour, baking powder, and salt. Whisk them together until there are no lumps. The dry mix should smell amazing thanks to the cocoa powder—it’s like a warm hug in a bowl. Chef’s tip: Sift the cocoa powder beforehand to avoid clumps later.
Step 3: Prepare the Wet Ingredients
In another bowl, whisk together the eggs, milk, vegetable oil, and vanilla extract. You’ll notice how smooth and glossy the mixture becomes. Vanilla adds a subtle fragrance that ties everything together. Pro tip: Crack the eggs into a separate bowl first to avoid shell mishaps.
Step 4: Join the Mixtures
Slowly pour the wet ingredients into the dry ones, stirring gently. Overmixing can make your cupcakes dense, so stop as soon as everything is combined. The batter will be thick and velvety—a good sign that you’re on the right track.
Step 5: Incorporate the Flour
Add the remaining flour gradually, folding it in carefully. Your goal is to keep the batter light and airy. Think of it as giving the cupcakes room to breathe. Once mixed, the batter should have a smooth, spoonable consistency.
Step 6: Fill and Bake
Fill each cupcake liner about two-thirds full with the batter. Bake for 18-20 minutes, or until a toothpick comes out clean. As they bake, your kitchen will fill with the irresistible scent of chocolate. Pro tip: Rotate the tray halfway through for even baking.
Step 7: Cool Completely
Let the cupcakes cool on a wire rack before decorating. Cooling prevents the chocolate topping from melting too quickly. Patience pays off here—trust me, it’s worth the wait!
Step 8: Melt the Chocolate
Melt the chopped chocolate in the microwave in 30-second intervals, stirring between each session. Alternatively, use a double boiler for a gentler melt. Watch closely to avoid burning. Pro tip: Add a teaspoon of coconut oil to the chocolate for extra shine.
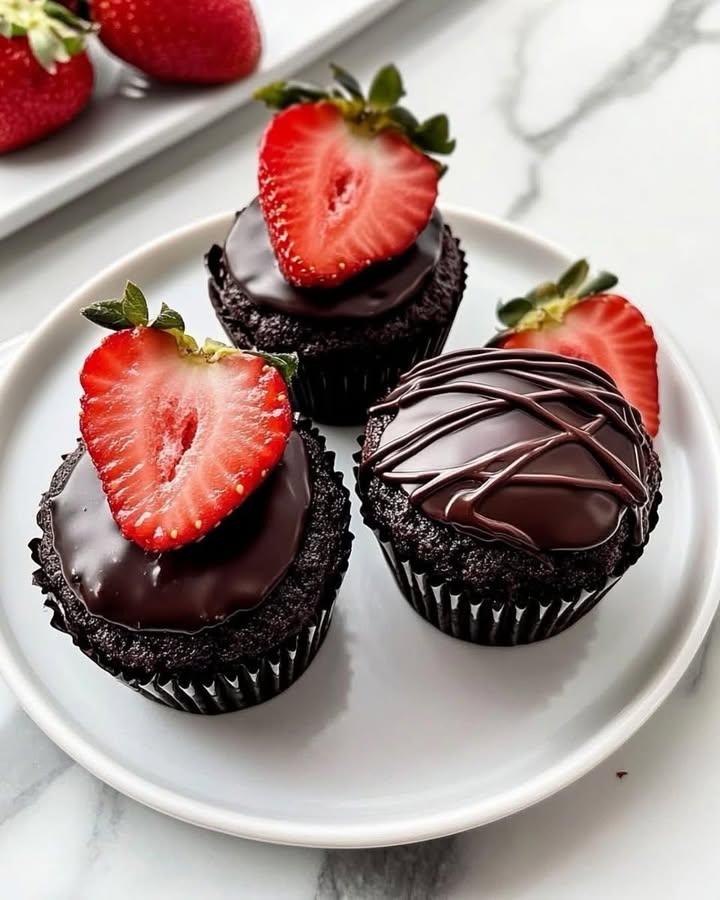
Step 9: Decorate and Serve
Dip the top of each cupcake into the melted chocolate, then place a strawberry half on top. Sprinkle with colorful sprinkles if you’re feeling fancy. Let the chocolate set for a few minutes before serving. Voilà—you’ve just created edible art!
Timing Breakdown
- Prep Time: 15 minutes
- Cooking Time: 20 minutes
- Cooling Time: 30 minutes
- Total Time: 1 hour 5 minutes
Chef’s Secret
For an extra burst of flavor, brush the cooled cupcakes with a thin layer of simple syrup before adding the chocolate coating. It keeps them moist and adds a hint of sweetness.
Fun Fact About Strawberries
Did you know strawberries are the only fruit with seeds on the outside? Each berry has about 200 tiny seeds, making them unique in the fruit world. No wonder they pair so beautifully with chocolate!
Necessary Equipment
- Muffin tin
- Paper liners
- Mixing bowls
- Whisk
- Measuring cups and spoons
- Toothpick or cake tester
- Wire cooling rack
Storage Tips
Store these cupcakes in an airtight container at room temperature for up to two days. If you live in a warm climate, refrigerate them to prevent the chocolate from softening. Bring them back to room temp before serving for the best texture.
For longer storage, freeze the undecorated cupcakes in a freezer-safe bag. Thaw overnight in the fridge and decorate just before serving.
Avoid stacking the cupcakes unless separated by parchment paper—chocolate-covered strawberries deserve space to shine!
Tips and Advice
- Use high-quality chocolate for the coating; it makes a big difference.
- Wash and dry the strawberries thoroughly to prevent water droplets from ruining the chocolate.
- Experiment with different toppings like chopped nuts or edible glitter.
Presentation Ideas
- Arrange the cupcakes on a tiered stand for a bakery-worthy display.
- Add a drizzle of contrasting chocolate (dark over milk or vice versa).
- Place small heart-shaped picks in each cupcake for a themed touch.
Healthier Alternatives
Want to lighten things up? Try these variations:
- Gluten-Free Option: Swap all-purpose flour with almond or oat flour.
- Vegan Version: Replace eggs with flax eggs and use plant-based milk.
- Low-Sugar Treat: Use sugar substitutes like stevia or monk fruit.
- Fruit-Focused Topping: Skip the chocolate and simply glaze with strawberry jam.
- Protein-Packed: Add a scoop of protein powder to the batter.
- No-Bake Option: Make mini cheesecake bites topped with chocolate and strawberries.
Mistake 1: Overmixing the Batter
Overmixing leads to tough, dense cupcakes. To avoid this, stir gently until the ingredients are just combined. A few lumps are okay—they’ll disappear during baking.
Mistake 2: Using Cold Eggs
Cold eggs can cause the batter to curdle. Always let your eggs sit at room temperature for 20-30 minutes before using. Pro tip: Place them in warm water if you’re short on time.
Mistake 3: Skipping the Cooling Step
Hurrying to decorate warm cupcakes results in melted chocolate. Patience is key here—let them cool completely for picture-perfect results.
Mistake 4: Burning the Chocolate
Chocolate burns easily, especially in the microwave. Heat it in short bursts and stir frequently. Better yet, use a double boiler for consistent melting.
Mistake 5: Cutting Strawberries Too Early
Cut strawberries release moisture, which can ruin the chocolate. Prep them right before decorating to ensure freshness.
FAQ 1: Can I make these cupcakes ahead of time?
Absolutely! Bake the cupcakes a day in advance and store them in an airtight container. Decorate them just before serving to maintain freshness and presentation quality.
FAQ 2: What type of chocolate works best?
High-quality dark or semi-sweet chocolate melts smoothly and pairs beautifully with strawberries. Milk chocolate is sweeter and kid-friendly, while white chocolate offers a fun visual contrast.
FAQ 3: How do I keep the chocolate shiny?
Add a teaspoon of coconut oil or shortening to the melted chocolate. This trick gives it a glossy finish and makes it easier to work with.
FAQ 4: Can I freeze these cupcakes?
Yes! Freeze the undecorated cupcakes in a freezer-safe bag for up to three months. Thaw overnight in the fridge and add toppings before serving.
FAQ 5: Do I need a mixer for this recipe?
Nope! A whisk and spatula are all you need. Hand-mixing keeps the process simple and cleanup minimal.
FAQ 6: Can I use frozen strawberries?
Fresh strawberries are recommended because they hold their shape better. Frozen ones tend to be mushy and watery, which can affect the chocolate coating.
FAQ 7: Why did my cupcakes sink in the middle?
Sinking usually happens due to underbaking or opening the oven door too early. Make sure to bake for the full recommended time and resist peeking until the timer goes off.
FAQ 8: Can I substitute the cocoa powder?
You can replace cocoa powder with melted chocolate, but adjust the liquid ingredients accordingly. Expect a slightly richer flavor.
FAQ 9: How long do these cupcakes stay fresh?
They stay fresh for up to two days at room temperature or five days in the fridge. Store them properly to maintain their texture and taste.
FAQ 10: Can kids help with this recipe?
Definitely! Kids love dipping the cupcakes in chocolate and placing strawberries on top. Just supervise when handling hot appliances or sharp knives.
These Chocolate Covered Strawberry Cupcakes are more than just a dessert—they’re a celebration of flavors, textures, and creativity. Whether you’re baking for a special occasion or simply craving something sweet, this recipe delivers joy in every bite. So grab your apron, gather your ingredients, and let the magic unfold!
Equipment
- Mixing bowls
- Whisk
- Measuring cups and spoons
- Muffin tin
- Toothpick or cake tester
Ingredients
- 200 g granulated sugar
- 50 g unsweetened cocoa powder
- 250 g all-purpose flour
- 15 g baking powder
- 3 g salt
- 2 large eggs
- 120 ml milk
- 120 ml vegetable oil
- 1 c.c vanilla extract
- 200 g fresh strawberries cut into halves
- 220 g dark or milk chocolate chopped
- q.s. sprinkles optional for decoration
Instructions
- Preheat your oven to 350°F (175°C) and line a cupcake tray with paper liners.
- In a large bowl, combine the sugar, cocoa powder, flour, baking powder, and salt, and whisk until there are no lumps.
- In another bowl, whisk together the eggs, milk, vegetable oil, and vanilla extract until smooth.
- Slowly pour the wet ingredients into the dry ingredients, stirring gently until combined.
- Gradually fold in the remaining flour until the batter is smooth and spoonable.
- Fill each cupcake liner about two-thirds full with the batter and bake for 18-20 minutes or until a toothpick comes out clean.
- Let the cupcakes cool on a wire rack completely before decorating.
- Melt the chopped chocolate in the microwave in 30-second intervals or use a double boiler until smooth.
- Dip the top of each cupcake into the melted chocolate, place a strawberry half on top, and optionally sprinkle with colorful sprinkles. Let the chocolate set before serving.
Notes
Nutrition

Hi, I’m Olivia Parker, the founder of BakingSecret.com and a lifelong lover of all things sweet and homemade. I grew up in a small town in Oregon, where the smell of fresh cookies in my family’s kitchen sparked my passion for baking. Over the years, I turned that passion into a mission: to help home bakers feel confident, inspired, and creative.
After studying food science and working in several artisan bakeries across the U.S., I decided to create a space where everyone from beginners to seasoned bakers can find reliable recipes, expert tips, and a warm, welcoming community. BakingSecret.com is my way of sharing the magic of baking with the world. When I’m not testing new recipes, you’ll find me exploring farmers’ markets, collecting vintage cookbooks, or perfecting my sourdough technique.