
Why Garlic Cheese Buns Are a Must-Try
There’s something magical about the smell of freshly baked bread wafting through the kitchen. But when you add creamy cheese and garlicky goodness to the mix? Pure bliss! I remember the first time I made Garlic Cheese Buns for my family. My kids, who usually gobble up dinner in silence, actually stopped to comment on how amazing these buns smelled and tasted. That’s when I knew this recipe was a keeper. Whether you’re a seasoned baker or just starting out, these buns are easy to make and guaranteed to impress.
A Little History Behind Garlic Cheese Buns
While the exact origins of Garlic Cheese Buns are unclear, they seem to be inspired by traditional European bread recipes that pair garlic and herbs with soft, pillowy dough. Over time, creative bakers added cheese to the mix, creating a decadent twist. These buns have become a popular snack or side dish worldwide, especially in bakeries and cafes. I like to think of them as the ultimate comfort food—perfectly balanced with savory garlic, rich cheese, and a hint of sweetness from the dough.
Why You’ll Love This Recipe
This Garlic Cheese Buns recipe is a winner for so many reasons. First, it’s incredibly versatile—you can serve them as a snack, appetizer, or even as a side dish with soups and stews. Second, the flavors are bold yet comforting. The gooey cream cheese filling pairs beautifully with the garlicky buttery topping. Lastly, the dough is surprisingly easy to work with, even if you’ve never made bread before. Trust me, once you try these, you’ll want to bake them again and again!
Perfect Occasions to Make Garlic Cheese Buns
These buns are perfect for any occasion. Whip them up for a cozy family dinner, a holiday feast, or even a weekend brunch. They’re also a hit at potlucks and parties because everyone loves warm, cheesy bread. I’ve served them at birthday gatherings, game nights, and even as a surprise treat for my book club. No matter the event, these Garlic Cheese Buns will steal the show.
Ingredients You’ll Need
Here’s what you’ll need to make these mouthwatering buns:
Bread Ingredients
- Yeast: 5g
- Warm water: 15g
- High gluten flour: 500g
- White sugar: 50g
- Salt: 5g
- Honey: 15g
- Beaten egg: 75g
- Milk: 235g
- Unsalted Butter: 50g softened
Filling
- Cream cheese: 200g softened
- Sugar: 50g
- Heavy cream: 160g
Garlic and Parsley Brush
- Butter: 85g melted
- Sugar: 25g
- Salt: 2g
- Heavy cream: 40g
- Garlic: 16g minced
- Chopped parsley: 4g
- Mayonnaise: 25g
Substitution Options
If you’re missing an ingredient, don’t worry! Here are some swaps you can make:
- Use all-purpose flour instead of high gluten flour, though the texture might be slightly less chewy.
- Replace heavy cream with whole milk for a lighter option.
- Swap honey with maple syrup or agave nectar.
- If you don’t have mayonnaise, just skip it—it adds richness but isn’t essential.
Step 1: Make the Dough
Start by mixing all the bread ingredients except the butter in a large bowl. Knead until you get a rough dough. It might feel sticky at first, but that’s okay—it’ll come together as you knead. Once the dough starts forming, add the softened butter little by little. Keep kneading until the dough becomes smooth and elastic. You’ll know it’s ready when it springs back when poked. Pro tip: Use a stand mixer with a dough hook if you have one—it saves time and effort!
Step 2: First Rise
Place the dough in a lightly oiled bowl, cover it with a damp cloth, and let it rise for about an hour. Find a warm spot in your kitchen—near the oven or on a sunny windowsill works well. As the dough rises, it should double in size. Watching it puff up is oddly satisfying, like magic happening right before your eyes. Chef’s tip: If your kitchen is cold, place the bowl near a warm appliance to speed up the process.
Step 3: Shape the Dough
Once the dough has risen, punch it down to release the air. Divide it into equal-sized balls—I like to weigh them for consistency. Shape each piece into a smooth ball and arrange them on a baking tray lined with parchment paper. Let them rise again for 45-60 minutes in a warm place. During this second rise, the dough will become light and airy, setting the stage for perfectly fluffy buns.
Step 4: Bake the Buns
Preheat your oven to 180°C (356°F). Pop the buns in the oven and bake for 20 minutes or until they turn golden brown. The aroma of freshly baked bread will fill your kitchen, making it hard to resist peeking inside the oven. When they’re done, take them out and let them cool slightly before moving on to the next step. Pro tip: Rotate the tray halfway through baking for even browning.
Step 5: Prepare the Filling
In a mixing bowl, combine the softened cream cheese, sugar, and heavy cream. Beat until the mixture is smooth and creamy. This filling is the heart of the Garlic Cheese Buns, adding a rich, tangy flavor that complements the garlic topping perfectly. Taste a little spoonful—it’s almost impossible not to!
Step 6: Garlic and Parsley Brush
Mix the melted butter, sugar, salt, heavy cream, minced garlic, chopped parsley, and mayonnaise in a small bowl. Stir until everything is well combined. This garlic sauce is what gives the buns their signature flavor and aroma. Don’t skimp on the garlic—it’s the star of the show!
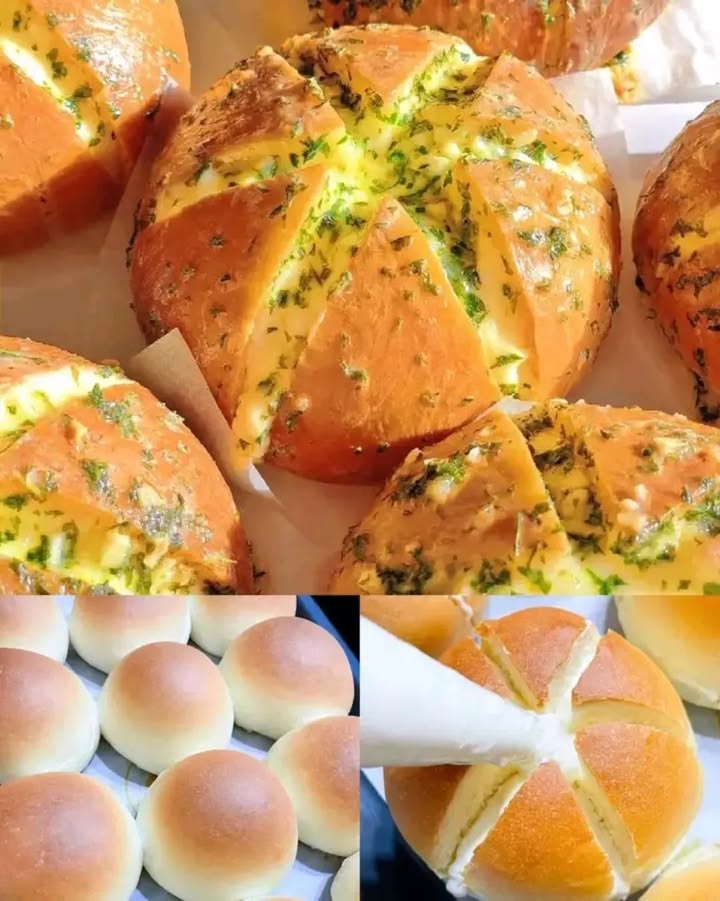
Step 7: Final Assembly
Using a sharp knife, make a cross-cut on the top of each bun. Be careful not to cut all the way through—just deep enough to hold the filling. Spoon the cream cheese mixture into the cuts, then brush the tops generously with the garlic sauce. The contrast between the golden buns and the creamy filling is absolutely irresistible.
Step 8: Final Bake
Lower the oven temperature to 160°C (320°F) and bake the assembled buns for another 15 minutes. This final bake ensures the filling sets and the garlic sauce infuses the bread with its delicious flavor. When they’re done, pull them out and let them cool slightly before serving. Trust me, they’ll disappear fast!
Timing Breakdown
Here’s how long each part of the process takes:
- Prep Time: 30 minutes
- Rising Time: 2 hours (1 hour for the first rise, 1 hour for the second)
- Baking Time: 35 minutes (20 minutes for the initial bake, 15 minutes for the final bake)
- Total Time: About 3 hours
Chef’s Secret
To make your Garlic Cheese Buns extra special, sprinkle a pinch of grated Parmesan cheese on top before the final bake. It adds a salty, nutty crunch that takes these buns to the next level.
Extra Info
Did you know garlic has been used for centuries not only for its flavor but also for its health benefits? It’s believed to boost immunity and support heart health. So while these buns are indulgent, you can feel good knowing there’s a tiny bit of wellness tucked inside!
Necessary Equipment
You’ll need a few basic tools to make these buns:
- Large mixing bowls
- Stand mixer (optional)
- Baking tray
- Parchment paper
- Sharp knife
- Measuring cups and spoons
Storage Tips
To keep your Garlic Cheese Buns fresh, store them in an airtight container at room temperature for up to two days. If you live in a humid climate, refrigerate them to prevent spoilage. For longer storage, freeze the buns in a freezer-safe bag. They’ll stay good for up to a month.
When reheating, pop them in the oven at 160°C (320°F) for 5-10 minutes. This restores their softness and brings back the garlicky aroma. Avoid microwaving, as it can make the bread soggy.
If you want to prepare these buns ahead of time, you can freeze the unbaked dough after shaping. Simply thaw it in the fridge overnight, let it rise, and bake as usual.
Tips and Advice
Here are a few tips to make your Garlic Cheese Buns even better:
- Use fresh yeast for the best results—it makes the dough rise beautifully.
- Don’t rush the rising process. Patience is key to achieving fluffy buns.
- If the garlic sauce seems too thick, add a splash of milk to thin it out.
- Experiment with different cheeses, like cheddar or mozzarella, for variety.
Presentation Ideas
Serve your Garlic Cheese Buns on a rustic wooden board for a cozy vibe. Garnish with extra chopped parsley for a pop of color. You can also arrange them in a basket lined with a napkin for a charming touch. For a fun twist, tie a ribbon around the basket for special occasions.
Healthier Alternatives
Love the idea of Garlic Cheese Buns but looking for healthier options? Try these variations:
- Whole Wheat Version: Replace half the flour with whole wheat flour for added fiber.
- Low-Fat Option: Use low-fat cream cheese and skim milk instead of heavy cream.
- Vegan Twist: Substitute dairy ingredients with plant-based alternatives like almond milk and vegan butter.
- Herb-Infused Buns: Add dried herbs like rosemary or thyme to the dough for extra flavor.
- Gluten-Free Adaptation: Use a gluten-free flour blend designed for bread baking.
- Spicy Kick: Mix red pepper flakes into the filling for a spicy surprise.
Mistake 1: Overmixing the Dough
Overmixing the dough can lead to tough, dense buns. This happens when you knead the dough too aggressively or for too long. To avoid this, stop kneading as soon as the dough becomes smooth and elastic. A good test is to stretch a small piece—if it forms a thin “windowpane” without tearing, it’s ready.
Mistake 2: Skipping the Rising Process
Some people skip or shorten the rising time to save time, but this is a big no-no. Without proper rising, the buns won’t be light and fluffy. Always let the dough rise in a warm, draft-free area until it doubles in size. Pro tip: Set a timer to remind yourself when it’s time to check the dough.
Mistake 3: Overfilling the Buns
It’s tempting to stuff the buns with as much filling as possible, but overfilling can cause the cheese to ooze out during baking. Stick to about 1-2 teaspoons per bun for the perfect balance. This ensures the filling stays intact while still delivering maximum flavor.
FAQs About Garlic Cheese Buns
Can I use instant yeast instead of active dry yeast?
Yes, you can use instant yeast. Just mix it directly with the dry ingredients without dissolving it in water first. Instant yeast works faster, so your dough might rise quicker than expected.
How do I know if my yeast is still active?
To test your yeast, dissolve it in warm water with a pinch of sugar. If it bubbles and froths within 5-10 minutes, it’s good to go. If nothing happens, it’s time to buy new yeast.
Can I make these buns ahead of time?
Absolutely! You can prepare the dough a day in advance and refrigerate it overnight. Let it come to room temperature before shaping and baking.
What can I substitute for heavy cream?
Whole milk or half-and-half works well as a substitute for heavy cream. The filling might be slightly less rich, but it will still taste delicious.
How do I reheat leftover buns?
Reheat the buns in a preheated oven at 160°C (320°F) for 5-10 minutes. This method keeps them soft and flavorful. Avoid microwaving, as it can make the bread soggy.
Can I freeze the baked buns?
Yes, you can freeze the baked buns in an airtight container for up to a month. Thaw them at room temperature or reheat them in the oven for best results.
Why is my dough sticky?
Sticky dough often means it needs more flour. Add small amounts of flour gradually while kneading until the dough feels smooth and manageable. Be careful not to add too much, though, as it can make the buns dense.
What type of cheese works best?
Cream cheese is ideal for the filling because of its creamy texture and mild flavor. However, you can experiment with other soft cheeses like ricotta or mascarpone for a unique twist.
Can I use garlic powder instead of fresh garlic?
While fresh garlic is recommended for its vibrant flavor, you can use garlic powder in a pinch. Use 1 teaspoon of garlic powder for every tablespoon of minced garlic.
Why didn’t my buns rise?
If your buns didn’t rise, it could be due to old yeast, cold temperatures, or insufficient rising time. Make sure your yeast is fresh, your kitchen is warm, and you give the dough enough time to double in size.
Final Thoughts
There’s nothing quite like the joy of pulling a tray of warm, fragrant Garlic Cheese Buns out of the oven. These buns are simple to make, packed with flavor, and sure to become a favorite in your household. Whether you’re baking for your family or hosting friends, this recipe is a crowd-pleaser. So grab your apron, roll up your sleeves, and get ready to create some magic in the kitchen. Happy baking!
Equipment
- Large mixing bowls
- Stand mixer (optional)
- Baking tray
- Parchment paper
- Sharp knife
Ingredients
- 5 g Yeast
- 15 g Warm water
- 500 g High gluten flour
- 50 g White sugar
- 5 g Salt
- 15 g Honey
- 75 g Beaten egg
- 235 g Milk
- 50 g Unsalted Butter (softened)
- 200 g Cream cheese (softened)
- 50 g Sugar
- 160 g Heavy cream
- 85 g Butter (melted)
- 25 g Sugar
- 2 g Salt
- 40 g Heavy cream
- 16 g Garlic (minced)
- 4 g Chopped parsley
- 25 g Mayonnaise
Instructions
- Mix all bread ingredients except butter in a large bowl.
- Knead until a rough dough forms, then add softened butter little by little.
- Knead the dough until smooth and elastic.
- Place the dough in a lightly oiled bowl, cover, and let it rise for about 1 hour.
- Punch down the dough to release air; divide into equal-sized balls and shape into smooth balls.
- Arrange shaped dough on a baking tray lined with parchment paper and let them rise for another 45-60 minutes.
- Preheat oven to 180°C (356°F) and bake buns for 20 minutes or until golden brown.
- Prepare the filling by beating cream cheese, sugar, and heavy cream until smooth.
- Mix melted butter, sugar, salt, heavy cream, minced garlic, chopped parsley, and mayonnaise for the garlic brush.
- Make a cross-cut on top of each bun and spoon in the cream cheese filling.
- Brush the tops with the garlic sauce.
- Lower oven temperature to 160°C (320°F) and bake for another 15 minutes.
Notes
Nutrition

Hi, I’m Olivia Parker, the founder of BakingSecret.com and a lifelong lover of all things sweet and homemade. I grew up in a small town in Oregon, where the smell of fresh cookies in my family’s kitchen sparked my passion for baking. Over the years, I turned that passion into a mission: to help home bakers feel confident, inspired, and creative.
After studying food science and working in several artisan bakeries across the U.S., I decided to create a space where everyone from beginners to seasoned bakers can find reliable recipes, expert tips, and a warm, welcoming community. BakingSecret.com is my way of sharing the magic of baking with the world. When I’m not testing new recipes, you’ll find me exploring farmers’ markets, collecting vintage cookbooks, or perfecting my sourdough technique.