
Why This Love Stuffed Cake Will Steal Your Heart
There’s something magical about a cake that feels like a warm hug. I first stumbled upon this Love Stuffed Cake recipe during a family reunion. My cousin brought it, and as soon as I took a bite, I knew I had to recreate it. The velvety chocolate filling paired with the soft, vanilla-scented sponge is pure bliss. It’s not just a dessert; it’s an experience that brings people together. Whether you’re baking for a special occasion or just because, this cake will make your loved ones feel extra special.
A Little Sweet History
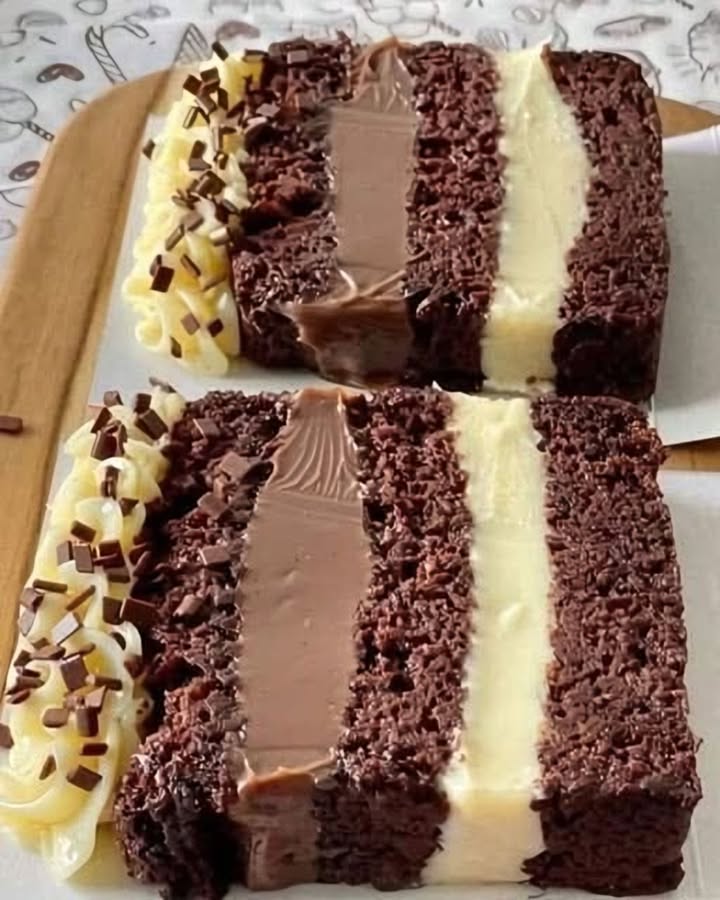
This cake reminds me of those old-school recipes passed down through generations, but with a modern twist. The “two loves” filling—a rich blend of chocolate and condensed milk—has roots in Brazilian brigadeiro culture. Brigadeiros are gooey, chocolatey treats often served at birthday parties. I’ve taken that beloved flavor combo and turned it into a show-stopping cake. When I tested this recipe, my kids couldn’t stop sneaking spoonfuls of the filling before I even assembled the cake. That’s when I knew it was a winner!
Why You’ll Fall Head Over Heels for This Recipe
What makes this Love Stuffed Cake so irresistible? First, it’s easy enough for beginner bakers but impressive enough to wow guests. The filling is creamy, dreamy, and packed with chocolate goodness. Plus, the cake itself has a light, fluffy texture that perfectly balances the decadent center. And let’s not forget the aroma—vanilla wafting through your kitchen is always a mood booster. Best of all, it’s versatile. You can tweak it to suit any taste or dietary preference.
Perfect Occasions for Love Stuffed Cake
This cake is perfect for birthdays, anniversaries, Valentine’s Day, or even a random Tuesday. It’s also a hit at potlucks and holiday gatherings. I once made it for a friend’s bridal shower, and everyone raved about how beautiful and delicious it was. If you’re looking to surprise someone with a homemade treat, this cake says “I love you” louder than words ever could.
Ingredients List
- For the cake:
- 3 eggs
- 1 cup of sugar
- 1 cup of milk
- 1/2 cup of oil
- 2 cups of wheat flour
- 1 tablespoon of yeast powder
- 1 teaspoon vanilla essence
- For the two loves filling:
- 1 can of condensed milk
- 200g of dark or milk chocolate
- 1/2 box of sour cream (100g)
Substitution Options
If you’re out of certain ingredients or want to try something different, here are some swaps:
- Use almond or oat milk instead of regular milk for a dairy-free option.
- Replace oil with melted butter for a richer flavor.
- Swap dark chocolate for white chocolate if you prefer a sweeter filling.
- Instead of sour cream, use Greek yogurt for tanginess.
Feel free to experiment based on what you have in your pantry.
Step-by-Step Preparation
Step 1: Preparing the Cake Batter
Start by preheating your oven to 180°C (350°F). Grab your mixer and beat the eggs with sugar until they turn into a pale, fluffy cream. This step is crucial—it’s what gives the cake its airy texture. Once the mixture looks light and cute, slowly pour in the milk and oil while mixing. Gradually add the flour, ensuring everything blends smoothly. Finally, fold in the yeast and vanilla essence gently. Pro tip: Sift the flour and yeast together to avoid lumps.
Step 2: Baking the Cake
Pour the batter into a greased and floured pan. Pop it into the oven for 30-40 minutes. Keep an eye on it! To check if it’s done, insert a toothpick—if it comes out clean, you’re golden. While the cake bakes, your kitchen will fill with the comforting scent of vanilla. Let the cake cool completely before moving on to the next step. Patience is key here.
Step 3: Making the Two Loves Filling
Melt the chocolate using a water bath or microwave, stirring every 30 seconds to prevent burning. In a separate pan, heat the condensed milk over low heat, stirring constantly until it thickens slightly (about 10 minutes). Mix in the melted chocolate and sour cream until smooth and glossy. This filling is so good, you might be tempted to eat it straight from the pan. Trust me, I’ve been there!
Step 4: Assembling the Cake
Once the cake has cooled, slice it horizontally in half. Spread the two loves filling generously between the layers and on top. Use a spatula to create swirls or peaks for a fancy finish. Garnish with chocolate shavings or sprinkles if you’re feeling extra creative. Chef’s tip: Chill the assembled cake for 30 minutes before serving to let the flavors meld.
Timing Breakdown
Prep time: 20 minutes
Cooking time: 40 minutes
Resting time: 30 minutes (optional)
Total time: Approximately 1 hour and 30 minutes
Chef’s Secret
Here’s a little trick I learned: brush the cake layers with a bit of simple syrup (equal parts sugar and water, heated until dissolved) before adding the filling. It keeps the cake moist and adds a subtle sweetness. Your guests won’t know why it tastes so amazing—they’ll just keep coming back for more!
Extra Info
Did you know that condensed milk was invented in the 19th century as a way to preserve milk without refrigeration? It’s no wonder it became a staple in desserts worldwide. Its creamy texture and caramel-like flavor make it a star ingredient in this Love Stuffed Cake.
Necessary Equipment
You’ll need a few basic tools to whip up this beauty:
- Mixer (handheld or stand)
- Baking pan
- Spatula
- Toothpick or skewer
- Pan for heating condensed milk
Nothing too fancy—just your everyday kitchen gear.
Storage Tips
To store leftovers, wrap the cake tightly in plastic wrap or place it in an airtight container. It stays fresh at room temperature for up to two days. For longer storage, pop it in the fridge. Just remember to bring it back to room temperature before serving for the best texture and flavor. Freezing is another option—slice the cake and freeze individual portions for up to three months. Thaw overnight in the fridge before enjoying.
Tips and Advice
Want to take your Love Stuffed Cake to the next level? Here are some pointers:
- Don’t rush the cooling process. A warm cake can cause the filling to melt and slide off.
- Use high-quality chocolate for the filling—it makes a noticeable difference.
- If you’re short on time, use store-bought dulce de leche instead of making it from scratch.
Small tweaks can lead to big improvements.
Presentation Ideas
Make your cake Instagram-worthy with these ideas:
- Dust powdered sugar over the top for a snowy effect.
- Add fresh berries for a pop of color.
- Drizzle melted chocolate or caramel sauce around the edges.
- Top with edible flowers for a touch of elegance.
Presentation matters—it’s the cherry on top of your hard work.
Healthier Alternatives
If you’re looking to lighten things up, here are six variations:
- Gluten-Free: Swap wheat flour for almond or coconut flour.
- Vegan: Replace eggs with flaxseed meal and use plant-based milk and butter.
- Low-Sugar: Use sugar substitutes like stevia or monk fruit in both the cake and filling.
- Protein-Packed: Add protein powder to the batter and filling.
- Fruit-Filled: Mix mashed bananas or pureed strawberries into the batter.
- Nutty Delight: Stir chopped nuts into the filling for added crunch.
Healthy doesn’t mean boring—you can still indulge responsibly.
Common Mistakes to Avoid
Mistake 1: Overmixing the Batter
Overmixing can make your cake dense instead of light and fluffy. Mix until the ingredients are just combined. Remember, a few lumps are okay! Pro tip: Stop mixing as soon as you see no streaks of flour.
Mistake 2: Skipping the Cooling Step
Rushing to assemble a warm cake can lead to disaster. The filling may melt and ooze out, ruining the presentation. Always let the cake cool completely before adding the filling.
Mistake 3: Burning the Chocolate
Chocolate burns easily, especially in the microwave. Heat it in short bursts and stir frequently. If it seizes, don’t panic—you can salvage it by whisking in a splash of warm milk.
Mistake 4: Not Greasing the Pan Properly
A poorly greased pan means your cake might stick and break apart. Be generous with the grease and flour to ensure a smooth release.
Mistake 5: Overfilling the Layers
Too much filling can make the cake unstable and messy. Spread it evenly and leave a small border around the edges to prevent spillage.
FAQ
Can I make this cake ahead of time?
Absolutely! You can bake the cake a day in advance and store it wrapped at room temperature. Prepare the filling separately and assemble the cake just before serving.
What type of chocolate works best?
Dark chocolate pairs beautifully with the condensed milk, but milk chocolate works too if you prefer a sweeter taste. Choose one with at least 60% cocoa for a balanced flavor.
How do I prevent the cake from drying out?
Brushing the layers with simple syrup helps lock in moisture. Also, store the cake properly to maintain its freshness.
Can I freeze this cake?
Yes, you can freeze slices individually for up to three months. Wrap them tightly in plastic wrap and aluminum foil to prevent freezer burn.
Is this recipe kid-friendly?
Kids love helping with this recipe, especially when it comes to licking the bowl! Just supervise them during steps involving heat or sharp tools.
What if I don’t have a mixer?
No problem! Whisk the eggs and sugar vigorously by hand until frothy, then proceed with the rest of the recipe as usual.
Can I use self-rising flour?
Yes, replace the wheat flour and yeast with an equivalent amount of self-rising flour for convenience.
Why did my filling turn grainy?
Grainy filling usually happens if the condensed milk overheats. Cook it on low heat and stir continuously to achieve a smooth consistency.
How do I fix a sunken cake?
A sunken cake might result from underbaking or opening the oven door too early. Don’t worry—just trim the top and use it as crumble topping!
Can I add alcohol to the filling?
For an adult twist, stir in a tablespoon of rum, liqueur, or brandy into the filling. It adds depth and complexity to the flavor profile.
Final Thoughts
This Love Stuffed Cake is more than just a dessert—it’s a labor of love that brings joy to everyone who tries it. From its pillowy sponge to its indulgent chocolate filling, every bite is a celebration. So grab your apron, gather your ingredients, and get ready to create something truly unforgettable. Happy baking!
Equipment
- Mixer (handheld or stand)
- Baking pan
- Spatula
- Toothpick or skewer
- Pan for heating condensed milk
Ingredients
- 3 eggs eggs
- 1 cup sugar
- 1 cup milk
- 1/2 cup oil
- 2 cups wheat flour
- 1 tablespoon yeast powder
- 1 teaspoon vanilla essence
- 1 can condensed milk
- 200 g dark or milk chocolate
- 100 g sour cream 1/2 box
Instructions
- Preheat your oven to 180°C (350°F).
- Beat the eggs with sugar until light and fluffy.
- Gradually mix in the milk and oil.
- Slowly add the sifted flour and yeast, mixing smoothly.
- Pour the batter into a greased and floured pan.
- Bake for 30-40 minutes, checking with a toothpick for doneness.
- Let the cake cool completely.
- Melt the chocolate and heat the condensed milk until thickened.
- Combine melted chocolate and sour cream until smooth.
- Slice the cooled cake horizontally in half.
- Spread the filling between the layers and on top.
- Chill the assembled cake for 30 minutes before serving.
Notes
Nutrition

Hi, I’m Olivia Parker, the founder of BakingSecret.com and a lifelong lover of all things sweet and homemade. I grew up in a small town in Oregon, where the smell of fresh cookies in my family’s kitchen sparked my passion for baking. Over the years, I turned that passion into a mission: to help home bakers feel confident, inspired, and creative.
After studying food science and working in several artisan bakeries across the U.S., I decided to create a space where everyone from beginners to seasoned bakers can find reliable recipes, expert tips, and a warm, welcoming community. BakingSecret.com is my way of sharing the magic of baking with the world. When I’m not testing new recipes, you’ll find me exploring farmers’ markets, collecting vintage cookbooks, or perfecting my sourdough technique.