
Why This Million Dollar Pound Cake is Worth Every Bite
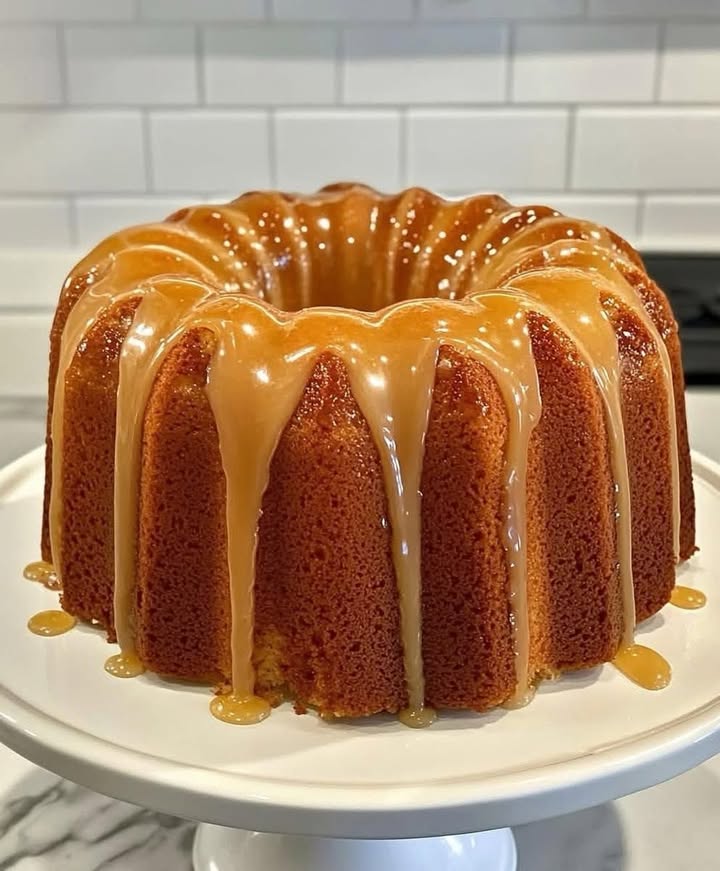
Let me tell you a little story. Last Christmas, I decided to try my hand at baking something truly special for my family gathering. That’s when I stumbled upon the Million Dollar Pound Cake. One bite in, and my brother declared it the best cake he’d ever tasted. The fluffy texture, the buttery aroma, and that luscious glaze dripping down the sides—this cake lives up to its name. Trust me, once you make it, you’ll feel like a million bucks yourself!
The Story Behind the Million Dollar Pound Cake
This classic dessert has roots in Southern baking traditions, where pound cakes have been a staple for generations. The name “pound cake” originally came from the simple formula of using a pound each of butter, sugar, eggs, and flour. Over time, bakers added their own twists, creating richer, more decadent versions like this one. My version includes almond extract, which adds a subtle nutty flavor that pairs beautifully with the vanilla. It’s a modern take on a timeless favorite.
Why You’ll Love This Recipe
What makes this Million Dollar Cake stand out? First, it’s incredibly easy to make. No fancy techniques or hard-to-find ingredients here! Second, the flavors are rich yet balanced. The buttery cake practically melts in your mouth, while the glaze adds just the right amount of sweetness. Plus, it’s versatile enough for any occasion. Whether you’re baking for a holiday or just because, this cake will impress everyone who tries it.
Perfect Occasions for This Million Dollar Cake
This cake is perfect for birthdays, holidays, potlucks, or even Sunday dinners. Imagine serving it at a bridal shower, with its elegant drizzle of glaze stealing the show. Or picture it as the centerpiece of your Thanksgiving dessert table. Honestly, you don’t need a special reason to bake this beauty. Sometimes, a regular Tuesday night calls for a slice of something extraordinary.
Treasure Ingredients for Your Million Dollar Cake
Here’s what you’ll need to create this masterpiece:
- For the cake:
- 6 large eggs
- 1 cup whole milk
- 2 cups of soft butter
- 3 cups of granulated sugar
- 4 cups of all-purpose flour
- 1 tsp. vanilla extract
- 1 tsp. almond extract (optional, but delicious!)
- For the glaze:
- 1 cup powdered sugar
- 2-3 tbsp. milk or cream
- ½ tsp. vanilla extract
Substitution Options
If you’re missing an ingredient or want to tweak the recipe, here are some swaps:
- Use buttermilk instead of whole milk for extra tanginess.
- Replace almond extract with more vanilla if you prefer.
- Swap butter with margarine, though butter gives the best flavor.
- Gluten-free flour works well for those with dietary restrictions.
Step 1: Prepare Your Oven
Start by preheating your oven to 300°F (150°C). While it heats up, grease your Bundt pan generously. I use a mix of butter and flour to ensure the cake slides out effortlessly. Pro tip: Don’t skip this step! A well-greased pan makes all the difference.
Step 2: Mix the Magic
In a large mixing bowl, beat the butter and sugar until they’re light and creamy. This step is crucial—it creates air pockets that make the cake fluffy. Add the eggs one at a time, mixing well after each addition. Watch how the batter transforms into a pale yellow cloud of goodness. It’s almost hypnotic!
Step 3: Incorporate Dry and Wet Ingredients
Now comes the fun part. Alternate adding the flour and milk, starting and ending with the flour. This method prevents the batter from becoming too dense. Stir in the vanilla and almond extracts for that signature flavor. The aroma alone will have your family peeking into the kitchen.
Step 4: Bake the Gold
Pour the batter into your prepared Bundt pan and smooth the top. Pop it into the oven and bake for 1 hour and 30 minutes. To check if it’s done, insert a toothpick—if it comes out clean, you’re golden! The cake should be golden brown and smell absolutely divine.
Step 5: The Glaze
While the cake cools, whip up the glaze. Combine powdered sugar, milk, and vanilla in a bowl. Adjust the milk until the glaze is thick but pourable. Drizzle it over the cooled cake, letting it cascade down the sides like icing on a dream.
Step 6: Decorate and Serve
Once glazed, let the cake sit for a few minutes so the glaze sets. Slice it up and watch everyone’s eyes light up. This cake is so good, it doesn’t even need garnishes—but a sprinkle of chopped nuts or fresh berries never hurts.
Chef’s Tip
To take this Million Dollar Cake to the next level, toast your flour lightly before adding it to the batter. This trick enhances the nutty flavor and gives the cake an even softer texture.
Timing Breakdown
Here’s how long everything takes:
- Prep time: 20 minutes
- Baking time: 1 hour 30 minutes
- Cooling time: 30 minutes
- Total time: About 2 hours 20 minutes
Extra Info
Did you know that pound cakes were originally named because they used equal weights of key ingredients? Back then, bakers didn’t have precise measurements, so they relied on this simple ratio. Today’s recipes, like this one, have evolved to include more flavor and flair.
Necessary Equipment
You’ll need a few basic tools to make this cake:
- A stand mixer or hand mixer
- A Bundt pan
- Mixing bowls
- A spatula
- A cooling rack
Storage Tips
To keep your cake fresh, store it in an airtight container at room temperature for up to 3 days. If you live in a warm climate, refrigerate it to prevent spoilage. Bring it back to room temperature before serving for the best taste and texture.
For longer storage, wrap individual slices in plastic wrap and freeze them. They’ll stay good for up to 2 months. Just thaw overnight in the fridge before enjoying.
Never store the cake uncovered, as it can dry out quickly. A little care goes a long way in preserving its moistness.
Tips and Advice
Want to make your Million Dollar Pound Cake even better? Here are some tips:
- Use room-temperature ingredients for smoother mixing.
- Don’t overmix the batter—stop as soon as everything is combined.
- Let the cake cool completely before glazing to avoid a runny mess.
Presentation Ideas
Serve this cake on a pretty cake stand for maximum impact. Add a dusting of powdered sugar or a sprig of mint for a touch of elegance. For holidays, decorate with seasonal fruits or edible flowers.
Healthier Alternatives
If you’re looking to lighten things up, try these variations:
- Low-fat version: Use reduced-fat butter and skim milk.
- Sugar-free: Swap granulated sugar with a sugar substitute.
- Gluten-free: Use a gluten-free flour blend.
- Dairy-free: Replace butter with coconut oil and milk with almond milk.
- Eggless: Use flax eggs as a vegan alternative.
- Fruit-infused: Fold in diced apples or blueberries for extra moisture and flavor.
Mistake 1: Overmixing the Batter
Overmixing can lead to a dense cake instead of a light and fluffy one. To avoid this, mix just until the ingredients are combined. Remember, less is more when it comes to stirring.
Mistake 2: Skipping the Grease
Not greasing the pan properly can result in a stuck cake. Always grease and flour your pan thoroughly. Pro tip: Use nonstick spray with flour for extra insurance.
Mistake 3: Rushing the Cooling Process
Glazing a warm cake causes the glaze to melt and slide off. Let the cake cool completely before adding the glaze. Patience pays off here!
FAQs
Can I use a different type of pan?
Yes, you can use loaf pans or round cake pans, but adjust the baking time accordingly. Keep an eye on the cake and test for doneness with a toothpick.
How do I know when the cake is done?
The cake is ready when a toothpick inserted into the center comes out clean. It should also pull away slightly from the edges of the pan.
Can I make this cake ahead of time?
Absolutely! This cake tastes even better the next day as the flavors meld. Store it properly, and it’ll be ready to wow whenever you need it.
What if I don’t have almond extract?
No problem! Simply double the amount of vanilla extract for a similar effect.
Can I freeze the cake?
Yes, freezing works great. Wrap slices tightly in plastic wrap and place them in a freezer-safe bag. Thaw overnight in the fridge before serving.
Why is my cake dry?
Dry cakes often result from overbaking. Stick to the recommended time and check frequently toward the end of baking.
Can I add fruit to the batter?
Of course! Diced apples, berries, or citrus zest can add a lovely twist to the classic recipe.
What’s the best way to serve this cake?
Serve it plain, with a dollop of whipped cream, or alongside a scoop of vanilla ice cream for an indulgent treat.
Is this cake kid-friendly?
Definitely! Kids love its sweet, buttery flavor. Plus, it’s easy to make, so they can help with mixing and decorating.
Can I reduce the sugar?
Yes, but reducing sugar may affect the cake’s texture. Try cutting it by no more than ¼ cup to maintain structure.
Final Thoughts
Baking a Million Dollar Pound Cake is like giving yourself a gift. It’s rich, comforting, and oh-so-delicious. Whether you’re making it for a special occasion or just because, this cake will bring joy to anyone lucky enough to taste it. So grab your apron, gather your ingredients, and get ready to bake something truly unforgettable.
Equipment
- Stand mixer or hand mixer
- Bundt pan
- Mixing bowls
- Spatula
- Cooling rack
Ingredients
- 6 large eggs
- 1 cup whole milk
- 2 cups soft butter
- 3 cups granulated sugar
- 4 cups all-purpose flour
- 1 tsp vanilla extract
- 1 tsp almond extract (optional)
Instructions
- Preheat your oven to 300°F (150°C) and grease a Bundt pan generously.
- In a large mixing bowl, beat the butter and sugar until light and creamy.
- Add the eggs one at a time, mixing well after each addition.
- Alternate adding the flour and milk, starting and ending with flour. Stir in the vanilla and almond extracts.
- Pour the batter into the prepared Bundt pan and smooth the top.
- Bake for 1 hour and 30 minutes, checking with a toothpick for doneness.
- While the cake cools, mix powdered sugar, milk, and vanilla in a bowl to make the glaze.
- Drizzle glaze over the cooled cake and let it set before slicing to serve.
Notes
Nutrition

Hi, I’m Olivia Parker, the founder of BakingSecret.com and a lifelong lover of all things sweet and homemade. I grew up in a small town in Oregon, where the smell of fresh cookies in my family’s kitchen sparked my passion for baking. Over the years, I turned that passion into a mission: to help home bakers feel confident, inspired, and creative.
After studying food science and working in several artisan bakeries across the U.S., I decided to create a space where everyone from beginners to seasoned bakers can find reliable recipes, expert tips, and a warm, welcoming community. BakingSecret.com is my way of sharing the magic of baking with the world. When I’m not testing new recipes, you’ll find me exploring farmers’ markets, collecting vintage cookbooks, or perfecting my sourdough technique.