
Why Pineapple Sweet Buns Are a Must-Try
There’s something magical about the smell of freshly baked bread wafting through the kitchen. But when that aroma is paired with the sweet, crunchy topping of Pineapple Sweet Buns, it’s like stepping into a bakery in Hong Kong or your favorite dim sum spot. I first tried these buns during a family trip to Chinatown, and let me tell you—they were love at first bite! The soft, pillowy dough combined with the sugary, golden crust was pure bliss. Since then, I’ve been perfecting this recipe at home, and now I’m sharing it with you. Whether you’re a seasoned baker or just starting out, these buns are sure to become a favorite.
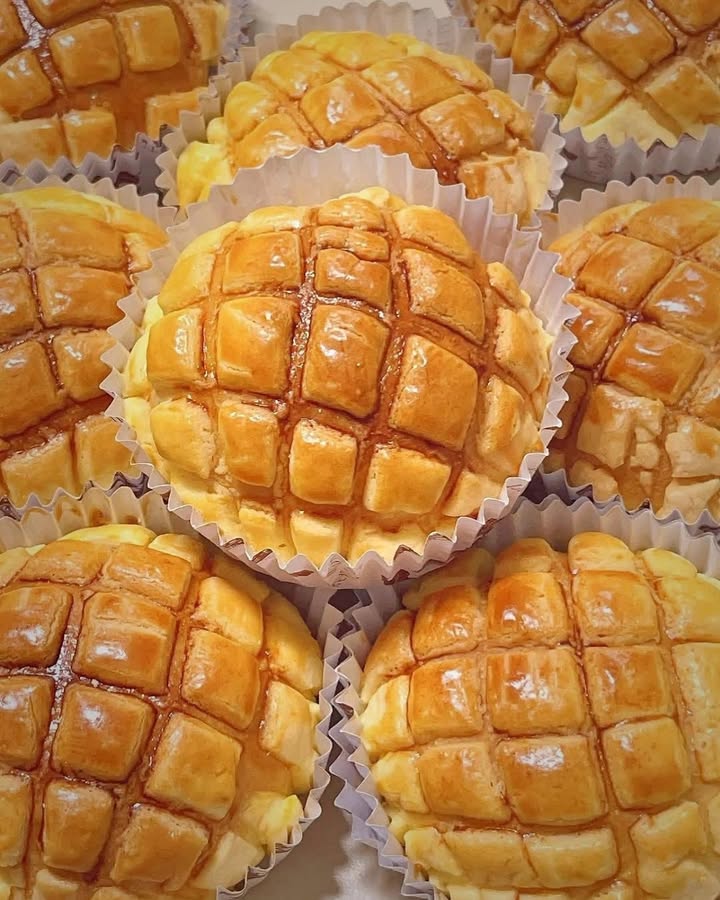
The Story Behind Pineapple Sweet Buns
Pineapple Sweet Buns, or bo lo bao, are a beloved treat in Chinese bakeries. Despite their name, they don’t actually contain pineapple—just a topping that resembles the fruit’s textured skin. These buns originated in Hong Kong and have become a staple in Asian bakeries worldwide. Traditionally served warm, they’re often enjoyed as a snack or breakfast item. Over time, variations have popped up, including stuffed versions with custard or red bean paste. My version keeps things classic, focusing on the simple joy of a perfectly baked bun with its signature crackly top.
Why You’ll Love This Recipe
This recipe is all about balance. The fluffy, slightly sweet dough pairs beautifully with the crisp, caramelized topping. Plus, it’s surprisingly easy to make! Even if you’ve never worked with yeast before, this recipe will guide you step by step. The result? A batch of golden, fragrant buns that will impress your friends and family. Trust me, once you taste these, you’ll want to bake them again and again.
Perfect Occasions for Pineapple Sweet Buns
These buns are versatile enough for any occasion. Serve them at brunch alongside coffee or tea for a cozy morning. They’re also a hit at afternoon tea parties or as a sweet surprise for kids’ lunchboxes. I love bringing them to potlucks because they always disappear fast! And let’s not forget—they make an excellent gift for neighbors or coworkers. Who wouldn’t smile at the sight of these golden beauties?
Ingredients
- For the dough:
- 250 g of high gluten flour
- 20 g of sugar
- 15 g of powdered milk
- 3 g of yeast
- 135 g of liquid milk
- 1 egg
- 15 g unsalted butter
- For the puff pastry:
- 50 g unsalted butter
- 20 g of sugar
- 15 g egg liquid
- 70 g of low gluten flour
- 15 g of powdered milk
Substitution Options
If you can’t find high gluten flour, bread flour works just as well. For vegans, swap the butter with plant-based margarine and use flaxseed meal mixed with water instead of eggs. If powdered milk isn’t available, omit it and add a splash more liquid milk to the dough. These tweaks keep the texture and flavor intact while accommodating dietary needs.
Step 1: Prepare the Dough
Start by mixing all the dough ingredients except the butter. Knead until smooth, then add the butter bit by bit. As you work, the dough transforms from sticky to silky—a sign it’s ready. Let it rise in a warm spot until doubled in size. Pro tip: Cover the bowl with a damp cloth to prevent drying. Watching the dough puff up is oddly satisfying!
Step 2: Shape It
Once risen, gently deflate the dough and divide it into six equal portions. Roll each piece into a ball and let them rest briefly. This shaping process ensures even baking and gives the buns their iconic round shape. Handle the dough lightly—it’s delicate but forgiving.
Step 3: Prepare the Puff Pastry
While the dough rests, whip up the puff pastry topping. Mix the ingredients until crumbly, then form six small discs. Flatten each disc between sheets of plastic wrap. The contrast between the soft dough and crunchy topping is what makes Pineapple Sweet Buns so irresistible.
Step 4: Assemble the Buns
Place a puff pastry disc atop each dough ball. Use a scraper to create decorative lines, mimicking a pineapple’s pattern. Let the assembled buns proof until they grow by half. During this time, the kitchen fills with anticipation—and the promise of fresh-baked goodness.
Step 5: Bake
Brush the buns with egg yolk for a glossy finish, then bake at 180°C (356°F) for 25 minutes. Keep an eye on them; they should turn a rich golden brown. The aroma alone is worth the wait. Chef’s tip: Rotate the tray halfway through baking for even color.
Timing
- Preparation time: 1 hour
- Cooking time: 25 minutes
- Resting time: 1 hour
- Total time: 2 hours 25 minutes
Chef’s Secret
To enhance the sweetness without adding extra sugar, brush the baked buns with a light syrup made from equal parts water and sugar. This trick gives the crust an irresistible sheen and a hint of extra flavor.
Extra Info
Did you know that Pineapple Sweet Buns are often called “crackly tops” in Chinese bakeries? That’s because the topping cracks beautifully as it bakes, creating a unique texture. Fun fact: Some bakers add turmeric to the topping for a brighter yellow hue!
Necessary Equipment
- Mixing bowls
- Rolling pin
- Baking tray
- Parchment paper
- Plastic wrap
- Oven
Storage
To keep Pineapple Sweet Buns fresh, store them in an airtight container at room temperature for up to two days. For longer storage, freeze the cooled buns in a zip-top bag. Reheat frozen buns in the oven for a few minutes to restore their crunch.
If you live in a humid climate, avoid leaving the buns uncovered, as the topping can lose its crispness. Instead, wrap them loosely in parchment paper before placing them in a container.
For best results, enjoy the buns within a week if frozen. Thaw them overnight in the fridge before reheating.
Tips and Advice
Use a kitchen scale for precise measurements—it makes a big difference in baking. Don’t rush the rising process; patience yields softer buns. Lastly, experiment with fillings like custard or coconut cream for a twist on the classic recipe.
Presentation Tips
- Serve the buns on a rustic wooden board for a charming touch.
- Dust lightly with powdered sugar for added elegance.
- Pair with a steaming cup of jasmine tea for a complete experience.
Healthier Alternative Recipes
Here are six ways to tweak this recipe for a healthier spin:
- Whole Wheat Version: Substitute half the flour with whole wheat for added fiber.
- Reduced Sugar: Cut the sugar in both the dough and topping by half.
- Vegan Option: Replace dairy with plant-based alternatives.
- Gluten-Free: Use a gluten-free flour blend designed for breads.
- Low-Fat: Reduce the butter and replace it with applesauce.
- Fruit-Infused: Add dried fruits like raisins or cranberries to the dough.
Mistake 1: Skipping the Resting Time
Rushing the resting period can lead to dense buns. Yeast needs time to ferment and expand the dough. To avoid this, plan ahead and allow ample time for rising.
Mistake 2: Overworking the Dough
Kneading too much can make the dough tough. Stop once it feels smooth and elastic. A good test is the windowpane method: stretch a small piece—if it forms a translucent film, it’s ready.
Mistake 3: Using Cold Ingredients
Cold milk or eggs can slow down yeast activity. Always use room-temperature liquids for optimal results.
Mistake 4: Overbaking
Baking too long dries out the buns. Set a timer and check early. If unsure, tap the bottom—a hollow sound means they’re done.
FAQ
Can I make these buns ahead of time?
Absolutely! You can prepare the dough a day in advance and refrigerate it overnight. Just let it come to room temperature before shaping and baking.
Do I need a stand mixer?
Nope! While a stand mixer speeds things up, you can knead the dough by hand. It’s a great workout and just as effective.
Why is my topping cracking too much?
Overmixing the topping can cause excessive cracking. Mix until just combined for the perfect texture.
Can I freeze the baked buns?
Yes! Freeze them in a sealed bag and reheat in the oven for a fresh-baked taste.
What’s the purpose of powdered milk?
Powdered milk adds richness and enhances the browning of the dough and topping.
How do I know when the dough has doubled?
Gently press your finger into the dough. If the indentation stays, it’s ready to go.
Can I use active dry yeast instead of instant?
Yes, but dissolve it in warm milk first to activate it.
Why does my dough feel sticky?
Sticky dough usually means it needs more flour. Add a tablespoon at a time until manageable.
Is it okay to skip the decorative lines?
Of course! The lines are optional but do add visual appeal.
Can I stuff the buns?
Definitely! Try filling them with custard, red bean paste, or even ham and cheese.
Final Thoughts
Pineapple Sweet Buns are more than just a treat—they’re a celebration of texture, flavor, and tradition. With this recipe, you can bring a little piece of Hong Kong into your own kitchen. So grab your apron, gather your ingredients, and get ready to bake something truly special. Happy baking!
Equipment
- Mixing bowls
- Rolling pin
- Baking tray
- Parchment paper
- Plastic wrap
- Oven
Ingredients
- 250 g high gluten flour
- 20 g sugar
- 15 g powdered milk
- 3 g yeast
- 135 g liquid milk
- 1 egg
- 15 g unsalted butter
- 50 g unsalted butter
- 20 g sugar
- 15 ml egg liquid
- 70 g low gluten flour
- 15 g powdered milk
Instructions
- Mix all dough ingredients except for butter until smooth, then incorporate butter gradually.
- Let the mixture rise in a warm spot until doubled in size.
- Gently deflate the dough and divide it into six equal portions, shaping each into a ball.
- For the puff pastry topping, mix the ingredients until crumbly, forming six small discs.
- Place a puff pastry disc atop each dough ball, creating a decorative pattern.
- Proof the assembled buns until they increase in size by half.
- Brush the buns with egg yolk and bake at 180°C (356°F) for 25 minutes until golden brown.
Notes
Nutrition

Hi, I’m Olivia Parker, the founder of BakingSecret.com and a lifelong lover of all things sweet and homemade. I grew up in a small town in Oregon, where the smell of fresh cookies in my family’s kitchen sparked my passion for baking. Over the years, I turned that passion into a mission: to help home bakers feel confident, inspired, and creative.
After studying food science and working in several artisan bakeries across the U.S., I decided to create a space where everyone from beginners to seasoned bakers can find reliable recipes, expert tips, and a warm, welcoming community. BakingSecret.com is my way of sharing the magic of baking with the world. When I’m not testing new recipes, you’ll find me exploring farmers’ markets, collecting vintage cookbooks, or perfecting my sourdough technique.