
Why This Strawberry Velvet Cheesecake Is a Must-Try
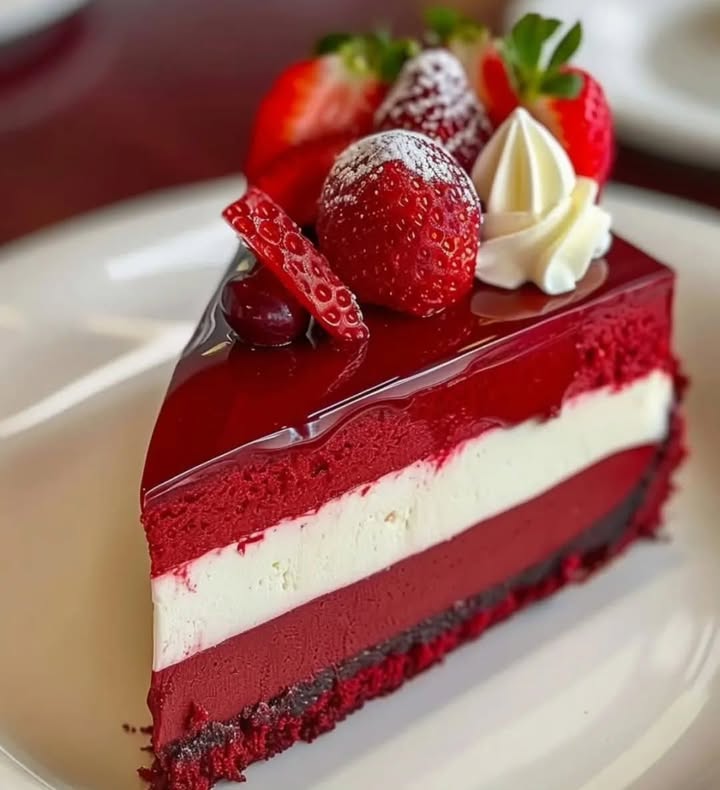
Picture this: a velvety red velvet cake layer, topped with creamy cheesecake goodness, and crowned with sweet strawberries. Sounds like dessert heaven, right? I stumbled upon this Strawberry Velvet Cheesecake recipe while experimenting in my kitchen one lazy Sunday afternoon. My family couldn’t stop raving about it! It’s rich yet light, indulgent yet refreshing—perfect for anyone who loves a mix of textures and flavors. Whether you’re baking for a special occasion or just craving something sweet, this recipe is sure to impress.
The Story Behind the Layers
This dessert combines two iconic treats: red velvet cake and cheesecake. Red velvet cake has its roots in Southern American baking traditions, known for its signature crimson hue and subtle cocoa flavor. Cheesecake, on the other hand, has been around since ancient Greece but became a household favorite in the U.S. during the 1900s. The addition of fresh strawberries brings a modern twist that balances the richness of both layers. I first made this for a friend’s birthday, and it quickly became my go-to recipe for potlucks and family gatherings. Trust me, people will think you spent hours at a bakery!
Why You’ll Love This Recipe
This Strawberry Velvet Cheesecake is a showstopper for so many reasons. First, the flavors are spot-on: the tangy cream cheese layer complements the slightly chocolatey red velvet base beautifully. Then there’s the strawberry topping, which adds a burst of freshness and color. Plus, it’s surprisingly easy to make—even if you’re not a seasoned baker. The hardest part is waiting for it to bake and cool! Another bonus? It’s versatile. You can tweak it to suit your taste or dietary needs without losing its wow factor.
Perfect Occasions for This Dessert
This cheesecake shines at any event where you want to impress. Bring it to a holiday dinner, and watch it disappear faster than pumpkin pie. It’s also perfect for Valentine’s Day, thanks to its romantic red-and-pink theme. Birthdays, bridal showers, or even casual weekend get-togethers? Yes, yes, and yes. Honestly, I’ve served this cheesecake at everything from formal dinners to backyard barbecues, and it always gets rave reviews.
Ingredients You’ll Need
Here’s what you’ll need to create this masterpiece:
- For the Red Velvet Cake Layer:
- 1 1/2 cups all-purpose flour
- 1 cup granulated sugar
- 1 teaspoon sodium bicarbonate (baking soda)
- 1 teaspoon cocoa powder
- 1/2 teaspoon salt
- 1 cup vegetable oil
- 1 cup buttermilk, at room temperature
- 2 large eggs
- 2 tablespoons red food coloring
- 1 teaspoon vanilla extract
- 1 teaspoon white vinegar
- For the Cheesecake Layer:
- 16 oz (2 packages) cream cheese, softened
- 1 cup granulated sugar
- 1 teaspoon vanilla extract
- 3 large eggs
- 1 cup sour cream
- For the Strawberry Topping:
- 2 cups fresh strawberries, sliced
- 1/4 cup granulated sugar
- 1 tablespoon lemon juice
- Optional: whipped cream for decoration
Substitution Options
Not everyone has every ingredient on hand, and that’s okay! Here are some swaps you can try:
- If you don’t have buttermilk, mix 1 cup of milk with 1 tablespoon of lemon juice or vinegar. Let it sit for 5 minutes.
- Use Greek yogurt instead of sour cream for a tangier cheesecake layer.
- For a natural red color, swap the food coloring with beetroot powder.
- Frozen strawberries work fine for the topping—just thaw them first.
Step 1: Preheat the Oven
Start by preheating your oven to 325°F (160°C). Grease a 9-inch springform pan and wrap the outside with aluminum foil. This little trick prevents water from seeping in during the water bath step later. Pro tip: Make sure the foil wraps snugly around the pan to avoid leaks. A dry crust means a happy baker!
Step 2: Prepare the Red Velvet Cake Layer
In a large bowl, whisk together the flour, sugar, baking soda, cocoa powder, and salt. In another bowl, combine the vegetable oil, buttermilk, eggs, red food coloring, vanilla extract, and vinegar. Gradually pour the wet ingredients into the dry ones, mixing until smooth. Pour this vibrant red batter into your prepared pan and spread it evenly. Doesn’t it look gorgeous already?
Step 3: Make the Cheesecake Layer
In a separate bowl, beat the softened cream cheese and sugar until creamy. Add the vanilla extract and mix well. Crack in the eggs one at a time, blending gently to avoid overmixing. Stir in the sour cream until the mixture is silky smooth. Pour this luscious filling over the red velvet layer. Gently tap the pan on the counter to release air bubbles.
Step 4: Bake Your Cheesecake
Place the springform pan inside a larger baking dish. Fill the outer dish with hot water halfway up the sides of the springform pan. This water bath ensures your cheesecake bakes evenly without cracking. Bake for about 70-80 minutes, or until the center is set but still slightly jiggly. Chef’s tip: Don’t open the oven door too often—it can cause cracks!
Timing Breakdown
- Prep Time: 20 minutes
- Cooking Time: 70-80 minutes
- Cooling Time: 2 hours
- Total Time: Approximately 3.5 hours
Chef’s Secret
To prevent cracks, let the cheesecake cool gradually. Turn off the oven after baking and leave the door slightly ajar for 30 minutes before removing the cake. This slow cooling process helps maintain that smooth, crack-free surface we all love.
An Interesting Fact About Strawberries
Did you know strawberries are the only fruit with seeds on the outside? Each berry has about 200 tiny seeds! They’re packed with vitamin C, making them not only delicious but also good for your skin and immune system. No wonder they pair so perfectly with desserts like this Strawberry Velvet Cheesecake.
Necessary Equipment
- 9-inch springform pan
- Mixing bowls
- Electric mixer or whisk
- Spatula
- Baking dish (for water bath)
- Aluminum foil
Storage Tips
Once cooled, cover the cheesecake tightly with plastic wrap or transfer it to an airtight container. Store it in the refrigerator for up to 5 days. For longer storage, freeze slices wrapped individually in parchment paper and placed in a freezer-safe bag. Thaw overnight in the fridge before serving.
When freezing, label each slice with the date to keep track of freshness. Always bring the cheesecake back to room temperature before serving for optimal flavor and texture.
Avoid storing the cheesecake near strong-smelling foods in the fridge, as it can absorb odors easily. Keep it away from onions and garlic!
Tips and Advice
- Use room-temperature ingredients for smoother mixing.
- Don’t skip the water bath—it’s key to preventing cracks.
- Let the cheesecake chill overnight for the best texture.
Presentation Ideas
- Garnish with extra strawberry slices and a dollop of whipped cream.
- Dust powdered sugar lightly over the top for a touch of elegance.
- Serve on a decorative cake stand surrounded by fresh berries.
Healthier Alternatives
Love this cheesecake but looking for lighter options? Try these variations:
- Low-Sugar Version: Use a sugar substitute like stevia or monk fruit in both the cake and cheesecake layers.
- Vegan Option: Replace eggs with flaxseed meal and dairy with plant-based alternatives like coconut cream.
- Gluten-Free: Swap regular flour with almond or oat flour in the red velvet layer.
- Reduced-Fat: Use low-fat cream cheese and Greek yogurt instead of full-fat versions.
- No-Bake Version: Skip the oven entirely by using a no-bake cheesecake recipe.
- Mini Cheesecakes: Portion the batter into muffin tins for bite-sized treats.
Mistake 1: Overmixing the Batter
Overmixing can lead to dense, tough layers. Mix just until the ingredients are combined. Pro tip: Stop mixing as soon as you see no streaks of flour or lumps in the batter.
Mistake 2: Skipping the Water Bath
Skipping the water bath might save time, but it increases the risk of cracks. The steam from the water keeps the cheesecake moist and prevents drying out.
Mistake 3: Opening the Oven Door Too Early
Opening the oven door too soon lets heat escape, causing uneven baking. Resist the urge to peek until at least halfway through the cooking time.
Frequently Asked Questions
Can I use store-bought red velvet cake mix?
Absolutely! While homemade is always better, a boxed mix works in a pinch. Just follow the package instructions for the cake layer.
Do I have to use fresh strawberries?
Nope! Frozen strawberries work great too. Just thaw and drain them before adding sugar and lemon juice.
How do I prevent the cheesecake from sticking to the pan?
Grease the pan generously and line the bottom with parchment paper. Once cooled, run a knife around the edges before releasing the springform latch.
What if I don’t have a springform pan?
You can use a regular cake pan, but lining it with parchment paper makes removal easier. Be gentle when lifting the cheesecake out.
Can I make this ahead of time?
Yes! This cheesecake actually tastes better the next day. Assemble it a day in advance and chill overnight for maximum flavor.
Is this recipe kid-friendly?
Kids love helping with this recipe, especially decorating with strawberries. Just supervise when handling sharp tools or the oven.
How do I know when the cheesecake is done?
The edges should be set, but the center will still jiggle slightly. It will firm up as it cools.
Can I double the recipe?
Definitely! Double all ingredients and use two pans or one larger pan, adjusting baking time accordingly.
Why did my cheesecake crack?
Cracks happen due to rapid temperature changes. Avoid opening the oven door frequently and let the cheesecake cool slowly.
Can I freeze leftovers?
Yes! Wrap individual slices in plastic wrap and freeze for up to 3 months. Thaw in the fridge overnight before serving.
Final Thoughts
This Strawberry Velvet Cheesecake is more than just a dessert—it’s a labor of love that brings joy to everyone who tries it. With its stunning layers, delightful flavors, and endless customization options, it’s bound to become a staple in your recipe collection. So grab your apron, gather your ingredients, and get ready to wow your loved ones with this unforgettable treat. Happy baking!
Equipment
- Mixing bowls
- Electric mixer or whisk
- Spatula
- 9-inch springform pan
- Baking dish (for water bath)
- Aluminum foil
Ingredients
- 1 1/2 cups all-purpose flour
- 1 cup granulated sugar
- 1 teaspoon sodium bicarbonate (baking soda)
- 1 teaspoon cocoa powder
- 1/2 teaspoon salt
- 1 cup vegetable oil
- 1 cup buttermilk, at room temperature
- 2 large eggs
- 2 tablespoons red food coloring
- 1 teaspoon vanilla extract
- 1 teaspoon white vinegar
- 16 oz (2 packages) cream cheese, softened
- 1 cup granulated sugar
- 1 teaspoon vanilla extract
- 3 large eggs
- 1 cup sour cream
- 2 cups fresh strawberries, sliced
- 1/4 cup granulated sugar
- 1 tablespoon lemon juice
- q.s. whipped cream for decoration
Instructions
- Preheat your oven to 325°F (160°C). Grease a 9-inch springform pan and wrap with aluminum foil.
- In a large bowl, whisk together the flour, sugar, baking soda, cocoa powder, and salt.
- In another bowl, combine the vegetable oil, buttermilk, eggs, red food coloring, vanilla extract, and vinegar. Gradually mix into the dry ingredients.
- Pour the red velvet batter into the prepared pan and spread evenly.
- In a separate bowl, beat softened cream cheese and sugar until creamy. Add vanilla extract and mix well.
- Add eggs one at a time, blending gently. Stir in sour cream until smooth.
- Pour the cheesecake mixture over the red velvet layer in the pan. Gently tap to release air bubbles.
- Place the springform pan inside a larger baking dish and fill with hot water halfway up the sides. Bake for 70-80 minutes, or until the center is set but slightly jiggly.
- Once baked, turn off the oven, slightly open the door, and let cool for 30 minutes before removing from the oven.
- After cooling, prepare the strawberry topping by mixing sliced strawberries with sugar and lemon juice.
- Decorate the cheesecake with the strawberry topping before serving.
Notes
Nutrition

Hi, I’m Olivia Parker, the founder of BakingSecret.com and a lifelong lover of all things sweet and homemade. I grew up in a small town in Oregon, where the smell of fresh cookies in my family’s kitchen sparked my passion for baking. Over the years, I turned that passion into a mission: to help home bakers feel confident, inspired, and creative.
After studying food science and working in several artisan bakeries across the U.S., I decided to create a space where everyone from beginners to seasoned bakers can find reliable recipes, expert tips, and a warm, welcoming community. BakingSecret.com is my way of sharing the magic of baking with the world. When I’m not testing new recipes, you’ll find me exploring farmers’ markets, collecting vintage cookbooks, or perfecting my sourdough technique.