
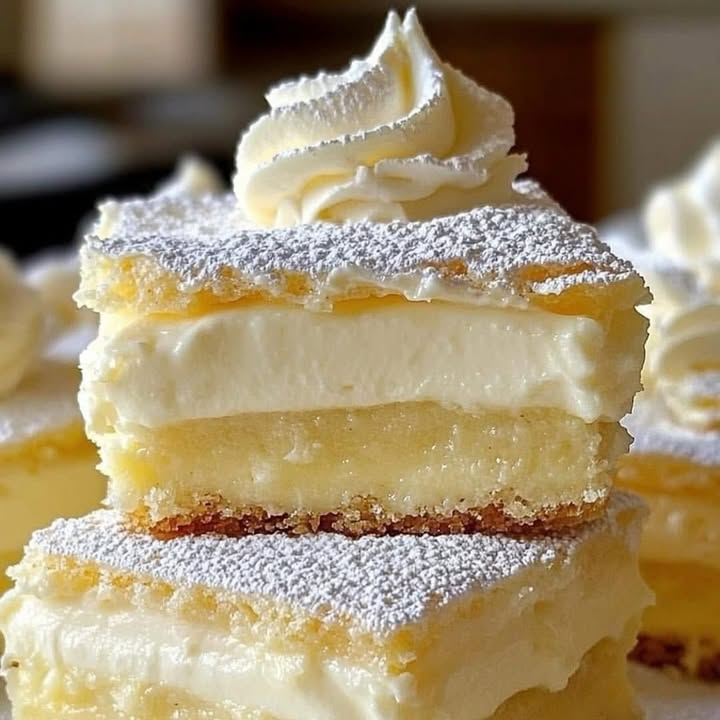
Why Vanilla Custard Squares Are a Dessert Game-Changer
Let me tell you about the dessert that made my kitchen smell like heaven last weekend. I was hosting a small get-together, and I wanted something simple yet impressive. Enter Vanilla Custard Squares. These creamy, dreamy squares are like a warm hug for your taste buds. With their buttery crust, velvety custard filling, and cloud-like whipped cream topping, they’re the kind of dessert that makes people ask for seconds—and the recipe!
A Little Sweet History
I first stumbled upon this recipe while flipping through an old cookbook at my grandma’s house. She used to make something similar during family gatherings, but her version was more rustic. Over time, I’ve added my own twists, like using heavy cream for extra richness and adding a sprinkle of cookie crumbs on top for crunch. It’s amazing how a classic dessert can evolve while still keeping its nostalgic charm.
Why You’ll Love This Recipe
If you’re looking for a dessert that’s easy to make but feels fancy, this is it. The flavors are comforting yet sophisticated—vanilla custard is timeless for a reason. Plus, it’s versatile! Whether you’re serving it at a holiday dinner or just craving something sweet on a lazy Sunday, these Vanilla Custard Squares will hit the spot every time.
Perfect Occasions to Whip Up This Dessert
This dessert shines at potlucks, birthday parties, or even as a surprise treat for your family. I once brought it to a book club meeting, and everyone raved about how beautiful and delicious it was. It’s also perfect for holidays like Thanksgiving or Christmas when you want something lighter than pie but still indulgent.
Ingredients
For the Crust:
- 1 1/2 cups graham cracker crumbs
- 1/3 cup melted butter
- 1/4 cup granulated sugar
For the Custard:
- 2 cups whole milk
- 1 cup heavy cream
- 3/4 cup granulated sugar
- 5 large egg yolks
- 2 teaspoons vanilla extract
- 3 tablespoons cornstarch
For the Whipped Cream:
- 1 1/2 cups heavy cream
- 1/4 cup powdered sugar
- 1 teaspoon vanilla extract
Substitution Options
Not everyone has all the ingredients on hand, and that’s okay! Here are some swaps:
- Graham crackers: Use crushed digestive biscuits or shortbread cookies instead.
- Heavy cream: Substitute with half-and-half if needed, though the texture might be slightly less rich.
- Cornstarch: Arrowroot powder works as a thickener too.
Feel free to experiment based on what you have in your pantry!
Step-by-Step Preparation
Step 1: Prepare the Crust
Start by mixing the graham cracker crumbs, melted butter, and sugar in a bowl until it resembles wet sand. Press this mixture firmly into a 9×9-inch pan lined with parchment paper. Pop it into the oven at 350°F (175°C) for 10 minutes. The aroma of toasted graham crackers will fill your kitchen, making everyone curious about what you’re baking. Pro tip: Use the back of a spoon to press the crust evenly—it ensures a sturdy base.
Step 2: Make the Custard
In a saucepan, gently heat the milk and heavy cream until warm but not boiling. In another bowl, whisk together the sugar, egg yolks, vanilla, and cornstarch until smooth. Slowly pour the hot milk mixture into the yolk mixture, whisking constantly to avoid scrambling the eggs. Return the combined mixture to the stove and cook over medium heat, stirring nonstop, until it thickens into a luscious custard. Chef’s tip: Strain the custard through a fine mesh sieve for an ultra-smooth texture.
Step 3: Assemble the Dessert
Once the crust has cooled, pour the custard over it and spread it evenly. Let it chill in the fridge for at least 2 hours. This resting period allows the flavors to meld and the custard to set perfectly. Trust me, patience pays off here!
Step 4: Add the Whipped Cream
Beat the heavy cream, powdered sugar, and vanilla extract until stiff peaks form. Spread this fluffy layer over the chilled custard. Don’t rush this step—it’s worth taking your time to create soft, billowy peaks. Pro tip: Chill your mixing bowl beforehand for faster whipping.
Step 5: Decorate and Serve
Cut the dessert into squares and add a final touch of elegance with cookie crumbs, puff pastry shards, or white chocolate chips. These little extras take the presentation from good to great. Now, grab a fork and dig in!
Timing Breakdown
Here’s how long each part takes:
- Prep Time: 20 minutes
- Cooking Time: 15 minutes
- Resting Time: 2+ hours
- Total Time: About 3 hours (mostly hands-off)
Chef’s Secret
To enhance the vanilla flavor, use real vanilla beans instead of extract. Split the bean lengthwise, scrape out the seeds, and infuse them into the milk before heating. It adds a subtle floral note that elevates the entire dish.
Extra Info
Did you know that custard dates back to medieval Europe? Back then, it was often served as a savory dish before becoming the sweet treat we know today. Isn’t it fascinating how food evolves over centuries?
Necessary Equipment
You don’t need anything fancy to make these squares. A 9×9-inch baking pan, a whisk, a saucepan, and a spatula are the essentials. If you want to go the extra mile, a stand mixer helps whip the cream quickly.
Storage Tips
These Vanilla Custard Squares store beautifully in the fridge. Keep them covered with plastic wrap or in an airtight container to prevent the whipped cream from drying out. They’ll stay fresh for up to 3 days.
If you live in a humid area, consider adding a layer of parchment paper between the squares to keep them from sticking together. For longer storage, freeze the squares without the whipped cream topping. Simply thaw overnight in the fridge and add the cream later.
One last thing: Always bring the dessert to room temperature before serving. Cold custard doesn’t taste nearly as good as one that’s had a chance to soften slightly.
Tips and Advice
Here are a few pointers to make your life easier:
- Use room-temperature eggs for smoother custard.
- Don’t skip straining the custard—it removes any lumps and ensures silkiness.
- If you’re nervous about curdling, temper the eggs slowly by adding just a splash of hot milk at a time.
Presentation Ideas
Make your squares Instagram-worthy with these ideas:
- Sprinkle edible flowers for a pop of color.
- Drizzle caramel or chocolate sauce around the plate.
- Serve with fresh berries on the side for contrast.
Healthier Alternatives
Want to lighten things up? Try these variations:
- Low-Fat Version: Swap whole milk for skim milk and reduce the sugar by half.
- Vegan Option: Use coconut cream and plant-based butter for the crust.
- Gluten-Free Twist: Opt for gluten-free graham crackers or almond flour.
- Protein-Packed: Add a scoop of vanilla protein powder to the custard.
- Fruit-Infused: Stir in pureed mango or passionfruit for a tropical flair.
- Spiced Delight: Add cinnamon or nutmeg to the custard for warmth.
Common Mistakes to Avoid
Mistake 1: Overcooking the Custard
Overcooked custard turns rubbery and loses its creamy texture. To avoid this, remove it from heat as soon as it thickens. Pro tip: Dip a spoon into the custard—if it coats the back smoothly, it’s done.
Mistake 2: Skipping the Resting Time
Rushing the chilling process leads to messy slices. Give the dessert ample time to set so it cuts cleanly and holds its shape.
Mistake 3: Not Tempering the Eggs
Dumping hot milk directly onto cold eggs causes scrambling. Always temper them gradually to ensure a smooth custard.
FAQs
Can I make this recipe ahead of time?
Absolutely! You can prepare the crust and custard a day in advance and assemble everything right before serving. Just whip the cream fresh for best results.
What if I don’t have a 9×9-inch pan?
No worries! Use an 8×8-inch pan for thicker squares or a larger pan for thinner ones. Adjust baking times slightly if needed.
Can I freeze this dessert?
Yes, but freeze only the custard and crust layers. Add the whipped cream after thawing to maintain freshness.
How do I fix lumpy custard?
Strain it through a fine mesh sieve to remove lumps. Next time, whisk more thoroughly while cooking.
Is this recipe kid-friendly?
Definitely! Kids love the creamy texture and mild sweetness. Plus, they can help decorate with sprinkles or fruit.
Can I use flavored extracts?
Of course! Almond, coconut, or lemon extract adds unique twists to the custard.
Why does my crust crumble?
It might need more butter to bind the crumbs. Try adding an extra tablespoon next time.
What’s the best way to cut clean squares?
Use a sharp knife dipped in hot water and wiped dry between cuts. This prevents sticking and creates neat edges.
Can I double the recipe?
Yes, simply adjust ingredient amounts and use a larger pan. Bake times may increase slightly.
How do I know when the custard is thick enough?
The custard should coat the back of a spoon and leave a clear trail when you run your finger through it.
Final Thoughts
There you have it—the ultimate guide to making Vanilla Custard Squares. Whether you’re a seasoned baker or a beginner, this recipe is sure to impress. So grab your apron, gather your ingredients, and let’s create something magical in the kitchen. Your friends and family will thank you!
Equipment
- 9x9-inch baking pan
- Whisk
- Spatula
- Fine mesh sieve (optional)
- Stand mixer (optional)
Ingredients
- 1.5 cups graham cracker crumbs
- 1/3 cup melted butter
- 1/4 cup granulated sugar
- 2 cups whole milk
- 1 cup heavy cream
- 3/4 cup granulated sugar
- 5 large egg yolks
- 2 teaspoons vanilla extract
- 3 tablespoons cornstarch
- 1.5 cups heavy cream (for whipped cream)
- 1/4 cup powdered sugar
- 1 teaspoon vanilla extract (for whipped cream)
Instructions
- Mix the graham cracker crumbs, melted butter, and sugar in a bowl until it resembles wet sand; press into a 9x9-inch pan lined with parchment paper. Bake at 350°F (175°C) for 10 minutes.
- Gently heat the milk and heavy cream in a saucepan until warm but not boiling. In a separate bowl, whisk together the sugar, egg yolks, vanilla, and cornstarch until smooth.
- Slowly pour the hot milk mixture into the yolk mixture while whisking constantly. Return to the stove and cook over medium heat, stirring nonstop until it thickens into a custard. Strain the custard through a fine mesh sieve.
- Pour the custard over the cooled crust and chill in the fridge for at least 2 hours.
- Beat the heavy cream, powdered sugar, and vanilla extract until stiff peaks form and spread over the chilled custard.
- Cut into squares and decorate with cookie crumbs, puff pastry shards, or white chocolate chips before serving.
Notes
Nutrition

Hi, I’m Olivia Parker, the founder of BakingSecret.com and a lifelong lover of all things sweet and homemade. I grew up in a small town in Oregon, where the smell of fresh cookies in my family’s kitchen sparked my passion for baking. Over the years, I turned that passion into a mission: to help home bakers feel confident, inspired, and creative.
After studying food science and working in several artisan bakeries across the U.S., I decided to create a space where everyone from beginners to seasoned bakers can find reliable recipes, expert tips, and a warm, welcoming community. BakingSecret.com is my way of sharing the magic of baking with the world. When I’m not testing new recipes, you’ll find me exploring farmers’ markets, collecting vintage cookbooks, or perfecting my sourdough technique.