
Why This Homemade Moose Tracks Ice Cream is a Must-Try
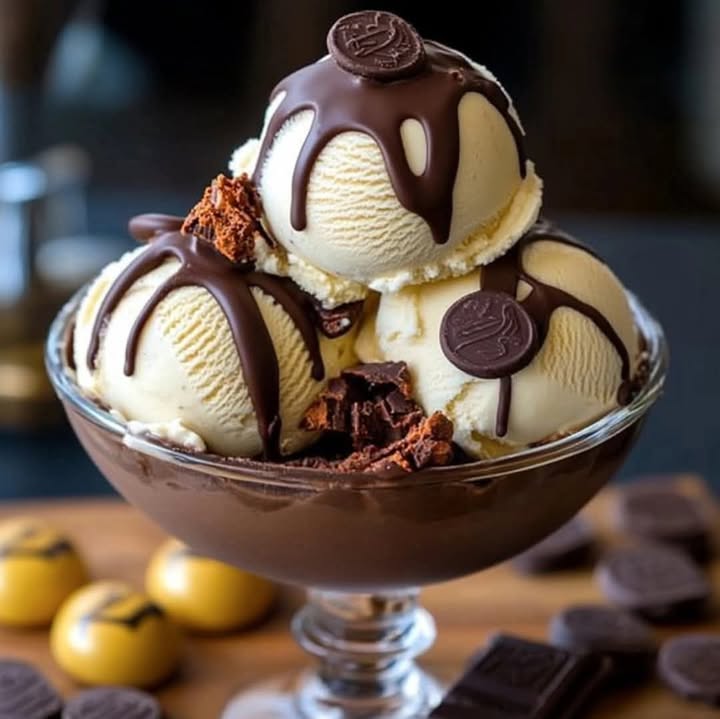
There’s something magical about homemade ice cream. The creamy texture, the rich flavors, and the joy of creating something from scratch are unbeatable. One summer afternoon, while hosting a backyard BBQ, I decided to whip up a batch of Homemade Moose Tracks. My friends went nuts over it! Packed with semisweet chocolate chips and chopped peanut butter cups, this ice cream is like a party in your mouth. Trust me, once you try making it yourself, you’ll never settle for store-bought again.
The Story Behind Moose Tracks Ice Cream
Moose Tracks isn’t just any ice cream—it’s a legend in the frozen dessert world. Originating in Michigan, this flavor was created by the folks at Northern Michigan University in the 1980s. They wanted something fun, indulgent, and totally crave-worthy. And boy, did they succeed! Over the years, Moose Tracks has become a household favorite, but nothing beats the homemade version. When I first tried making it, I realized how easy it is to customize and make it even better than the original.
Why You’ll Love This Recipe
This Homemade Moose Tracks recipe is pure bliss. It’s creamy, chocolatey, and packed with peanut butter goodness. Plus, it’s surprisingly simple to make. All you need is an ice cream maker and some basic ingredients. Whether you’re a seasoned home cook or a beginner, this recipe will impress everyone. The best part? You control the quality of the ingredients, so no artificial flavors or preservatives here!
Perfect Occasions to Make This Treat
Looking for a show-stopping dessert for your next gathering? This Homemade Moose Tracks is perfect for birthdays, potlucks, or even a cozy movie night at home. I’ve served it at summer barbecues, holiday parties, and casual get-togethers, and it’s always a hit. Kids love the chocolate-peanut butter combo, and adults appreciate the homemade touch. It’s also a great gift idea—just pack it in a cute container and watch the recipient light up!
Ingredients You’ll Need
- 1 gallon half-and-half
- 1 cup sugar
- ½ cup light corn syrup
- 1 tablespoon vanilla extract
- ½ teaspoon salt
- 1 cup semisweet chocolate chips
- 1 cup peanut butter cups, chopped
Substitution Options
If you’re out of half-and-half, whole milk and heavy cream work as a substitute. For a dairy-free version, try coconut milk or almond milk. Instead of semisweet chocolate chips, dark chocolate chunks add a richer flavor. If peanut butter cups aren’t your thing, swap them for crushed cookies or caramel swirls. Feel free to experiment and make this recipe your own!
Step 1: Prepare the Ice Cream Base
Start by whisking together the half-and-half, sugar, corn syrup, vanilla extract, and salt in a large mixing bowl. Keep whisking until the sugar dissolves completely. You’ll notice the mixture turning slightly thicker and glossy. Pro tip: Use a fine-mesh sieve to sift the sugar if you want an extra-smooth texture. The aroma of vanilla will fill your kitchen, making it smell like a bakery.
Step 2: Churn the Ice Cream
Pour the prepared base into your ice cream maker and let it do its magic. Follow the manufacturer’s instructions, which usually take about 25-30 minutes. As the mixture churns, it transforms into a soft-serve consistency that’s oh-so-tempting. Resist the urge to taste too much—it’s not ready yet! Watching the ice cream thicken is oddly satisfying, like watching clouds form on a sunny day.
Step 3: Add the Mix-Ins
When the ice cream is almost frozen, toss in the semisweet chocolate chips and chopped peanut butter cups. Let the machine churn for another 2-3 minutes to evenly distribute the goodies. The contrast between the creamy ice cream and the crunchy mix-ins is what makes this Homemade Moose Tracks so irresistible. Chef’s tip: Freeze the mix-ins beforehand to prevent them from melting into the ice cream.
Step 4: Final Freeze
Transfer the churned ice cream into an airtight container. Smooth the top with a spatula and press a piece of parchment paper directly onto the surface to prevent ice crystals from forming. Freeze for at least 4 hours to firm up. Patience is key here—the longer it freezes, the better the texture. Trust me, the wait is worth it!
Step 5: Serve & Enjoy
Scoop the ice cream into bowls or cones and dig in! Each bite is a symphony of flavors and textures. The creamy base, the melty chocolate chips, and the peanut butter chunks create a harmony that’s hard to resist. Serve it with a drizzle of hot fudge or a sprinkle of sea salt for an extra wow factor.
Timing Breakdown
- Prep Time: 15 minutes
- Churning Time: 30 minutes
- Freezing Time: 4 hours
- Total Time: Approximately 5 hours
Chef’s Secret
For an ultra-smooth texture, chill the ice cream base in the fridge for a few hours before churning. Cold mixtures freeze faster and result in creamier ice cream. Another trick? Add a splash of vodka (yes, vodka!) to the base. Alcohol lowers the freezing point, keeping the ice cream scoopable even after hours in the freezer.
Extra Info
Did you know that Moose Tracks donates a portion of its profits to wildlife conservation efforts? While this recipe doesn’t come with a charitable donation, it does come with love and care. Plus, making it at home reduces packaging waste, which is a win for the planet!
Necessary Equipment
- Ice cream maker
- Large mixing bowl
- Whisk
- Airtight container
- Parchment paper
Storage Tips
To keep your Homemade Moose Tracks fresh, store it in an airtight container in the freezer. Press parchment paper onto the surface to minimize air exposure, which can cause ice crystals. Label the container with the date—homemade ice cream tastes best within two weeks. Avoid storing it near strong-smelling foods like onions or garlic, as ice cream can absorb odors easily.
If you notice ice crystals forming, simply let the ice cream sit at room temperature for a few minutes before serving. This helps redistribute the moisture and restore the creamy texture. For long-term storage, divide the ice cream into smaller portions to reduce the number of times it’s exposed to warm air when scooping.
Finally, consider investing in a freezer thermometer to ensure your freezer stays at the ideal temperature of 0°F (-18°C). Proper storage ensures your ice cream stays delicious for as long as possible.
Tips and Advice
Always use high-quality ingredients—they make a huge difference in flavor. Opt for pure vanilla extract instead of imitation, and choose premium chocolate chips and peanut butter cups. If you’re short on time, skip the chilling step, but know that the texture might not be as smooth. Lastly, clean your ice cream maker immediately after use to prevent sticky residue from hardening.
Presentation Ideas
- Serve in waffle cones with a sprinkle of crushed peanuts.
- Layer it in parfait glasses with whipped cream and caramel sauce.
- Top with fresh berries for a pop of color.
- Pair with warm brownies for an epic sundae.
Healthier Alternatives
Want to enjoy Homemade Moose Tracks without the guilt? Here are six variations:
- Low-Sugar Version: Replace sugar with a sugar substitute like stevia or monk fruit.
- Dairy-Free Delight: Use coconut milk or almond milk instead of half-and-half.
- Vegan Option: Swap dairy-based ingredients for plant-based alternatives and use vegan chocolate and peanut butter cups.
- Protein-Packed: Add a scoop of protein powder to the base for an energy boost.
- Fruit Twist: Stir in mashed bananas or swirls of strawberry jam for natural sweetness.
- Lightened-Up: Use low-fat half-and-half and reduce the amount of mix-ins.
Mistake 1: Skipping the Chilling Step
Many people rush the process by skipping the chilling step. Without chilling, the ice cream won’t freeze properly, resulting in icy or grainy texture. To avoid this, always chill the base in the fridge for at least 2 hours before churning. Pro tip: Plan ahead and prep the base the night before.
Mistake 2: Overloading the Mix-Ins
It’s tempting to go overboard with chocolate chips and peanut butter cups, but too many mix-ins can overwhelm the ice cream. Stick to the recommended amounts for the perfect balance. If you’re unsure, err on the side of caution—you can always add more later.
Mistake 3: Not Freezing Long Enough
After churning, the ice cream needs time to firm up in the freezer. Skipping this step leads to a soft, melty mess. Be patient and let it freeze for at least 4 hours. Your taste buds will thank you!
FAQs
Can I make this without an ice cream maker?
Absolutely! Pour the base into a shallow dish, freeze for 1 hour, then stir vigorously to break up ice crystals. Repeat every 30 minutes until smooth and frozen. It takes longer, but the results are still delicious.
How long does homemade ice cream last?
Stored properly, it lasts up to two weeks. After that, the texture may start to degrade. Always check for off smells or flavors before serving.
Can I use other mix-ins?
Of course! Try crushed cookies, caramel swirls, or chopped nuts. Get creative and tailor it to your taste.
Why is my ice cream icy?
Icy ice cream often results from improper storage or skipping the chilling step. Ensure the base is cold before churning and store it in an airtight container with minimal air exposure.
What’s the best way to serve it?
Scoop it into bowls or cones, and add toppings like hot fudge, sprinkles, or whipped cream. Pairing it with warm desserts like brownies or pie takes it to the next level.
Can I double the recipe?
Yes, but make sure your ice cream maker can handle the larger volume. If not, churn in batches to avoid overflow.
Is it okay to use dark chocolate?
Definitely! Dark chocolate adds a sophisticated twist and pairs beautifully with peanut butter.
How do I prevent ice crystals?
Press parchment paper onto the surface before freezing and minimize air exposure. Storing it in a deep container rather than a wide one also helps.
Can I freeze it in individual portions?
Yes! Use small containers or muffin tins for single servings. They’re perfect for portion control and quick snacks.
What’s the best way to clean the ice cream maker?
Rinse the bowl and paddle immediately after use. Soak stubborn residue in warm, soapy water to loosen it up.
Final Thoughts
Making Homemade Moose Tracks is a rewarding experience that brings joy to everyone who tries it. With its creamy texture, rich flavors, and endless customization options, this recipe is sure to become a family favorite. Whether you’re celebrating a special occasion or simply craving something sweet, this ice cream delivers. So grab your ice cream maker and get ready to create a treat that’s truly unforgettable!
Equipment
- Large mixing bowl
- Whisk
- Ice cream maker
- Airtight container
- Parchment paper
Ingredients
- 1 gallon half-and-half
- 1 cup sugar
- ½ cup light corn syrup
- 1 tablespoon vanilla extract
- ½ teaspoon salt
- 1 cup semisweet chocolate chips
- 1 cup peanut butter cups, chopped
Instructions
- Whisk together the half-and-half, sugar, corn syrup, vanilla extract, and salt in a large mixing bowl until the sugar dissolves.
- Pour the prepared base into your ice cream maker and churn according to the manufacturer’s instructions (about 25-30 minutes).
- When the ice cream is almost frozen, add the semisweet chocolate chips and chopped peanut butter cups, and churn for another 2-3 minutes.
- Transfer the churned ice cream into an airtight container, smooth the top, and press parchment paper onto the surface to prevent ice crystals.
- Freeze for at least 4 hours to firm up, then scoop and serve.
Notes
Nutrition

Hi, I’m Olivia Parker, the founder of BakingSecret.com and a lifelong lover of all things sweet and homemade. I grew up in a small town in Oregon, where the smell of fresh cookies in my family’s kitchen sparked my passion for baking. Over the years, I turned that passion into a mission: to help home bakers feel confident, inspired, and creative.
After studying food science and working in several artisan bakeries across the U.S., I decided to create a space where everyone from beginners to seasoned bakers can find reliable recipes, expert tips, and a warm, welcoming community. BakingSecret.com is my way of sharing the magic of baking with the world. When I’m not testing new recipes, you’ll find me exploring farmers’ markets, collecting vintage cookbooks, or perfecting my sourdough technique.