
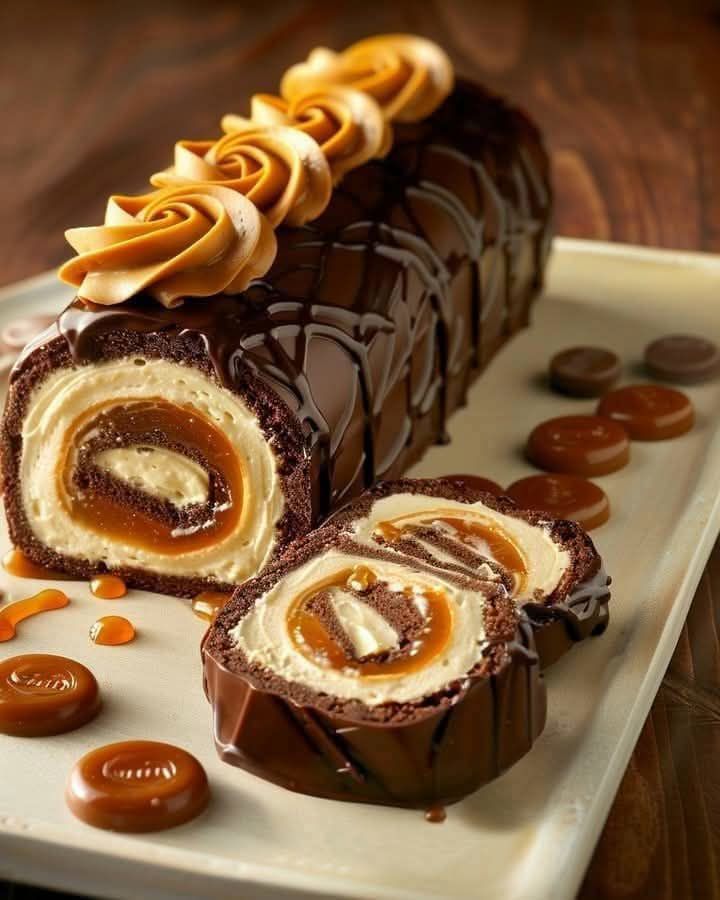

There’s something magical about a dessert that looks like it came from a fancy bakery but is secretly a joy to make at home. That’s my feeling every time I make this Chocolate Caramel Swiss Roll. It’s my go-to when I want to impress my book club or just treat my family after a busy week. The combination of light chocolate sponge, sweet caramel cream, and rich ganache is pure happiness on a plate.
The Story Behind This Chocolate Caramel Delight
While Swiss rolls have roots in Central Europe, this chocolate and caramel version is a pure American indulgence. I remember my grandma making a simpler jelly roll, but my twist with rich caramel and chocolate is a family favorite now. It’s a classic dessert that lets you play with flavors. The version I’m sharing today is the result of many happy (and slightly messy) kitchen experiments to get that perfect, crack-free roll every time.
Why You’ll Fall in Love With This Recipe
This isn’t just a cake; it’s an experience. First, it’s stunning to look at. Second, the texture is incredible—soft, airy cake with a creamy, dreamy filling. Best of all, it’s a fantastic make-ahead dessert. You can prepare it in the morning and let it chill, so you’re not scrambling when guests arrive. It’s easier than a layered cake but gets all the same “wows.”
Perfect Occasions for Your Chocolate Caramel Delight
This swiss roll is wonderfully versatile. It’s a showstopper for holiday gatherings like Thanksgiving or Christmas. It’s perfect for birthdays when you want something a little different from a standard frosted cake. I love bringing it to potlucks because slices are easy to serve. It also makes a wonderful weekend baking project with kids—they love helping with the rolling!
Ingredients for Your Chocolate Caramel Swiss Roll
Gather these simple ingredients for a truly amazing dessert.
For the Chocolate Sponge Cake:
- 1/2 cup all-purpose flour
- 1/4 cup unsweetened cocoa powder
- 1/2 teaspoon baking powder
- 1/4 teaspoon salt
- 4 large eggs, room temperature
- 1/2 cup granulated sugar
- 1 teaspoon vanilla extract
- 2 tablespoons vegetable oil
For the Caramel Filling:
- 1 cup dulce de leche or thick caramel sauce
- 1 cup heavy cream, chilled
- 2 tablespoons powdered sugar
- 1 teaspoon vanilla extract
For the Chocolate Ganache:
- 1 cup semi-sweet chocolate chips or chopped dark chocolate
- 1/2 cup heavy cream
For Decoration (Optional):
- Caramel buttercream, for piping rosettes
- Extra caramel drizzle
Handy Substitution Options
Don’t worry if you’re missing an item! Here are some easy swaps:
- Cocoa Powder: Use Dutch-processed cocoa for a richer, darker color and flavor.
- Dulce de Leche: You can make your own by slowly simmering a can of sweetened condensed milk, or use a thick store-bought caramel sauce.
- Heavy Cream: For the filling, full-fat coconut cream can work for a dairy-free version, though it will alter the taste slightly.
- Chocolate: Feel free to use milk chocolate chips for a sweeter ganache, or dark chocolate for a more intense, less sweet finish.
How to Make Your Chocolate Caramel Delight
Follow these steps for a perfect, beautiful roll. Take your time and enjoy the process!
Step 1: Bake the Perfect Chocolate Sponge
Start by preheating your oven to 350°F (175°C). Line your 10×15-inch baking tray with parchment paper. This is your best friend for a no-stick situation. In a bowl, sift together the flour, cocoa powder, baking powder, and salt. This aerates the dry ingredients and prevents lumps. Now, in a large bowl, beat the room-temperature eggs and sugar with an electric mixer. You want to beat them for a full 5-7 minutes until they are very pale, thick, and fluffy. It should leave a ribbon-like trail on the surface when you lift the beaters. This step gives the cake its light, airy structure. Gently fold in the vanilla, oil, and then the sifted dry ingredients. Spread the batter evenly in your pan and bake for 10-12 minutes. The cake is done when the top springs back lightly at your touch.
Pro tip: Dust your clean kitchen towel with cocoa powder instead of powdered sugar before rolling. This prevents the cake from getting too sweet and sticky on the outside.
Step 2: Roll the Cake While Warm
As soon as the cake comes out of the oven, work quickly but carefully. Turn it out onto your cocoa-dusted towel. Gently peel off the parchment paper—you’ll see that beautiful, moist surface. Starting from one of the short ends, use the towel to roll the cake up tightly. Rolling it warm with the towel inside trains it into that spiral shape and helps prevent cracks when you fill it later. Let this rolled-up bundle cool completely on a wire rack. Patience is key here!
Step 3: Whip Up the Dreamy Caramel Cream
While the cake cools, make the luscious filling. Chill your bowl and beaters for a few minutes in the freezer. Pour in the cold heavy cream, powdered sugar, and vanilla. Whip it until soft peaks form—it should hold its shape but still be smooth and pillowy. In another bowl, give your dulce de leche a quick stir to loosen it. Then, gently fold the whipped cream into the caramel until you have a smooth, uniform, beige-colored cloud of deliciousness. Try not to eat it all with a spoon!
Step 4: Assemble the Roll
Once your cake is completely cool, it’s time for the fun part. Very carefully unroll it. It will lay flat beautifully. Spread the caramel cream evenly over the entire surface, leaving just a tiny border around the edges. For an extra caramel kick, drizzle a little more sauce over the cream. Now, using the towel to guide you, gently but confidently roll the cake back up, this time without the towel inside. Wrap this new, filled roll tightly in plastic wrap. Refrigerate it for at least 30 minutes. This chills the filling and makes the roll firm and easy to slice.
Step 5: Create the Silky Chocolate Ganache
Place your chocolate chips or chopped chocolate in a heatproof bowl. Heat the heavy cream in a small saucepan until you see small bubbles form around the edges—it should be just simmering. Pour the hot cream over the chocolate and let it sit, untouched, for 2-3 minutes. This melts the chocolate gently. Then, stir slowly from the center outwards until you have a glossy, smooth, dark pool of ganache. Let it cool for 5-10 minutes so it thickens slightly but is still pourable.
Step 6: Decorate and Serve
Take your chilled roll from the fridge and place it on your serving platter. Pour the slightly cooled ganache over the top, using a spatula to nudge it over the sides for that gorgeous drip effect. If you want to get fancy, you can pipe little caramel buttercream rosettes on top and drizzle with more caramel. Let the ganache set for a few more minutes in the fridge. Then, use a sharp knife to slice it into beautiful spirals. Enjoy it chilled for a firmer texture, or let it sit out for 10 minutes for a softer, creamier bite.
Chef’s Tip: For the cleanest slices, run your sharp knife under hot water and wipe it dry between each cut. This gives you gorgeous, photogenic slices every single time.
Timing Your Baking Success
This recipe is all about planning. The active work time is fairly short, but allowing for cooling and chilling is what leads to success.
- Prep Time: 25 minutes (gathering, mixing, whipping)
- Cooking Time: 12 minutes (for the sponge cake)
- Resting/Cooling Time: 40 minutes (rolling and cooling)
- Chilling Time: At least 30 minutes (for assembly and setting)
- Total Time: About 1 hour 30 minutes from start to finish
- Kcal: Approximately 380 per slice
- Servings: 8-10 beautiful slices
A Secret From My Kitchen
Here’s my little secret for the fluffiest sponge: make sure your eggs are truly at room temperature. I take mine out of the fridge about an hour before baking. Room-temperature eggs whip up to a much greater volume than cold ones, giving you that light, springy cake that’s strong enough to roll but melts in your mouth.
A Sweet Bit of Extra Info
Did you know the technique of rolling a thin cake around a filling dates back centuries? While the Swiss roll is famous, many cultures have their own version. The Yule log, or *Bûche de Noël*, is a fancier cousin often made for Christmas. Our chocolate and caramel version is a delicious, year-round take on that elegant tradition.
Necessary Equipment
You don’t need fancy tools, just these basics:
- 10×15-inch jelly roll pan or baking sheet with sides
- Parchment paper
- Electric mixer (handheld or stand)
- Two mixing bowls (one large, one medium)
- Sifter or fine mesh strainer
- Spatulas (one rubber, one offset for smoothing)
- Clean kitchen towel
- Small saucepan
Storing Your Chocolate Caramel Swiss Roll
This cake stores wonderfully. Once the ganache is fully set, you can cover the entire platter with plastic wrap or place the roll in an airtight container. It will keep happily in the refrigerator for up to 3-4 days. The flavors actually meld and improve after a day!
For longer storage, you can freeze the unfrosted roll. Wrap the filled (but not ganached) roll tightly in a layer of plastic wrap and then a layer of aluminum foil. Freeze for up to 2 months. Thaw overnight in the refrigerator before adding the ganache and serving.
Leftover slices can be stored in the fridge in a sealed container. They make for a fantastic sweet treat with your afternoon coffee!
Pro Tips & Friendly Advice
- Measure your flour correctly: Spoon it into your measuring cup and level it off. Don’t scoop directly from the bag, as this packs in too much flour and can lead to a dry cake.
- Don’t overmix the batter: Once you add the dry ingredients, fold gently just until no white streaks remain. Overmixing deflates the air you whipped into the eggs.
- Use the towel: Don’t skip rolling the cake in the towel while it’s warm. This is the single best trick for a crack-free roll.
- If you love the combo of chocolate and cream cheese, you might enjoy the rich layers of our Triple Chocolate Mousse Cake for another special occasion.
Presentation Inspiration
Make your dessert table pop! Here are a few ideas:
- Dust the platter with a light sprinkle of cocoa powder before placing the roll.
- Garnish each slice with a tiny pinch of flaky sea salt to balance the sweetness.
- Serve with a side of fresh berries like raspberries or strawberries for a fresh contrast.
- For a dinner party, plate individual slices with a swirl of extra caramel sauce on the plate.
Healthier & Fun Variations to Try
Feel like mixing it up? This recipe is a wonderful base for creativity!
- Peanut Butter Caramel Roll: Add 1/4 cup of smooth peanut butter to the caramel filling. Top the ganache with chopped salted peanuts.
- Mocha Roll: Add 1-2 teaspoons of instant espresso powder to the dry cake ingredients. The coffee enhances the chocolate flavor beautifully.
- Salted Caramel Delight: Use a salted caramel sauce for the filling. Finish the ganache with a flourish of flaky sea salt.
- Orange-Chocolate Roll: Add the zest of one orange to the cake batter. You can also add a tablespoon of orange liqueur to the whipped cream.
- Berry Cream Roll: Replace the caramel filling with a whipped cream mixed with 1/2 cup of seedless raspberry or strawberry jam.
- “Turtle” Chocolate Roll: Fold chopped toasted pecans into the caramel filling. Decorate the top of the roll with whole pecans and extra caramel drizzle.
Common Mistakes to Avoid
Avoid these simple pitfalls for a perfect roll every time.
Mistake 1: Using Cold Eggs
This is the most common issue. Cold eggs simply will not whip up to the same fluffy, voluminous peak as room-temperature ones. A dense, under-whipped batter makes a thin, tough cake that’s likely to crack. Take your eggs out of the fridge at least 30-60 minutes before you start baking. In a pinch, place them in a bowl of warm (not hot) water for 5-10 minutes.
Mistake 2: Overbaking the Sponge
That 10-12 minute window is small but critical. An overbaked sponge loses its moisture and flexibility. It becomes dry and brittle, guaranteed to crack when you try to roll it. Start checking at 10 minutes. The cake is done when the top looks set and springs back immediately when you gently press it. Remember, it will continue to cook a little from residual heat after coming out.
Mistake 3: Adding Filling to a Warm Cake
Impatience can ruin your roll! If you try to spread that lovely caramel cream onto a cake that’s even slightly warm, the heat will melt the whipped cream. You’ll end up with a soggy, runny mess that soaks into the cake and makes it impossible to roll neatly. Let the rolled-up cake cool completely in the towel. No shortcuts here.
Mistake 4: Rolling Too Tightly or Too Loosely
The initial “training” roll with the towel needs a gentle but firm touch. Rolling too tightly can cause the cake to stick to itself or even tear. Rolling too loosely creates a wide spiral that won’t hold its shape well later. Aim for a snug, even roll. Use the towel as a guide, applying even pressure as you go.
Mistake 5: Pouring Ganache That’s Too Hot
A ganache straight from mixing is very fluid and warm. If you pour it immediately over your chilled roll, it can melt the filling underneath and cause the whole thing to soften and slump. Let the ganache cool and thicken for 5-10 minutes. It should coat the back of a spoon nicely. This ensures a beautiful, even layer that sets perfectly.
Frequently Asked Questions
Can I make this Chocolate Caramel Swiss Roll ahead of time?
Absolutely! This cake is a fantastic make-ahead dessert. You can bake the sponge, roll it with the towel, and let it cool a day in advance. Just wrap the cooled cake roll (still in the towel) tightly in plastic wrap and leave it on the counter. The next day, make the filling, assemble, and add the ganache. You can also complete the entire cake, cover it well, and refrigerate it for up to 24 hours before serving. The flavors actually improve as they meld together.
My cake cracked when I rolled it. What did I do wrong?
Don’t worry, it happens! Cracking is usually due to one of three things: the cake was overbaked and dried out, it wasn’t rolled while still warm, or it was rolled too tightly. The cake needs to be flexible. Next time, ensure you take it out of the oven on time and roll it in the towel immediately. Even with a small crack, once you fill and re-roll it, it often sticks back together. A dusting of cocoa or a generous pour of ganache can hide any minor imperfections beautifully.
What can I use if I don’t have dulce de leche?
No problem! A thick, store-bought caramel sauce is a perfect substitute. Just make sure it’s a sauce meant for topping, not a thin ice cream syrup. You can also make a quick substitute by mixing 3/4 cup of soft caramel candies (like Kraft caramels) with 2-3 tablespoons of heavy cream. Microwave in short bursts, stirring until smooth, then let it cool completely before folding into the whipped cream.
How do I get a really tight, neat roll?
The secret is in the first “empty” roll while the cake is warm. Use your kitchen towel to help you. As you start rolling, tuck the edge of the cake over firmly and then use the towel to lift and continue rolling, applying even, gentle pressure. Think of it as guiding the cake into a spiral rather than forcing it. When you re-roll it with the filling, use the imprint from the first roll as a guide.
Can I freeze a Swiss roll?
Yes, you can! It’s best to freeze it after assembling and rolling with the filling but before adding the ganache. Wrap the unfrosted roll very tightly in plastic wrap, then again in aluminum foil or place it in a freezer bag. Freeze for up to 2 months. Thaw overnight in the refrigerator. Then, let it sit at room temperature for about 30 minutes before adding the freshly made ganache and any final decorations.
Why is my whipped cream filling runny?
A runny filling typically means the cream was not cold enough, your bowl wasn’t chilled, or you overwhipped it into butter. Ensure your heavy cream is very cold straight from the fridge. Chill your mixing bowl and beaters for 15 minutes before starting. Whip just until you get soft peaks that hold their shape. When you fold in the caramel, do it gently to avoid deflating the cream.
What’s the best way to slice the roll without squishing it?
A sharp, thin-bladed knife is your best tool. For the cleanest cuts, run the knife under very hot water, wipe it completely dry with a towel, and then slice. Repeat the heating and wiping process between each slice. The heat helps the knife glide through the ganache and filling without dragging, giving you those perfect, picture-ready slices.
Can I use a different size pan?
The 10×15-inch jelly roll pan is ideal for the right thickness. Using a larger pan will make the cake too thin and fragile. Using a smaller pan will make it too thick, making it difficult to roll and more likely to crack. If you don’t have the exact size, get as close as you can. A 9×13 pan will work, but your cake will be thicker and your baking time may increase by a few minutes.
Is there a way to make this recipe less sweet?
Sure! You can reduce the granulated sugar in the sponge by a tablespoon or two. For the filling, use a dark chocolate ganache (with 70% cocoa) instead of semi-sweet, as it will be less sweet and more intense. You can also reduce or omit the powdered sugar in the whipped cream, especially if your caramel sauce is already very sweet. When you master basic cooking techniques like balancing sweetness, you can adjust any recipe to your taste.
My ganache is too thick/too thin. How can I fix it?
Ganache is easy to adjust. If it’s too thick and won’t pour, it may have cooled too much. Gently reheat it in 5-second bursts in the microwave, stirring between each, until it’s fluid again. If it’s too thin and runny, it needs to cool longer. You can pop it in the fridge for a few minutes, stirring every 2 minutes, until it thickens to a pourable but coatable consistency. The ratio of cream to chocolate determines the final texture—more cream makes a thinner glaze, less cream makes a thicker frosting.
I hope this recipe brings as much joy to your kitchen as it has to mine. It’s a testament to how a few simple ingredients can create something truly spectacular. The process is part of the fun, and the result is always rewarding. If you’re looking for more inspiration for stunning baked goods, explore our full collection of favorite cake recipes. Whether it’s for a cozy family night or a big celebration, this Chocolate Caramel Swiss Roll is sure to be a hit. Happy baking!
Equipment
- Grand bol
- Fouet
- Spatule
- Plaque à pâtisserie
- Papier sulfurisé
Ingredients
- 4 œufs
- 100 g sucre
- 30 g cacao en poudre
- 65 g farine tout usage
- 5 g poudre à lever
- 1 g sel
- 240 ml crème épaisse
- 120 ml sauce caramel
- 90 g pépites de chocolat
- q.s. sucre glace pour saupoudrer
- q.s. cacao en poudre pour saupoudrer
- q.s. sauce caramel pour le décor
Instructions
- Préchauffez votre four à 175°C. Graissez une plaque à pâtisserie de 15x10 pouces et tapissez-la de papier sulfurisé.
- Dans un grand bol, battez les œufs et le sucre jusqu'à ce que le mélange soit épais et pâle. Tamisez le cacao en poudre, la farine, la poudre à lever et le sel. Incorporez délicatement jusqu'à obtenir une pâte lisse.
- Versez la pâte dans le moule préparé et étalez-la uniformément. Faites cuire au four pendant 10-12 minutes ou jusqu'à ce que le gâteau rebondisse au toucher.
- Alors que le gâteau cuit, chauffez la crème épaisse dans une casserole jusqu'à frémissement. Ajoutez la sauce caramel et les pépites de chocolat jusqu'à obtenir un mélange lisse.
- Une fois le gâteau cuit, retournez-le sur un torchon saupoudré de cacao en poudre. Retirez soigneusement le papier sulfurisé et roulez-le avec le torchon à l'intérieur. Laissez-le refroidir complètement.
- Déroulez le gâteau et étalez la garniture caramel-chocolat uniformément. Roulez à nouveau le gâteau sans le torchon.
- Saupoudrez le dessus du rouleau de sucre glace et de cacao en poudre. Nappez de sauce caramel.
- Réfrigérez le rouleau pendant au moins 30 minutes avant de le trancher et de le servir.
Notes
Nutrition

Hi, I’m Olivia Parker, the founder of BakingSecret.com and a lifelong lover of all things sweet and homemade. I grew up in a small town in Oregon, where the smell of fresh cookies in my family’s kitchen sparked my passion for baking. Over the years, I turned that passion into a mission: to help home bakers feel confident, inspired, and creative.
After studying food science and working in several artisan bakeries across the U.S., I decided to create a space where everyone from beginners to seasoned bakers can find reliable recipes, expert tips, and a warm, welcoming community. BakingSecret.com is my way of sharing the magic of baking with the world. When I’m not testing new recipes, you’ll find me exploring farmers’ markets, collecting vintage cookbooks, or perfecting my sourdough technique.