
Is there anything better than a cold, creamy scoop of homemade ice cream on a hot summer day? I used to think making it required a fancy machine and hours of churning. Then, I discovered this magical Strawberry No-Bake Ice Cream. My kids begged for seconds, and my friends thought I’d bought it from a fancy shop! The best part? You probably have most of the ingredients in your pantry right now. It’s a dream come true for any dessert lover who’s short on time but big on flavor.
A Sweet Little Story: From Powder to Paradise
This recipe has a fun, modern twist. It reminds me of the powdered drink mixes we loved as kids, but all grown up! While traditional ice cream has a long, churned history, this version is a clever cheat. It uses a simple packet of flavored mix to create an instant, vibrant taste. I first tried it during a heatwave when my ice cream maker was buried in the garage. I was desperate for something sweet and fast. Mixing that pink powder into the condensed milk felt almost like a science experiment. But when we tasted the final product? Pure, creamy, fruity magic. It’s a wonderful example of how modern convenience can create something truly delightful.
Why You’ll Fall in Love With This Strawberry No-Bake Dessert
You will adore this recipe for so many reasons! First, it’s incredibly easy. There’s no cooking, no churning, and no special equipment needed. Second, the flavor is wonderfully bold and sweet, just like a strawberry milkshake in frozen form. It’s perfect for getting kids involved in the kitchen. My daughter loves helping me whip the cream. Finally, it’s wonderfully versatile. You can change the flavor in an instant by using a different drink mix. It’s a guaranteed crowd-pleaser that looks like you spent all day making it.
When to Whip Up This Frozen Treat
This no-bake ice cream is your secret weapon for so many occasions. It’s a star at summer picnics and backyard barbecues. Bring it to a potluck and watch it disappear. It’s a lifesaver for birthday parties when you need a cold dessert that’s not cake. I even make it for cozy movie nights at home. It turns a simple evening into a special event. For a real show-stopper, serve it alongside a slice of something warm, like our Luscious Vanilla Banana Walnut Cake, for the perfect hot-and-cold combo.
Gathering Your Simple Ingredients
- 1 packet of strawberry-flavored drink mix (or your preferred flavor)
- 395 grams (14 ounces) of sweetened condensed milk (1 can/box)
- 200 grams (7 ounces) of heavy whipping cream (1 small box)
Easy Swaps: Make It Your Own!
- Drink Mix: Any flavor works! Try cherry, lemonade, or even peach-mango.
- Heavy Cream: For a lighter version, you can use chilled full-fat coconut cream. Whip it just like dairy cream.
- Sweetened Condensed Milk: There’s no direct substitute for its unique texture and sweetness in this recipe.
Creating Your Strawberry No-Bake Ice Cream
Let’s turn these simple items into a frozen masterpiece. The process is fast, fun, and foolproof.
Step 1: Whip the Cream to Fluffy Peaks
Pour your cold heavy cream into a large, clean mixing bowl. Using a hand mixer or stand mixer, start whipping on medium speed. Watch as the liquid cream transforms. It will become frothy, then thick, and finally form soft, luscious peaks. You’ll know it’s ready when you lift the beaters and the cream holds a gentle, curling peak. This whipped cream is the key to the ice cream’s light, airy texture. Pro tip: Make sure your bowl and beaters are very cold. This helps the cream whip up faster and higher.
Step 2: Mix the Sweet, Strawberry Base
In a separate bowl, combine the entire can of sweetened condensed milk with the packet of strawberry drink mix. The thick, pale milk will instantly turn a vibrant, playful pink. Stir vigorously with a whisk or spoon. You want to dissolve every last grain of that flavored powder. The mixture will become smooth, sweet, and intensely aromatic with the smell of fresh strawberries. This is the potent flavor base for your entire dessert.
Step 3: Gently Fold Everything Together
This step requires a gentle touch. Add the pink strawberry mixture to the bowl of whipped cream. Using a large spatula, gently fold them together. Cut through the center, scoop from the bottom, and fold over the top. You are combining them while trying to keep as much air in the whipped cream as possible. The color will marble at first, then become a beautiful, uniform soft pink. Stop as soon as no white streaks remain. Chef’s tip: Folding, not stirring, is what keeps your ice cream from becoming dense and heavy.
Step 4: Freeze Until Perfectly Firm
Pour the lovely pink cloud into a freezer-safe container. A loaf pan or airtight container works perfectly. Smooth the top with your spatula. Cover it tightly with plastic wrap or a fitted lid. This prevents ice crystals from forming. Now, the hardest part: patience! Place it in the freezer for at least 4 to 6 hours. Overnight is even better. The mixture needs time to transform from a fluffy mousse into a scoopable, firm ice cream.
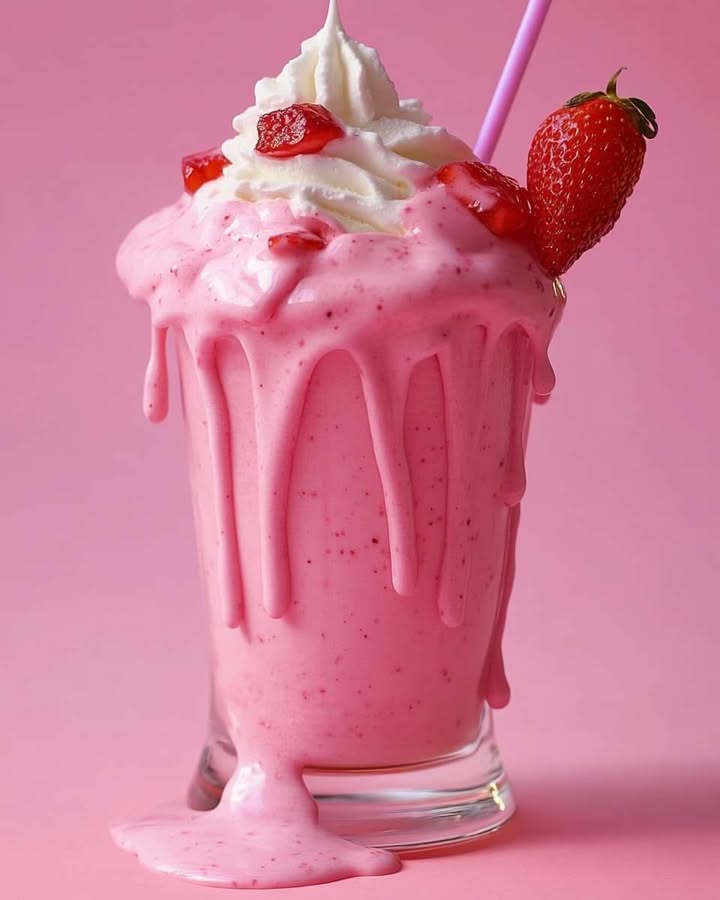
Step 5: Scoop, Garnish, and Enjoy the Magic!
When you’re ready, grab your ice cream scoop. Run it under hot water for a second for cleaner scoops. Dig into the container and lift out a perfect pink curl. The texture should be creamy and smooth, not icy. Serve it in bowls or cones. Top with fresh strawberries, a sprinkle of chocolate chips, or an extra dollop of whipped cream for pure indulgence.
Your Recipe Timeline
- Prep Time: 15 minutes
- Freezing Time: 4-6 hours (or overnight)
- Total Time: 4 hours 15 minutes minimum
- Servings: About 6 generous scoops
Chef’s Secret for the Best Texture
For ultra-creamy ice cream, take your container out of the freezer after about 2 hours. Give it a quick stir with a fork to break up any ice crystals that are starting to form. Then return it to freeze. This mimics the churning action of an ice cream maker and guarantees a super smooth result every single time.
A Fun Fact About Your Main Ingredients
Sweetened condensed milk was originally invented as a long-lasting milk product before refrigeration. Its thick, syrupy sweetness comes from removing about 60% of the water from regular milk and adding sugar. This process not only preserves it but also gives it that uniquely rich texture that makes our no-bake desserts so decadent and easy!
What You’ll Need to Make It
- Large mixing bowl
- Medium mixing bowl
- Hand mixer or stand mixer
- Whisk or spatula
- Freezer-safe container with lid (like a loaf pan or airtight tub)
- Ice cream scoop for serving
How to Store Your Homemade Ice Cream
Keep your ice cream in its airtight container in the freezer. Press a piece of parchment paper directly onto the surface before sealing the lid. This creates an extra barrier against freezer air and prevents unsightly ice crystals. Properly stored, it will maintain its best quality for about 2-3 weeks.
After you scoop some out, always smooth the top again before re-sealing. This helps keep the texture consistent. Avoid taking the whole container out and letting it sit on the counter for long periods. Repeated thawing and refreezing will make it icy.
For long-term storage, you can scoop individual servings onto a parchment-lined baking sheet. Freeze them solid, then transfer the scoops to a zip-top freezer bag. This way, you can grab a single serving anytime without disturbing the rest!
Tips & Tricks for Ice Cream Success
- Use full-fat heavy whipping cream for the best, most stable results.
- Make sure all your ingredients are cold before you start.
- Experiment with mix-ins! After folding, gently stir in crushed cookies, mini chocolate chips, or swirls of fruit sauce.
- If your ice cream is too hard to scoop straight from the freezer, let it sit on the counter for 5-10 minutes to soften slightly.
Pretty Ways to Present Your Dessert
- Serve in vintage glass sundae dishes with a fresh strawberry on the rim.
- Create an ice cream sandwich using homemade cookies or store-bought waffle cones.
- Make a “berry patch” sundae by topping with mixed berries and a mint leaf.
- For a dinner party, pre-scoop balls onto a baking sheet and keep frozen until ready to plate for a beautiful, effortless presentation.
Healthier & Creative Recipe Twists
This recipe is a fantastic base for endless creativity! Here are six delicious variations to try.
- Mixed Berry Bliss: Use a mixed-berry drink mix. Fold in a handful of freeze-dried raspberries for a tangy, crunchy surprise.
- Tropical Dream: Swap in a pineapple or piña colada mix. Stir in a 1/2 cup of finely chopped dried mango and toasted coconut flakes before freezing.
- Chocolate-Dipped Strawberry: Use the classic strawberry base and fold in 1/2 cup of chopped dark chocolate. The chocolate will get delightfully firm in the freezer.
- Creamsicle Swirl: Make a batch with orange drink mix. After putting it in the container, swirl in 1/4 cup of vanilla yogurt for a creamy, nostalgic orange-and-vanilla ribbon.
- Berry Cheesecake: Fold in 1/4 cup of crushed graham crackers and a spoonful of cream cheese softened with a bit of milk. It’s like our Peach Raspberry Cheesecake, but in frozen form!
- Mocha Chip Delight: Use a chocolate drink mix and stir in 1 teaspoon of instant espresso powder with the condensed milk. Fold in mini chocolate chips for double the chocolatey goodness.
Common Mistakes to Avoid
Avoiding these simple errors will ensure your ice cream is perfect every time.
Mistake 1: Under-whipping or Over-whipping the Cream
This is the most common error. If the cream is under-whipped (still liquidy), your ice cream won’t freeze with a light, airy texture. It will be dense and icy. If you over-whip it, the cream turns grainy and begins to separate into butter. To avoid this, watch carefully. Stop when the cream holds soft peaks that curl over when you lift the beater. It should look smooth and billowy.
Mistake 2: Stirring Instead of Folding
When you combine the strawberry mix and whipped cream, aggressive stirring will deflate all the air you just whipped in. You’ll end up with a dense, flat dessert. Always use a folding technique. Cut through the middle, scoop from the bottom, and gently fold over the top. Repeat just until combined. It’s okay if it looks a little streaky at first; it will blend as you go.
Mistake 3: Not Using an Airtight Container
Freezer air is the enemy of creamy ice cream. It causes nasty ice crystals to form on the surface, giving your dessert a gritty texture. Always use a container with a tight-fitting lid. For extra protection, press plastic wrap directly onto the surface of the ice cream before putting the lid on. This simple step makes a huge difference in quality.
Mistake 4: Skipping the Freeze Time
Impatience can ruin the final product. If you try to scoop the ice cream after only 2 hours, it will be a soft, melty mess. It needs the full 4-6 hours to set properly. For the best, firmest texture, freezing overnight is ideal. Planning ahead is the key to perfect no-bake ice cream.
Frequently Asked Questions
Can I use fresh strawberries instead of a drink mix?
Using fresh strawberries is tricky for this specific method. Fresh fruit contains a lot of water, which will freeze into hard ice crystals and make your ice cream icy. If you want a fresh fruit flavor, I’d recommend making a cooked strawberry compote or syrup, let it cool completely, and then fold it in. The drink mix works so well because it’s a concentrated, dry powder that won’t water down the mix. For a recipe that beautifully incorporates fresh fruit in a no-bake setting, check out our creamy Luxurious Caramel Apple Cheesecake for inspiration.
My ice cream is too hard. How can I soften it?
This happens sometimes if it freezes for too long or your freezer is very cold. The fix is simple! Just move the container from the freezer to the refrigerator for about 20-30 minutes before you plan to serve it. This allows it to temper and soften slightly for easier scooping. You can also let it sit on the kitchen counter for 5-10 minutes. Avoid using the microwave, as it will melt the edges unevenly.
Can I make this recipe dairy-free?
Absolutely! For a dairy-free version, use chilled full-fat coconut cream (the solid part from a can of coconut milk) instead of heavy whipping cream. Whip it just the same. For the condensed milk, you will need to find a store-bought vegan condensed milk alternative, often made from coconut or oat milk. The drink mix is usually vegan-friendly, but always check the label.
Why did my ice cream turn out grainy or icy?
A grainy texture usually means the whipped cream was over-whipped and started to turn to butter. An icy texture has two likely causes: either the ingredients weren’t folded together well, leaving pockets of heavier liquid, or the ice cream wasn’t stored in an airtight container, allowing freezer air to form crystals. Ensuring a proper whip, a gentle fold, and a tight lid will solve both issues.
How long does this homemade ice cream last in the freezer?
When stored properly in an airtight container, this ice cream will be at its best quality for about 2 to 3 weeks. After that, it’s still safe to eat, but it may develop more ice crystals or its flavor might fade slightly. For the freshest taste and creamiest texture, I recommend enjoying it within the first 10 days.
Can I use a sugar-free drink mix?
Yes, you can use a sugar-free drink mix. The final ice cream will be less sweet since the primary sweetness comes from the sweetened condensed milk. The texture should remain the same. It’s a great option if you’re watching your sugar intake but still want a fun, frosty treat.
What other flavors work well?
The possibilities are endless! Any powdered drink mix flavor you enjoy will work. Popular choices in my house are lemonade for a tart sorbet-style treat, peach-mango for a tropical vibe, and of course, chocolate. You could even try a fun one like blue raspberry for a colorful surprise. It’s a great way to use up those single packets in your cupboard.
Is it necessary to use an electric mixer?
An electric mixer (hand or stand) is highly recommended to whip the cream to the right consistency. You can whip it by hand with a whisk, but it will take a lot of time and arm strength! The electric mixer incorporates air quickly and efficiently, which is crucial for the light texture of this no-bake dessert.
Can I add alcohol to this recipe?
You can add a small amount (1-2 tablespoons) of a liqueur like strawberry liqueur, vodka, or Irish cream. Alcohol lowers the freezing point, which can make the ice cream softer and help prevent large ice crystals. However, adding too much will prevent it from freezing solid. If you do add some, you may need to freeze it a bit longer.
This tastes great! What other no-bake recipes can I try?
I’m so glad you like it! If you love easy, no-oven-required desserts, you’re in the right place. For another incredibly rich and simple treat, you must try our Chocolate Peanut Butter Delight. It’s pure indulgence in a pan. And for even more inspiration, explore our entire collection of easy no-bake desserts that are perfect for any season. Remember, while enjoying sweet treats, overall health is key. Studies show that proper hydration is vital for well-being, so always balance your desserts with plenty of water!
The Final Scoop
This Strawberry No-Bake Ice Cream is more than just a recipe. It’s a ticket to instant summer joy. It proves you don’t need fancy tools to make something truly special. In under 20 minutes of hands-on work, you create a dessert that brings smiles. The vibrant pink color, the sweet strawberry scent, and the unbelievably creamy bite make it unforgettable. So grab that mixer, a packet of drink mix, and get ready for the easiest, most satisfying ice cream adventure. Your family and friends will thank you for it. Now, who’s ready for a scoop?
Equipment
- Grand bol
- Fouet
- Spatule
- Container résistant au congélateur
- Cuillère à glace pour servir
Ingredients
- 1 paquet mélange de boisson à la fraise (ou votre saveur préférée)
- 395 g lait concentré sucré (1 boîte)
- 200 g crème épaisse (1 petite boîte)
Instructions
- Versez la crème épaisse froide dans un grand bol et battez jusqu'à obtenir des pics souples à l'aide d'un batteur à main ou d'un robot.
- Dans un autre bol, mélangez le lait concentré sucré avec le mélange de boisson à la fraise et remuez jusqu'à ce que le tout soit homogène.
- Incorporez délicatement le mélange de fraises dans la crème fouettée jusqu'à ce qu'il n'y ait plus de stries blanches visibles.
- Versez dans un récipient résistant au congélateur, lissez le dessus et couvrez hermétiquement.
- Congeler pendant au moins 4 à 6 heures, de préférence toute la nuit, jusqu'à ce que le mélange soit ferme.
- Réalisez des boules, garnissez et servez selon vos souhaits.
Notes
Nutrition

Hi, I’m Olivia Parker, the founder of BakingSecret.com and a lifelong lover of all things sweet and homemade. I grew up in a small town in Oregon, where the smell of fresh cookies in my family’s kitchen sparked my passion for baking. Over the years, I turned that passion into a mission: to help home bakers feel confident, inspired, and creative.
After studying food science and working in several artisan bakeries across the U.S., I decided to create a space where everyone from beginners to seasoned bakers can find reliable recipes, expert tips, and a warm, welcoming community. BakingSecret.com is my way of sharing the magic of baking with the world. When I’m not testing new recipes, you’ll find me exploring farmers’ markets, collecting vintage cookbooks, or perfecting my sourdough technique.