
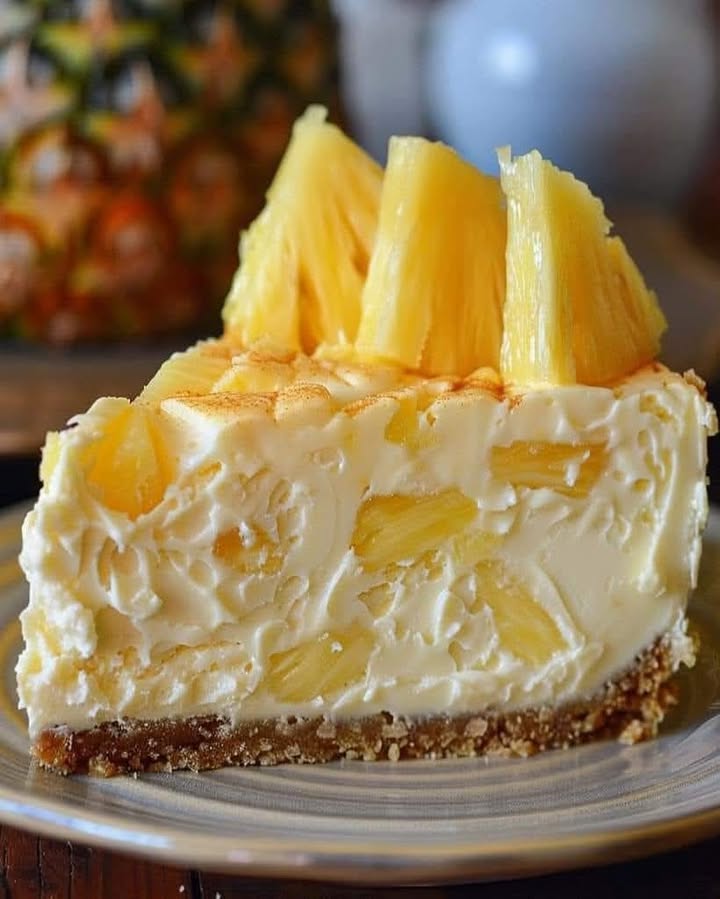
There’s something magical about a dessert that feels like a tropical vacation in every bite. I remember serving this Refreshing No-Bake Pineapple Mousse Cheesecake at a summer potluck last year. The pan was scraped clean before I even had a chance to get a second slice for myself! It’s the perfect treat when you crave something creamy, dreamy, and completely oven-free. It brings the sunny, sweet-tart flavor of pineapple into a light, fluffy cheesecake that will have everyone asking for the recipe.
A Slice of Sunshine: The Story of Pineapple Cheesecake
Cheesecake has been a beloved dessert for centuries, dating back to ancient Greece. The modern no-bake version, however, is a much more recent and brilliant invention for busy home cooks. Adding pineapple to the mix is a nod to mid-century American dining, where the tropical fruit became a symbol of hospitality and fun. My version takes inspiration from those classic pineapple upside-down cakes but transforms it into a chilled, creamy mousse. It’s a beautiful blend of tradition and no-fuss modern baking that anyone can master.
Why You’ll Love This No-Bake Pineapple Cheesecake
You will adore this recipe for so many reasons! First, it’s incredibly simple–no water baths, no cracked tops, and no oven required. The texture is wonderfully light and airy, unlike heavier baked cheesecakes. The sweet graham cracker crust pairs perfectly with the bright, tangy pineapple. It’s a dessert that looks impressive but secretly requires very little effort. It’s also incredibly forgiving. Whether you’re a seasoned baker or just starting out, this pineapple delight is sure to be a success.
Perfect Occasions for This Tropical Dessert
This cheesecake is your new go-to for any gathering. It’s a star at summer barbecues, baby showers, and birthday parties. I love bringing it to potlucks because it travels so well in its pan. It’s an elegant finish to a weeknight family dinner or a festive centerpiece for holidays like Easter or Mother’s Day. When the weather is hot and the last thing you want to do is turn on the oven, this cool, creamy dessert is the absolute perfect solution.
Ingredients for Your Pineapple Mousse Cheesecake
Gather these simple ingredients for a flawless dessert:
- 2 cups crushed graham crackers – The foundation of our sweet, crunchy crust.
- 1/2 cup melted butter – Binds the crust together for the perfect crumb.
- 1/4 cup granulated sugar – Adds a little extra sweetness to the crust.
- 2 cups cream cheese, softened – The creamy, tangy heart of the cheesecake.
- 1 cup powdered sugar – Dissolves easily for a silky-smooth filling.
- 2 cups pineapple chunks, drained – The star of the show! Provides juicy, tropical flavor.
- 1 cup heavy cream – Whipped into soft peaks to create the light mousse texture.
- 1 tablespoon vanilla extract – Adds a warm, aromatic depth.
- 1 packet gelatin – The secret to a perfectly set no-bake cheesecake.
- 1/4 cup cold water – For blooming the gelatin.
- Pineapple slices for garnish – For a beautiful, professional finish.
Handy Substitution Options
No worries if you’re missing an item! This recipe is very adaptable.
- Graham Crackers: Use digestive biscuits, vanilla wafers, or even crushed pretzels for a salty-sweet twist.
- Butter: Coconut oil works as a great dairy-free alternative.
- Cream Cheese: For a lighter version, try Neufchâtel cheese. For dairy-free, use a high-quality plant-based cream cheese.
- Heavy Cream: Full-fat coconut cream can be whipped for a dairy-free mousse.
- Gelatin: Agar-agar powder (use according to package directions) is a great vegetarian substitute to achieve the right cooking consistency for your filling.
Creating Your No-Bake Pineapple Masterpiece
Step 1: Build the Crust
Start by mixing your crushed graham crackers, melted butter, and sugar in a medium bowl. The mixture should look like wet sand and hold together when you pinch it. Pour it into your springform pan. Use the bottom of a glass or a measuring cup to press it firmly and evenly into the bottom. This creates a solid base for our creamy filling. A firm press is key to a crust that doesn’t crumble when sliced. Pop the pan in the fridge to chill and set while you make the filling.
Step 2: Make the Creamy Pineapple Base
In a large bowl, beat the softened cream cheese with the powdered sugar. Use an electric mixer on medium speed until it’s completely smooth and there are no lumps. This is the most important step for a silky texture. Next, gently fold in the drained pineapple chunks. The vibrant yellow pieces will speckle the white cream cheese beautifully. Make sure the pineapple is well-drained so you don’t add extra liquid to the filling.
Step 3: Whip and Fold for Fluffiness
Now, pour the heavy cream into a clean, cold bowl. Whip it on high speed until stiff peaks form. You’ll know it’s ready when you lift the beaters and the cream stands up straight. This airy whipped cream is what gives our cheesecake its mousse-like quality. Add about a third of it to the cream cheese mixture and fold gently. This lightens the dense base. Then, carefully fold in the remaining whipped cream until no white streaks remain.
Step 4: Activate the Gelatin
Pour the cold water into a small saucepan and sprinkle the gelatin packet evenly over the top. Let it sit for a minute—this is called “blooming” and helps it dissolve smoothly. Then, place the pan over very low heat. Gently swirl the pan until the gelatin is completely dissolved and the liquid is clear. Let it cool for just a minute or two. Pro tip: Don’t let it boil, as high heat can ruin gelatin’s setting power.
Step 5: Combine and Chill to Set
While whisking the cream cheese mixture constantly, slowly drizzle in the slightly cooled, liquid gelatin. This ensures it mixes in evenly and doesn’t clump. Once fully incorporated, pour the entire luscious filling over your chilled crust. Smooth the top with a spatula. Now, the hard part: waiting! Chill the cheesecake in the refrigerator for at least 4 hours, though overnight is best for a perfect, clean slice.
Step 6: Garnish and Serve
Once set, carefully run a thin knife around the edge of the springform pan before releasing the clamp. Arrange fresh pineapple slices on top in a pretty pattern. For extra flair, you can lightly brush them with a little honey or sprinkle with toasted coconut. Chef’s tip: Use a hot, dry knife to slice. Dip it in hot water and wipe it clean between each cut for beautifully clean slices that show off all the lovely layers.
Timing Your Dessert Perfectly
This recipe is all about planning ahead. The active prep time is a quick 20 minutes. There is zero cooking time since it’s a no-bake dream. The crucial part is the chilling time: a minimum of 4 hours to set properly. For the absolute best texture and flavor, I recommend making it the day before and letting it chill overnight. Your total time from start to perfect slice is about 4 hours and 20 minutes.
Chef’s Secret for the Best Texture
My secret trick is to use well-drained canned pineapple packed in juice, not syrup. The syrup can be overly sweet and sometimes contains flavors that compete with the pure fruit taste. Draining the juice-packed pineapple thoroughly ensures your mousse stays light and fluffy instead of becoming watery. You can even pat the chunks dry with a paper towel for extra insurance!
A Sweet Piece of Extra Info
Did you know the pineapple has been a symbol of welcome and hospitality for centuries? In colonial America, hostesses would place a fresh pineapple in the center of their dining table when expecting guests. Serving this No-Bake Pineapple Cheesecake continues that lovely tradition. It tells your family and friends they are truly welcome and cherished.
Necessary Equipment
- 9-inch springform pan
- Electric hand mixer or stand mixer
- Mixing bowls (one large, one medium)
- Small saucepan
- Spatula
- Measuring cups and spoons
How to Store Your Cheesecake
This cheesecake must be stored in the refrigerator. Cover it tightly with plastic wrap or place it in a large, airtight container. This prevents it from absorbing any other odors from your fridge. The cold environment keeps the creamy filling firm and the crust from getting soggy.
Properly stored, your pineapple cheesecake will stay fresh and delicious for up to 4-5 days. The flavors actually meld and improve after the first day, making fantastic leftovers.
I do not recommend freezing this particular mousse-style cheesecake. While the crust and filling are freezer-safe, the texture of the whipped cream and pineapple can become watery and grainy when thawed. It’s best enjoyed fresh from the fridge.
Pro Tips and Advice for Success
- Ensure your cream cheese is truly softened at room temperature. Cold cream cheese will leave lumps in your filling.
- Chill your mixing bowl and beaters before whipping the heavy cream. Cold tools help the cream whip up faster and hold more air.
- When folding, use a gentle, sweeping motion with your spatula to keep as much air in the mixture as possible.
- If you’re in a hurry, you can place the cheesecake in the freezer for 1-2 hours to set quickly, then transfer to the fridge.
Inspired Presentation Ideas
Make your dessert table shine with these simple ideas:
- Serve each slice on a pool of bright mango or passion fruit coulis.
- Top with a dollop of extra whipped cream and a sprinkle of toasted coconut flakes.
- For individual servings, layer the crust and filling in fancy glasses for a pineapple cheesecake parfait.
- Add a fresh mint leaf next to the pineapple garnish for a pop of green color.
Healthier & Fun Recipe Variations
Love this base recipe? Try these six delicious twists:
- Lighter Pineapple Cheesecake: Use reduced-fat cream cheese and a sugar substitute approved for baking. The result is still creamy but with fewer calories.
- Dairy-Free Tropical Cheesecake: Substitute with plant-based cream cheese and whip full-fat coconut cream. It’s a perfect vegan treat with all the tropical flavor.
- Pina Colada Cheesecake: Add 1/2 cup of finely chopped macadamia nuts to the crust and replace 1 teaspoon of vanilla with rum extract in the filling. Garnish with toasted coconut.
- Mixed Berry Pineapple Cheesecake: Fold in 1 cup of fresh raspberries or blueberries along with the pineapple for a beautiful berry medley and antioxidant boost.
- Mini Pineapple Cheesecake Bites: Press the crust into a muffin tin lined with paper liners. Divide the filling among the cups for perfectly portioned, portable treats.
- Lemon-Pineapple Cheesecake: Add the zest of one lemon to the filling for a zesty, bright note that cuts through the sweetness beautifully.
Linking to Other Sweet Favorites
If you love the creamy, no-bake aspect of this dessert, you might also enjoy my Caramelized Banana Butterscotch Parfait for another easy, make-ahead treat. For nut lovers, the rich and unique Decadent Pistachio Cream Cheesecake is a showstopper. If you’re craving more fruity chocolate combos, the Raspberry Chocolate Delight cake is pure indulgence. And for a classic berry pairing, you can’t beat this elegant White Chocolate Strawberry Cheesecake.
Common Mistakes to Avoid
Mistake 1: Using Cold Cream Cheese
This is the number one reason for a lumpy cheesecake filling. Cold cream cheese does not blend smoothly with the sugar or other ingredients. No amount of mixing will fully get rid of those little white bits. To avoid this, take your cream cheese out of the fridge at least an hour before you start. Let it sit on the counter until it’s soft to the touch. Pro tip: If you forget, you can microwave the blocks on a low-power setting for 10-15 seconds, but be very careful not to melt it.
Mistake 2: Not Draining the Pineapple Well
Extra liquid from the pineapple is the enemy of a firm, sliceable no-bake cheesecake. That juice will thin out your filling and prevent it from setting properly. You’ll end up with a delicious but soupy mess. Always drain canned pineapple in a colander. For extra safety, spread the chunks on a few layers of paper towels and gently pat them dry. Investing this extra minute makes all the difference in texture.
Mistake 3: Overheating or Boiling the Gelatin
Gelatin is a powerful setting agent, but it’s delicate. If you apply too much heat or let it boil, it can lose its thickening ability. Your cheesecake might not set at all. Always use low heat and just gently warm the mixture until the granules disappear and the liquid is clear. Remove it from the heat immediately. Let it cool slightly before adding it to the cream cheese mixture so it doesn’t cook the dairy.
Mistake 4: Stirring Instead of Folding the Whipped Cream
Vigorously stirring or beating the whipped cream into the filling will deflate all the air you just whipped into it. You’ll lose that light, mousse-like texture and end up with a dense cheesecake. The correct technique is to “fold.” Use a rubber spatula to cut down through the center of the mixture, sweep across the bottom, and fold it over the top. Turn the bowl as you go. Be patient and gentle to keep it fluffy.
Mistake 5: Not Chilling Long Enough
Impatience is a common pitfall! Four hours is the minimum chilling time, but the center might still be a bit soft. Cutting into it too early can cause a collapse. For the perfect, clean slice that holds its shape on a plate, let it chill overnight. The extended time allows the gelatin to fully set and the flavors to deepen beautifully. Trust me, the wait is worth it.
Exploring more cheesecake ideas is always a joy. You can find a whole world of inspiration in our collection of creamy and delicious cheesecake recipes for every season and craving.
Frequently Asked Questions
Can I use fresh pineapple instead of canned?
You can use fresh pineapple, but there is an important caution. Fresh pineapple contains an enzyme called bromelain that breaks down protein. This enzyme can prevent the gelatin from setting properly and can also make your dairy filling thin and runny. If you want to use fresh fruit, you must cook the pineapple chunks first. Lightly sautéing or poaching them will deactivate the bromelain. Let the cooked pineapple cool completely and drain any liquid before adding it to the recipe. Canned pineapple is already cooked during the canning process, which is why it’s a safer, more reliable choice for this no-bake dessert.
How do I know when the heavy cream is whipped to stiff peaks?
Getting the right whip on your cream is crucial for structure. Start with a cold bowl and cold beaters. Pour in the cream and begin mixing on medium-high speed. First, it will become frothy, then it will thicken into soft peaks. Soft peaks mean the cream holds a gentle peak that curls over at the tip when you lift the beater. Continue beating just a bit longer until you see stiff peaks. Stiff peaks stand up straight and hold their shape firmly when the beater is lifted. Be careful not to over-whip, or you’ll start making butter! If the cream looks grainy or separates, you’ve gone too far.
My cheesecake didn’t set. What went wrong and can I fix it?
Several factors could cause a runny cheesecake. The most common are: not using enough gelatin, not dissolving the gelatin properly, adding overly wet pineapple, or not chilling it long enough. Unfortunately, you can’t add more gelatin to a finished mixture. Your best fix is to repurpose it! Pour the unset filling into individual cups or a serving bowl and treat it as a delicious pineapple mousse or parfait. It will still taste amazing. For next time, double-check your gelatin packet size, ensure you fully dissolve it, and pat your pineapple chunks very dry.
Can I make this recipe gluten-free?
Absolutely! Making a gluten-free No-Bake Pineapple Cheesecake is very simple. The only ingredient that typically contains gluten is the graham cracker crust. To make it gluten-free, substitute the graham crackers with an equal amount of certified gluten-free graham crackers or gluten-free cookies. Gluten-free shortbread or ginger snap cookies make a fantastic crust. Just crush them into fine crumbs and follow the same recipe steps. Always check labels on other ingredients like vanilla extract and powdered sugar to ensure they are processed in a gluten-free facility if you have a severe allergy.
How far in advance can I make this cheesecake?
This cheesecake is an excellent make-ahead dessert, which makes it perfect for parties. You can prepare it up to two days in advance. In fact, the flavor improves after a day in the fridge as everything melds together. After assembling, cover it tightly with plastic wrap and store it in the refrigerator. Add the fresh pineapple garnish on the day you plan to serve it. This prevents the garnish from drying out or weeping onto the top of the cheesecake. Avoid making it more than three days ahead, as the crust may start to soften.
What can I use if I don’t have a springform pan?
No springform pan? No problem. You have a few good options. You can use a regular 9-inch pie dish or a deep-dish tart pan. The slices won’t come out as cleanly, but it will still taste wonderful. For the cleanest slices from a regular pan, line it with strips of parchment paper that overhang the sides before you add the crust. These “sling” handles will help you lift the entire cheesecake out. You can also make individual cheesecakes in a muffin tin lined with paper liners, which are fun for parties and require no slicing at all.
Is there a way to make this without gelatin?
Yes, you can omit the gelatin, but be aware that the texture will be different. Without gelatin, the cheesecake will be more like a very thick, creamy mousse. It will need to be served very cold and may not hold a perfectly clean slice. It’s best served in dishes or as a dip. For a firmer set without animal-based gelatin, you can use a vegetarian substitute like agar-agar. Agar sets more firmly than gelatin, so follow the package instructions carefully for the correct powder-to-liquid ratio, as it is not a direct 1:1 substitution.
Can I use frozen pineapple chunks?
Frozen pineapple is a convenient option, but you must thaw and drain it extremely well. Place the frozen chunks in a colander over a bowl and let them thaw completely in the refrigerator. Once thawed, press down on them gently to release as much liquid as possible. Then, spread them on several layers of paper towels and pat them dry. Using frozen fruit without thorough draining will introduce a lot of excess water into your filling, which can prevent it from setting and dilute the flavor.
Why did my crust get soggy?
A soggy crust usually happens when the filling is poured onto a warm crust or when the cheesecake is stored for several days. To prevent this, always make sure your crust has chilled in the refrigerator for the full 15 minutes (or longer) until it’s firm and cool to the touch before adding the filling. Also, the butter in the crust acts as a barrier. Ensure you’ve pressed the crust mixture very firmly into the pan so it’s compact. Even with all precautions, the very bottom of the crust may soften slightly after 3-4 days in the fridge, but it will still be delicious.
Can I double this recipe?
Doubling this recipe is a great idea for a crowd! Simply double all the ingredients. You will need a much larger pan, like a 9×13-inch baking dish or a large, deep rectangular pan. The preparation steps are exactly the same. Keep in mind that a larger, thicker cheesecake will need a longer time to set completely in the refrigerator. I would plan for at least 6 hours of chilling, but overnight is still the best guarantee for a perfect set all the way through to the center.
Your New Go-To Summer Dessert
This Refreshing No-Bake Pineapple Mousse Cheesecake is more than just a recipe. It’s a promise of a simple, stunning dessert that never fails to impress. From the buttery crust to the light pineapple cloud filling, it’s a true celebration of flavor and ease. I hope it brings as much joy to your table as it has to mine. Grab your ingredients, and get ready for the compliments to roll in. Happy no-baking!
Equipment
- Grand bol
- Fouet
- Spatule
- Moule à charnière
- Casserole
Ingredients
- 2 tasses biscuits graham écrasés
- 1/2 tasse beurre fondu
- 1/4 tasse sucre
- 2 tasses fromage à la crème, ramolli
- 1 tasse sucre glace
- 2 tasses morceaux d'ananas, égouttés
- 1 tasse crème épaisse
- 1 cuillère à soupe extrait de vanille
- 1 paquet gélatine
- 1/4 tasse eau froide
- q.s. tranches d'ananas pour garnir
Instructions
- Mélangez les biscuits graham écrasés, le beurre fondu et le sucre dans un bol moyen; versez dans un moule à charnière et appuyez fermement pour former la croûte.
- Dans un grand bol, battez le fromage à la crème ramolli avec le sucre glace jusqu'à obtenir une consistance lisse; incorporez délicatement les morceaux d'ananas égouttés.
- Fouettez la crème jusqu'à obtenir des pics fermes; incorporez un tiers de la crème fouettée dans le mélange de fromage à la crème, puis incorporez le reste de la crème fouettée.
- Faites gonfler la gélatine dans l'eau froide, puis dissolvez-la à feu doux; laissez refroidir légèrement avant de l'incorporer dans le mélange de fromage à la crème.
- Versez la garniture sur la croûte réfrigérée et lissez le dessus; réfrigérez pendant au moins 4 heures ou toute la nuit pour qu'elle prenne.
- Passez un couteau autour du bord du moule; décorez avec des tranches d'ananas frais et servez.
Notes
Nutrition

Hi, I’m Olivia Parker, the founder of BakingSecret.com and a lifelong lover of all things sweet and homemade. I grew up in a small town in Oregon, where the smell of fresh cookies in my family’s kitchen sparked my passion for baking. Over the years, I turned that passion into a mission: to help home bakers feel confident, inspired, and creative.
After studying food science and working in several artisan bakeries across the U.S., I decided to create a space where everyone from beginners to seasoned bakers can find reliable recipes, expert tips, and a warm, welcoming community. BakingSecret.com is my way of sharing the magic of baking with the world. When I’m not testing new recipes, you’ll find me exploring farmers’ markets, collecting vintage cookbooks, or perfecting my sourdough technique.