
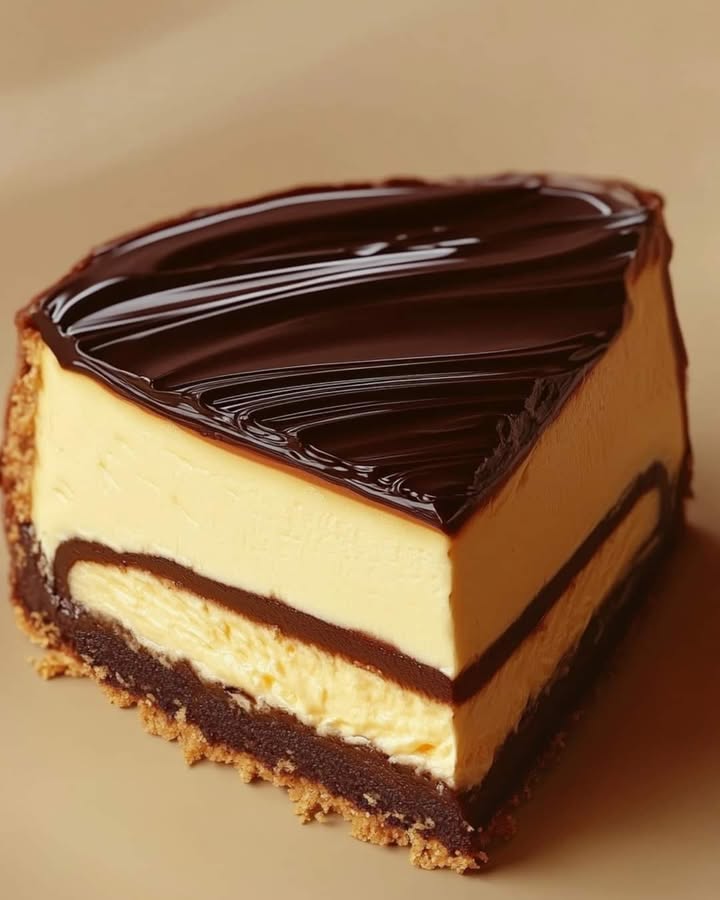
The Ultimate Dreamy Boston Cream Cheesecake Recipe
Have you ever had a dessert so perfectly layered and decadent that it felt like a sweet dream? I created this Boston Cream Cheesecake one rainy Sunday when my family was craving something spectacular. The classic Boston Cream Pie—that lovely sponge cake with custard and chocolate—has always been a favorite. But I thought, why not make it even more indulgent? Turning it into a cheesecake was my ‘aha!’ moment. It combines a buttery crust, a silky chocolate layer, a creamy custard filling, and a glossy ganache topping. Every forkful is pure bliss. The best part? While it looks like it came from a fancy bakery, it’s totally doable in your own kitchen. Let’s make some magic together!
A Sweet Slice of History: From Pie to Cheesecake
The original Boston Cream Pie isn’t a pie at all—it’s a cake! It was invented in the 19th century at Boston’s Parker House Hotel. The classic version features two layers of sponge cake sandwiching a rich vanilla custard, all topped with a shiny chocolate glaze. It’s a staple in New England bakeries. My Dreamy Boston Cream Cheesecake is a loving homage to that tradition. We’re taking the soul of the dessert—the custard and chocolate—and letting it shine in a rich, creamy cheesecake format. It’s a modern twist that honors the past while being utterly irresistible. This fusion is perfect for anyone who can’t decide between a slice of cheesecake and a piece of cake. Why choose when you can have the best of both?
Why You’ll Fall in Love With This Dreamy Cheesecake Delight
This isn’t just another cheesecake recipe. It’s a showstopper designed to create happy memories. You’ll love it because it delivers on every level: texture, flavor, and wow factor. The graham cracker crust adds a sweet crunch. The hidden chocolate layer is a lovely surprise. The filling is smooth, rich, and perfectly set. And that glossy ganache? Pure elegance. It’s also incredibly versatile. You can make it a day ahead for stress-free entertaining. Whether you’re a seasoned baker or a nervous newbie, this recipe walks you through each step with clear instructions and my tested tips. The result is a Dreamy Cheesecake Delight that will have everyone asking for seconds.
Perfect Occasions for This Showstopping Dessert
This cheesecake turns any event into a celebration. It’s the star of the table at birthday parties, anniversaries, and holiday dinners like Thanksgiving or Christmas. I love bringing it to potlucks—it always disappears first! It’s also a wonderful way to say “thank you” to a neighbor or to treat your family on a lazy weekend. Think of it as your secret weapon for impressing guests. The layers of flavor feel special and luxurious, making even a simple Tuesday night feel like a party.
Gathering Your Ingredients for Dreamy Cheesecake Delight
Using high-quality, room-temperature ingredients is the first secret to a perfect cheesecake. Here’s what you’ll need:
- For the Crust: 1 ½ cups graham cracker crumbs, ¼ cup granulated sugar, ⅓ cup unsalted butter (melted).
- For the Chocolate Layer: 1 cup semi-sweet chocolate chips, ½ cup heavy cream.
- For the Cream Cheese Custard Filling: 24 oz (three 8-oz blocks) cream cheese (softened!), 1 cup granulated sugar, 3 large eggs, 1 cup heavy cream, 2 teaspoons vanilla extract.
- For the Ganache: 1 cup semi-sweet chocolate chips, ½ cup heavy cream.
Easy Ingredient Swaps (No Panic Allowed!)
Don’t worry if you’re missing one thing. Baking is flexible!
- Graham Cracker Crumbs: Digestive biscuits or vanilla wafers work great.
- Chocolate Chips: Use dark chocolate for a richer taste or milk chocolate for a sweeter touch.
- Heavy Cream: For the ganache and filling, full-fat coconut cream can be a dairy-free substitute.
- Cream Cheese: Always use full-fat, brick-style cream cheese for the best texture. Low-fat versions can make the filling runny.
Crafting Your Dreamy Boston Cream Cheesecake, Step-by-Step
Step 1: The Buttery Foundation
Start by preheating your oven to 350°F (175°C). Grease a 9-inch springform pan—I like to use a little butter on my fingers to make sure the sides are coated. In a medium bowl, combine the graham cracker crumbs and sugar. Pour in that glorious melted butter. The mixture should look like wet sand and hold together when you pinch it. Press it firmly and evenly into the bottom of your pan. A flat-bottomed glass or measuring cup helps create a perfect, compact base. Bake this for 10 minutes until it’s fragrant and set. Let it cool completely on a wire rack. This ensures your chocolate layer won’t melt when it hits the crust.
Pro tip: For an extra-secure crust, press some crumbs about halfway up the sides of the pan. It makes slicing cleaner!
Step 2: The Secret Chocolate Layer
This step is a fun, delicious secret! Place your chocolate chips in a heatproof bowl. Heat the ½ cup of heavy cream in a small saucepan until tiny bubbles form around the edges—you don’t want a rolling boil. Pour the hot cream over the chocolate chips. Let it sit, untouched, for two whole minutes. This allows the heat to gently melt the chocolate. After two minutes, take a whisk and stir slowly from the center outwards. You’ll see a smooth, glossy chocolate ganache come together. Pour this over your cooled crust and spread it into an even layer with an offset spatula. Pop the pan in the fridge for 30 minutes. This chills the chocolate so it forms a solid barrier before we add the cheesecake batter.
Step 3: The Heart of the Dreamy Cheesecake Delight
Now for the main event: the creamy custard filling. Ensure your cream cheese is truly softened at room temperature for at least an hour. This is non-negotiable for a lump-free filling! In a large bowl, beat the cream cheese and sugar together on medium speed until completely smooth and creamy, about 3 minutes. Scrape down the bowl. Add the eggs, one at a time, beating well after each addition. Now, pour in the heavy cream and vanilla extract. Beat on low speed just until everything is beautifully combined and the batter is velvety. Overmixing can incorporate too much air, leading to cracks. Slowly pour this luscious batter over your chilled chocolate layer. Give the pan a few gentle taps on the counter to release any air bubbles.
Chef’s tip: For the ultimate creamy texture and to avoid cracks, place a pan of hot water on the bottom rack of your oven while the cheesecake bakes on the middle rack. The steam works wonders!
Step 4: Baking to Perfection
Carefully place your cheesecake in the preheated oven. Bake for 55-60 minutes. You’re looking for the edges to be puffed and set, but the center should still have a slight jiggle—like Jell-O—when you gently shake the pan. It will firm up as it cools. Do NOT open the oven door during the first 45 minutes of baking! Sudden temperature drops are a cheesecake’s enemy. Once done, turn off the oven, crack the door open, and let the cheesecake cool inside for about an hour. This gradual cooling helps prevent those pesky top cracks. Then, move it to a wire rack to cool to room temperature. Finally, cover it and refrigerate for at least 4 hours, but overnight is truly best. Patience is rewarded with the perfect slice.
Step 5: The Glossy Ganache Finish
The grand finale! Repeat the ganache process just like in Step 2. Heat the remaining ½ cup of heavy cream until simmering, then pour it over the cup of chocolate chips. Let it sit, then stir into a silky, pourable frosting. Take your fully chilled cheesecake out of the fridge. Pour the warm ganache into the center of the cheesecake. Using a spatula, gently guide it to the edges, letting it drip beautifully down the sides. This creates that professional, bakery-style look. Return the cheesecake to the fridge for a final 30 minutes to set the ganache. Now, you’re ready for the most satisfying part: slicing and serving your masterpiece.
Timing Your Dreamy Cheesecake Delight
Good things take time, and this cheesecake is no exception. Here’s your game plan:
- Active Prep Time: 30 minutes
- Bake Time: 70 minutes (10 for crust, 60 for filling)
- Cooling Time: 1 hour (in the oven)
- Chilling Time: At least 4 hours, preferably overnight
- Final Ganache Set: 30 minutes
- Total Time (Hands-off): About 8 hours from start to slice
Plan to make this the day before you need it. The long, slow chill in the fridge is what gives you that dreamy, firm-yet-creamy texture.
My Chef’s Secret: The Room Temperature Rule
My number one secret for a flawless Dreamy Cheesecake Delight is simple: room temperature ingredients. This is especially crucial for the cream cheese and eggs. Cold cream cheese will never blend smoothly with sugar, leaving you with a lumpy batter. Cold eggs can cause the batter to break or curdle. I take my cream cheese and eggs out of the fridge at least 2 hours before I start baking. When you press the cream cheese, your finger should sink in easily with little resistance. This ensures a silky-smooth, homogeneous filling that bakes evenly and tastes incredibly luxurious.
A Fun Fact: Why “Boston Cream”?
Here’s a tasty bit of trivia: The “cream” in Boston Cream Pie refers to the custard or pastry cream filling. Back in the 1850s, custard-filled cakes were quite fashionable. The Parker House Hotel’s chef, a Frenchman named Monsieur Sanzian, is credited with perfecting the recipe and covering it in chocolate glaze—a new and exotic ingredient at the time. So, every time you make this cheesecake, you’re baking a little piece of culinary history with a French-American twist!
Your Cheesecake Toolkit
You don’t need fancy equipment, but these tools make the process smoother:
- 9-inch Springform Pan: The removable sides are essential for getting your beautiful cheesecake out.
- Stand Mixer or Hand Mixer: For creaming the cheese and sugar to perfection.
- Heatproof Bowls: For making the chocolate ganache layers.
- Offset Spatula: The best tool for spreading ganache and smoothing batter.
- Wire Cooling Rack: Allows air to circulate for even cooling.
How to Store Your Leftover Dreamy Cheesecake Delight
In the Refrigerator: This cheesecake must always be stored in the fridge. Once sliced, cover the cut edges with plastic wrap pressed directly onto the surface. Then, cover the whole pan with aluminum foil or a cake dome. Properly stored, it will stay fresh and delicious for up to 5 days.
For Freezing: This dessert freezes beautifully! Freeze the whole cheesecake or individual slices. First, chill it completely. Then, wrap the whole cheesecake (or slices) tightly in plastic wrap, followed by a layer of heavy-duty aluminum foil. Place it in a freezer-safe bag. It will keep for up to 2 months. To serve, thaw it overnight in the refrigerator.
Serving After Storage: For the best texture and flavor, let the cheesecake sit at room temperature for about 20-30 minutes before serving. This slight warming allows the flavors to bloom and the texture to become perfectly creamy.
Tips for Cheesecake Success
- Always use a water bath (or steam bath, as mentioned) for an even bake and crack-free top.
- When adding eggs, mix on low speed and only until incorporated. Overbeating adds too much air.
- Run a thin knife around the edge of the cheesecake after baking (before cooling) to help it contract away from the pan and prevent cracks.
- For clean slices, dip your knife in hot water and wipe it dry between each cut.
Pretty Presentation Ideas
Make your dessert table pop! Serve each slice with a dollop of whipped cream and a fresh raspberry. Dust the plate with a little cocoa powder or powdered sugar using a stencil for a fancy touch. You can also pipe little rosettes of whipped cream around the edge of the whole cheesecake before slicing. For a drizzle effect, use white chocolate ganache alongside the dark chocolate.
Dreamy Variations to Try
Love this recipe? Mix it up! Here are six delicious twists:
- Dreamy Salted Caramel Cheesecake: Swap the chocolate layer for a thick layer of salted caramel sauce. Drizzle more caramel over the ganache.
- Dreamy Peanut Butter Cup: Mix ½ cup peanut butter into the cream cheese filling. Use peanut butter chips in the ganache layer.
- Dreamy Coconut Cream: Replace the heavy cream in the filling with coconut cream. Toast some shredded coconut and sprinkle it over the set ganache.
- Dreamy Mocha Delight: Dissolve 2 tbsp instant espresso powder into the heavy cream for the filling. Use dark chocolate for an intense mocha flavor.
- Dreamy Berry Swirl: Before baking, dollop ½ cup of raspberry or strawberry puree on the batter and swirl with a knife for a marbled effect.
- Dreamy (and Lighter) Version: Use reduced-fat cream cheese and swap the heavy cream in the filling for full-fat Greek yogurt. The texture will be slightly denser but still delicious.
Common Mistakes to Avoid
Mistake 1: Using Cold Cream Cheese
This is the most common culprit behind lumpy cheesecake batter. Cold cream cheese will not blend smoothly with sugar, no matter how long you mix it. You’ll end up with tiny bits of unmixed cheese throughout your filling, which bakes into an uneven texture. Always plan ahead. Take your cream cheese blocks out of the fridge at least 2 hours before you start baking. They should feel soft and pliable at room temperature.
Mistake 2: Overmixing the Batter After Adding Eggs
Once you add the eggs, you need to switch to a gentle touch. Overbeating incorporates too much air into the batter. During baking, this trapped air expands and then collapses, often causing the cheesecake to rise dramatically and then fall, leading to cracks and a less creamy texture. Mix on low speed and only until each egg is just combined. Stop as soon as you no longer see yellow streaks.
Mistake 3: Skipping the Gradual Cooling Step
Pulling a hot cheesecake out of the oven and plopping it on the counter is a shock to its system. The sudden temperature change makes the delicate custard contract too quickly, almost guaranteeing a giant crack down the middle. Avoid the heartbreak! After baking, turn off the oven, crack the door open with a wooden spoon, and let the cheesecake cool down slowly inside for about an hour. This gentle transition is key to a flawless top.
Mistake 4: Not Testing for Doneness Correctly
Using a toothpick or knife to test a cheesecake is a recipe for disaster. A clean toothpick means it’s overbaked, which leads to a dry, crumbly texture. The correct test is the “jiggle.” When the baking time is up, gently shake the pan. The edges should look set and puffed, but the center (about the size of a lemon) should have a slight, gentle jiggle—like Jell-O. It will firm up perfectly as it chills.
Mistake 5: Slicing with a Dirty Knife
You’ve baked, chilled, and created a masterpiece. Don’t ruin the presentation with messy, crushed slices! Cutting through the firm ganache and dense filling with a standard knife will create ragged edges and squish the layers. For picture-perfect slices, dip a sharp, thin-bladed knife in very hot water, wipe it clean with a towel, and then make your cut. Repeat this for every single slice. The clean, warm blade glides through like butter.
Frequently Asked Questions
Can I make this cheesecake gluten-free?
Absolutely! To make a gluten-free Dreamy Cheesecake Delight, simply swap the graham cracker crumbs for your favorite gluten-free cookie crumbs. Gluten-free graham-style crackers, gluten-free vanilla wafers, or even crushed gluten-free pretzels (for a sweet-salty twist) work wonderfully. Ensure all other ingredients, like vanilla extract, are certified gluten-free if you have a severe sensitivity. The process remains exactly the same, and the result will be just as delicious.
Why did my cheesecake crack on top?
Cracks happen, and don’t worry—it still tastes amazing! The main causes are overmixing the batter (adding too much air), overbaking, or cooling it too quickly. The steam bath (water bath) method is the best defense against cracks, as it creates a humid oven environment. Also, avoid opening the oven door during the first 45 minutes of baking. Remember, even if it cracks, that’s what the beautiful, glossy ganache topping is for—it covers all sins!
Can I use a different size pan?
I strongly recommend using a 9-inch springform pan for this recipe. Using a larger pan will make the layers too thin and cause the cheesecake to bake much faster, risking dryness. A smaller pan will be too deep, requiring a much longer bake time and potentially causing the edges to overbake before the center sets. Stick with the 9-inch size for the perfect ratio of crust to creamy filling to ganache.
How do I know when the cheesecake is fully chilled and ready to slice?
Patience is key! The cheesecake needs at least 4 hours in the fridge, but overnight is truly best. A fully set cheesecake will feel firm to a gentle touch on top. When you lightly press the center, it should not feel soft or jiggly underneath the surface. The ganache topping should also be completely set and not tacky. Giving it the full time allows the custard structure to stabilize, guaranteeing a clean slice.
Can I freeze the whole cheesecake?
Yes, you can freeze it with great results! Make sure the cheesecake is completely chilled first. Do not add the ganache topping before freezing. Wrap the chilled, bare cheesecake tightly in multiple layers of plastic wrap, then a layer of aluminum foil. Freeze for up to 2 months. To serve, thaw it unwrapped in the refrigerator overnight. Then, prepare your ganache fresh and pour it over the top the next day for the best taste and texture.
What’s the difference between this and a Boston Cream Pie?
The classic Boston Cream Pie is actually a cake—two layers of sponge or butter cake with pastry cream in the middle and chocolate glaze on top. Our Dreamy Boston Cream Cheesecake takes those iconic flavors and reimagines them in a denser, richer format. We replace the cake layers with a buttery graham cracker crust and a luxurious cream cheese custard filling, keeping the signature chocolate ganache. It’s a more decadent, creamy interpretation of the original.
My chocolate layer is too hard after chilling. What did I do wrong?
If your chocolate layer is rock-hard, you may have used a chocolate with too high a cocoa percentage or overheated the ganache. Semi-sweet chocolate chips are ideal because they contain stabilizers that keep them softer when set. For the layer, you want a ganache that firms up but is still sliceable. If it’s too hard, let the cheesecake sit at room temperature for 20-30 minutes before serving to soften slightly.
Can I use store-bought custard or pudding for the filling?
I don’t recommend it. The magic of this Dreamy Cheesecake Delight is in the homemade cream cheese custard filling. It’s richer, sets more firmly, and has a far superior flavor and texture compared to instant pudding mixes. The cream cheese provides a tangy depth that balances the sweetness beautifully. Trust the process—the homemade filling is worth the extra step!
Is there a way to make this without a springform pan?
While a springform pan is the best tool for easy removal, you can use a regular 9-inch cake pan in a pinch. Line the bottom with parchment paper and let the paper hang over two opposite sides to create “handles.” After chilling completely, you can use the handles to carefully lift the entire cheesecake out of the pan. It requires a bit more finesse, but it can be done.
What other desserts use similar techniques?
If you loved the layered, creamy-chocolatey approach of this recipe, you might enjoy other decadent treats. For a quicker, crunchy chocolate fix, my Christmas Crack Saltine Cracker Toffee is a foolproof favorite. If individual portions are more your style, try these adorable Mini Lemon Blackberry Cheesecakes for a fruity twist. For a stunning rolled dessert, this Swiss Roll Meets Black Forest Charm cake is a showstopper. And when you want cake and ice cream together, nothing beats a Decadent Strawberry Chocolate Fantasy Ice Cream Loaf Cake. You can explore more amazing ideas in our full collection of cheesecake recipes and inspirations.
Ready to Bake Your Masterpiece?
There you have it—your guide to creating the most Dreamy Boston Cream Cheesecake imaginable. This dessert is a labor of love, but every single minute is worth it when you see the joy on your friends’ and family’s faces. Remember, baking is as much about the fun you have making it as it is about the delicious result. Don’t stress over a little crack or a messy swirl of ganache; it all adds to the homemade charm. Using full-fat, high-quality dairy not only makes this dessert incredibly rich but also provides important nutrients like calcium. In fact, enjoying dairy as part of a balanced diet can contribute to good digestive health. So gather your ingredients, preheat that oven, and get ready to create something truly special. Slice, serve, and savor every dreamy, creamy, chocolatey bite. Happy baking!
Equipment
- Grand bol
- Fouet
- Spatule
- Moule à charnière de 9 pouces
- Grille de refroidissement
Ingredients
- 1 ½ tasse miettes de biscuits Graham
- ¼ tasse sucre granulé
- ⅓ tasse beurre non salé, fondu
- 1 tasse pépites de chocolat semi-sucrées
- ½ tasse crème épaisse
- 24 oz fromage à la crème, ramolli
- 1 tasse sucre granulé
- 3 œufs
- 1 tasse crème épaisse
- 2 cuil. à café extrait de vanille
- 1 tasse pépites de chocolat semi-sucrées
- ½ tasse crème épaisse
Instructions
- Préchauffez votre four à 175°C et graissez un moule à charnière de 9 pouces.
- Dans un grand bol, mélangez les miettes de biscuits Graham et le sucre, puis ajoutez le beurre fondu et mélangez jusqu'à consistance de sable humide.
- Pressez le mélange uniformément au fond du moule et faites cuire pendant 10 minutes, puis laissez refroidir sur une grille.
- Chauffez ½ tasse de crème épaisse dans une casserole jusqu'à ce que de petites bulles se forment, puis versez-la sur les pépites de chocolat dans un bol et laissez reposer 2 minutes.
- Battez le mélange de chocolat jusqu'à obtenir une consistance lisse, puis versez-le sur la croûte refroidie et étalez uniformément. Réfrigérez pendant 30 minutes.
- Dans un grand bol, battez le fromage à la crème ramolli et le sucre jusqu'à consistance lisse, puis ajoutez les œufs un à un, suivis de la crème épaisse et de l'extrait de vanille.
- Passez la pâte à crème sur la couche de chocolat refroidie, en tapotant doucement le moule pour éliminer les bulles d'air.
- Cuire au four pendant 55-60 minutes, en veillant à ce que le centre tremble légèrement.
- Après la cuisson, éteignez le four et laissez le cheesecake refroidir à l'intérieur pendant 1 heure.
- Transférez sur une grille pour refroidir à température ambiante, puis réfrigérez au moins 4 heures ou toute la nuit.
- Pour la ganache, répétez le processus de chauffage du chocolat avec la crème restante.
- Versez la ganache sur le cheesecake refroidi, en la guidant vers les bords pour créer un effet de goutte, et réfrigérez pendant encore 30 minutes avant de servir.
Notes
Nutrition

Hi, I’m Olivia Parker, the founder of BakingSecret.com and a lifelong lover of all things sweet and homemade. I grew up in a small town in Oregon, where the smell of fresh cookies in my family’s kitchen sparked my passion for baking. Over the years, I turned that passion into a mission: to help home bakers feel confident, inspired, and creative.
After studying food science and working in several artisan bakeries across the U.S., I decided to create a space where everyone from beginners to seasoned bakers can find reliable recipes, expert tips, and a warm, welcoming community. BakingSecret.com is my way of sharing the magic of baking with the world. When I’m not testing new recipes, you’ll find me exploring farmers’ markets, collecting vintage cookbooks, or perfecting my sourdough technique.