
Why This Biscoff Caramel Cheesecake is a Must-Try
Let me tell you a little story. Last weekend, I decided to surprise my best friend with a dessert that screamed “celebration.” She’s a fan of anything caramel and cookie-flavored, so I thought, why not combine the two? Enter the Biscoff Caramel Cheesecake. One bite, and she declared it her new favorite dessert. Honestly, I don’t blame her. The creamy cheesecake filling paired with the rich Biscoff cookie butter topping is pure magic. If you’re looking for a dessert that’s easy to make yet feels indulgent, this recipe is your golden ticket.
A Bite of History: What Makes Biscoff Special
Biscoff cookies have been around since the 1930s, originating in Belgium. They were created as a biscuit that stayed fresh during long journeys—perfect for travelers. Fast forward to today, and these spiced, crunchy cookies have become a global sensation. Their spreadable cousin, Biscoff cookie butter, has taken the world by storm. When paired with caramel, they create a flavor combo that’s both nostalgic and exciting. My version of the Biscoff Caramel Cheesecake combines these classic flavors into one show-stopping dessert.
Why You’ll Love This Recipe
First off, it’s ridiculously easy to make. No baking required! Just mix, chill, and serve. Plus, the flavors are bold but balanced. The crust is buttery and crunchy, the filling is light and creamy, and the topping is rich and gooey. It’s like a party in your mouth. Trust me, once you try this Biscoff Caramel Cheesecake, you’ll want to make it again and again. Bonus: it’s perfect for impressing guests without spending hours in the kitchen.
Perfect Occasions to Whip Up This Cheesecake
This cheesecake is versatile. Serve it at a holiday gathering, and watch it disappear faster than you can say “seconds, please!” It’s also a great choice for birthdays, dinner parties, or even a cozy movie night at home. I’ve made it for everything from potlucks to date nights, and it always gets rave reviews. Plus, it looks fancy enough to be the centerpiece of any dessert table.
Ingredients You’ll Need
- For the Crust:
- 2 cups Biscoff cookie crumbs (about 20 cookies)
- 6 tbsp unsalted butter, melted
- For the Cheesecake Filling:
- 16 oz cream cheese, softened
- ½ cup powdered sugar
- 1 tsp vanilla extract
- 1 cup whipped cream or whipped topping
- For the Cookie Butter Topping:
- 1 cup Biscoff cookie butter, melted
- ¼ cup caramel sauce
- For Garnish:
- Whole Biscoff cookies
- Crushed Biscoff cookies (optional)
Substitution Options
Not everyone has every ingredient on hand, and that’s okay. Here are some swaps:
- If you can’t find Biscoff cookies, graham crackers or digestive biscuits work well for the crust.
- Use store-bought whipped topping instead of homemade whipped cream to save time.
- If you’re out of caramel sauce, dulce de leche makes a great substitute.
- Vegan? Swap the cream cheese and butter for plant-based alternatives.
Step-by-Step Preparation
Step 1: Prepare the Crust
Start by crushing those Biscoff cookies into fine crumbs. I use a food processor, but a ziplock bag and rolling pin work just as well. Mix the crumbs with melted butter until it resembles wet sand. Press this mixture firmly into a 9-inch springform pan or individual containers. Pro tip: Use the back of a spoon or a measuring cup to press it down evenly. Chill the crust while you prep the filling—it needs about 15 minutes in the fridge to firm up.
Step 2: Make the Cheesecake Filling
In a large mixing bowl, beat the softened cream cheese and powdered sugar until smooth and creamy. Add the vanilla extract and mix until combined. Now comes the fun part: gently fold in the whipped cream. Be careful not to overmix—you want the filling to stay light and airy. Imagine clouds of creamy goodness ready to sit atop your buttery crust.
Step 3: Assemble the Cheesecake
Spread the cheesecake filling evenly over the chilled crust. Smooth it out with a spatula for a professional finish. Pop it back in the fridge for at least 4 hours—or overnight if you can wait that long. This resting time allows the flavors to meld and the filling to set perfectly.
Step 4: Add the Cookie Butter Topping
Once the cheesecake is set, it’s time for the star of the show: the Biscoff cookie butter topping. Melt the cookie butter and mix it with caramel sauce. Let it cool slightly before pouring it over the cheesecake. Spread it evenly with a spatula. Chef’s tip: Warm the caramel sauce slightly to make it easier to mix with the cookie butter.
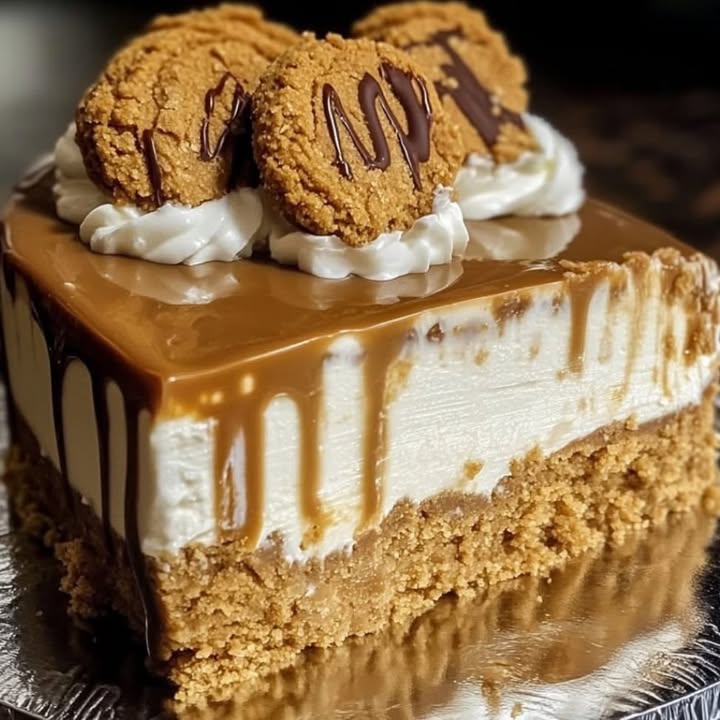
Step 5: Garnish and Serve
Garnish with whole Biscoff cookies and a sprinkle of crushed cookies if you’re feeling fancy. This final touch adds texture and makes the dessert look Instagram-worthy. Slice and serve with pride!
Timing Details
Here’s how long each step takes:
- Prep Time: 20 minutes
- Chilling Time: 4 hours (or overnight)
- Total Time: 4 hours and 20 minutes
Chef’s Secret
To take this Biscoff Caramel Cheesecake to the next level, drizzle extra caramel sauce on each slice before serving. It adds a gooey, photogenic finish that everyone will love.
An Interesting Fact About Biscoff
Did you know Biscoff cookies got their name because they’re “biscuits” with a “coffee” flavor? That unique spice blend is what makes them so addictive. Fun fact: they’re often served on airplanes as a complimentary snack!
Necessary Equipment
You don’t need much to make this recipe:
- Food processor or ziplock bag and rolling pin
- Mixing bowls
- Hand mixer or stand mixer
- Spatula
- Springform pan or individual containers
Storage Tips
Store leftovers in an airtight container in the fridge. This cheesecake stays fresh for up to 3 days. If you’re making it ahead of time, keep it covered to prevent the topping from drying out.
For longer storage, freeze the cheesecake without the topping. Wrap it tightly in plastic wrap and foil, then freeze for up to 2 months. Thaw in the fridge overnight before adding the topping.
If you’re transporting this dessert, keep it chilled in a cooler. It’s best served cold, so plan accordingly.
Tips and Advice
– Soften the cream cheese by leaving it out at room temperature for 30 minutes. Cold cream cheese can make the filling lumpy.
– Use a hot knife to cut clean slices. Dip the blade in hot water, then wipe it dry before slicing.
– Don’t skip the chilling time—it’s crucial for the cheesecake to set properly.
Presentation Ideas
Serve slices on pretty dessert plates with a dollop of whipped cream on top. For a rustic look, sprinkle crushed cookies around the edges of the plate. You can also layer mini versions in jars for a cute, portable treat.
Healthier Alternatives
Want to lighten up this recipe? Here are six variations:
- Low-Sugar Version: Use sugar-free cookies and sweetener in place of powdered sugar.
- Vegan Option: Substitute plant-based cream cheese and whipped cream.
- Gluten-Free Twist: Use gluten-free cookies for the crust.
- Lightened-Up Filling: Replace half the cream cheese with Greek yogurt.
- No-Bake Keto: Use almond flour mixed with melted butter for the crust and sugar-free caramel.
- Fruit Infusion: Add a layer of fresh berries between the filling and topping.
Common Mistakes to Avoid
Mistake 1: Overmixing the Filling
Overmixing can deflate the whipped cream, leaving you with a dense filling. Fold gently, just until the ingredients are combined. Pro tip: Stop mixing as soon as you see no streaks of white.
Mistake 2: Skipping the Chilling Time
Patience is key here. Skipping the chilling time means your cheesecake won’t set properly, and the layers may slide apart when you cut it. Plan ahead and let it chill for at least 4 hours.
Mistake 3: Using Cold Cream Cheese
Cold cream cheese won’t blend smoothly, leading to lumps in your filling. Always soften it beforehand for a silky texture.
Mistake 4: Overloading the Topping
While the topping is delicious, too much can overwhelm the other flavors. Stick to a thin, even layer for the perfect balance.
FAQ
Can I use store-bought whipped cream?
Absolutely! Store-bought whipped cream saves time and works just as well. Just make sure it’s nice and fluffy before folding it in.
Place the cookies in a ziplock bag and crush them with a rolling pin or the bottom of a heavy pan. It’s quick and effective.
Can I freeze this cheesecake?
Yes, you can freeze it without the topping for up to 2 months. Thaw it in the fridge overnight before adding the topping and serving.
What can I substitute for caramel sauce?
Dulce de leche or even a drizzle of honey works beautifully as a substitute.
Is this recipe gluten-free?
Not inherently, but you can make it gluten-free by using gluten-free cookies for the crust.
How far in advance can I make this?
You can make it up to 2 days ahead. Keep it chilled and add the topping just before serving.
Yes, graham crackers or digestive biscuits work well if you can’t find Biscoff cookies.
What size pan should I use?
A 9-inch springform pan is ideal, but you can also use smaller pans or individual containers.
Why is my cheesecake grainy?
Graininess usually happens when the cream cheese isn’t softened enough or when the powdered sugar isn’t fully incorporated. Beat the filling thoroughly to avoid this.
Can I add fruit to this cheesecake?
Definitely! A layer of fresh berries or a swirl of fruit compote would pair beautifully with the Biscoff flavors.
Final Thoughts
The Biscoff Caramel Cheesecake is more than just a dessert—it’s an experience. With its buttery crust, creamy filling, and decadent topping, it’s sure to become a favorite in your recipe collection. Whether you’re making it for a special occasion or just because, this no-bake wonder is guaranteed to impress. So grab those Biscoff cookies, roll up your sleeves, and get ready to wow your taste buds!
Equipment
- Mixing bowls
- Hand mixer or stand mixer
- Spatula
- Springform pan or individual containers
- Food processor or ziplock bag and rolling pin
Ingredients
- 2 cups Biscoff cookie crumbs (about 20 cookies)
- 6 tbsp unsalted butter melted
- 16 oz cream cheese softened
- ½ cup powdered sugar
- 1 tsp vanilla extract
- 1 cup whipped cream or whipped topping
- 1 cup Biscoff cookie butter melted
- ¼ cup caramel sauce
Instructions
- Crush Biscoff cookies into fine crumbs using a food processor or ziplock bag and rolling pin.
- Mix the crumbs with melted butter until it resembles wet sand. Press firmly into a 9-inch springform pan or individual containers. Chill the crust for about 15 minutes.
- In a large mixing bowl, beat softened cream cheese and powdered sugar until smooth. Add vanilla extract and mix until combined.
- Gently fold in the whipped cream, being careful not to overmix.
- Spread the cheesecake filling evenly over the chilled crust and smooth out with a spatula. Chill for at least 4 hours or overnight.
- Melt the Biscoff cookie butter and mix it with caramel sauce. Let it cool slightly, then pour it over the cheesecake, spreading it evenly.
- Garnish with whole and crushed Biscoff cookies. Slice and serve.
Notes
Nutrition

Hi, I’m Olivia Parker, the founder of BakingSecret.com and a lifelong lover of all things sweet and homemade. I grew up in a small town in Oregon, where the smell of fresh cookies in my family’s kitchen sparked my passion for baking. Over the years, I turned that passion into a mission: to help home bakers feel confident, inspired, and creative.
After studying food science and working in several artisan bakeries across the U.S., I decided to create a space where everyone from beginners to seasoned bakers can find reliable recipes, expert tips, and a warm, welcoming community. BakingSecret.com is my way of sharing the magic of baking with the world. When I’m not testing new recipes, you’ll find me exploring farmers’ markets, collecting vintage cookbooks, or perfecting my sourdough technique.