
The Blackberry Velvet Gothic Cake: A Deliciously Dramatic Dessert
Have you ever wanted to bake something that looks like it stepped out of a romance novel but tastes like pure joy? I first made this Blackberry Velvet Gothic Cake for a friend’s Halloween party, and it was such a hit that it’s now my go-to for every dramatic, elegant occasion. It’s the perfect mix of deep, dark chocolate, tangy sweet blackberries, and a stunning look that makes everyone say “wow” before they even take a bite.
A Modern Twist on a Classic Velvet Cake
Red velvet cake has a long, rich history, but this version gives it a dark and fruity spin. Where the classic gets its color from a fun chemical reaction, our gothic cake gets its look from dark cocoa and a hint of black coloring, and its fantastic flavor from juicy fresh blackberries. It’s a modern creation for anyone who loves the moist, tender crumb of a velvet cake but craves something with a little more berry magic and visual drama.
Why You’ll Fall in Love With This Blackberry Velvet Cake
This recipe is a winner for so many reasons. The chocolate cake base is incredibly moist, thanks to the buttermilk and hot water. The blackberry buttercream is sweet, tart, and creamy all at once. Plus, it’s surprisingly simple to make! The “gothic” element is so fun to play with, making you feel like a true baking artist. It’s the kind of dessert that makes you feel proud to serve it.
The Perfect Occasions for Your Gothic Dessert
This cake is not your everyday bake. It’s a statement piece! It’s perfect for a moody autumn dinner party, a dramatic birthday for someone special, a Halloween celebration, or even a chic, dark-themed wedding shower. Any event that calls for a touch of elegant artistry is the right time for this Blackberry Velvet Gothic Cake.
Gathering Your Ingredients for a Moist Chocolate Cake
Here’s what you’ll need to create this dark and lovely masterpiece. Make sure everything is at room temperature for the best, smoothest results.
For the Cake:
- 2 cups all-purpose flour
- 1 ¾ cups granulated sugar
- ¾ cup unsweetened cocoa powder (use a dark cocoa for extra gothic color!)
- 1 teaspoon baking soda
- ¾ teaspoon salt
- 2 large eggs
- 1 cup buttermilk
- ½ cup vegetable oil
- 1 teaspoon vanilla extract
- ½ cup hot water
- 1 cup fresh blackberries, mashed
For the Blackberry Buttercream:
- 1 cup (2 sticks) unsalted butter, softened
- 3 cups powdered sugar
- ½ cup blackberry puree, strained (from about 1 ½ cups fresh berries)
- 1 teaspoon vanilla extract
- Black food coloring (optional, but great for that deep gothic effect)
Easy Ingredient Substitutions
Out of something? Don’t worry! Here are some easy swaps. If you don’t have buttermilk, add 1 tablespoon of lemon juice or white vinegar to a cup of regular milk and let it sit for 5 minutes. No fresh blackberries? Frozen work beautifully for the puree; just thaw and strain. For the oil, you can use an equal amount of melted coconut oil. And if you want a pure fruit color, skip the black food gel and let the natural purple shade of the blackberries shine.
Creating Your Blackberry Velvet Cake: A Step-by-Step Guide
Follow these steps, and you’ll have a perfect, dramatic dessert. I promise it’s easier than it looks!
Step 1: Preheat and Prepare
Start by preheating your oven to 350°F (175°C). This ensures it’s perfectly hot when your batter is ready. Grease two 8-inch round cake pans with butter or baking spray, then line the bottoms with parchment paper circles. This little trick is a lifesaver for getting your cakes out cleanly and in one beautiful piece. Trust me, it’s worth the extra minute.
Step 2: Whisk the Dry Goods
In a large mixing bowl, take a whisk and briskly combine your flour, sugar, dark cocoa powder, baking soda, and salt. Whisking by hand here does two great things: it thoroughly combines everything and aerates the flour, which helps create a lighter cake texture. You’ll see the mixture become a uniform, rich brown color. That deep color is the start of your gothic base.
Step 3: Combine the Wet Ingredients
To the same bowl with your dry ingredients, add the eggs, buttermilk, vegetable oil, and vanilla extract. Use an electric mixer on medium speed to blend everything together. You’ll watch as the thick, dark paste transforms into a smooth, silky, and glossy batter. The smell of the chocolate and vanilla at this stage is absolutely heavenly.
Step 4: The Final Stir and Bake
Now, carefully pour in the hot water. The batter will become very thin – this is exactly what you want for that signature velvet cake texture! Gently stir in the mashed blackberries last; you want little pockets of fruity goodness. Divide the thin batter evenly between your two prepared pans. Slide them into the oven and bake for 30-35 minutes. You’ll know they’re done when the top springs back to a light touch and a toothpick poked in the center comes out with just a crumb or two.
Pro tip: Let the cakes cool in their pans for 10 minutes before turning them out onto a wire rack to cool completely. Rushing this can cause the tender cake to break.
Step 5: Make the Dramatic Blackberry Frosting
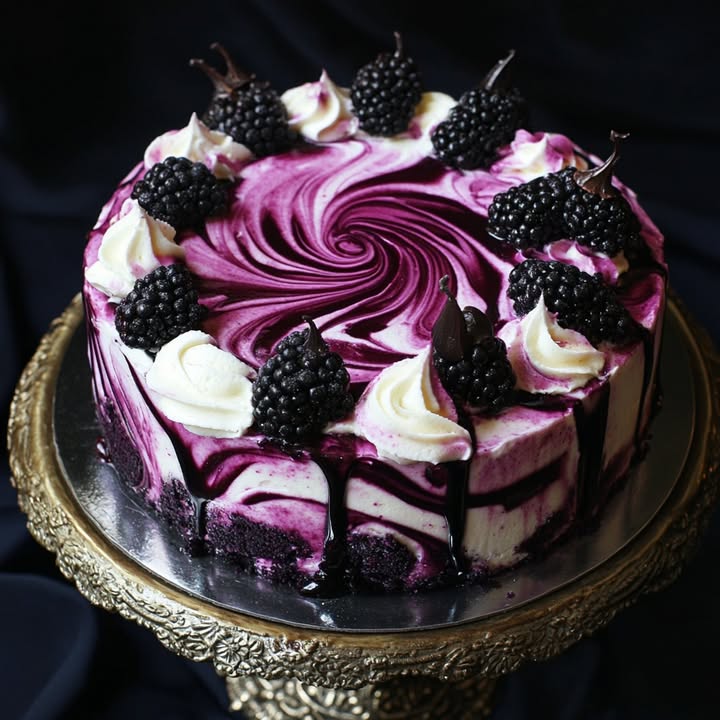
While the cakes cool, make your stunning frosting. In a clean bowl, beat the softened butter with an electric mixer for 2-3 minutes until it’s pale and super creamy. Gradually add the powdered sugar, about a cup at a time, mixing on low speed first to avoid a sugar cloud! Once combined, pour in the beautiful, deep purple blackberry puree and the vanilla. Whip it on medium-high until fluffy. For that true gothic desserts look, add a few drops of black food coloring gel until you get a shade you love.
Step 6: Assemble Your Masterpiece
Place one completely cooled cake layer on your serving plate. Spread a thick, even layer of the blackberry buttercream on top. Carefully place the second layer on it. Now, frost the entire outside of the cake with the remaining frosting. Don’t worry about it being perfectly smooth – a slightly rustic, “whipped” look is beautiful and elegant. For the final bold, gothic touch, decorate the top with a cluster of fresh, whole blackberries.
Chef’s Tip: For super clean slices, pop the frosted cake in the fridge for 20 minutes before cutting. This sets the frosting and gives you gorgeous, sharp slices.
Your Baking Timeline
- Prep Time: 25 minutes
- Cooking Time: 35 minutes
- Cooling Time: 1 hour (very important!)
- Total Time: About 2 hours
- Kcal: 520 per slice
- Servings: 12
The Secret to Perfect Blackberry Flavor
My secret trick is in the blackberry puree. Simmer your fresh (or frozen) blackberries with a tiny spoonful of sugar for about 10 minutes before straining. This cooks off some of the natural water, concentrating the flavor into a more intense, jam-like syrup. When you add this to your buttercream, you get a much richer berry taste that won’t get lost against the chocolate. It makes all the difference!
A Berry Interesting Fact
Blackberries aren’t actually berries in the botanical sense! They are “aggregate fruits,” made up of lots of tiny individual drupelets, each containing its own seed. This unique structure is why they have that wonderful, complex texture and can release so much amazing juice when mashed or cooked. It’s that juice that gives our blackberry cake its amazing color and tangy kick.
Essential Equipment for Baking Success
You don’t need any fancy tools, but these basics will help:
- Two 8-inch round cake pans
- Parchment paper
- Stand mixer or hand electric mixer
- Large mixing bowls
- Fine-mesh strainer (for the puree)
- Wire cooling rack
- Offset spatula (makes frosting so much easier!)
How to Store Your Gothic Cake
Because of the fresh fruit in the frosting, this cake is best stored in the refrigerator. Place it in a cake carrier or loosely cover it with a dome or some plastic wrap. It will stay fresh and delicious for up to 3 days.
The cold fridge will firm up the buttercream, making the texture a bit denser. For the absolute best eating experience, let the cake sit at room temperature for about 30 minutes before serving. This softens the frosting back to its creamy, dreamy state.
You can also freeze the unfrosted cake layers very successfully. Wrap the cooled layers tightly in plastic wrap, then a layer of foil. They can be frozen for up to 2 months. Thaw in the refrigerator overnight before frosting.
Pro Tips for the Best Blackberry Velvet Cake
- Use Room Temperature Ingredients: This is non-negotiable for a smooth, well-combined batter and frosting.
- Don’t Overmix: Once you add the flour, mix just until you no longer see dry streaks. Overmixing leads to a tough cake.
- Strain That Puree: Taking the time to strain the seeds from your blackberry puree gives your buttercream a luxuriously smooth texture.
- Gel Food Coloring: If you want a deep black color, use gel or paste food coloring. Liquid coloring can thin out your frosting.
Presentation Ideas to Wow Your Guests
- Add edible gold leaf flakes for a stunning “dark crown” effect.
- Decorate with fresh rosemary sprigs and blackberries for an earthy, elegant look.
- Dust the very edges of the serving plate with edible black sanding sugar or purple sprinkles.
- Serve each slice with a small drizzle of extra blackberry puree on the plate.
Other Fun Recipes to Try
If you love this combination of fruit and cake, you’ll adore my other recipes. You simply must try the tropical twist of my Hawaiian Carrot Pineapple Cake for a sunnier option. For a quicker berry fix, these Cheesecake Fruit Roll-Ups are a playful, portable treat. When autumn arrives, nothing beats the cozy spice of my Soft Batch Pumpkin Sugar Cookies. And for a simple, flaky delight, you can’t go wrong with easy Caramel Apple Puff Pastry twists.
Common Mistakes to Avoid With Your Velvet Cake
Mistake 1: Using Cold Ingredients
This is the number one reason batters curdle or don’t mix smoothly. Cold eggs and buttermilk can re-solidify the butter or oil, creating a lumpy batter that doesn’t trap air properly. Your cake will be dense, not light and velvety. Always plan ahead and set your refrigerated items on the counter for at least 30 minutes before you start baking. Your final texture will thank you.
Mistake 2: Not Straining the Blackberry Puree
It’s tempting to skip this step, but those tiny seeds will get stuck in your piping tip and give your beautiful frosting a gritty texture. Push the cooked blackberries through a fine-mesh strainer with the back of a spoon. You’ll be left with a gorgeous, smooth, and vibrant purple liquid that blends into the buttercream like a dream. It’s the key to that professional, smooth finish.
Mistake 3: Frosting a Warm Cake
I know, the wait is hard! But if you try to frost your cake layers before they are completely cool to the touch, you’re asking for trouble. The warm cake will melt the buttercream, causing it to slide right off and soak into the cake. The layers might even crumble. Be patient. Let the cakes cool in the pan, then on a rack. Speed things up by popping them in the fridge for a bit, but make sure they are truly cold before you start decorating.
Mistake 4: Overbaking the Cake
Since the batter is so thin, it’s easy to think it’s not done yet. But a velvet cake should remain super moist. Overbaking will dry it out. Start checking at the 30-minute mark with a toothpick. It should come out with a few moist crumbs attached, not completely clean. Remember, the cake will continue to cook a little from residual heat as it cools in the pan. Taking it out at the perfect moment is the secret to that famously tender crumb.
Your Blackberry Velvet Gothic Cake Questions, Answered
Can I use frozen blackberries instead of fresh?
Absolutely! Frozen blackberries work wonderfully, especially for the puree. There’s no need to thaw them first for cooking. Just place them in a saucepan, maybe with a tablespoon of water to prevent sticking, and simmer until they break down. They often have a more concentrated flavor. Just be sure to strain them well. For the mashed berries in the cake, let them thaw first and drain any excess liquid.
Why did my cake sink in the middle?
A sinking cake is usually a sign of too much leavening, underbaking, or an door opened too early. Make sure your baking soda is fresh. More importantly, don’t open the oven door before at least 25 minutes have passed. The rush of cold air can cause the delicate structure to collapse. Also, ensure your oven temperature is accurate with an oven thermometer. An oven that runs too cool can cause underbaking.
My buttercream is too runny. How can I fix it?
Don’t panic! This can happen if your butter was too soft or your blackberry puree was very watery. The easiest fix is to chill the whole bowl of frosting in the refrigerator for 20-30 minutes, then re-whip it. If it’s still too soft, you can gradually add a little more powdered sugar, a quarter cup at a time, until it reaches a spreadable consistency. For a great frosting, understanding nutrition basics like how fats behave can be surprisingly helpful in the kitchen.
Can I make this cake ahead of time?
Yes, you can! The unfrosted cake layers can be baked, cooled, wrapped tightly in plastic wrap, and stored at room temperature for one day or frozen for longer. The frosting can be made and kept in an airtight container in the fridge for 2-3 days. Let it come to room temperature and re-whip it before using. It’s best to assemble the cake the day you plan to serve it for the freshest look and texture.
What can I use instead of black food coloring?
You have a few lovely options. You can skip it entirely and let the natural purple-gray of the blackberry puree color your frosting. For a deeper color without artificial dye, try adding 1-2 extra tablespoons of dark cocoa powder to the buttercream. You can also find natural black or dark purple food colorings made from ingredients like vegetable juice or spirulina at specialty baking stores.
How do I get my cake layers perfectly even?
For perfectly level layers, I swear by using cake strips. These are fabric strips you soak in water and wrap around the outside of the cake pan. They insulate the edges, so the cake bakes evenly and doesn’t dome. If you don’t have them, you can bake the cakes and then use a long serrated knife to carefully slice off any dome after they’ve cooled. Weighing your batter as you divide it between pans is also a foolproof method.
Is there a non-dairy substitute for the buttermilk?
Yes, you can easily make a dairy-free “buttermilk.” Use your favorite unsweetened plant milk (soy and oat work best). For every cup of milk, add 1 tablespoon of lemon juice or apple cider vinegar. Stir and let it sit for 5-10 minutes until it curdles slightly. It will react with the baking soda just like regular buttermilk to give your cake a nice lift.
Can I turn this into cupcakes?
This recipe makes fantastic, dramatic cupcakes! Line a muffin tin with paper liners. Fill each liner about ⅔ full with the batter. Bake at 350°F for 18-22 minutes, or until a toothpick comes out clean. Let them cool completely before frosting. You’ll get about 18-24 stunning dark bakes perfect for a party!
The blackberry seeds got into my frosting. What now?
If you’ve already mixed them in, you can try to press the frosting through a coarse strainer to remove some seeds, but it’s messy. Your best bet is to embrace it! Call it a “rustic” style. The seeds add a bit of texture and prove you used real fruit. For next time, remember to strain the puree while it’s still warm, as it passes through the mesh much more easily.
What’s the best way to serve this cake?
Serve each slice at room temperature for the best flavor and texture. Use a sharp, thin-bladed knife, and dip it in hot water between cuts for super clean slices. A small dollop of whipped cream or a few extra fresh berries on the side make it extra special. This isn’t just a cake; it’s an experience of elegant cake artistry.
If you found joy in creating this dramatic dessert, you’ll find a whole world of inspiration in our main collection of delicious cake and cupcake recipes for every skill level and occasion.
Final Thoughts on Your Baking Artistry
Baking this Blackberry Velvet Gothic Cake is more than just following a recipe. It’s a chance to create something truly stunning and delicious. The deep chocolate, the tangy berry frosting, and that gorgeous dark look come together in a way that feels special and celebratory. So put on some moody music, embrace your inner baking artist, and make something wonderful. I can’t wait for you to see the looks on your friends’ and family’s faces when you present this masterpiece. Happy baking!
Equipment
- Grand bol
- Fouet
- Spatule
- Deux moules à gâteau de 8 pouces
- Papier sulfurisé
Ingredients
- 2 tasses farine tout usage
- 1 ¾ tasses sucre granulé
- ¾ tasses cacao noir non sucré
- 1 cuillère à café bicarbonate de soude
- ¾ cuillère à café sel
- 2 grands œufs œufs
- 1 tasse lait ribot
- ½ tasse huile végétale
- 1 cuillère à café extrait de vanille
- ½ tasse eau chaude
- 1 tasse mûres fraîches écrasées
- 1 (2 bâtons) beurre non salé, ramolli
- 3 tasses sucre glace
- ½ tasse purée de mûres filtrée, à partir d'environ 1 ½ tasses de mûres fraîches
- 1 cuillère à café extrait de vanille (pour le beurre crémeux)
- q.s. colorant alimentaire noir (facultatif)
Instructions
- Préchauffez votre four à 175°C et graissez deux moules à gâteau ronds de 8 pouces, en tapissant le fond de papier sulfurisé.
- Dans un grand bol, fouettez ensemble la farine, le sucre, le cacao noir, le bicarbonate de soude et le sel.
- Ajoutez les œufs, le lait ribot, l'huile végétale et l'extrait de vanille au mélange sec et mélangez avec un batteur électrique jusqu'à obtenir une pâte lisse.
- Incorporez délicatement l'eau chaude pour fluidifier la pâte, puis ajoutez les mûres écrasées.
- Versez la pâte uniformément dans les moules préparés et faites cuire pendant 30-35 minutes jusqu'à ce qu'un cure-dent ressorte avec quelques miettes.
- Laissez les gâteaux refroidir dans les moules pendant 10 minutes, puis retirez-les et laissez-les refroidir complètement sur une grille.
- Pour le glaçage, battez le beurre ramolli jusqu'à ce qu'il soit crémeux, puis ajoutez progressivement le sucre glace jusqu'à obtenir une texture lisse.
- Incorporez la purée de mûres et l'extrait de vanille, en ajoutant du colorant alimentaire si désiré.
- Placez une couche de gâteau sur un plat de service, étalez du glaçage sur le dessus, puis placez la deuxième couche par-dessus et glacer les côtés et le dessus du gâteau.
- Pour la décoration, garnissez de mûres fraîches et réfrigérez le gâteau pendant 20 minutes avant de servir pour des tranches nettes.
Notes
Nutrition

Hi, I’m Olivia Parker, the founder of BakingSecret.com and a lifelong lover of all things sweet and homemade. I grew up in a small town in Oregon, where the smell of fresh cookies in my family’s kitchen sparked my passion for baking. Over the years, I turned that passion into a mission: to help home bakers feel confident, inspired, and creative.
After studying food science and working in several artisan bakeries across the U.S., I decided to create a space where everyone from beginners to seasoned bakers can find reliable recipes, expert tips, and a warm, welcoming community. BakingSecret.com is my way of sharing the magic of baking with the world. When I’m not testing new recipes, you’ll find me exploring farmers’ markets, collecting vintage cookbooks, or perfecting my sourdough technique.