
Blueberry Chocolate Brownies: A Surprising Sweet Treat
Have you ever stared at your classic brownie recipe and thought, “This needs a pop of color”? I did. Last summer, with a basket of fresh blueberries and a major chocolate craving, I threw them together. The result? Pure magic. These aren’t just brownies. They’re a fudgy, chocolatey explosion with juicy bursts of sweet-tart berry. It’s the perfect baking twist I didn’t know I needed, and now my family won’t let me make them any other way.
A Brief, Berry-Filled History of the Blueberry Brownie
The classic brownie is a beloved American dessert, born from a happy baking accident over a century ago. Its dense, chocolatey nature makes it the perfect canvas for fun add-ins. Adding fruit to chocolate isn’t new—think chocolate-covered strawberries—but folding plump blueberries right into the batter is a modern, home-baker’s delight. It balances rich decadence with a touch of fruity freshness. This recipe is my personal take on that delicious fusion, tested repeatedly until I got that perfect crackly top and gooey center.
Why You’ll Love These Blueberry Brownies
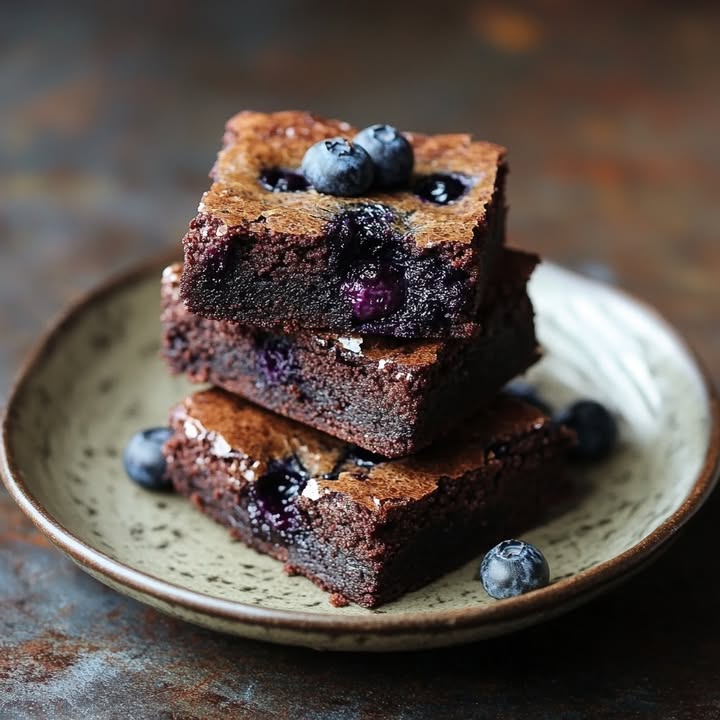
First, they are incredibly easy. You can make them in one bowl! They’re also a fantastic way to use up seasonal blueberries. The flavor combination is just incredible. The deep, dark chocolate and the bright berry create a sweet and savory dance in your mouth. They look stunning, the deep purple berries peeking through the dark batter, and they always impress guests. Trust me, these will become your new favorite unique dessert.
Perfect Occasions for This Recipe
These brownies are wonderfully versatile. Bring them to a summer picnic or a potluck for a show-stopping treat. They’re perfect for an afternoon tea or a cozy book club meeting. I love serving them as a slightly fancy yet easy homemade bake for dinner parties. Kids adore them, and they make a wonderful lunchbox surprise. Really, any time calls for a little brownie love and a berry dessert twist!
Ingredients for Blueberry Chocolate Brownies
Here is your simple shopping list. Using good-quality chocolate makes a big difference!
- ¾ cup unsalted butter
- 1 cup semi-sweet chocolate chips
- 1 cup granulated sugar
- 2 large eggs
- 1 teaspoon vanilla extract
- ¾ cup all-purpose flour
- ¼ cup unsweetened cocoa powder
- ½ teaspoon salt
- 1 cup fresh or frozen blueberries
Handy Substitution Options
No worries if you’re missing something! Here are some easy swaps:
- Butter: You can use salted butter, but then omit the added salt.
- Chocolate Chips: Dark chocolate chips or a chopped chocolate bar work great.
- Sugar: A mix of white and brown sugar adds depth.
- Flour: For gluten-free, use a 1:1 gluten-free flour blend.
- Blueberries: Frozen berries are perfect! Don’t thaw them first, just toss them in frozen to prevent a purple swamp.
How to Make the Best Blueberry Brownies
Follow these simple steps for fudge brownies that are out of this world.
Step 1: Prep and Melt
First, preheat your oven to 350°F. Grease an 8×8 inch baking pan or line it with parchment paper. This ensures your brownies come out cleanly. Next, grab a medium saucepan. Place it over low heat and add the butter and chocolate chips. Watch them slowly melt together, swirling into a glossy, dark pool. Stir gently until the mixture is completely smooth and smells like a chocolate dream. Remove it from the heat immediately once melted.
Step 2: Combine Wet Ingredients
Now, whisk the granulated sugar into the warm chocolate mixture. You’ll hear a lovely sandy sound as you stir. Next, crack in the eggs one at a time, whisking well after each addition. The batter will start to look shiny and thicken slightly. Finally, stir in the vanilla extract. That wonderful aroma of vanilla and chocolate will fill your kitchen. It’s heavenly!
Step 3: Add Dry Ingredients
Time to bring it all together. Sift the flour, cocoa powder, and salt directly over the wet mixture. Sifting prevents lumps and ensures a perfectly smooth batter. Use a spatula to fold everything together gently. Stop mixing as soon as you no longer see dry flour streaks. Overmixing is the enemy of a fudgy texture! You should have a thick, dark, and luscious brownie batter.
Step 4: Fold and Bake
Here comes the star! Gently fold in your blueberries. If using frozen, keep them frozen. Toss them through the batter just until they are evenly distributed. Pour this beautiful, berry-studded batter into your prepared pan. Smooth the top with your spatula. Place the pan in the center of your preheated oven. Bake for 25-30 minutes. You’ll know they’re done when the top is set and a toothpick inserted into the center comes out with a few moist crumbs, not wet batter.
Pro Tip: The brownies will continue to set as they cool. Don’t be tempted to overbake them!
Chef’s Tip: For an extra flavor boost, toss your blueberries in a light dusting of the dry flour mixture before folding them in. This helps prevent them from sinking to the bottom during baking.
Timing Your Blueberry Brownie Creation
- Prep Time: 10 minutes
- Cooking Time: 30 minutes
- Cooling Time: At least 1 hour (this is crucial for clean slices!)
- Total Time: About 1 hour 40 minutes
- Kcal: Approximately 280 per brownie
- Servings: 9 generous squares
Chef’s Secret for Ultimate Fudginess
My secret is twofold. First, I use a combination of melted chocolate and cocoa powder. This double chocolate hit creates an intense, deep flavor and a super fudgy crumb. Second, I never, ever overbake. Taking them out when the center is just set is key. They finish cooking from residual heat in the pan, giving you that perfect, melt-in-your-mouth texture.
A Little Extra Info on Your Ingredients
Blueberries are often called a “superfood,” and for good reason! They’re packed with antioxidants. When baked, their flavor intensifies and they release lovely purple juices that create little pockets of fruity sweetness in the chocolate. It’s a natural pairing that feels both indulgent and a tiny bit virtuous.
Necessary Equipment
You don’t need fancy gear for this easy baking project! Just gather:
- 8×8 inch baking pan
- Medium saucepan
- Whisk and spatula
- Measuring cups and spoons
- Cooling rack
How to Store Your Blueberry Brownies
Once completely cooled, you can store these brownies right in the pan, covered tightly with plastic wrap or foil. They will stay fresh and moist at room temperature for up to 3 days. The blueberries keep them wonderfully soft.
For longer storage, place them in an airtight container and refrigerate for up to a week. The cold will make them extra fudgy. Let them come to room temperature before serving for the best flavor and texture.
You can also freeze them! Wrap individual squares tightly in plastic wrap and then place them in a freezer bag. They’ll keep for up to 3 months. Thaw at room temperature for a quick, delicious treat anytime.
Tips and Advice for Perfect Brownies
- Always use room temperature eggs. They blend into the batter more smoothly.
- Grease your pan well, or use parchment paper with an overhang for easy lifting.
- Let the brownies cool completely before cutting. This prevents a crumbly mess and gives you clean edges.
- Use a sharp knife, wiped clean between cuts, for the prettiest slices.
Presentation Tips to Impress
- Dust the top with powdered sugar or a light sift of cocoa powder right before serving.
- Serve with a dollop of fresh whipped cream or a scoop of vanilla ice cream.
- For a party, cut them into small, bite-sized squares and serve on a tiered stand.
- Add a few fresh blueberries and a mint leaf on the side of the plate for a restaurant-worthy look.
Six Healthier & Fun Alternative Recipes
Love the idea but want to mix it up? Here are six delicious variations:
- Vegan Blueberry Brownies: Swap the butter for coconut oil, use flax eggs, and choose vegan chocolate.
- Gluten-Free Blueberry Brownies: Simply replace the all-purpose flour with your favorite gluten-free blend.
- Black Forest Brownies: Use cherries instead of blueberries and add a hint of almond extract.
- Orange Zest Blueberry Brownies: Add the zest of one orange to the batter for a citrusy twist.
- Protein-Packed Brownies: Replace half the flour with your favorite vanilla or chocolate protein powder.
- Blondie Version: Omit the cocoa powder, use brown sugar, and keep the blueberries for a delicious blueberry blondie!
If you’re looking for other simple baking projects, you might enjoy this incredibly fast 20-minute homemade bread recipe for a savory treat. For another buttery delight inspired by Southern tradition, my Kentucky Butter Cake Cookies are always a hit with guests. And for the next holiday, consider a fun, colorful option like this festive Easter Bunny Poke Cake. Of course, sometimes you just need pure chocolate, and my simple one-bowl chocolate cake never disappoints.
Common Mistakes to Avoid
Mistake 1: Overmixing the Batter
This is the #1 reason brownies become tough or cakey. Once you add the dry ingredients, you only need to mix until just combined. Overworking the flour develops gluten, which gives you a more bread-like texture instead of that dense, fudgy crumb we all love. Use a folding motion with a spatula. Stop as soon as you no longer see streaks of flour.
Mistake 2: Overbaking the Brownies
Brownies continue to cook from residual heat after you pull them from the oven. If you wait for a toothpick to come out completely clean, they will be overdone and dry. The perfect sign is a toothpick with a few moist crumbs clinging to it. The center should look set, but not completely solid. Remember, fudgy is the goal!
Mistake 3: Using Hot Melted Chocolate Mixture
If you add your eggs to a piping hot butter-chocolate mix, you risk scrambling them. Always remove the melted mixture from the heat and let it cool for a minute or two. When you whisk in the sugar, it should feel warm, not hot, to the touch. This ensures your eggs blend in smoothly for a silky batter.
Mistake 4: Not Coating Frozen Blueberries
If you’re using frozen blueberries, tossing them in a tablespoon of the measured flour before adding them to the batter is a game-changer. This light coating helps absorb excess moisture and prevents the berries from bleeding their color everywhere and sinking straight to the bottom. You’ll get a better distribution of fruit throughout.
Frequently Asked Questions
Can I use frozen blueberries instead of fresh?
Absolutely! Frozen blueberries work perfectly in this recipe. In fact, I often prefer them because they hold their shape better during mixing. The key is to use them straight from the freezer. Do not thaw them. Toss the frozen berries lightly in a bit of the measured flour before folding them in. This prevents them from discoloring the entire batter and helps them distribute evenly without sinking.
Why did my brownies turn out cakey instead of fudgy?
A cakey texture usually comes from two things: too much mixing or overbaking. Once you add the flour, mix only until the ingredients are combined. Overmixing develops gluten. Also, check your oven temperature with a thermometer. An oven that runs hot will bake them faster. Remember, you want a few moist crumbs on the toothpick test, not a clean one.
Can I make these brownies gluten-free?
Yes, you can easily make gluten-free blueberry brownies. Simply replace the all-purpose flour with a good-quality 1:1 gluten-free flour blend. Brands like Cup4Cup or Bob’s Red Mill work wonderfully. Keep all other ingredients and steps the same. The result will be just as fudgy and delicious!
How do I prevent the blueberries from sinking to the bottom?
The best trick is to lightly coat your blueberries (fresh or frozen) in a small spoonful of the flour or cocoa powder you’ve already measured for the recipe. Toss them in a small bowl until they have a light dusting. This creates a barrier and helps them “float” in the thick batter, giving you a beautiful, even distribution of berries in every bite.
Can I add white chocolate chips or nuts to this recipe?
You sure can! This recipe is a great base for add-ins. Feel free to fold in ½ cup of white chocolate chips, chopped walnuts, or pecans along with the blueberries. If you add too many extras, the batter might become crowded and not bake as evenly. Stick to about ½ to ¾ cup of total add-ins for the best results.
How should I store leftover brownies?
Store cooled brownies in an airtight container at room temperature for up to 3 days. For longer storage, keep them in the fridge for up to a week. They also freeze beautifully for up to 3 months. Wrap individual squares tightly in plastic wrap, then place them in a freezer bag. Thaw at room temperature when the craving hits.
Can I double this recipe?
Yes, you can double all the ingredients. Bake the doubled batch in a 9×13 inch pan. Your baking time may increase slightly. Start checking at around 30-35 minutes. Use the same toothpick test to determine doneness. This is perfect for feeding a crowd!
My brownies are too gooey in the middle. Did I underbake them?
They might be slightly underbaked. A very gooey center that seems uncooked means they needed a few more minutes. Next time, bake for an extra 3-5 minutes. Remember, “fudgy” is different from “raw.” A properly baked brownie will have a set, slightly crinkly top and a firm edge, with a dense, moist center.
What can I use instead of cocoa powder?
The cocoa powder adds depth and classic brownie flavor. If you must substitute, you could use melted dark chocolate instead. For every ¼ cup of cocoa powder, try using about 1 ½ ounces of additional melted dark chocolate. Keep in mind this will change the fat content slightly. The texture might be slightly different, but still delicious.
Are these brownies suitable for a school bake sale?
They are perfect for a bake sale! They are easy to transport, don’t require refrigeration for a day, and are a unique twist on a classic that will stand out. Cut them into smaller squares for kid-friendly portions. To follow safe food handling practices, it’s always good to be aware of guidelines for storing and serving homemade goods, like paying attention to proper serving size and storage conditions.
I hope you enjoy baking and sharing these delightful brownies as much as I do. For more delicious inspiration like this, be sure to explore all my favorite treats in the dessert bars and brownies category on the blog.
Final Thoughts on Your Berry-Chocolate Adventure
So there you have it—my foolproof recipe for the most amazing Blueberry Chocolate Brownies. They’re a simple, yet stunning treat that combines the best of both worlds: rich chocolate and sweet, juicy fruit. The next time you’re in the mood for something special without a ton of fuss, give these a try. I promise, one bite of that fudgy, berry-filled square, and you’ll be hooked. Happy baking!
Equipment
- Plaque à pâtisserie
- Fouet
- Spatule
- Médium casserole
- Papier sulfurisé
Ingredients
- 170 g beurre non salé
- 180 g pépites de chocolat amer
- 200 g sucre cristallisé
- 2 unités œufs
- 1 cuillère à café extrait de vanille
- 100 g farine tout usage
- 30 g cacao en poudre
- 1 cuillère à café sel
- 150 g myrtilles fraîches ou congelées
Instructions
- Préchauffez votre four à 175°C et graissez un moule carré de 20x20 cm ou tapissez-le de papier sulfurisé.
- Dans une casserole moyenne à feu doux, faites fondre le beurre et les pépites de chocolat ensemble, en remuant jusqu'à obtenir une consistance lisse.
- Retirez la casserole du feu et incorporez le sucre jusqu'à ce que le mélange soit bien mélangé.
- Ajoutez les œufs un par un, en fouettant bien après chaque ajout, puis incorporez l'extrait de vanille.
- Tamisez la farine, le cacao et le sel directement sur le mélange humide et incorporez doucement jusqu'à ce que le tout soit juste combiné.
- Incorporez délicatement les myrtilles jusqu'à ce qu'elles soient réparties uniformément, puis versez la pâte dans le moule préparé, en lissant le dessus.
- Faites cuire dans le four préchauffé pendant 25-30 minutes ou jusqu'à ce que le dessus soit pris et qu'un cure-dent en ressorte avec quelques miettes humides.
- Laissez les brownies refroidir dans le moule pendant au moins 1 heure avant de les couper en carrés.
Notes
Nutrition

Hi, I’m Olivia Parker, the founder of BakingSecret.com and a lifelong lover of all things sweet and homemade. I grew up in a small town in Oregon, where the smell of fresh cookies in my family’s kitchen sparked my passion for baking. Over the years, I turned that passion into a mission: to help home bakers feel confident, inspired, and creative.
After studying food science and working in several artisan bakeries across the U.S., I decided to create a space where everyone from beginners to seasoned bakers can find reliable recipes, expert tips, and a warm, welcoming community. BakingSecret.com is my way of sharing the magic of baking with the world. When I’m not testing new recipes, you’ll find me exploring farmers’ markets, collecting vintage cookbooks, or perfecting my sourdough technique.