
Introduction
I’ve always had a soft spot for baking. There’s something magical about turning simple ingredients into treats that make people smile. One of my favorite desserts to experiment with is Boston cream pie. It’s rich, creamy, and just the right amount of indulgent. But let’s be honest—making a full cake can feel overwhelming, especially if you’re new to baking. That’s why I love Boston cream pie cupcakes recipe with cake mix. They’re a fun twist on the classic dessert and so much easier to make.
Using cake mix simplifies the process without sacrificing flavor. You still get that tender vanilla cupcake, creamy filling, and glossy chocolate glaze we all love. These cupcakes are perfect for beginners or anyone short on time but big on cravings. Plus, they’re portable, which makes them ideal for parties, potlucks, or even a quiet night in.
A few years ago, I made these cupcakes for a family gathering. I was nervous because I wasn’t sure how they’d turn out. But when I saw the empty tray at the end of the night, I knew I had a winner. People kept asking me for the recipe, and that’s when I realized how special these little treats are. Whether you’re baking for a crowd or just treating yourself, this easy dessert recipe will win hearts every time.
Why You’ll Love This Recipe
Let’s talk about why these cupcakes are such a hit. First off, they’re versatile. Need a quick cupcake idea for a birthday party? Done. Want to impress your coworkers at a potluck? These will do the trick. Even if you’re just craving something sweet after dinner, these cupcakes deliver. They’re bite-sized versions of happiness.
Another reason to love this recipe is how straightforward it is. With cake mix as the base, you don’t need to worry about complicated steps or hard-to-find ingredients. The filling comes together in minutes, and the chocolate glaze is a breeze to make. Trust me, if I can do it, so can you.
I remember one summer picnic where I brought these along. My cousin, who isn’t usually into desserts, couldn’t stop raving about them. He even asked for seconds! That’s the thing about Boston cream pie cupcakes—they appeal to everyone. Kids love the creamy center, adults appreciate the balance of flavors, and bakers enjoy how simple they are to make.
Ingredients Breakdown
Now let’s dive into what you’ll need to make these amazing cupcakes. Don’t worry—it’s a short list, and most of the items are probably already in your pantry. Here’s a quick rundown:
- Cake mix: Look for a high-quality vanilla or yellow cake mix. This will be the base of your cupcakes. Some bakers swear by certain brands, but honestly, any good cake mix works fine.
- Pudding mix: Instant vanilla pudding is key for the creamy filling. It’s smooth, rich, and holds up well inside the cupcakes. If you’re wondering how to make Boston cream filling, this is your secret weapon.
- Chocolate glaze: A simple mix of chocolate chips and heavy cream creates a glossy topping that ties everything together. You can adjust the sweetness to suit your taste.
One tip I’ve picked up over the years is to choose the best cake mix for cupcakes. Some mixes are denser than others, which can affect the texture of your finished product. For light and fluffy cupcakes, stick to mixes labeled specifically for cakes rather than muffins.
If you’re feeling adventurous, you can also customize this recipe. Swap the vanilla pudding for chocolate or add a splash of liqueur to the filling for an adult twist. The possibilities are endless, but even the basic version is sure to please.
By now, you might be wondering: Can I really pull this off? The answer is yes. With this Boston cream pie cupcakes recipe with cake mix, you’ll have a dessert that looks and tastes like it came from a bakery—but made in your own kitchen. So grab your apron and let’s get started!
Step-by-Step Instructions
Alright, let’s roll up our sleeves and get into the fun part. By now, you’ve got your ingredients ready—cake mix, pudding, chocolate chips, and all that good stuff. The next step is turning these humble components into bite-sized masterpieces. Trust me, it’s easier than you think. Here’s how to nail each part of the process.
Preparing the Cupcakes
First things first: grab your cake mix. I always go for a vanilla or yellow one because it pairs perfectly with the creamy filling and chocolate glaze. But here’s a question I hear often—can you use any flavor of cake mix? Honestly, you can experiment if you’re feeling bold. Chocolate cake mix could work for a double-chocolate twist, but for a classic Boston cream pie vibe, stick with vanilla. It lets the other flavors shine without overpowering them.
Mixing the batter is where the magic begins. Follow the instructions on the box, but don’t rush it. Overmixing can make your cupcakes dense, and nobody wants that. A light hand is your best friend here. Oh, and here’s a tip: preheat your oven before you start mixing. It ensures even baking, which is crucial for getting those fluffy, golden tops. Speaking of which, I once forgot to preheat, and my cupcakes turned out more like muffins. Not the end of the world, but definitely not what I was aiming for.
By the way, if you’re worried about common mistakes, here’s one to watch out for: overfilling the cupcake liners. Fill them about two-thirds of the way to leave room for rising. Otherwise, you’ll end up with domes that look more like mini volcanoes. And trust me, uneven cupcakes are cute in theory but not so much when you’re trying to frost them later. For inspiration on perfecting your technique, check out this Costco chocolate muffin recipe. It’s got some great tips for achieving bakery-worthy results.
Making the Cream Filling
Now, onto the star of the show—the creamy center. This is where your instant vanilla pudding mix comes in. Funny enough, I used to think making custard from scratch was the only way to go. Don’t get me wrong, homemade custard is amazing, but sometimes you just need something quick and reliable. That’s why I love using pudding mix for this homemade custard filling recipe. It’s foolproof and still tastes incredible.
To make the filling, simply whisk the pudding mix with milk according to the package directions. Let it chill in the fridge while your cupcakes bake and cool. This gives it time to set properly, which makes piping it into the cupcakes much easier. Pro tip: use a piping bag with a narrow tip or even a plastic bag with the corner snipped off. It’s less messy and gives you more control.
Here’s the thing—what type of cream works best for Boston cream cupcakes? If you’re going full DIY mode, heavy cream whipped until stiff peaks form is an excellent choice. But again, pudding mix saves the day if you’re short on time. Either way, the goal is a smooth, rich filling that complements the tender cupcake and decadent glaze. For another creative take on fillings, you might enjoy this Disney Dreamlight Valley sugar-free muffins recipe. It’s got some unique ideas worth trying.
Adding the Chocolate Glaze
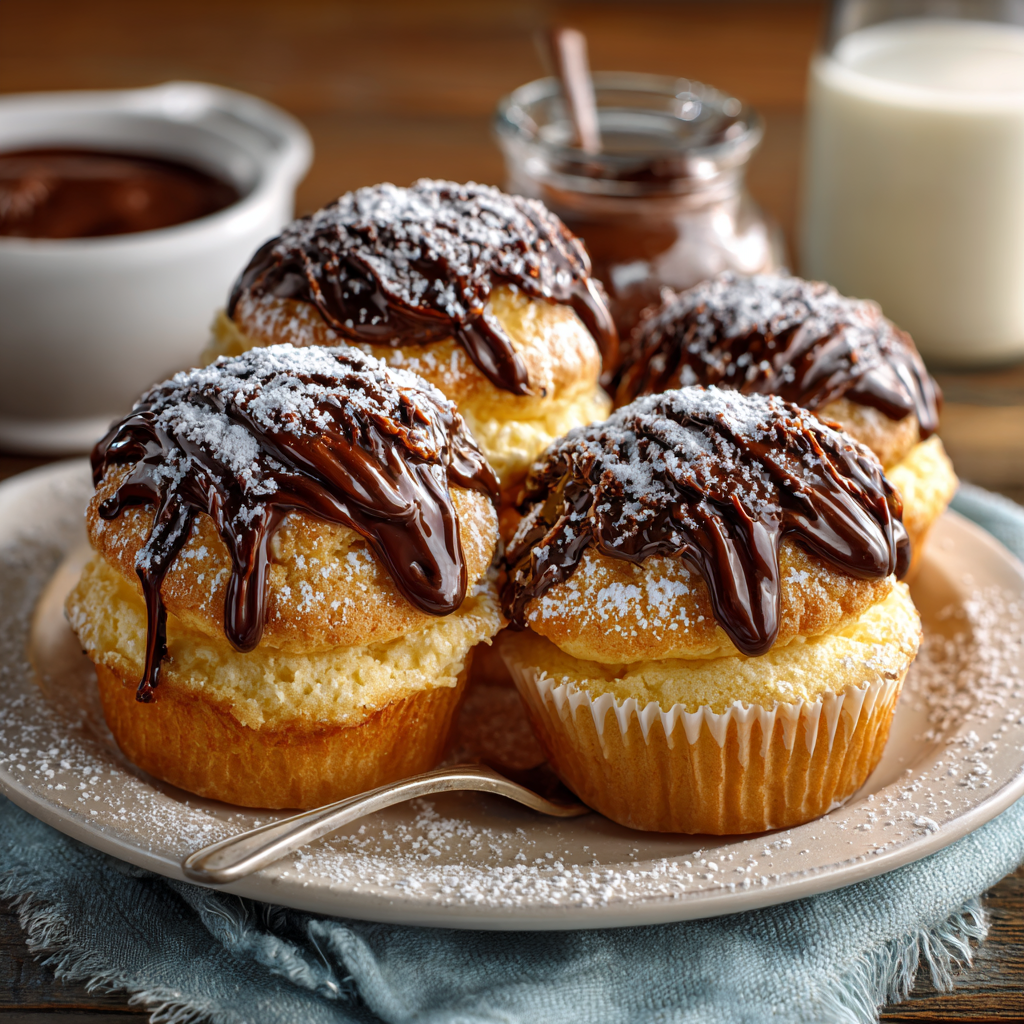
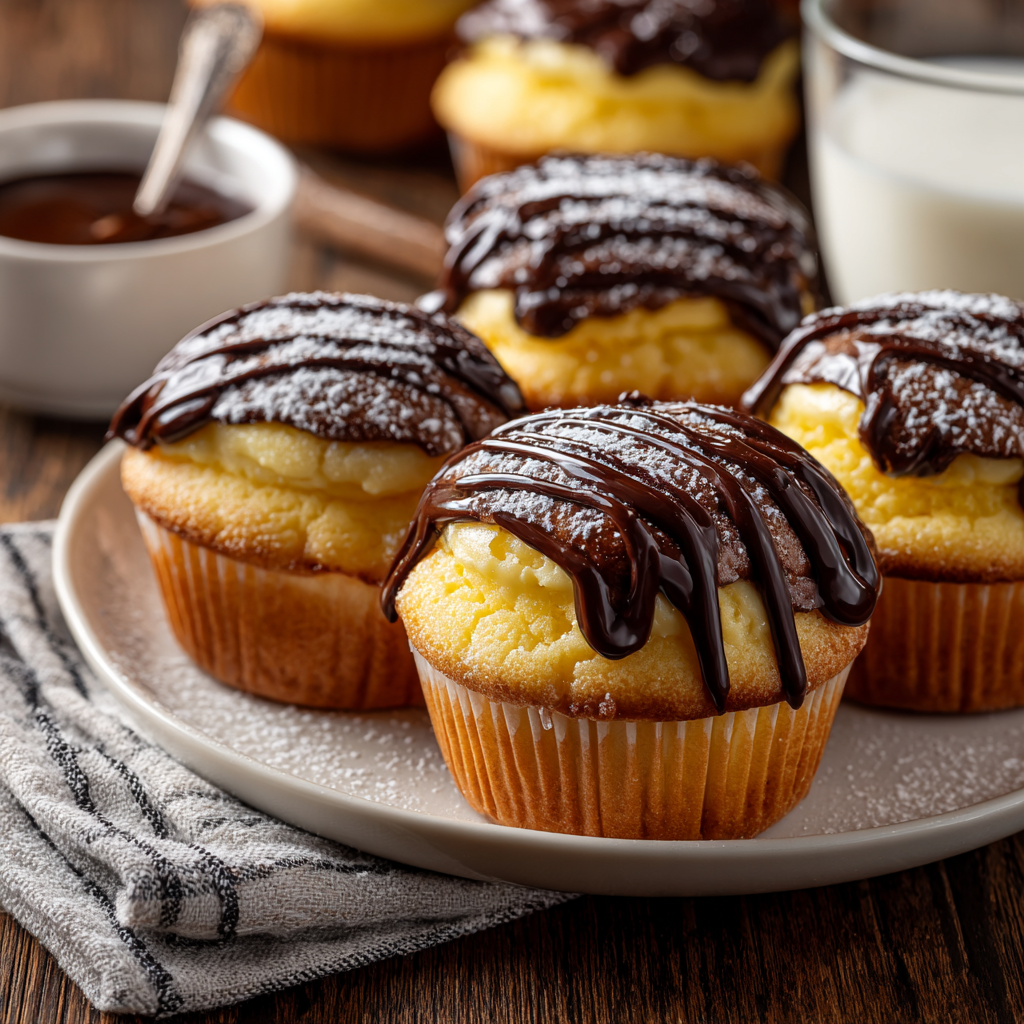
Last but certainly not least, we’ve got the glossy chocolate topping. This part feels almost therapeutic. There’s something satisfying about melting chocolate and watching it transform into a silky glaze. For this step, you’ll need chocolate chips and heavy cream. Heat the cream until it’s warm but not boiling, then pour it over the chocolate chips. Stir gently until everything melts together into pure chocolate bliss.
A lot of people ask me, “How do I get the chocolate glaze smooth?” The secret is patience. If your mixture looks lumpy, give it a few extra seconds of stirring. You can also strain it through a fine mesh sieve to catch any stubborn bits. Once it’s silky-smooth, let it sit for a couple of minutes before spooning it over the cupcakes. This gives it a chance to thicken slightly, which helps it stay put instead of sliding off.
For those who want to elevate their dessert game, consider swapping the basic glaze for a chocolate ganache for desserts. Ganache has a richer texture and deeper flavor, making it a favorite among bakers. To achieve this, use equal parts chocolate and cream for a thicker consistency. If you’re curious about other ways to incorporate ganache, take a peek at this DIY German horse muffins recipe. It’s packed with clever ideas for using ganache creatively.
One final note—don’t stress too much about perfection. Some drips and drizzles add character, right? Think of it as your signature touch. When I made these for a holiday party last year, I went a little wild with the glaze. Turns out, everyone loved the rustic look. So feel free to embrace imperfections—they make your treats uniquely yours.
Oh, and speaking of unique touches, have you ever thought about adding a sprinkle of sea salt on top of the glaze? Just a pinch can enhance the sweetness and create a delightful contrast. Or try pairing these cupcakes with a side of coffee or tea—like the ones served alongside Cracker Barrel corn muffins. It’s a combo that never fails to impress.
At the end of the day, baking is supposed to be fun. Whether you’re whipping up these Boston cream pie cupcakes recipe with cake mix for a special occasion or just because, remember to enjoy the process. After all, the best desserts come from the heart—and maybe a little bit of chaos in the kitchen.
Tips for Perfect Results
Let’s be honest—nobody wants dry, flavorless cupcakes. Lucky for you, I’ve got a few tricks up my sleeve to make sure your Boston cream pie cupcakes recipe with cake mix turns out moist, fluffy, and downright irresistible. Here’s the thing: baking isn’t rocket science, but it does require a little attention to detail. For starters, don’t skimp on the eggs or oil when preparing the batter. These ingredients are what give your cupcakes their tender crumb. If you’re feeling fancy, swap the water called for in the cake mix instructions with milk—or even buttermilk—for an extra-rich flavor.
Another pro tip? Don’t overbake them. Seriously, this is where most people go wrong. Cupcakes are done when a toothpick inserted into the center comes out clean or with just a few crumbs clinging to it. Overbaking leads to dryness, and nobody’s got time for that. Set a timer and keep an eye on them during the last few minutes of baking. By the way, did you know that letting your cupcakes cool completely before adding the filling and glaze makes a huge difference? It prevents everything from sliding around or melting prematurely.
Now, let’s talk storage. Once your cupcakes are assembled, store them in an airtight container at room temperature for up to two days. After that, they’ll start losing their freshness. If you need them to last longer, pop them in the fridge. Just bring them back to room temperature before serving so the flavors shine through. Pro move: place a piece of parchment paper between layers if you’re stacking them to avoid messing up the glaze.
And here’s something you’ve probably wondered: Can Boston cream pie cupcakes be made ahead of time? Absolutely! In fact, making them a day in advance works wonders. The flavors meld together overnight, creating a richer taste experience. Just assemble everything except the glaze, then add that right before serving for maximum shine and texture. Trust me, your future self will thank you when you’re not scrambling to finish dessert at the last minute.
Variations to Try
Okay, confession time—I love experimenting with recipes. While the classic version of these cupcakes is amazing, sometimes it’s fun to switch things up. Have you ever thought about adding sprinkles to the batter? A handful of rainbow or chocolate sprinkles can turn these into a festive treat perfect for birthdays or holidays. Or how about swapping vanilla pudding for pistachio or coconut pudding? It sounds wild, but it adds a whole new dimension of flavor.
Extracts are another game-changer. A splash of almond extract in the batter gives it a subtle nutty aroma, while orange or lemon zest in the filling adds brightness. Funny enough, I once tried adding a teaspoon of espresso powder to the chocolate glaze, and wow—it elevated the entire dessert. The bitterness balanced the sweetness beautifully. If you’re looking for customizable cupcake recipes, this one’s a goldmine.
For those who want to get really creative, consider changing up the frosting. Instead of the traditional chocolate glaze, try a white chocolate drizzle or even a cream cheese frosting. Both pair beautifully with the creamy filling and soft cupcake base. And hey, why not sprinkle crushed cookies or toasted nuts on top for some crunch? These small tweaks result in unique dessert ideas that feel like your own signature creation.
Frequently Asked Questions
- Are Boston cream pie cupcakes gluten-free?
Unfortunately, most cake mixes contain gluten, so these aren’t naturally gluten-free. However, you can find gluten-free cake mixes and pudding options at many grocery stores. Just double-check the labels to ensure all ingredients meet your dietary needs. - How many calories are in each cupcake?
Calorie counts vary depending on the brands you use, but a typical cupcake clocks in around 300–400 calories. Keep in mind, though, that sharing desserts makes them practically calorie-free…right? - Can I freeze these cupcakes?
Yes, you can! Freeze the unfilled cupcakes in an airtight container for up to three months. Thaw them overnight in the fridge, then fill and glaze as usual. Easy peasy. - What’s the best way to pipe the filling?
Use a piping bag fitted with a narrow tip or cut a small hole in a zip-top bag. Insert the tip into the center of each cupcake and squeeze gently until you feel resistance. Less is more—you don’t want overflow! - Do I have to use instant pudding?
Not necessarily. You can whip heavy cream with sugar and vanilla extract for a homemade filling. But honestly, pudding mix saves time without sacrificing taste. - Can I use dark chocolate for the glaze?
Absolutely! Dark chocolate creates a richer, less sweet glaze. Just adjust the amount of cream slightly to account for its thicker consistency. - Why did my glaze crack after cooling?
This happens if the glaze sets too quickly. Try warming it slightly before pouring it over the cupcakes, and let it sit for a minute or two to thicken gradually. - Is there a dairy-free option?
Yep! Substitute almond or coconut milk for regular milk in both the batter and filling. For the glaze, use dairy-free chocolate chips and coconut cream instead of heavy cream. - Can I bake these as mini cupcakes?
Definitely! Just reduce the baking time by about half. Keep an eye on them—they’re done when golden brown and springy to the touch. - Where can I find more easy dessert recipes?
Head over to our cakes and cupcakes category for tons of inspiration. From simple treats to show-stopping desserts, we’ve got you covered.
Conclusion
Here’s the deal: this Boston cream pie cupcakes recipe with cake mix is proof that great desserts don’t have to be complicated. Whether you stick to the classic version or get adventurous with variations, these cupcakes are guaranteed crowd-pleasers. So go ahead—whisk, fill, glaze, and enjoy every bite. And hey, if you end up making them, I’d love to see how they turned out! Tag me in your photos or drop a comment below. Let’s spread the joy of baking together.
One last thing: never underestimate the power of a good cupcake. They’re tiny, portable, and packed with happiness. Now grab your whisk and get baking—you’ve totally got this!
Equipment
- Mixing bowls
- Piping bag or plastic bag
- Oven
- Baking tray
- Cupcake liners
Ingredients
- 1 box high-quality vanilla or yellow cake mix
- 1 box instant vanilla pudding mix
- 1 cup milk (for pudding)
- 1 cup chocolate chips
- 1/2 cup heavy cream (for glaze)
Instructions
- Preheat the oven according to cake mix instructions.
- Prepare the cake mix according to the package directions.
- Fill cupcake liners two-thirds full with the batter.
- Bake according to package instructions, checking for doneness.
- In a separate bowl, whisk the instant vanilla pudding mix with milk according to package directions.
- Chill the pudding in the refrigerator while the cupcakes cool.
- Use a piping bag or plastic bag to fill the cooled cupcakes with the pudding.
- Heat the heavy cream until warm but not boiling.
- Pour the hot cream over the chocolate chips and stir until smooth.
- Let the glaze cool slightly, then spoon it over the filled cupcakes.
Notes
Nutrition

Hi, I’m Olivia Parker, the founder of BakingSecret.com and a lifelong lover of all things sweet and homemade. I grew up in a small town in Oregon, where the smell of fresh cookies in my family’s kitchen sparked my passion for baking. Over the years, I turned that passion into a mission: to help home bakers feel confident, inspired, and creative.
After studying food science and working in several artisan bakeries across the U.S., I decided to create a space where everyone from beginners to seasoned bakers can find reliable recipes, expert tips, and a warm, welcoming community. BakingSecret.com is my way of sharing the magic of baking with the world. When I’m not testing new recipes, you’ll find me exploring farmers’ markets, collecting vintage cookbooks, or perfecting my sourdough technique.