
The Best Cherry Pistachio Citrus Cheesecake You’ll Ever Bake
There’s a magic moment when you pull a cheesecake from the oven. The kitchen smells like sunshine and celebration. That’s exactly what happens with this Cherry Pistachio Cheesecake. It’s not your average dessert. It’s a creamy, dreamy slice of heaven with a crunch of nuts and a burst of berry joy. I first made it for my sister’s birthday, and let me tell you—it stole the show! Now, it’s our family’s go-to for every special gathering.
A Sweet Little History: From Classic to Creative
The cheesecake has been a beloved dessert for ages. From New York’s dense classics to light Italian versions, it’s always been a crowd-pleaser. My version takes that classic and dances with it! I adore adding bright citrus and crunchy nuts. It feels modern and festive. The cherry topping is like the final, happy bow on a perfect present. It mixes tradition with a bit of playful, personal flair.
Why You’ll Fall in Love With This Cheesecake
This Cherry Pistachio Cheesecake is a superstar for three big reasons. First, the flavor combo is unforgettable. Tart lemon and orange zest cut through the rich cream cheese. Sweet cherries and salty pistachios create a perfect balance. Second, it’s surprisingly simple to make. No fancy techniques are needed! Third, it looks stunning. The ruby-red cherries and green pistachios make it a showstopper. It tastes like a bakery bought it, but you made it with love.
When to Serve Your Spectacular Cheesecake
This dessert turns any day into a celebration. Here are my favorite times to bake it:
- Holiday Parties: Its colors and flavors scream Christmas or New Year’s Eve.
- Spring Brunches: The citrus feels fresh and lively for Easter or Mother’s Day.
- Summer Gatherings: Cherries are in season! It’s perfect for a backyard BBQ or picnic.
- Just Because: Sometimes, a Tuesday needs a slice of cherry pistachio joy.
Gathering Your Ingredients
Here’s what you’ll need to create this masterpiece. I recommend using full-fat, good-quality ingredients for the best texture and taste.
For the Crust:
- 1 cup graham cracker crumbs
- ½ cup finely chopped pistachios
- ¼ cup sugar
- 6 tablespoons unsalted butter, melted
For the Filling:
- 16 ounces (2 blocks) cream cheese, softened
- ¾ cup sugar
- 2 large eggs
- ½ cup sour cream
- 1 tablespoon lemon zest
- 1 tablespoon orange zest
- 1 teaspoon vanilla extract
- 1 tablespoon fresh lemon juice
For the Topping:
- 1 cup cherry preserves or fresh cherries, pitted and halved
- ¼ cup chopped pistachios
- 1 teaspoon lemon zest
Smart Substitutions (When You Need Them)
Don’t stress if you’re missing something! Baking is about creativity.
- Crust: Use digestive biscuits instead of graham crackers. Almonds can replace pistachios.
- Citrus: Use only lemon or only orange zest if you have one. Lime zest also works!
- Topping: Any berry preserve works—strawberry, raspberry, or even blueberry. Dried cherries are good too.
- Sour Cream: Plain, full-fat Greek yogurt is a great substitute.
How to Make Your Cherry Pistachio Citrus Cheesecake
Follow these steps, and you’ll have a perfect, creamy cheesecake. Let’s get baking!
Step 1: Preheat and Prepare Your Pan
First, get your oven ready. Set it to 325°F (160°C). This lower temperature is key for a smooth, crack-free cheesecake. Then, lightly grease your 9-inch springform pan. I use a tiny bit of butter on my fingers to rub around the bottom and sides. This ensures nothing sticks. Place your pan on a clean counter. You’re building your dessert’s foundation here!
Step 2: Make the Nutty Crust
In a medium bowl, mix your graham cracker crumbs, chopped pistachios, and sugar. The colors are already lovely—golden brown and green specks. Pour in the melted butter. Stir until every crumb is coated and the mix holds together when pinched. Now, press this mixture firmly into the bottom of your pan. Use the bottom of a glass or a measuring cup to get it even and tight. Bake it for 8-10 minutes. This short bake sets the crust and gives it a toasted flavor. Let it cool completely before adding filling. Pro tip: A cool crust prevents a soggy bottom!
Step 3: Create the Citrus Cream Cheese Filling
In a large bowl, beat the softened cream cheese and sugar. Use an electric mixer on medium speed. Beat until it’s completely smooth and fluffy, about 2 minutes. Scrape down the sides of the bowl. Add eggs, one at a time. Mix well after each egg until just combined. Over-beating eggs can add too much air and cause cracks. Then, stir in the sour cream, lemon zest, orange zest, vanilla, and lemon juice. The aroma will be incredible—bright, creamy, and sweet. Mix until everything is creamy and uniform. Chef’s tip: Zest your citrus directly over the bowl to catch all the fragrant oils!
Step 4: Bake to Perfection
Pour your beautiful filling over the cooled crust. Smooth the top with a spatula. Place the pan in your preheated oven. Bake for 45-50 minutes. The center should look set but still have a slight jiggly wobble when you gently tap the pan. This is the sign of perfect baking! Do not open the oven door during baking. Sudden temperature changes can cause cracks. When the time is up, turn off the oven. Crack the door open slightly with a wooden spoon. Let the cheesecake cool slowly inside for 1 hour. This gradual cooling is another secret to a flawless top.
Step 5: Chill and Add the Final Toppings
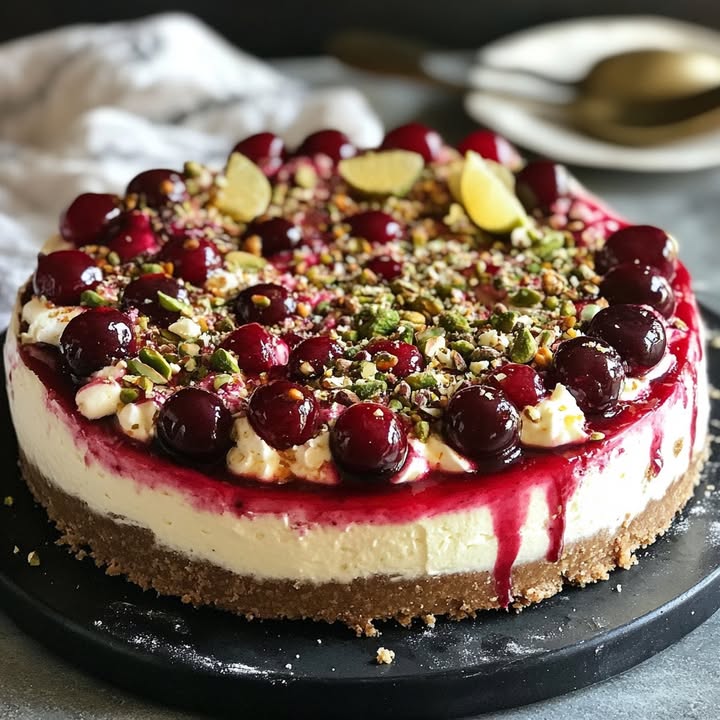
After the oven cooling, move the cheesecake to your refrigerator. Let it chill for at least 4 hours, or better yet, overnight. This patience is worth it! It allows the flavors to deepen and the texture to become firm and sliceable. Just before serving, spread the cherry preserves evenly over the top. Sprinkle with the chopped pistachios and that final teaspoon of lemon zest. The red, green, and yellow look like confetti! Slice with a clean, warm knife for neat pieces.
Your Cheesecake Timeline
Planning is part of baking success. Here’s the breakdown for this Cherry Pistachio Cheesecake.
- Prep Time: 20 minutes (zesting, mixing, pressing the crust)
- Cooking Time: 50 minutes (actual oven baking)
- Cooling & Chilling Time: 5 hours (1 hour in oven, 4+ hours in fridge)
- Total Time: About 6 hours 10 minutes (mostly hands-off chilling)
- Servings: 10 generous slices
- Kcal per serving: Approximately 380
Chef’s Secret: The Room Temperature Rule
My biggest secret for a creamy cheesecake? Room temperature ingredients. Your cream cheese, eggs, and sour cream must not be cold. Let them sit out for at least 30 minutes before you start. Cold ingredients don’t blend smoothly. They can cause a lumpy batter and uneven baking. A smooth batter starts with warm, friendly ingredients!
A Little Extra Sweet Fact
Pistachios aren’t just tasty. Their green color comes from antioxidants! Cherries are also packed with good-for-you compounds. So, while this is a dessert, it’s a celebration of nature’s colorful, nutritious gifts. Every slice tells a story of sunshine, trees, and good soil.
Equipment You’ll Need
You don’t need fancy tools. A few basics will do the job perfectly.
- 9-inch springform pan (the clamp-side lets you remove the cake easily)
- Electric hand mixer or stand mixer
- Medium and large mixing bowls
- Measuring cups and spoons
- Microplane or fine grater for zesting
- Rubber spatula
- Knife for slicing
How to Store Your Leftover Cheesecake
If you have leftovers (a rare event in my house!), store them right. First, cover the cheesecake tightly. Use the springform pan lid or plastic wrap. Press the wrap directly on the surface of the cherries to keep them fresh. This prevents drying and fridge smells.
Second, always store it in the refrigerator. Cheesecake must stay cold. It will keep beautifully for up to 4-5 days. The flavors might even get better after a day or two!
Third, for longer storage, you can freeze it. Wrap whole or individual slices tightly in plastic wrap and then in foil. Freeze for up to 2 months. Thaw overnight in the fridge before serving.
Tips and Advice for Baking Bliss
A few extra thoughts to make your baking journey smooth.
- Don’t Overmix: Mix the filling until just combined after adding eggs. Overmixing adds air bubbles that cause cracks.
- Use a Water Bath if Nervous: If you’re worried about cracks, wrap the springform pan bottom in foil. Place it in a larger pan with ½ inch of hot water. This steamy bath gives extra gentle heat.
- Fresh vs. Preserves: Fresh cherries are gorgeous in summer. In winter, good-quality preserves are perfectly delicious and easier.
- Chill Completely: Do not rush the chilling step. A firm, cold cheesecake slices cleanly and tastes better.
Presentation Tips to Wow Your Guests
Make your dessert table sparkle with these easy ideas.
- Place the whole cheesecake on a vintage cake stand for a centerpiece.
- Dust slices with a tiny bit of powdered sugar for a snowy effect.
- Serve with a dollop of extra sour cream or a scoop of vanilla ice cream.
- Add a few whole fresh cherries and pistachios around each plate.
- Use a mint leaf garnish for a fresh, green touch.
Healthier Twists on the Cherry Pistachio Cheesecake
Love this recipe but want to lighten it up? Try these six clever variations.
- Lightened Filling: Use neufchâtel cheese instead of full-fat cream cheese. It has less fat but similar texture.
- Sugar Swap: Replace the granulated sugar in the filling with a monk fruit or stevia blend designed for baking.
- Nut-Free Crust: Skip the pistachios in the crust. Use extra graham crumbs or rolled oats instead.
- Greek Yogurt Base: Substitute all the sour cream with plain, non-fat Greek yogurt for extra protein.
- Vegan Version: Use vegan cream cheese, coconut oil in the crust, and a flax egg substitute. Top with agave-sweetened cherry jam.
- Mini Cheesecakes: Make individual servings in a muffin tin. They’re easier for portion control and fun for parties.
Common Mistakes to Avoid
Even great bakers can slip up. Avoid these common pitfalls for a perfect cherry pistachio citrus cheesecake.
Mistake 1: Using Cold Cream Cheese
This is the number one reason for a lumpy, uneven batter. Cold cream cheese doesn’t blend smoothly with sugar and eggs. It stays in little hard chunks. Your cheesecake will bake with dense spots. Always let your cream cheese blocks soften on the counter for at least 30 minutes. If you forget, you can microwave them on low power for 10-15 seconds. Just don’t melt them!
Mistake 2: Over-beating the Batter After Adding Eggs
We love a smooth batter. But once you add eggs, mix just until they are incorporated. Over-beating on high speed adds too many air bubbles. These bubbles expand in the oven. Then they collapse, causing cracks on your beautiful cheesecake top. Mix on low speed after adding eggs. Stop as soon as you see a uniform, creamy mixture.
Mistake 3: Skipping the Gradual Cooling Step
It’s tempting to pull the cheesecake out and put it straight in the fridge. Don’t do it! The sudden temperature shock can cause it to sink or crack badly. That slow cool in the cracked oven is crucial. It lets the structure set gently. If you don’t have an hour, at least let it cool on the counter for two hours before refrigerating.
Mistake 4: Cutting Into a Warm Cheesecake
You baked it. You’re excited. You want a slice now! But a warm cheesecake is a soft, messy cheesecake. It will squish and not hold its shape. The flavors also haven’t developed fully. That long chill in the fridge makes it sliceable and intensifies the citrus and cherry notes. Be patient. Your perfect slice is worth the wait.
Mistake 5: Not Preparing the Springform Pan Properly
A little grease on the bottom and sides of the pan makes all the difference. If you skip this, even with a crust, the cheesecake can stick. Getting it out cleanly becomes a struggle. I use a dab of butter or a quick spray of baking oil. It’s a tiny step that saves a lot of frustration at serving time.
Frequently Asked Questions
Can I make this Cherry Pistachio Cheesecake without a springform pan?
Yes, you can use a regular 9-inch cake pan. The challenge is removing the cheesecake. Line the pan with parchment paper sling. Cut a circle for the bottom and strips for the sides. After chilling, you can use the paper to lift the cake out. It’s a bit more fiddly than a springform pan, but it works. The crust might be slightly thinner in a regular pan, so watch the baking time.
Why is my cheesecake filling lumpy?
Lumps usually come from cold ingredients or not mixing the cream cheese and sugar enough before adding other items. Make sure your cream cheese is very soft. Beat it with the sugar for a full 2-3 minutes until it’s completely smooth and creamy. Scrape the bowl sides often. Then add your other ingredients. Also, your eggs and sour cream should be at room temperature. Cold sour cream can cause little lumps too.
Can I freeze this cheesecake?
Absolutely! This cherry pistachio cheesecake freezes very well. Wrap the whole chilled cheesecake (without toppings) tightly in plastic wrap. Then wrap it again in aluminum foil. Freeze for up to 2 months. To serve, thaw it overnight in the refrigerator. Add the cherry and pistachio topping after it’s thawed. Freezing can slightly change the texture, making it a bit more dense, but it’s still delicious.
What if I don’t have fresh citrus for zest?
Citrus zest is key for that bright flavor. If you don’t have fresh lemons or oranges, you can use bottled lemon juice. Increase the amount to 2 tablespoons. Also, add ½ teaspoon of pure orange extract or lemon extract to the filling. It won’t be exactly the same as fresh zest, but it will give a good citrus note. Avoid dried zest from spice jars—it lacks flavor and aroma.
How do I know when the cheesecake is done baking?
The best test is the “jiggly center” method. At 45-50 minutes, gently tap the side of the pan. The center of the cheesecake should jiggle like soft jelly. The edges will look set and firmer. If the entire surface jiggles wildly, it needs more time. If it doesn’t jiggle at all and is firm, it might be overdone. A slight, soft jiggle in a small center area is the perfect sign.
Can I use frozen cherries for the topping?
Yes, frozen cherries work well. Thaw them completely and drain any extra liquid before using. Pat them dry with a paper towel. Otherwise, the extra juice can make the topping runny. You can also cook frozen cherries with a little sugar to make a quick preserve if you don’t have jam. Fresh cherries are lovely in season, but frozen are a great year-round option.
My crust is crumbling. How can I make it hold together better?
A crumbly crust often needs more butter or better mixing. Make sure your melted butter is coating every crumb and pistachio piece. Mix it thoroughly. Press the mixture very firmly into the pan. Use the flat bottom of a glass or cup to apply strong, even pressure. Bake it for the full 10 minutes to set it. A properly baked crust holds together much better when sliced.
Is there a way to make this recipe less sweet?
You can reduce the sugar slightly. Try using ½ cup of sugar in the filling instead of ¾ cup. The citrus will shine more, and the cheesecake will be tangier. For the crust, you can cut the sugar to 2 tablespoons. Also, choose a cherry preserve with no added sugar or a reduced-sugar variety. The dessert will still be sweet but more balanced for some tastes.
How important is the sour cream in the filling?
Sour cream is very important. It adds tanginess that balances the sweet cream cheese. It also adds moisture and helps create the classic creamy, smooth cheesecake texture. If you must substitute, use full-fat plain Greek yogurt. It has a similar tang and thickness. Do not skip it or use a low-fat sour cream if possible. The fat content helps the texture.
Can I add other nuts besides pistachios?
Of course! This recipe is flexible. Almonds would be a lovely, classic substitute. Toast them lightly for extra flavor. Pecans or walnuts would add a different, earthy richness. Hazelnuts could be a fancy twist. Keep the same amount—½ cup in the crust and ¼ cup for topping. Chopping them finely for the crust ensures they mix well with the graham crumbs.
Remember, good kitchen hygiene is the foundation of all great baking. Always wash your hands and tools before starting, especially when handling fresh ingredients like citrus and cherries.
This Cherry Pistachio Citrus Cheesecake is more than a recipe. It’s a memory maker. The joy of sharing it is the best part. For more incredible cheesecake inspiration, explore our full collection of cheesecake recipes. You might love our creamy Strawberry Earthquake Cake or the fun, portable Strawberry Cheesecake Stuffed Cookies. If you’re a citrus fan, our Lemon Poundcake Cookies are a zesty treat. And for a unique fruit twist, try the sweet-tart Brown Sugar Rhubarb Cookies.
So, gather your ingredients. Zest your citrus. Chop those pistachios. Feel the joy of creating something beautiful and delicious. This cheesecake is waiting to become your new favorite dessert. It brings people together around the table. That’s the real magic of baking. Share it, savor it, and enjoy every creamy, crunchy, sunny bite.
Equipment
- Grand bol
- Fouet
- Spatule
- Moule à charnière de 9 pouces
- Papier sulfurisé
Ingredients
- 1 tasse crumbs de biscuit Graham
- ½ tasse pistaches hachées
- ¼ tasse sucre
- 6 cuil. beurre non salé, fondu
- 16 oz fromage à la crème, ramolli
- ¾ tasse sucre
- ½ tasse sour crème
- 1 cuil. zeste de citron
- 1 cuil. zeste d'orange
- 1 cuil. extrakt de vanille
- 1 cuil. jus de citron frais
- 1 tasse confiture de cerises ou cerises fraîches, dénoyautées et coupées en deux
- ¼ tasse pistaches hachées
- 1 cuil. zeste de citron
Instructions
- Préchauffez le four à 160°C (325°F) et graissez un moule à charnière de 9 pouces.
- Dans un grand bol, mélangez les miettes de biscuits Graham, les pistaches hachées et le sucre, puis incorporez le beurre fondu jusqu'à ce qu'il soit bien enrobé.
- Pressez le mélange fermement au fond du moule préparé et faites cuire pendant 8 à 10 minutes ; laissez refroidir complètement.
- Dans un grand bol, battez le fromage à la crème ramolli et le sucre jusqu'à obtenir un mélange lisse, puis ajoutez les œufs un à un en mélangeant bien après chaque ajout.
- Incorporez la crème aigre, le zeste de citron, le zeste d'orange, l'extrait de vanille et le jus de citron jusqu'à obtenir une consistance crémeuse et homogène.
- Versez la garniture sur la croûte refroidie et égalisez le dessus, puis faites cuire pendant 45 à 50 minutes jusqu'à ce que le centre soit juste pris mais légèrement tremblotant.
- Éteignez le four et entrouvrez la porte, laissant le cheesecake refroidir à l'intérieur pendant 1 heure.
- Après refroidissement, réfrigérez pendant au moins 4 heures ou toute la nuit.
- Avant de servir, étalez la confiture de cerises sur le dessus et saupoudrez de pistaches hachées et de zeste de citron.
Notes
Nutrition

Hi, I’m Olivia Parker, the founder of BakingSecret.com and a lifelong lover of all things sweet and homemade. I grew up in a small town in Oregon, where the smell of fresh cookies in my family’s kitchen sparked my passion for baking. Over the years, I turned that passion into a mission: to help home bakers feel confident, inspired, and creative.
After studying food science and working in several artisan bakeries across the U.S., I decided to create a space where everyone from beginners to seasoned bakers can find reliable recipes, expert tips, and a warm, welcoming community. BakingSecret.com is my way of sharing the magic of baking with the world. When I’m not testing new recipes, you’ll find me exploring farmers’ markets, collecting vintage cookbooks, or perfecting my sourdough technique.