
Why This Chocolate Cream Cheesecake Will Steal Your Heart
Let me tell you a little secret. A few months ago, I decided to surprise my family with something sweet and indulgent after dinner. I had always been intimidated by cheesecakes—they seemed fancy and complicated. But guess what? This Chocolate Cream Cheesecake turned out to be one of the easiest desserts I’ve ever made, and oh boy, did it wow everyone! The creamy texture, the rich chocolate chunks scattered throughout, and that buttery cookie crust—it was love at first bite. If you’re looking for a dessert that’s simple, decadent, and sure to impress, this is your recipe.
A Little History Behind the Magic
Cheesecakes have been around for centuries, dating back to ancient Greece. Back then, they were more like dense cheese pies than the light, creamy versions we adore today. Over time, different cultures added their own twists—some used ricotta, others mascarpone, and eventually cream cheese became a favorite in America. Adding chocolates into the mix? Pure genius! It’s like taking a classic and giving it a modern, playful upgrade. I first tried this version at a friend’s party, and when she shared her tips, I knew I had to make it my own. Trust me, once you try it, you’ll see why it’s such a hit.
Why You’ll Love This Recipe
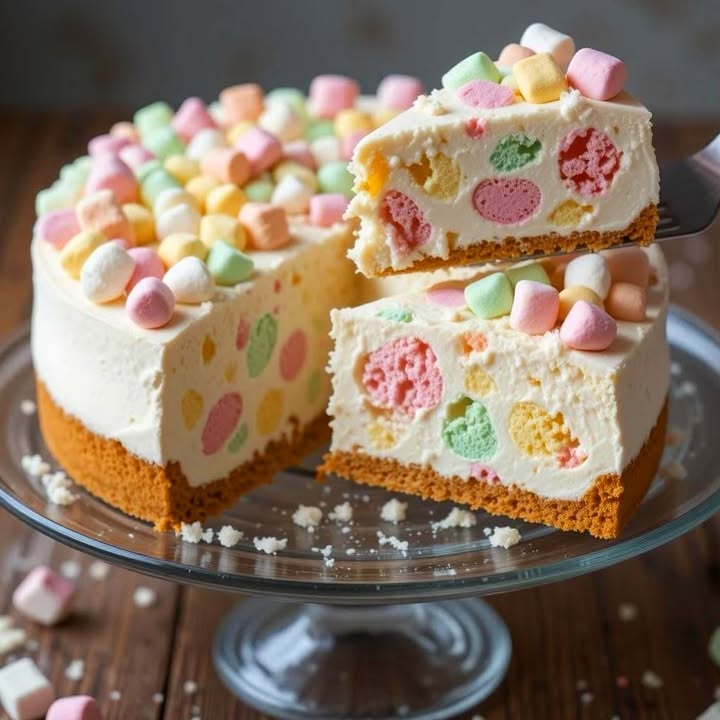
What makes this Chocolate Cream Cheesecake stand out? First, it’s incredibly easy to prepare. No baking required—just mixing, chilling, and decorating. Second, the flavor combination is unbeatable. The tangy cream cheese balances the sweetness of condensed milk and the richness of chocolates perfectly. Plus, those colorful chocolate chunks add a fun, festive touch. Whether you’re a seasoned baker or a beginner, this recipe will make you feel like a pro.
Perfect Occasions to Whip Up This Dessert
This cheesecake is perfect for any occasion—or no occasion at all! Bring it to a potluck, serve it at a birthday party, or enjoy it on a cozy family night. I personally love making it during the holidays because the colorful chocolates make it look extra cheerful. It’s also a great choice for Valentine’s Day or Mother’s Day—because who doesn’t love chocolate?
Ingredients
Here’s what you’ll need to create this masterpiece:
- 190 g (6.7 oz) cream cheese
- 1 can (397 g / 14 oz) sweetened condensed milk
- 1 can (354 ml / 12 oz) evaporated milk
- 1 tbsp (15 ml) vanilla extract
- 14 g (0.5 oz) gelatin powder
- ½ cup (120 ml) cold water for gelatin
- 1 cup (180 g) colorful chocolates
- 1 cup (180 g) crushed cookies
- ¼ cup (60 g) melted butter
- 1 cup (240 ml) whipped cream (optional)
Substitution Options
Not everyone has the exact ingredients on hand, and that’s okay! Here are some swaps you can try:
- Cream cheese: Use mascarpone or even Greek yogurt for a lighter option.
- Sweetened condensed milk: Substitute with regular condensed milk mixed with sugar.
- Evaporated milk: Whole milk works well if you don’t mind adjusting the sweetness slightly.
- Gelatin: Agar-agar is a vegetarian alternative.
- Crushed cookies: Graham crackers, digestive biscuits, or even Oreos work beautifully.
Preparation Section
Step 1: Build Your Base
Start by mixing your crushed cookies with melted butter until it resembles wet sand. Press this mixture firmly into the bottom of an 18 cm (7-inch) or 20 cm (8-inch) deep cake pan. Pop it in the fridge while you move on to the next steps. This base adds a satisfying crunch that pairs wonderfully with the creamy filling. Pro tip: Use the back of a spoon to press the crumbs evenly—it ensures every slice holds together nicely.
Step 2: Bloom the Gelatin
Sprinkle the gelatin powder over cold water and let it sit for about 5 minutes to bloom. Once it’s softened, microwave it in short bursts of 10 seconds each until fully dissolved. Be careful not to overheat it, as gelatin can lose its setting power if overheated. Chef’s tip: Stir gently between microwaving to prevent clumps.
Step 3: Blend the Filling
In a blender or large bowl, combine the cream cheese, sweetened condensed milk, evaporated milk, vanilla extract, and dissolved gelatin. Blend until smooth and silky. The aroma of vanilla mingling with the cream cheese is heavenly! Pour half of this mixture into your prepared mold, then sprinkle some chocolates evenly before adding the rest of the filling.
Step 4: Add the Final Touches
For an Instagram-worthy finish, scatter more chocolates on top before refrigerating. If you want the chocolates evenly distributed, freeze the layers briefly before adding the next one. Chill the cheesecake for at least 4 hours—or overnight for best results. Patience pays off here!
Timing
- Prep time: 20 minutes
- Chilling time: 4+ hours
- Total time: About 5 hours
Chef’s Secret
To ensure the chocolates stay suspended rather than sinking, chill each layer for 30 minutes before adding the next. It takes a bit longer but creates beautiful, evenly layered slices.
Extra Info
Did you know that gelatin was originally made from boiling animal bones and connective tissues? Thankfully, modern versions are much easier to handle and come in powdered form. Fun fact: Agar-agar, the vegetarian alternative, comes from seaweed!
Necessary Equipment
You’ll need:
- An 18 cm or 20 cm deep cake pan
- A spatula for smoothing the filling
- A microwave-safe bowl for blooming gelatin
- A whisk or electric mixer for blending
Storage
Store your Chocolate Cream Cheesecake in the fridge, covered with plastic wrap or in an airtight container. It stays fresh for up to 5 days. For longer storage, freeze it for up to a month. Thaw overnight in the fridge before serving. Keep in mind that freezing may slightly alter the texture of the chocolates.
If you live in a warm climate, keep the cheesecake chilled until just before serving. Avoid leaving it out for more than 2 hours, as dairy-based desserts spoil quickly in heat.
Tips and Advice
- Use room-temperature cream cheese for smoother blending.
- Don’t skip the chilling step—it’s crucial for setting the gelatin.
- Experiment with different types of chocolates, like dark or white chocolate chips.
Presentation Tips
Dress up your cheesecake with fresh berries, a dusting of cocoa powder, or a drizzle of chocolate sauce. Serve slices on pretty plates with a dollop of whipped cream for an elegant touch.
Healthier Alternative Recipes
Want to lighten things up? Try these variations:
- Low-sugar version: Replace sweetened condensed milk with unsweetened almond milk and stevia.
- Vegan delight: Swap cream cheese for cashew cream and use coconut milk instead of dairy.
- Gluten-free base: Use gluten-free cookies or nuts for the crust.
- Protein-packed: Add a scoop of protein powder to the filling.
- Fruit twist: Fold in chopped strawberries or blueberries alongside the chocolates.
- Mini cheesecakes: Make individual servings using muffin tins.
Common Mistakes to Avoid
Mistake 1: Skipping the Blooming Step
Gelatin needs time to absorb liquid before dissolving. Rushing this step leads to lumpy filling. Always bloom it for at least 5 minutes.
Mistake 2: Overmixing the Batter
Overmixing introduces air bubbles, which can ruin the smooth texture. Mix only until combined. Tip: Use a gentle folding motion.
Mistake 3: Not Chilling Long Enough
Impatience is the enemy here. Cutting into the cheesecake too soon will result in a messy, unset dessert. Wait the full 4 hours—or better yet, chill overnight.
FAQ
Can I use flavored gelatin?
Yes, but stick to unflavored gelatin for best results. Flavored varieties can alter the taste.
How do I unmold the cheesecake cleanly?
Run a thin knife around the edges and dip the bottom of the pan in warm water for a few seconds to loosen it.
Can I freeze leftovers?
Absolutely! Wrap slices individually and freeze for up to a month. Thaw in the fridge before eating.
What if I don’t have a blender?
A hand mixer or whisk works fine. Just make sure the cream cheese is soft enough to blend easily.
Is this recipe kid-friendly?
Yes! Kids love the colorful chocolates and creamy texture. Let them help decorate the top.
Can I use homemade condensed milk?
Of course! Homemade condensed milk gives a fresher flavor, though store-bought is quicker.
Why did my gelatin not set?
It could be due to overheating or insufficient chilling. Double-check your technique and timings.
How can I make it richer?
Add a splash of heavy cream or cream cheese frosting to the filling for extra indulgence.
Can I use chocolate syrup instead of chunks?
While possible, chunks provide a better texture contrast. Syrup might make the filling too runny.
What size pan should I use?
An 18 cm (7-inch) or 20 cm (8-inch) pan works best. Larger pans may result in thinner cheesecake.
Final Thoughts
This Chocolate Cream Cheesecake is proof that simplicity and elegance go hand in hand. With minimal effort, you can create a dessert that looks and tastes amazing. So grab your ingredients, roll up your sleeves, and get ready to impress. After all, life’s too short for boring desserts!
Equipment
- Large bowl
- Whisk
- Spatula
- 18 cm or 20 cm deep cake pan
- Microwave-safe bowl
Ingredients
- 190 g cream cheese
- 397 g sweetened condensed milk
- 354 ml evaporated milk
- 1 tbsp vanilla extract
- 14 g gelatin powder
- 120 ml cold water for gelatin
- 180 g colorful chocolates
- 180 g crushed cookies
- 60 g melted butter
- 240 ml whipped cream (optional)
Instructions
- Mix crushed cookies with melted butter until it resembles wet sand and press into the bottom of an 18 cm or 20 cm deep cake pan. Refrigerate.
- Sprinkle gelatin powder over cold water and let it sit for about 5 minutes to bloom, then microwave until fully dissolved.
- In a blender or large bowl, combine cream cheese, sweetened condensed milk, evaporated milk, vanilla extract, and dissolved gelatin. Blend until smooth.
- Pour half of the mixture into the prepared mold, sprinkle with colorful chocolates, then add the remaining filling.
- Scatter more chocolates on top and refrigerate the cheesecake for at least 4 hours, or overnight for best results.