
Why This Chocolate Grid Delight Will Make Your Day
Picture this: a slice of cake so rich, so decadent, that it stops conversations mid-sentence. That’s what happened when I served my Chocolate Grid Delight at a family gathering last summer. My cousin, who claims to “not really like cake,” polished off two slices and asked for the recipe. This cake isn’t just dessert; it’s an experience. The velvety chocolate layers, the creamy frosting, and that stunning chocolate grid on top? Pure magic.
A Little History Behind the Cake
I first stumbled upon the idea of a chocolate grid cake while flipping through an old baking magazine. It was inspired by European patisserie traditions where presentation is as important as taste. Back then, bakers used intricate piping techniques to make cakes look like art. Modern versions, like this Chocolate Grid Delight, simplify the process but keep the wow factor alive. When I made it for the first time, I felt like a pastry chef in Paris—except I was in my tiny kitchen wearing pajamas.
Why You’ll Love This Recipe
This cake is all about balance. The deep cocoa flavor pairs perfectly with the light whipped cream topping. It’s not overly sweet, which makes it perfect for chocolate lovers who appreciate a more sophisticated taste. Plus, the steps are easy enough for a beginner baker but impressive enough to earn you bragging rights at any potluck. Trust me, once you try it, you’ll want to make it again and again.
Perfect Occasions to Prepare This Recipe
Whether it’s a birthday, anniversary, or just a random Tuesday, this Chocolate Grid Delight fits the bill. It’s ideal for celebrations because it looks fancy without requiring hours of work. I’ve also served it at casual get-togethers, and everyone raves about how “professional” it seems. Bonus: leftovers freeze beautifully, so you can enjoy it later!
Ingredients You’ll Need
Here’s everything you need to whip up this masterpiece:
For the Cake:
- 1 3/4 cups all-purpose flour
- 1 1/2 cups granulated sugar
- 3/4 cup unsweetened cocoa powder
- 1 1/2 teaspoons baking powder
- 1 1/2 teaspoons baking soda
- 1 teaspoon salt
- 2 large eggs
- 1 cup whole milk
- 1/2 cup vegetable oil
- 2 teaspoons vanilla extract
- 1 cup boiling water
For the Frosting:
- 1 cup unsalted butter, softened
- 3 1/2 cups powdered sugar
- 1/2 cup unsweetened cocoa powder
- 1/2 cup heavy cream
- 2 teaspoons vanilla extract
For the Decoration:
- 1 cup heavy whipping cream
- 2 tablespoons powdered sugar
- 1/2 teaspoon vanilla extract
- 1/2 cup chocolate ganache or melted chocolate for the grid pattern
Substitution Options
Not everyone has every ingredient on hand, and that’s okay! Here are some swaps:
- All-purpose flour: Use gluten-free flour if needed.
- Whole milk: Substitute almond milk or oat milk for a dairy-free option.
- Vegetable oil: Canola oil or melted coconut oil works too.
- Heavy cream: Try full-fat coconut milk for a vegan twist.
Step 1: Preheat the Oven
Start by preheating your oven to 350°F (175°C). Grease and flour two 9-inch round cake pans. I always use parchment paper circles at the bottom of my pans—it makes removing the cakes a breeze. Pro tip: Dusting the pans with cocoa powder instead of flour adds a little extra chocolatey goodness.
Step 2: Prepare the Cake Batter
In a large bowl, whisk together the dry ingredients: flour, sugar, cocoa powder, baking powder, baking soda, and salt. Then add the eggs, milk, oil, and vanilla extract. Beat on medium speed for 2 minutes until smooth. Finally, stir in the boiling water. Don’t panic—the batter will be thin, but that’s exactly what you want for a moist cake. Chef’s tip: Let the batter sit for 5 minutes before pouring it into the pans to let the cocoa bloom for maximum flavor.
Step 3: Bake the Cake
Pour the batter evenly into the prepared pans. Pop them into the oven and bake for 30-35 minutes. You’ll know they’re done when a toothpick inserted into the center comes out clean. As the cakes bake, your kitchen will fill with the irresistible aroma of chocolate. Once baked, cool the cakes in the pans for 10 minutes, then transfer them to wire racks to cool completely. Patience is key here—warm cakes can melt the frosting!
Step 4: Prepare the Frosting
In a large bowl, beat the softened butter until creamy. Gradually add the powdered sugar and cocoa powder, beating until combined. Pour in the heavy cream and vanilla extract, and continue beating until the frosting is light and fluffy. This step transforms simple ingredients into something truly magical. Pro tip: Chill the bowl and beaters for 10 minutes before whipping the frosting—it helps stabilize it.
Step 5: Assemble the Cake
Place one cake layer on a serving plate and spread a generous layer of frosting on top. Add the second cake layer and frost the top and sides of the entire cake. Take your time here; smooth frosting makes the final product look professional. Chef’s secret: Dip your spatula in hot water before smoothing the frosting for a flawless finish.
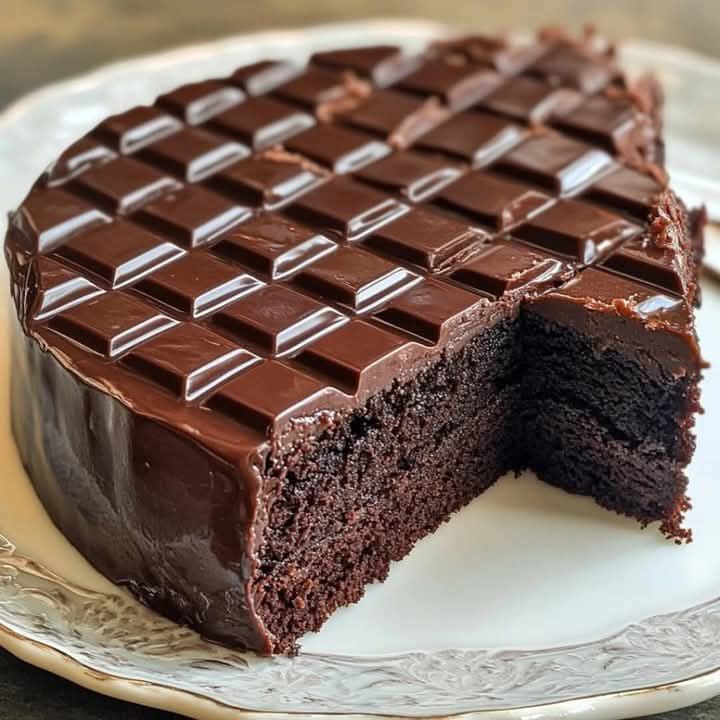
Step 6: Decorate the Cake
In a medium bowl, whip the heavy cream, powdered sugar, and vanilla extract until stiff peaks form. Pipe swirls of whipped cream around the edges of the cake using a piping bag or a zip-top bag with the corner snipped off. Drizzle melted chocolate or ganache over the top in a grid pattern. Voilà! Your Chocolate Grid Delight is ready to impress.
Timing Breakdown
- Prep Time: 20 minutes
- Cooking Time: 35 minutes
- Resting/Cooling Time: 1 hour
- Total Time: About 2 hours
Chef’s Secret
To enhance the chocolate flavor, use high-quality cocoa powder. Dutch-processed cocoa gives a deeper, richer taste compared to regular cocoa powder. It’s worth the splurge for special occasions.
Extra Info
Did you know that chocolate was once considered a luxury item? In the 16th century, only European royalty could afford it. Today, we can enjoy its decadence anytime with recipes like this Chocolate Grid Delight. Pretty cool, right?
Necessary Equipment
- Two 9-inch round cake pans
- Electric mixer
- Piping bag or zip-top bag
- Offset spatula
- Wire cooling racks
Storage Tips
Store your Chocolate Grid Delight in the refrigerator to keep the whipped cream fresh. Cover it loosely with plastic wrap or place it in an airtight container. For best results, consume within 3 days.
If you have leftovers, slice the cake into individual portions and freeze them. Wrap each slice tightly in plastic wrap and store in a freezer-safe bag. They’ll stay good for up to 2 months.
When reheating frozen slices, let them thaw in the fridge overnight, then bring them to room temperature before serving. A quick zap in the microwave can soften the frosting if needed.
Tips and Advice
- Use room-temperature eggs for better emulsification in the batter.
- Sift the powdered sugar and cocoa powder to avoid lumps in the frosting.
- Practice your chocolate drizzling technique on a plate before applying it to the cake.
Presentation Ideas
- Garnish with fresh berries for a pop of color.
- Add edible gold leaf for an elegant touch.
- Serve with a dusting of cocoa powder or powdered sugar.
Healthier Alternative Recipes
Love the idea but want a lighter version? Try these variations:
- Gluten-Free Option: Swap all-purpose flour for a gluten-free blend.
- Vegan Version: Use plant-based milk, oil, and substitute flax eggs for regular eggs.
- Low-Sugar Recipe: Replace granulated sugar with a sugar alternative like stevia or monk fruit.
- Almond Flour Cake: Use almond flour for a nutty twist.
- Coconut Whipped Cream: Top with whipped coconut cream instead of dairy-based cream.
- Dark Chocolate Ganache: Use dark chocolate with 70% cocoa for a richer, less sugary grid.
Mistake 1: Overmixing the Batter
Overmixing the batter can lead to dense, tough cake layers. This happens because overworking the gluten in the flour makes the texture rubbery. To avoid this, mix just until the ingredients are combined. Pro tip: Stop mixing as soon as you no longer see streaks of flour.
Mistake 2: Skipping the Cooling Step
Rushing to frost a warm cake is a recipe for disaster. The heat will melt the frosting, creating a messy, unappetizing result. Always let the cakes cool completely on wire racks before assembling. Practical tip: Chill the layers in the fridge for 15 minutes if you’re short on time.
Mistake 3: Using Cold Ingredients
Cold butter or eggs can cause lumps in your batter and frosting. Bring all ingredients to room temperature before starting. If you forget, microwave the butter in short bursts and let the eggs sit in warm water for 5 minutes.
Mistake 4: Uneven Layers
If your cake layers are uneven, the finished product may look lopsided. Trim the tops with a serrated knife to create flat surfaces before frosting. Pro tip: Use a cake leveler tool for precision.
Mistake 5: Rushing the Decoration
Decorating a cake takes patience. If you rush, the whipped cream swirls might droop, or the chocolate grid could smudge. Work slowly and confidently. Tip: Practice piping on a plate first to build confidence.
FAQ: Can I Make This Cake Ahead of Time?
Absolutely! This Chocolate Grid Delight tastes even better the next day as the flavors meld. Store it in the fridge overnight, and let it come to room temperature before serving.
FAQ: What If I Don’t Have Piping Bags?
No worries! You can use a zip-top bag with the corner snipped off. It’s an easy and effective alternative.
FAQ: Can I Use Store-Bought Ganache?
Yes, store-bought ganache works fine if you’re short on time. Just warm it slightly to make it pourable.
FAQ: How Do I Prevent the Cake From Sticking?
Grease and flour your pans thoroughly, or line them with parchment paper. Cocoa powder can replace flour for a chocolatey touch.
FAQ: Is This Cake Kid-Friendly?
Definitely! Kids love the rich chocolate flavor and fun grid design. It’s a hit at birthday parties.
FAQ: Can I Freeze the Entire Cake?
Yes, wrap the assembled cake tightly in plastic wrap and foil, then freeze for up to 2 months. Thaw in the fridge overnight.
FAQ: Why Does My Frosting Look Grainy?
Grainy frosting usually means the powdered sugar wasn’t sifted. Sifting removes lumps and ensures a silky-smooth texture.
FAQ: Can I Use a Different Pan Size?
You can use square pans, but adjust the baking time slightly. Check for doneness with a toothpick.
FAQ: How Do I Get Perfect Swirls?
Practice makes perfect! Start with a small amount of whipped cream and pipe onto a plate until you feel confident.
FAQ: What If I Mess Up the Grid Pattern?
No stress! Simply scrape off the chocolate and start again. Or embrace the imperfections—it’s homemade, after all.
This Chocolate Grid Delight is more than just a cake; it’s a labor of love that brings joy to everyone who tries it. Whether you’re baking for a celebration or just because, this recipe will become a cherished favorite. So grab your apron, turn on some music, and let’s make memories in the kitchen!
Equipment
- Two 9-inch round cake pans
- Electric mixer
- Piping bag or zip-top bag
- Offset spatula
- Wire cooling racks
Ingredients
- 1 3/4 cups all-purpose flour
- 1 1/2 cups granulated sugar
- 3/4 cup unsweetened cocoa powder
- 1 1/2 teaspoons baking powder
- 1 1/2 teaspoons baking soda
- 1 teaspoon salt
- 2 large eggs
- 1 cup whole milk
- 1/2 cup vegetable oil
- 2 teaspoons vanilla extract
- 1 cup boiling water
Instructions
- Preheat oven to 350°F (175°C). Grease and flour two 9-inch round cake pans.
- In a large bowl, whisk together dry ingredients: flour, sugar, cocoa powder, baking powder, baking soda, and salt.
- Add eggs, milk, oil, and vanilla extract. Beat on medium speed for 2 minutes until smooth. Stir in boiling water.
- Pour batter into prepared pans. Bake for 30-35 minutes until a toothpick inserted comes out clean. Cool in pans for 10 minutes, then transfer to wire racks to cool completely.
- Beat softened butter until creamy. Gradually add powdered sugar and cocoa powder. Add heavy cream and vanilla extract, beat until light and fluffy.
- Place one cake layer on a serving plate, spread frosting on top, add the second layer, and frost the top and sides.
- Whip heavy cream, powdered sugar, and vanilla until stiff peaks form. Pipe swirls around the edges. Drizzle melted chocolate or ganache in a grid pattern on top.
Notes
Nutrition

Hi, I’m Olivia Parker, the founder of BakingSecret.com and a lifelong lover of all things sweet and homemade. I grew up in a small town in Oregon, where the smell of fresh cookies in my family’s kitchen sparked my passion for baking. Over the years, I turned that passion into a mission: to help home bakers feel confident, inspired, and creative.
After studying food science and working in several artisan bakeries across the U.S., I decided to create a space where everyone from beginners to seasoned bakers can find reliable recipes, expert tips, and a warm, welcoming community. BakingSecret.com is my way of sharing the magic of baking with the world. When I’m not testing new recipes, you’ll find me exploring farmers’ markets, collecting vintage cookbooks, or perfecting my sourdough technique.