
Why This Chocolate Strawberry Nest Will Make Your Day
Picture this: a lazy Sunday afternoon, the smell of chocolate wafting through the air, and your family gathered around the kitchen counter. That’s exactly how I first made this Chocolate Strawberry Nest, and let me tell you, it was love at first bite! This dessert is like a warm hug in a bowl—rich, creamy, and bursting with fresh strawberries. Whether you’re a seasoned baker or just starting out, this recipe is foolproof and oh-so-delicious. Plus, it’s got that wow factor when you flip it onto the plate. Trust me, everyone will be asking for seconds!
The Sweet Story Behind the Chocolate Strawberry Nest
I stumbled upon this recipe while trying to recreate a dessert I had at a friend’s birthday party. The original version was called a “chocolate nest,” but I added my own twist by layering in strawberries. It reminded me of those fancy layered desserts you see in patisseries, but this one is way easier to make. Over time, I’ve tweaked it to perfection, making it a go-to for family gatherings and potlucks. My kids even call it “Mom’s Magic Nest” because of how it magically disappears every time I serve it.
Why You’ll Fall Head Over Heels for This Recipe
This Chocolate Strawberry Nest is a dream come true for anyone who loves rich chocolate paired with tangy strawberries. The best part? It’s super simple to make, even if you’re not a pro in the kitchen. The creamy layers are smooth as silk, and the strawberries add a refreshing pop of color and flavor. Plus, it’s versatile—you can tweak it to suit any occasion or dietary preference. Whether you’re looking to impress guests or just treat yourself, this dessert has got you covered.
Perfect Occasions to Whip Up This Dessert
This dish is perfect for birthdays, Valentine’s Day, or even a cozy movie night at home. I’ve served it at holiday parties, baby showers, and even as a surprise treat for my book club. It’s also great for summer picnics since it’s light yet indulgent. Honestly, there’s no wrong time to make this Chocolate Strawberry Nest. It’s one of those desserts that fits any vibe, from casual to fancy.
Ingredients You’ll Need
- 300g medium-bitter chocolate
- 200g white chocolate
- 120g condensed milk
- 1 box cold cream (200g)
- 2 tablespoons emulsifier ice cream
- 1 box whipped cream
- 150g Nido milk
- 3 boxes strawberries
Substitution Options
- Medium-bitter chocolate: Use dark chocolate or semi-sweet chocolate chips.
- White chocolate: Swap with milk chocolate if you prefer a less sweet taste.
- Condensed milk: Try sweetened condensed coconut milk for a dairy-free option.
- Cold cream: Heavy whipping cream works just as well.
- Nido milk: Any powdered milk will do.
- Strawberries: Raspberries or sliced peaches are great alternatives.
Step-by-Step Preparation
Step 1: Create the Chocolate Shell
Start by melting the medium-bitter chocolate in the microwave. Be sure to stir it every 30 seconds to avoid burning. Once melted, brush the inside of a plastic cake container lid with the chocolate. This will form the outer shell of your Chocolate Strawberry Nest. Place it in the fridge to set. Pro tip: Use a pastry brush for an even layer. After about 15 minutes, add another layer of chocolate and chill again until firm.
Step 2: Make the Creamy Filling
Melt the white chocolate in the microwave, then mix in the condensed milk, cold cream, and emulsifier. Stir until smooth and glossy—it should look like a dreamy cloud of sweetness. In a separate bowl, whip the whipped cream until stiff peaks form. Gently fold this into the white chocolate mixture along with the powdered milk. The result is a luscious, velvety filling that smells divine.
Step 3: Assemble the Layers
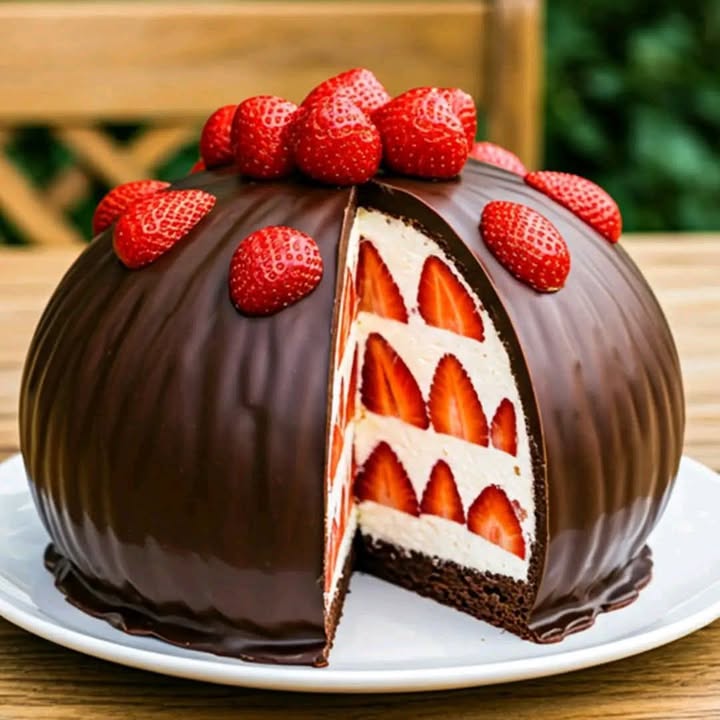
Now comes the fun part! Take your chilled chocolate shell and start layering the creamy filling and fresh strawberries. Alternate between the two until you reach the top. Finish with a final layer of the chocolate mixture and smooth it out. Pop it back into the fridge for at least 2 hours to set. Chef’s tip: Use a piping bag for a professional-looking finish.
Step 4: Unveil Your Masterpiece
Once set, carefully turn the lid over onto a serving plate. Gently push out the air to release the dessert. If done correctly, the chocolate shell will hold its shape beautifully. Garnish with extra strawberries or a dusting of cocoa powder. Voila! Your Chocolate Strawberry Nest is ready to dazzle.
Timing Breakdown
- Prep Time: 30 minutes
- Cooking Time: 10 minutes (melting chocolate)
- Resting Time: 2 hours (refrigeration)
- Total Time: 2 hours 40 minutes
Chef’s Secret
To ensure your chocolate shell doesn’t crack, let it sit at room temperature for 5 minutes before flipping it onto the plate. This little trick makes all the difference!
Extra Info
Did you know that strawberries are packed with vitamin C? Not only does this dessert look and taste amazing, but it’s also a sneaky way to get some nutrients into your diet. Win-win!
Necessary Equipment
- Microwave-safe bowls
- Pastry brush
- Whisk or electric mixer
- Plastic cake container lid
- Piping bag (optional)
Storage Tips
This dessert is best enjoyed fresh, but leftovers can be stored in the fridge for up to 2 days. Cover it tightly with plastic wrap to prevent the chocolate from absorbing odors. For longer storage, freeze the assembled nest without the strawberries. Simply thaw it in the fridge overnight and add fresh berries before serving.
If you live in a hot climate, keep the dessert chilled until the last moment. Chocolate melts quickly, so timing is key. Always use an airtight container to maintain freshness.
Avoid stacking heavy items on top of the dessert during storage, as this can damage the delicate chocolate shell. A flat shelf in the fridge works best.
Tips and Advice
- Use high-quality chocolate for the best flavor and texture.
- Wash and dry strawberries thoroughly to prevent soggy layers.
- Chill all ingredients beforehand for a smoother mixing process.
Presentation Ideas
- Garnish with mint leaves for a pop of color.
- Serve on a decorative plate with a drizzle of chocolate sauce.
- Add edible flowers for an elegant touch.
Healthier Alternatives
Here are six variations to make this dessert a bit lighter:
- Dairy-Free: Use coconut cream and dairy-free chocolate.
- Low-Sugar: Substitute condensed milk with sugar-free syrup.
- Vegan: Opt for plant-based whipped cream and vegan chocolate.
- Gluten-Free: Ensure all chocolate brands used are certified gluten-free.
- Fruit Swap: Replace strawberries with blueberries or mango slices.
- Protein Boost: Add a scoop of protein powder to the filling.
Common Mistakes to Avoid
Mistake 1: Rushing the Chilling Process
Patience is key when making this dessert. Skipping the chilling steps can lead to a messy collapse. Always allow enough time for each layer to set properly. Pro tip: Set a timer to remind yourself when it’s ready.
Mistake 2: Overmixing the Whipped Cream
Overbeating the whipped cream turns it grainy and deflated. Stop as soon as you see soft peaks forming. A hand mixer works wonders here.
Mistake 3: Using Warm Chocolate
Warm chocolate can melt the cream layers, ruining the texture. Let it cool slightly before brushing or pouring.
FAQs
Can I use frozen strawberries?
Frozen strawberries can work, but they may release excess liquid. Thaw and drain them completely before using.
How do I prevent the chocolate from seizing?
Seizing happens when moisture gets into melted chocolate. Always use dry utensils and bowls, and heat in short intervals.
What if I don’t have a plastic cake lid?
No worries! You can use a small bowl lined with parchment paper instead.
Can I make this ahead of time?
Absolutely! Prepare it a day in advance and store it in the fridge until ready to serve.
Is this recipe kid-friendly?
Yes! Kids love helping assemble the layers and decorating with strawberries.
Can I use other fruits besides strawberries?
Of course! Try bananas, kiwis, or raspberries for a different twist.
How do I fix a cracked chocolate shell?
Patch it up with a bit of melted chocolate and smooth it over with a spoon.
What’s the best way to clean sticky tools?
Soak them in warm, soapy water before washing. The residue will loosen easily.
Can I double the recipe?
Yes, just make sure you have enough space in your fridge for the larger portions.
Why does my filling taste grainy?
Graininess usually happens if the white chocolate isn’t fully melted. Heat it gently and stir continuously.
This Chocolate Strawberry Nest is more than just a dessert—it’s a celebration of flavors, textures, and creativity. Whether you’re baking for loved ones or treating yourself, this recipe is sure to become a favorite. So grab your apron, gather your ingredients, and let’s make some magic in the kitchen!
Equipment
- Microwave-safe bowls
- Pastry brush
- Whisk or electric mixer
- Plastic cake container lid
- Piping bag (optional)
Ingredients
- 300 g medium-bitter chocolate
- 200 g white chocolate
- 120 g condensed milk
- 200 g cold cream
- 2 tablespoons emulsifier (ice cream)
- 1 box whipped cream
- 150 g Nido milk
- 3 boxes strawberries
Instructions
- Melt the medium-bitter chocolate in the microwave, stirring every 30 seconds.
- Brush the inside of a plastic cake container lid with melted chocolate and refrigerate to set.
- After 15 minutes, add another layer of melted chocolate and chill again until firm.
- Melt the white chocolate in the microwave, then mix in condensed milk, cold cream, and emulsifier until smooth.
- In a separate bowl, whip the whipped cream until stiff peaks form and gently fold it into the white chocolate mixture along with powdered milk.
- Layer the creamy filling and fresh strawberries inside the chilled chocolate shell until full.
- Finish with a final layer of chocolate mixture, smooth it out, and refrigerate for at least 2 hours.
- Carefully invert the lid onto a serving plate and release the dessert, garnishing with extra strawberries if desired.
Notes
Nutrition

Hi, I’m Olivia Parker, the founder of BakingSecret.com and a lifelong lover of all things sweet and homemade. I grew up in a small town in Oregon, where the smell of fresh cookies in my family’s kitchen sparked my passion for baking. Over the years, I turned that passion into a mission: to help home bakers feel confident, inspired, and creative.
After studying food science and working in several artisan bakeries across the U.S., I decided to create a space where everyone from beginners to seasoned bakers can find reliable recipes, expert tips, and a warm, welcoming community. BakingSecret.com is my way of sharing the magic of baking with the world. When I’m not testing new recipes, you’ll find me exploring farmers’ markets, collecting vintage cookbooks, or perfecting my sourdough technique.